VISITE NUESTRA PÁGINA WEB : BAXTRAN... · 3 TXD 2 5 GND 7 Nota: por favor, ... pronto. Cuando la...
25
1 VISITE NUESTRA PÁGINA WEB : WWW.COMPRABASCULA.COM
-
Upload
truongdieu -
Category
Documents
-
view
216 -
download
0
Transcript of VISITE NUESTRA PÁGINA WEB : BAXTRAN... · 3 TXD 2 5 GND 7 Nota: por favor, ... pronto. Cuando la...

1
VISITE NUESTRA PÁGINA WEB :
WWW.COMPRABASCULA.COM

manual de usuariomanuel d’usager
user’s manual
Indicador de peso, función cuentapiezasIndicateur de poids, fonction compteuseWeighing indicator, counting function
TC30
v.1.0

ESP
2
Manual de usuario | Manuel d’usager | User’s manual. TC30FR ENG
ESP ÍNDICE
I. Parámetros técnicos ....................................................................................................... 3II. Conexión......................................................................................................................... 3III. Funciones de teclado, pantallas e indicadores............................................................... 4IV. Operación ....................................................................................................................... 4V. Mantenimiento y notas.................................................................................................... 6VI. Garantía de reparación y servicio................................................................................... 6VII. Pantallas anormales ....................................................................................................... 6VIII. Configuración de parámetros ......................................................................................... 6IX. Calibración de la capacidad............................................................................................ 6X. Declaración de conformidad CE ................................................................................... 21
FR INDEX
I. Paramètres techniques................................................................................................... 9II. Connexion....................................................................................................................... 9III. Fonctions du clavier, écrans et indicateurs................................................................... 10IV. Opération ...................................................................................................................... 10V. Maintien et notes .......................................................................................................... 12VI. Garantie de réparation et service ................................................................................. 12VII. Ecrans anormales......................................................................................................... 12VIII. Configuration des paramètres ...................................................................................... 12IX. Calibration de la capacité ............................................................................................. 14X. Déclaration de conformité CE....................................................................................... 21
ENG INDEX
I. Technical parameters.................................................................................................... 15II. Connection.................................................................................................................... 15III. Button functions, display and announciator indication.................................................. 16IV. Operation ...................................................................................................................... 16V. Maintenance and notices.............................................................................................. 18VI. Repair guarantee & service .......................................................................................... 18VII. Abnormal display .......................................................................................................... 18VIII. Parameter setting ......................................................................................................... 18IX. Capacity calibration ...................................................................................................... 20X. CE conformity declaration............................................................................................. 21

3
ESPManual de usuario. Indicador de peso, función cuentapiezas TC30
I. Parámetros técnicos
1. A/D Conversión Triple integral A/D
2. Resolución de pantalla 1/3000 - 1/30000
3. A/D Resolución 200000
4. A/D Velocidad de conversión 40 veces/segundo
5. Tensión de excitación DC5V4 células de carga 350Ω, o 8 células de carga 700Ω.
6. Pantalla 17 dígitos de 14mm LED
7. Divisiones 1 / 2 / 5 / 0.1 / 0.2 / 0.5 / 0.01 / 0.02 / 0.001 / 0.002 / 0.005 / 10 / 20 / 50 / 100 / 200 / 500
8. Interfaz de salida serie Transmisión de datos contínua RS232, baud rate 1200 2400 4800 9600 opcional
9. Impresión Salida de impresión RS232.
10. Alimentación A.C. AC220V 50Hz (AC/DC batería interna 6V 4Ah)
11. Temperatura funcionamiento 0ºC ~ 40ºC
12. Temperatura almacenamiento -25ºC ~ 55ºC
13. Humidad relativa ≤ 85 % RH
14. Dimensiones exteriores 256 x 160 x 130 (mm)
15. Peso Aproximadamente 2 kg.
II. Conexión
1. La célula de carga se conecta al conector de 7 pins como sigue:
PIN1: IN+PIN2: SENSE+PIN3: OUT+PIN4: OUT-PIN5: SENSE-PIN6: IN-PIN7: NOT USED
2. Conexión de comunicaciones (D-SUB-9-pins): 3rd pin: TXD (RS232C transmisión contínua) 5th pin: GND
3. Formato de datos de comunicaciones (RS232C transmisión contínua)Dirección de la comunicación X=0 en transmisión contínua y el formato es = X1,X2,X3,X4,X5,X6.La transmisión X1,X2,X3,X4,X5,X6 son los datos mostrados, y “=” es el separador de lista.Ejemplo: peso: 100.00 kg, transmisión: =00.001=00.001.

ESP
4
Manual de usuario. Indicador de peso, función cuentapiezas TC30
III. Funciones de teclado, pantallas e indicadores
Pantalla: Valor de peso en primera línea, peso unitario en segunda, cantidad de piezas en tercera.
Indicadores:
Precio, no utilizado alimentación AC
Función cuentapiezas Batería bajaPeso estableTara, significa que el valor de peso presente es peso neto
Cero
IV. Operación1. On y off. Encienda el indicador (el interrupor está en la parte trasera del indicador), y luego pul-
sar en el frontal, está encendido. Pulse durante 2 segundos o más, se apagará. En modo de pesaje, mostrará - para ahorrar energía si no se utiliza durante 3 minutos o más.
2. Cero. Cuando el valor de peso < 2 %F·S, pulse durante dos segundos o más, la pantalla se colocará en 0, y el indicador se encenderá.
3. Tara. a. Tarar objeto Cuando el indicador está apagado y el valor de peso es mayor que cero y
estable, pulse , la pantalla volverá a ser cero, y el indicador se encen-derá.
b. Borrar tara Cuando el indicador está encendido, pulse , el valor de tara se borrará, y el indicador se apagará al mismo tiempo.
4. Acumulación. Cuando el valor de peso es mayor que 20d y también estable, pulse , el va-lor de peso será acumulado, y el valor acumulado será mostrado en la primera línea, la suma acumulada en la tercera línea. El indicador volverá al modo de pesaje al cabo de 2 segundos. En función cuentapiezas, la primera línea muestra el valor acumulado, la segunda línea muestra las veces acumuladas, y la tercera línea muestra la cantidad acumulada.

5
ESPManual de usuario. Indicador de peso, función cuentapiezas TC30
Nota: se permite solo acumular una vez en una acción de pesaje, la acumulación siguiente será permitida en la siguiente operación después que el valor de peso sea inferior a 20d.
5. Operación de cuentapiezasa. Entrada de peso de unidad (PMU, peso medio unitario):coloque la muestra en plataforma de pesaje, será más preciso con más cantidad de muestra (pero la cantidad de muestra no puede superar 9999 pcs). Entonces introduzca la cantidad de piezas, ejem-plo: hay 123 pcs en la muestra, pulse , , , .
b. Memorizar el peso de unidad (PMU):pulse las teclas numéricas de manera contínua para memorizar el peso de la unidad actual. Ejemplo: si quiere almacenar la unidad entrada en el número 2, pulse durante 2 segundos, después de que la pantalla parpadee suelte el botón, el peso de la unidad se ha memorizado en el botón 2. Se pueden almacenar un máximo de 10 unidades, números de 0-9.
c. Borrar un peso de unidad (PMU):pulse el dígito correspondiente para borrar la unidad de peso almacenada en él, y pulse . Ejemplo: pulse , para retirar el peso de unidad de la tecla 5.
d. Acumulación y borrado:pulse , , la primera línea de la pantalla muestra el peso acumulado, la segunda línea muestra las veces acumuladas, la tercera muestra el total acumulado. Pulse para borrar la acumulación esta vez, y pulse para salir.
6. Conexión de la micro impresoraCuando el indicador se conecta a la impresora serie, los cables deben conectarse como se indica:
Indicador Micro-impresora (con salida serie)conector 9-pin conector 25-pin
3 TXD 2
5 GND 7
Nota: por favor, configure la dirección de comunicación como Adr=01 y el baud rate como b=2400 antes de conectar la impresora con el indicador.
7. Operación de la impresora serie:a. Impresión de tíket de peso:en modo de pesaje, cuando el valor de peso >20d y está estable, pulse , la impresora imprimirá el ticket, (la segunda impresión será posible cuando el peso sea <20d).
Modo cuentapiezas: N0: 0012 (veces) Gross: 52.01 (peso bruto) Tare: 2.01 (peso tara) Net: 50.00 (peso neto) U/W: 21.322 (WT/1000 pcs) C: 2354p (cantidad de piezas)
b. Impresión de acumulación:en modo de pesaje, pulse , y después pulse , la impresora imprimirá los datos acumula-dos, pulse para salir.
Modo cuentapiezas (A. = acumulación): N0: 0018 (A. veces) W: 6215.72 (A. peso) C: 891313p (A. total)
8. Capacidad de la batería:Cuando enciende o apaga el indicador, el mensaje Pbt85 significa que resta el 85% de la capa-cidad de batería.

ESP
6
Manual de usuario. Indicador de peso, función cuentapiezas TC30
9. Indicación de carga:Cuando la capacidad de la batería <30% el indicador se enciende, indica que debe cargarse pronto. Cuando la capacidad <20% el indicador parpadea, debe cargarse immediatamente.
10. Protección frente sobredescarga:Cuando la capacidad de la batería <10%, el indicador se apaga automaticamente para evitar una sobredescarga.
11. Apagado automático:En el modo con la función de autoapagado seleccionada, mostrará - para disminuir el con-sumo de energía si no se utiliza durante 3 o más minutos. Y se apagará automáticamente si no se pesa durante 30 o más minutos.
12. Tiempo de funcionamiento:La batería interna de 4Ah completamente cargada puede suministrar 15 horas de trabajo.
V. Mantenimiento y notas:1. No utilice el indicador bajo la luz directa del sol para alargar su vida. Guárde el indicador en una
posición plana durante su uso.2. No utilice el indicador en lugares con mucho polvo ni con vibraciones fuertes.3. No sobrecargar (incluido el peso tara) (más de la capacidad de la balanza está prohibido).4. No limpiar la cubierta con agentes fuertes (como benceno, aceite de ácido nítrico, etc.).5. Mantenga la parte interior ausente de agua para evitar daños a los componentes eléctricos y el
choque eléctrico a la gente.6. Apague la energía cuando suceda un problema durante la operación. Por favor envíe el indicador
a nuestra compañía para la reparación, no repare el indicador usted mismo.7. El indicador carga automáticamente la batería mientras está conectado en corriente AC.
VI. Garantía de reparación y servicio (Por favor, envie el indicador a nuestra compañía para su reparación y servicio de garantía):El tiempo de garantía de reparación es de un año a partir de la fecha de compra. La garantía cubre los daños ocasionados por defectos de funcionamiento o de fabricación. La garantía no cubre los daños causados por un uso indevido. La batería queda excluída de la garantía de reparación. La garantía de reparación afecta solo al indicador y no al resto de componentes del sistema de pesaje dónde actúa.
VII. Pantallas anormales:
OUE r valor de peso > 100% F·S + 9d
-OUE r desbordamiento negativo del valor de peso
está encendido, capacidad de batería < 30%, conecte a 220V AC para cargar!
está encendido y XXXXXX (XXXXXX-valor de peso) parpadea, capacidad de batería
< 20%, conecte a 220V AC para cargar!
VIII. Configuración de parámetros:1. Conecte bien la célula de carga y realice la configuración de parámetros como sigue:
2. Pulse para confirmar y después entar al paso siguiente:
Paso Operación Pantalla Notas
1 Pulse
0 - 9
0
Con el indicador apagado, encienda el interruptor de la parte tra-
sera.

7
ESPManual de usuario. Indicador de peso, función cuentapiezas TC30
Paso Operación Pantalla Notas
2 Pulse
- - - - - -SEt- - - - - -
Requiere password de entrada.
3 Pulse 2003- - - - - -SEt
2003Código de parámetros de configuración = 2003
4 Pulse
1-d-
1
Entra en el modo de configuración de parámetros después de haber entrado el código.Selección de división
5
Pulse
Pulse
Pulse
25
0.1
1/2/5/0.1/0.2/0.5/0.01/0.02/0.05/0.001/0.002/0.005/10/20/50/100/200/500/0.10/0.20/0.50/0.010/0.020/0.050Example: Division d=0.1
6 Pulse
600.0-FS-
600.0
Configuración de escala completa.
7 Pulse 3000600.0
-FS-300.0
Ejemplo: Capacidad (F·S) es 300.0 kg
8 Pulse
10-FLt-
10
Selección 00-99 de baud de parámetro de filtro, la velocidad de res-puesta es más rápida con un valor pequeño, pero es más estable con un valor grande. Elija valor pequeño cuando las condiciones de pesaje son mejores y grande en caso contrario.
9Pulse
30
10-FLt-
30 Ejemplo: baud filtering: FLt=30 (por defecto FLt=0)
10 Pulse
10AUtP
10
El dígito de la posición del uno representa la opción de apagado automático.Posición del uno=0: No función de apagado automático.Posición del uno=1: Apagado automático.El dígito del diez representa el zero tracking (1~9): 1:0.4 d 2:0.8 d 3:1.2 d 4:1.6 d 5:2 d 6:2.4 d 7:2.8 d 8:3.2 d 9:3.6 dtambién representa el rango por sobre el que se enciende:Dígito diez=0 no cero cuando se enciendeDígito diez≥1 rango de cero es 20% F·S cuando se enciende
11 Pulse 1110
AUtP11
Ejemplo: AUtP=11
(Por defecto AUtP=10)
12 Pulse
01
-Adr-01
Selección dirección de comunicación, formato contínuo salida serieAdr=00Impresión de salida serie Adr=01Pulse el dígito para entrar la dirección correcta (por defecto Ard=0)
13 Pulse
2400bAUd2400
Selección baud rate: 1200 2400 4900 9600
Pulse para elegir (por defecto bAUd=2400)
14 Pulse
0.00.000.00
Configuración de parámetros finalizada.
3. Compruebe el valor de código interno de la transición A/D.
Pulse , 9 , , la primera línea mostrará el código interno del valor de peso acutal, pulse para salir.

ESP
8
Manual de usuario. Indicador de peso, función cuentapiezas TC30
IX. Calibración de la capacidad:1. Punto de calibración de cero (También accesible desde el modo de pesaje):
Paso Operáción Pantalla Notas
1 Pulse
- - - - - -SEt- - - - - -
2 Pulse
nLOADCAL 000000 Prepárese para incorporar la calibración de cero.
3 Pulse
0.00.000.00
No debe haber peso sobre la balanza !
2. Calibración de la capacidad:
Paso Operáción Pantalla Notas
1 Pulse
- - - - - -SEt- - - - - -
Requiere password de entrada
2 Pulse 8888- - - - - -SEt
8888
Password = 8888
3 Pulse
nLOADCAL 000000
Prepárese para incorporar la calibración de cero.
4 Pulse
- - - - - -CAL 0- - - - - -
No debe haber peso sobre la balanza !
5Unos segundos después
LOAdCAL
600.0
Prepárese para incorporar la calibración de capacidad completaSi el peso cargado no es el mismo que la capacidad requerida, se pede entrar el valor actual.
6 Pulse 3000LOAd
CAL300.0
Entre el valor de peso = 300.0 kg
7 Pulse
- - - - - -CAL- - - - - -
La calibración de la capacidad está en proceso
8300.00.000.00
Unos segundos después, mostrará el valor del peso cargado.La calibración ha finalizado.

9
Manuel d’usager. Indicateur de poids, fonction compteuse. TC30 FR
I. Paramètres techniques
1. A/D Conversion Triple integral A/D
2. Résolution de l’écran 1/3000 - 1/30000
3. A/D Résolution 200000
4. A/D Vitesse de conversion 40 fois/second
5. Tension d’excitation DC5V4 capteurs de charge 350Ω, ou 8 capteurs de charge 700Ω.
6. Écran 17 digits de 14mm LED
7. Divisions 1 / 2 / 5 / 0.1 / 0.2 / 0.5 / 0.01 / 0.02 / 0.001 / 0.002 / 0.005 / 10 / 20 / 50 / 100 / 200 / 500
8. Interface de sortie série Transmission de données continue RS232, baud rate 1200 2400 4800 9600 en option
9. Impression Sortie d’impression RS232.
10. Alimentation A.C. AC220V 50Hz (AC/DC batterie interne 6V 4Ah)
11. Température de fonctionnement 0ºC ~ 40ºC
12. Température de stockage -25ºC ~ 55ºC
13. Humidité relative ≤ 85 % RH
14. Dimensiones extérieures 256 x 160 x 130 (mm)
15. Poids Approximativement 2 kg.
II. Connexion
1. Le capteur de chargement est branché au connecteur de 7 bornes comme suivant:
PIN1: IN+PIN2: SENSE+PIN3: OUT+PIN4: OUT-PIN5: SENSE-PIN6: IN-PIN7: NOT USED
2. Connexion de communications (D-SUB-9-bornes): 3rd pin: TXD (RS232C transmission continue) 5th pin: GND
3. Format de données de communications (RS232C transmission continue)Direction de la communication X=0 en transmission continue et le format est = X1,X2,X3,X4,X5,X6.La transmission X1,X2,X3,X4,X5,X6 sont les données montrées, et “=” est le séparateur de la liste.Exemple: poids: 100.00 kg, transmission: =00.001=00.001.

10
Manuel d’usager. Indicateur de poids, fonction compteuse. TC30FR
III. Fonctions du clavier, écrans et indicateurs
Écran: Valeur de poids sur la première ligne, poids unitaire sur la seconde, quantité de pièces sur la troisième.
Indicateurs:
Prix, non utilisé alimentation AC
Function comptage Batterie bassePoids stableTare, signifie que la valeur de poids actuelle est poids net
Zéro
IV. Opération
1. On et off. Allumez l’indicateur (l’intérrupteur est arrière de l’indicateur), et pousser ensuite sur la face de l’indicateur, il est allumé. Poussez pendant 2 seconds minimum, il sera éteint. En mode de pesage, il montrera - pour économiser de l’énergie si vous n’êtes pas l’utilisés pendat 3 minutes ou plus de temps.
2. Zéro. Quand la valeur de poids < 2 %F·S, poussez pendant 2 seconds minimum, l’écran se placera sur 0, et l’indicateur sera éteint.
3. Tare. a. Tarer objet Quant l’indicateur est éteint et la valeur de poids est plus grand que zéro
et stable, poussez , l’écran sera à nouveau zéro, et l’indicateur sera allumé.
b. Éffacer tare Quand l’indicateur est allumé, pousser , la valeur de tare sera effacée, et l’indicateur sera éteint en même temps.
4. Acumulación. Quand la valeur de poids sera plus grande que 20d et aussi stable, poussez , la valeur de poids sera accumulée, et la valeur accumulée sera montrée
sur la première ligne. L’indicateur retournera au mode de pesage au bout de 2 seconds. En fonction comptage, la première ligne montre la valeur accumulée, la seconde ligne montre les fois accumulées, et la troiseième ligne montre la quantité accumulée.

11
Manuel d’usager. Indicateur de poids, fonction compteuse. TC30 FR
Note: on permet seulement d’accumuler une fois dans une action de pesage, l’accumulation su-viante sera permise dans l’opération suivante après que la valeur de poids est inférieure à 20d.
5. Opération de comptagea. Entrée de poids d’unité (PMU, poids moyen unitaire):placez l’échantillon sur la palte-forme de pesage, il sera plus précis avec plus quantité d’échantillon (mais la quantité d’échantillon ne peut pas dépasser 9999 pcs). Introduisez alor la quantité de pièces, exemple: il y a 123 pcs dans l’échantillon, poussez , , , .
b. Mémoriser le poids d’unité (PMU):poussez les touches numériques de manière continue pour mémoriser le poids de l’unité actuelle. Exemple: s’il veut stocker l’unité entrée sur le nombre 2, poussez pendant 2 seconds, après que l’écrant clignote détache le bouton, le poids de l’unité a été mémoriser sur le bouton 2. Peuvent être stockés un maximum de 10 unités, nombres de 0-9.
c. Effacer un poids d’unité (PMU):poussez le digit correspondant pour effacer l’unité de poids et stockée en lui, et poussez . Exem-ple: poussez , pour retirer le poids d’unité de la touche 5.
d. Accumulation et effacement:poussez , , la première ligne de l’écran montre le poids accumulé, la seconde ligne montre les fois accumulées, la troisième montre le total accumulé. Poussez pour effacer l’accumulation cette fois, et poussez pour sortir.
6. Branchement de la micro imprimanteQuand l’indicateur est branché à l’imprimante série, les câbles doivent être reliés comme s’indique:
Indicateur Micro imprimante (avec sortie série)connecteur 9-bornes connecteur 25-bornes
3 TXD 2
5 GND 7
Note: s’il vous plaît, mettez la direction de communication comme Adr=01 et le baud rate comme b=2400 avant de brancher l’imprimante avec l’indicateur.
7. Opération de l’imprimante série:a. Impression du ticket de poids:en mode depesage, quand la valeur de poids >20d et est stable, poussez , l’imprimante imprimera le ticket, (la seconde impresion sera possible quand le poids sera <20d).
Mode comptage: N0: 0012 (fois) Gross: 52.01 (poids brut) Tare: 2.01 (poids tare) Net: 50.00 (poids net) U/W: 21.322 (WT/1000 pcs) C: 2354p (quantité de pièces)
b. Impression de l’accumulation:en mode de pesage, poussez , et ensuite poussez , l’imprimante imprimera les données accumulées, poussez pour sortir.
Mode comptage: N0: 0018 (fois accumumlées) W: 6215.72 (poids accumulé) C: 891313p (accumulation totale)
8. Capacité de la batterie:Quand on allume ou éteint l’indicateur, le message Pbt85 signifie qu’il y a encore le 85% de la capacité de la batterie.

12
Manuel d’usager. Indicateur de poids, fonction compteuse. TC30FR
9. Indication de la charge:Quand la capacité de la batterie <30% l’indicateur s’allume, il indique qu’il doit tôt être chargé. Quand la capacité <20% l’indicateur clignote, doit immédiatement être chargé.
10. Protection avant une surdecharge:Quand la capacité de la batterie <10%, l’indicateur est automatiquement éteint pour éviter une sur-décharge.
11. Eteint automatique:Dans le mode avec la fonction auto éteint choisie, montrera - pour économiser la consom-mation d’énergie s’il n’est pas utilisé pendant 3 ou plus minutes. Et il sera automatiquementéteint s’il n’est pas pesé pendant 30 ou plus minutes.
12. Temps de fonctionnement:La batterie interne de 4Ah complètement chargée il peut fournir 15 heures de travail.
V. Maintien et notes:1. N’utilisez pas l’indicateur sous la lumière directe du soleil pour élargir sa vie. Gardez l’indicateur
dans une position plate pendant son utilisation.2. N’utilisez pas l’indicateur dans des lieux beaucoup de poussière ni avec vibrations forts.3. Ne pas surcharger (compris le poids tare) (plus de la capacité de la balance est interdite).4. Ne pas nettoyer la couverture avec des agents forts (comme benzène, huile d’acide nitrique, etc).5. Maintenez la partie intérieure absent d’eau pour éviter des dommages aux composants électriques
et le choc électrique aux gens.6. Éteignez l’énergie quand arrivera un problème pendant l’opération. S’il vous plaît envoyez
l’indicateur à notre compagnie pour la réparation, vous ne devez pas réparer l’indicateur.7. L’indicateur charge automatiquement la batterie entretemps est branché en courant AC.
VI. Garantie de réparation et service (S’il vous plaît, envoyez l’indicateur à notre com-pagnie pour sa réparation et service de garantie):Le temps de garantie de réparation est d’une année à partir de la date d’achat. La garantie couvre les dommages provoqués par des défauts de fonctionnement ou de fabrication. La garantie ne couvre pas les dommages causés par une utilisation indue. La batterie est exclue de la garantie de réparation. La garantie de réparation affecte seulement à l’indicateur et non au reste de composants du système de pesage où il agit.
VII. Ecrans anormaux:
OUE r valeur de poids > 100% F·S + 9d
-OUE r débordement négatif de la valeur de poids
est allumé, capacité de la batterie < 30%, branchez 220V AC pour le charger !
est allumé et XXXXXX (XXXXXX-valeur de poids) clignote, capacité de la batterie
<20%, branchez 220V AC pour le charger !
VIII. Configuration des paramètres:1. Branchez bien le capteur de chargement et effectuez la configuration de paramètres.
2. Poussez pour confirmer et ensuite entrer les pas suivant:
Pas Opération Écran Notes
1 Poussez
0 - 9
0
Avec l’indicateur éteint, allumez l’interrupteur de la partie arrière.
13
Manuel d’usager. Indicateur de poids, fonction compteuse. TC30 FR
Pas Opération Écran Notes
2 Poussez
- - - - - -SEt- - - - - -
Il requiert password d’entrée.
3Poussez
2003
- - - - - -SEt
2003Code des paramètres de configuration = 2003
4 Poussez
1-d-
1
Entre dans le mode de configuration de paramètres après avoir entré le code.Sélection de division
5
Poussez
Poussez
Poussez
25
0.1
1/2/5/0.1/0.2/0.5/0.01/0.02/0.05/0.001/0.002/0.005/10/20/50/100/200/500/0.10/0.20/0.50/0.010/0.020/0.050Exemple: Division d=0.1
6 Poussez
600.0-FS-
600.0
Configuration d’échelle complète.
7Poussez
3000
600.0-FS-
300.0
Exemple: Capacité (F·S) est 300.0 kg
8 Poussez
10-FLt-
10
Sélection 00-99 de baud de paramètre de filtre, la vitesse de répon-se est plus rapide avec une petite valeur, mais est plus stable avec une grande valeur. Choisissez une petite valeur quand les conditio-ns de pesaje seront meilleurs et grand en cas contraire.
9Poussez
30
10-FLt-
30 Exemple: baud filtering: FLt=30 (par défaut FLt=0)
10 Poussez
10AUtP
10
Le digit de la position de l’un représente l’option d’éteint automati-que.Position de l’un=0: Non fonction d’auto éteint.Position del’un =1: Fonction d’auto éteint.Le digit du dix représente le zero tracking (1~9): 1:0.4 d 2:0.8 d 3:1.2 d 4:1.6 d 5:2 d 6:2.4 d 7:2.8 d 8:3.2 d 9:3.6 dil représente aussi le rang par sur lequel il est allumé:Digit dix=0 non zéro quand il est alluméDigit dix≥1 rang de zéro est 20% F·S quant il est allumé
11 Poussez 1110
AUtP11
Exemple: AUtP=11
(Par défaut AUtP=10)
12 Poussez
01
-Adr-01
Sélection de communication, format continu sortie sérieAdr=00Impresion de sortie série Adr=01Poussez le digit pour entrer la direction correcte (par défaut Ard=0)
13 Poussez
2400bAUd2400
Sélection baud rate: 1200 2400 4900 9600
Poussez pour choisir (par défaut bAUd=2400)
14 Poussez
0.00.000.00
Configuration des paramètres finie.
3. Vérifiez la valeur de code interne de la transition A/D.
Poussez , 9 , , la première ligne montrera le code interne de la valeur de poids actuel, poussez pour sortir.

14
Manuel d’usager. Indicateur de poids, fonction compteuse. TC30FR
IX. Calibration de la capacité:1. Point de calibration du zéro (aussi accessible depuis le mode de pesage):
Pas Opération Écran Notes
1 Poussez
- - - - - -SEt- - - - - -
2 Poussez
nLOADCAL 000000 Préparez vous pour incorporer la calibration du zéro.
3 Poussez
0.00.000.00
Il ne doit pas y avoir poids sur la balance !
2. Calibration de la capacité:
Pas Opération Écran Notes
1 Poussez
- - - - - -SEt- - - - - -
Il requierd password d’entrée.
2 Poussez 8888- - - - - -SEt
8888
Password = 8888
3 Poussez
nLOADCAL 000000
Préparez vous pour incorporer la calibration de la capacité.
4 Poussez
- - - - - -CAL 0- - - - - -
Il ne doit pas y avoir poids sur la balance !
5Quelques secon-des ensuite
LOAdCAL
600.0
Préparez vous pour incorporer la calibration de la capacité complète. Si le poids chargé n’est pas le même que la capacité requise, se on entrer la valeur actuelle.
6 Poussez 3000LOAd
CAL300.0
Entrez la valeur de poids = 300.0 kg
7 Poussez
- - - - - -CAL- - - - - -
La calibration de la capacité est en processus
8300.00.000.00
Quelques seconds ensuite, il montrera la valeur du poids chargé. La calibration a fini.

15
User’s manual. Weighing indicator, counting function TC30 ENG
I. Technical parameter
1. A/D Conversion Triple integral A/D
2. Display Accuracy 1/3000 - 1/30000
3. A/D Resolution 200000
4. A/D Conversion speed 40 times/second
5. Excitation voltage DC5V(4) 350Ω load cell or (8) 700Ω load cells
6. Display 17 digits 14mm LED
7. Divisions 1 / 2 / 5 / 0.1 / 0.2 / 0.5 / 0.01 / 0.02 / 0.001 / 0.002 / 0.005 / 10 / 20 / 50 / 100 / 200 / 500
8. Serial output interface RS232 continuous transmitting, baud rate 1200 2400 4800 9600 optional
9. Printing RS232 printing output
10. A.C. Power AC220V 50Hz (AC/DC built-in battery 6V 4Ah)
11. Operating temperature 0ºC ~ 40ºC
12. Storage temperature -25ºC ~ 55ºC
13. Relative humidity ≤ 85 % RH
14. Exterior size 256 x 160 x 130 (mm)
15. Weight Around 2 kg.
II. Connection
1. The load cell adopts 7-pins socket as follows:
PIN1: IN+PIN2: SENSE+PIN3: OUT+PIN4: OUT-PIN5: SENSE-PIN6: IN-PIN7: NOT USED
2. Communication connection (D-SUB-9-pins): 3rd pin: TXD (RS232C continuous transmitting) 5th pin: GND
3. Communication Data Format (RS232C continuous transmitting)The comunication address X=0 in continuous transmitting and the format is = X1,X2,X3,X4,X5,X6.The transmitting X1,X2,X3,X4,X5,X6 is displaying data, and “=” is the list separator.Example: weight: 100.00 kg, transmitting: =00.001=00.001.

16
User’s manual. Weighing indicator, counting function TC30ENG
III. Button functions, display and announciator indication
Display: Weight value at the first line, unit weight at the second line, quantity at the third line.
Announciator:
Price computing, not used AC power supply
Counting function Low powerWeighing stableTare, it means that the present weight value is net weight
Zero
IV. Operation
1. On and off. Switch on the indicator (switch in the back cover of the indicator), and then press button, it is on. Press button for 2 seconds or more, it will be off. One the weighing mode, - will be displayed for saving power if no operation for 3 minutes or more.
2. Zero. When the weight value < 2 %F·S, press button for 2 seconds or more, it will be-come to be zero, and the announciator will be on.
3. Tare. a. Object tare When the announciator is off and the weight value is bigger than zero and
also stable, press button, it becomes to be zero, and the announciator will be on.
b. Cleanup tare Whent the announciator is on, press the button, the tare value is clea-ned away, and the announciator will be off at the same time.
4. Accumulation. When the weight value is bigger than 20d and also stable, press button, the weight value will be accumulated, and the accumulated value will be displayed at the first line, the accumulated sum at the third value. It return to weighing mode after 2 seconds. It counting function, the first line displays the accumulated weig-ht, the second line displays the accumulated times, and the third line displays the accumulated quantity.
17
User’s manual. Weighing indicator, counting function TC30 ENG
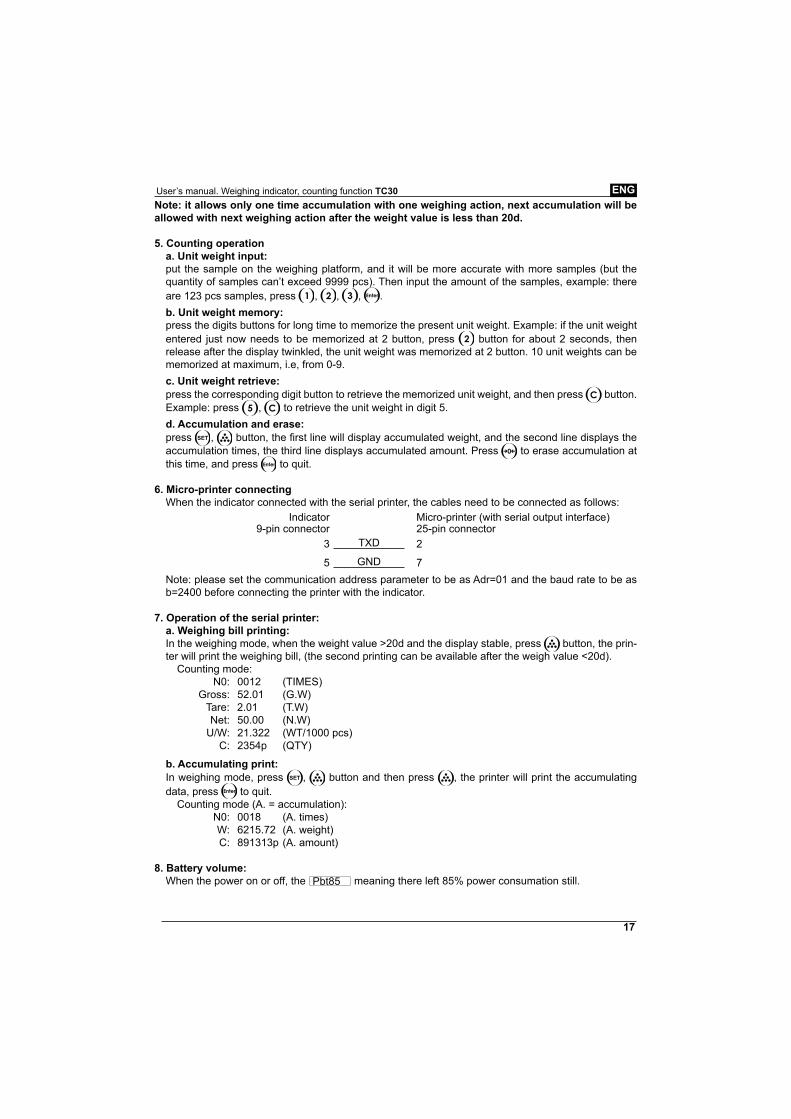
Note: it allows only one time accumulation with one weighing action, next accumulation will be allowed with next weighing action after the weight value is less than 20d.
5. Counting operationa. Unit weight input:put the sample on the weighing platform, and it will be more accurate with more samples (but the quantity of samples can’t exceed 9999 pcs). Then input the amount of the samples, example: there are 123 pcs samples, press , , , .
b. Unit weight memory:press the digits buttons for long time to memorize the present unit weight. Example: if the unit weight entered just now needs to be memorized at 2 button, press button for about 2 seconds, then release after the display twinkled, the unit weight was memorized at 2 button. 10 unit weights can be memorized at maximum, i.e, from 0-9.
c. Unit weight retrieve:press the corresponding digit button to retrieve the memorized unit weight, and then press button. Example: press , to retrieve the unit weight in digit 5.
d. Accumulation and erase:press , button, the first line will display accumulated weight, and the second line displays the accumulation times, the third line displays accumulated amount. Press to erase accumulation at this time, and press to quit.
6. Micro-printer connectingWhen the indicator connected with the serial printer, the cables need to be connected as follows:
Indicator Micro-printer (with serial output interface)9-pin connector 25-pin connector
3 TXD 2
5 GND 7
Note: please set the communication address parameter to be as Adr=01 and the baud rate to be as b=2400 before connecting the printer with the indicator.
7. Operation of the serial printer:a. Weighing bill printing:In the weighing mode, when the weight value >20d and the display stable, press button, the prin-ter will print the weighing bill, (the second printing can be available after the weigh value <20d).
Counting mode: N0: 0012 (TIMES) Gross: 52.01 (G.W) Tare: 2.01 (T.W) Net: 50.00 (N.W) U/W: 21.322 (WT/1000 pcs) C: 2354p (QTY)
b. Accumulating print:In weighing mode, press , button and then press , the printer will print the accumulating data, press to quit.
Counting mode (A. = accumulation): N0: 0018 (A. times) W: 6215.72 (A. weight) C: 891313p (A. amount)
8. Battery volume:When the power on or off, the Pbt85 meaning there left 85% power consumation still.

18
User’s manual. Weighing indicator, counting function TC30ENG
9. Charging indication:When the battery volume <30% the announciator is on, which indicates that the battery needs to be charged in time. When the battery volume <20% the indicator will be twinkled to indicate charge in time.
10. Overdischarging protection:When the battery volume <10%, the indicator will power off automatically for avoiding the overdis-charging.
11. Power off automatically:In the mode with the automatic power off function chosen, it will display - to decrease power consumption if no weighing operation for 3 minutes or more. And it will power off if no weighing ope-ration for 30 minutes or more.
12. Working time:The built-in 4Ah battery can supply 15 hours continuous working time with fully charged.
V. Maintenance and Notices:1. Do not use the indicator under strong sunlight for protecting the using life of it. Keep it on a flat
while using.
2. Do not use it in the places full with dust and strong vibration.
3. Do not overload (including the tare weight) (more than full scale is prohibiten).
4. Do not cleanout the case with strong impregnant (such as benzene, nitric acid oile, etc.).
5. Keep the interior part of indicator away from the water for avoiding the damage to the electrical
components and electronic shock to people.
6. Switch off the power when some problem happened while in operation. Please, send the indicator
to our company for repair, it is not allowed to repair the indicator yourself.
7. The indicator will charge the battery automatically while AC power being connected.
VI. Repair Guarantee & Service (Please send back to our company for repair guaran-tee and service):The repair guarantee time is 1 year from the selling date of this indicator, and the probelm should
be happened due to the problem of the indicator itself while in right operation (not due to wrong
operation). We supply the service to the indicator for life. (Battery exclude the repair gurantee).
Note: The repair guarantee not responsible for all problem of the weighing system while our indica-
tor only act as a part of this system, we only take charge of the problem caused from the indicator
itself.
VII. Abnormal display:
OUE r weight value > 100% F·S + 9d
-OUE r weight value negative overflow
is on, the battery volume < 30%, please connect with 220V AC power for charging !
is on and XXXXXX (XXXXXX-weight value) twinkled, battery volume < 20%, please
connect with 220V AC power for charging at once !!!
VIII. Parameter setting:1. Connecting with the load cell well and then doing the parameter set as follows:
2. Press button for confirmation and then enter next step:
Step Operation Display Notes
1 Press
0 - 9
0
In the power off mode, turn on the switch on the back of the
indicator.

19
User’s manual. Weighing indicator, counting function TC30 ENG
Step Operation Display Notes
2 Press
- - - - - -
SEt
- - - - - -Require to input password.
3 Press 2003
- - - - - -
SEt
2003Parameter setting code = 2003
4 Press
1
-d-
1
Enter the parameter-setting mode after password entered.
Division choise
5
Press
Press
Press
2
5
0.1
1/2/5/0.1/0.2/0.5/0.01/0.02/0.05/0.001/0.002/0.005/10/20/50/
100/200/500/0.10/0.20/0.50/0.010/0.020/0.050
Example: Division d=0.1
6 Press
600.0
-FS-
600.0
Full scale setting
7 Press 3000
600.0
-FS-
300.0
Example: Capacity (F·S) is 300.0 kg
8 Press
10
-FLt-
10
Baud filtering parameter choose 00-99, the response speed is faster with small value, but is more stable with big value.Choose the small one when the weighing condition is better, and choose the big one on the contrary condition.
9 Press 3010
-FLt-30 Example: baud filtering: FLt=30 (Default FLt=0)
10 Press
10AUtP
10
One place digit represents the option of automatically power off function or not.One place=0: No automatic power off function.One place=1: Automatic power off.Tens digit represents zero tracking range (1~9): 1:0.4 d 2:0.8 d 3:1.2 d 4:1.6 d 5:2 d 6:2.4 d 7:2.8 d 8:3.2 d 9:3.6 dalso represents the zero range upon power on:Tens digit=0 not zero when power onTens difit≥1 zero rang is 20% F·S when power on
11 Press 1110
AUtP11
Example: AUtP=11
(Default AUtP=10)
12 Press
01
-Adr-01
Communication address choice, serial continuous output formatAdr=00Serial output printing Adr=01Press the digit button to input the right address (default Ard=0)
13 Press
2400bAUd2400
Baud rate choice: 1200 2400 4900 9600
Press to choose (default bAUd=2400)
14 Press
0.00.000.00
Parameter setting finish
3. Check the internal code value of A/D transition.
Press , 9 , button, the first line will display the internal code of the present weight value, press button to quit.

20
User’s manual. Weighing indicator, counting function TC30ENG
IX. Capacity calibration:1. Zero point calibration (Also available on the weighing mode):
Step Operation Display Notes
1 Press
- - - - - -
SEt
- - - - - -
2 Press
nLOAD
CAL 0
00000 Prepare to enter zero calibration.
3 Press
0.00.00
0.00
Must no load on the scale !
2. Capacity calibration
Step Operation Display Notes
1 Press
- - - - - -
SEt
- - - - - -Require to input password
2 Press 8888
- - - - - -
SEt
8888
Password = 8888
3 Press
nLOAD
CAL 0
00000
Prepare to enter zero calibration
4 Press
- - - - - -
CAL 0
- - - - - -
Must no load on the scale !
5Several seconds
later
LOAd
CAL
600.0
Prepare to enter full-scale capacity calibration
If the loaded weight is not the one as capacity required, the ac-
tual value can be entered.
6 Press 3000
LOAd
CAL
300.0
Enter the weight value = 300.0 kg
7 Press
- - - - - -
CAL
- - - - - -
The capacity calibration is in process
8
300.00.00
0.00
Several seconds later, it will display the loaded weight value and
the calibration is finish.
DECLARACIÓN DE CONFORMIDADDECLARATION OF CONFORMITYDÉCLARATION DE CONFORMITÉ
Nosotros:We/Nos:
BAXTRAN S.L.Pol. Empordà International
C/F. Parcela 15-16
E-17469 VILAMALLA (Girona)
- SPAIN -
Declaramos bajo nuestra responsabilidad que el producto denominado:Declare under our responsibility that the denominated product:
Nous déclarons sous notre résponsabilité que le produit ci-dessous nommé:
Indicador de peso, función cuentapiezas TC30.Weighing indicator, counting function TC30.
Indicateur de poids, fonction compteuse TC30.
A la cual se refiere la presente declaración, es conforme a las siguientes normas o documentos:To wich déclaration referes to, conform wich the followings standards or other normative documents:
A la quelle se refaire la présente déclaration, et conforme aux normes suivantes ou documents:
Conformidad CE:CE conformity / Conformité CE:
2004/108/CE Directiva sobre la compatibilidad electromagnética.2004/108/CE Directive on the electromagnetic compatibility.
2004/108/CE Directive sur la compatibilité electromagnétique.
y a las siguientes normas armonizadas:and at following harmonized norms / normes harmonisées:
EN61326-1: 2006
EN61000-3-2: 2006
EN61000-3-3: 2008
Jordi Ribalta.
Director General
General Manager

ESP
22
Manual de usuario | Manuel d’usager | User’s manual. TC30FR ENG

23
ESPManual de usuario | Manuel d’usasger | User’s manual. TC30 FR ENG


![Dell SX2210WFP Monitor Manual del usuario · conectado 1 9tGHRURMR 2 9tGHRYHUGH 3 9tGHRD]XO 4 GND 5 7HVWDXWRPiWLFR 6 GND -R 7 GND -G 8 GND -B 9 5V del equipo 10 GND -sync 11 GND 12](https://static.fdocuments.ec/doc/165x107/5e9a04e6b082be3d6c067c7f/dell-sx2210wfp-monitor-manual-del-usuario-conectado-1-9tghrurmr-2-9tghryhugh-3-9tghrdxo.jpg)