Portable DVD Player Reproductor de DVD portátil...Reproductor de DVD portátil 2 Warning You are...
76
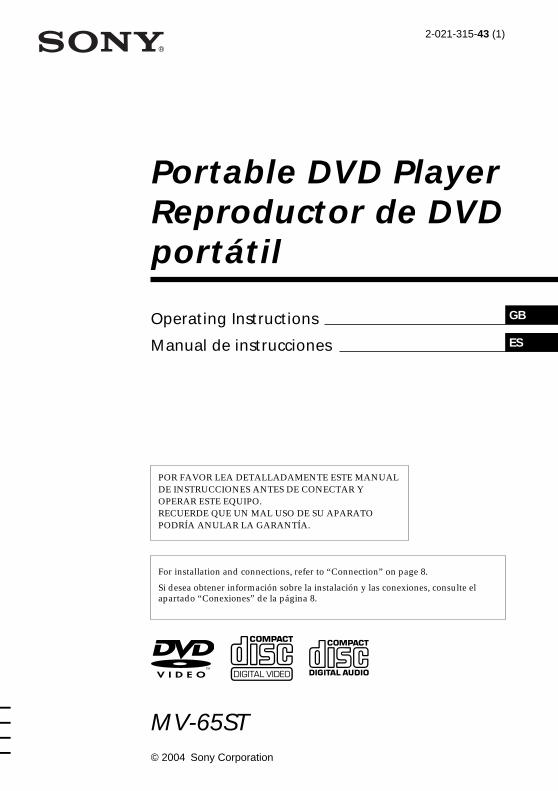
ES GB © 2004 Sony Corporation MV-65ST For installation and connections, refer to “Connection” on page 8. Si desea obtener información sobre la instalación y las conexiones, consulte el apartado “Conexiones” de la página 8. 2-021-315-43 (1) Operating Instructions Manual de instrucciones POR FAVOR LEA DETALLADAMENTE ESTE MANUAL DE INSTRUCCIONES ANTES DE CONECTAR Y OPERAR ESTE EQUIPO. RECUERDE QUE UN MAL USO DE SU APARATO PODRÍA ANULAR LA GARANTÍA. Portable DVD Player Reproductor de DVD portátil
Transcript of Portable DVD Player Reproductor de DVD portátil...Reproductor de DVD portátil 2 Warning You are...
ES
GB
© 2004 Sony Corporation
MV-65ST
For installation and connections, refer to “Connection” on page 8.
Si desea obtener información sobre la instalación y las conexiones, consulte elapartado “Conexiones” de la página 8.
2-021-315-43 (1)
Operating Instructions
Manual de instrucciones
POR FAVOR LEA DETALLADAMENTE ESTE MANUALDE INSTRUCCIONES ANTES DE CONECTAR YOPERAR ESTE EQUIPO.RECUERDE QUE UN MAL USO DE SU APARATOPODRÍA ANULAR LA GARANTÍA.
Portable DVD PlayerReproductor de DVDportátil
2
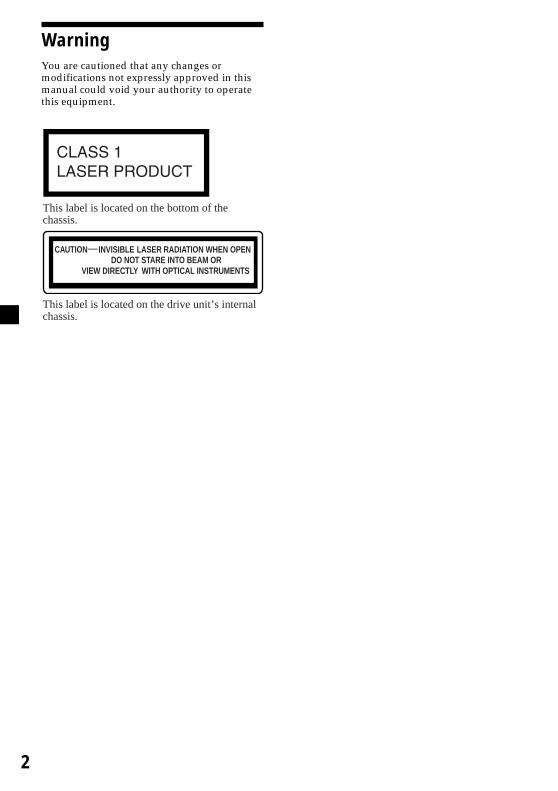
WarningYou are cautioned that any changes ormodifications not expressly approved in thismanual could void your authority to operatethis equipment.
This label is located on the bottom of thechassis.
CAUTION INVISIBLEDO NOT STARE INTO BEAM OR
VIEW DIRECTLY WITH OPTICAL INSTRUMENTS
LASER RADIATION WHEN OPEN
This label is located on the drive unit’s internalchassis.
3
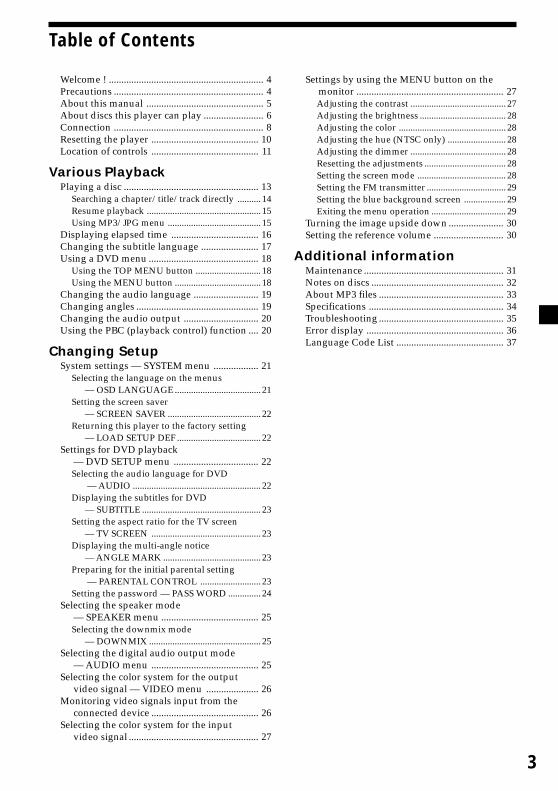
Table of Contents
Welcome ! .............................................................. 4Precautions ............................................................ 4About this manual ............................................... 5About discs this player can play ........................ 6Connection ............................................................ 8Resetting the player ........................................... 10Location of controls ........................................... 11
Various PlaybackPlaying a disc ...................................................... 13
Searching a chapter/title/track directly .......... 14Resume playback ................................................. 15Using MP3/JPG menu ........................................ 15
Displaying elapsed time ................................... 16Changing the subtitle language ....................... 17Using a DVD menu ............................................ 18
Using the TOP MENU button ............................ 18Using the MENU button ..................................... 18
Changing the audio language .......................... 19Changing angles ................................................. 19Changing the audio output .............................. 20Using the PBC (playback control) function .... 20
Changing SetupSystem settings — SYSTEM menu .................. 21
Selecting the language on the menus— OSD LANGUAGE ..................................... 21
Setting the screen saver— SCREEN SAVER ........................................ 22
Returning this player to the factory setting— LOAD SETUP DEF .................................... 22
Settings for DVD playback— DVD SETUP menu .................................. 22Selecting the audio language for DVD
— AUDIO ....................................................... 22Displaying the subtitles for DVD
— SUBTITLE ................................................... 23Setting the aspect ratio for the TV screen
— TV SCREEN ............................................... 23Displaying the multi-angle notice
— ANGLE MARK .......................................... 23Preparing for the initial parental setting
— PARENTAL CONTROL .......................... 23Setting the password — PASS WORD .............. 24
Selecting the speaker mode— SPEAKER menu ....................................... 25Selecting the downmix mode
— DOWNMIX ................................................ 25Selecting the digital audio output mode
— AUDIO menu ........................................... 25Selecting the color system for the output
video signal — VIDEO menu ..................... 26Monitoring video signals input from the
connected device ........................................... 26Selecting the color system for the input
video signal .................................................... 27
Settings by using the MENU button on themonitor ........................................................... 27Adjusting the contrast ......................................... 27Adjusting the brightness ..................................... 28Adjusting the color .............................................. 28Adjusting the hue (NTSC only) ......................... 28Adjusting the dimmer ......................................... 28Resetting the adjustments ................................... 28Setting the screen mode ...................................... 28Setting the FM transmitter .................................. 29Setting the blue background screen .................. 29Exiting the menu operation ................................ 29
Turning the image upside down ...................... 30Setting the reference volume ............................ 30
Additional informationMaintenance ........................................................ 31Notes on discs ..................................................... 32About MP3 files .................................................. 33Specifications ...................................................... 34Troubleshooting .................................................. 35Error display ....................................................... 36Language Code List ........................................... 37
4
PrecautionsTo avoid the risk of serious injury or accident,read the following precautions beforeinstalling and operating the player.
On safetyDo not put any foreign objects in the DC IN12V jack.
On power sources•Use house current or car battery (12 V DC).•For use in your house, use the AC power
adaptor supplied with the player. Do not useany other AC power adaptor since it maycause the player to malfunction.
•Connect the AC power adaptor to an easilyaccessible AC outlet. Should you notice anabnormality in the AC power adaptor,disconnect it from the AC outletimmediately.
•The player is not disconnected from the ACpower source (mains) as long as it isconnected to the wall outlet, even if theplayer itself has been turned off.
•If you are not going to use the player for along time, be sure to disconnect the powersupply (AC power adapter or car batterycord). To remove the AC power adaptor fromthe wall outlet, grasp the plug itself; neverpull the cord.
On heat build-upHeat may build up in the player if it is used foran extended period of time. This, however, isnot a malfunction.
For driver's safetyComply with your local traffic rules andregulations.
•While driving— The driver must not watch or operate the
player. It may lead to distraction andcause an accident.
— The driver must not use the headphones.It may lead to distraction and cause anaccident.Park the car in a safe place when thedriver watch and operate the player or usethe headphones.
Thank you for purchasing this Sony PortableDVD Player. You can enjoy its various featureseven more with:•DVD/Video CD/Audio CD playback.•Support DTS/Dolby Digital through optical
digital output terminal.•MP3/JPG file playback (recorded on CD-
ROMs/CD-Rs/CD-RWs).•Supplied controller accessory
Card remote commanderRM-X137
Before operating the player, please read thisoperating instructions thoroughly and retain itfor future reference.
CopyrightsThis product incorporates copyright protectiontechnology that is protected by method claimsof certain U.S. patents, other intellectualproperty rights owned by MacrovisionCorporation, and other rights owners. Use ofthis copyright protection technology must beauthorized by Macrovision Corporation, and isintended for home and other limited viewinguses only unless otherwise authorized byMacrovision Corporation. Reverse engineeringor disassembly is prohibited.
Manufactured under license from DolbyLaboratories. “Dolby”, “Pro Logic”, and thedouble-D symbol are trademarks of DolbyLaboratories.
“DTS,” “DTS Digital Surround” and “DTSDigital Out” are trademarks of Digital TheaterSystems, Inc.
Welcome !
Polarity ofthe plug
5
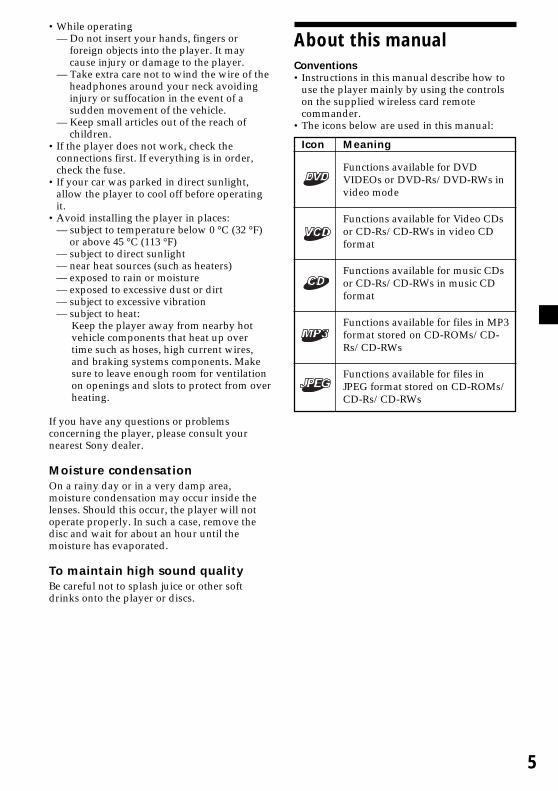
About this manualConventions•Instructions in this manual describe how to
use the player mainly by using the controlson the supplied wireless card remotecommander.
•The icons below are used in this manual:
•While operating— Do not insert your hands, fingers or
foreign objects into the player. It maycause injury or damage to the player.
— Take extra care not to wind the wire of theheadphones around your neck avoidinginjury or suffocation in the event of asudden movement of the vehicle.
— Keep small articles out of the reach ofchildren.
•If the player does not work, check theconnections first. If everything is in order,check the fuse.
•If your car was parked in direct sunlight,allow the player to cool off before operatingit.
•Avoid installing the player in places:— subject to temperature below 0 °C (32 °F)
or above 45 °C (113 °F)— subject to direct sunlight— near heat sources (such as heaters)— exposed to rain or moisture— exposed to excessive dust or dirt— subject to excessive vibration— subject to heat:
Keep the player away from nearby hotvehicle components that heat up overtime such as hoses, high current wires,and braking systems components. Makesure to leave enough room for ventilationon openings and slots to protect from overheating.
If you have any questions or problemsconcerning the player, please consult yournearest Sony dealer.
Moisture condensationOn a rainy day or in a very damp area,moisture condensation may occur inside thelenses. Should this occur, the player will notoperate properly. In such a case, remove thedisc and wait for about an hour until themoisture has evaporated.
To maintain high sound qualityBe careful not to splash juice or other softdrinks onto the player or discs.
Icon Meaning
Functions available for DVDVIDEOs or DVD-Rs/DVD-RWs invideo mode
Functions available for Video CDsor CD-Rs/CD-RWs in video CDformat
Functions available for music CDsor CD-Rs/CD-RWs in music CDformat
Functions available for files in MP3format stored on CD-ROMs/CD-Rs/CD-RWs
Functions available for files inJPEG format stored on CD-ROMs/CD-Rs/CD-RWs
6
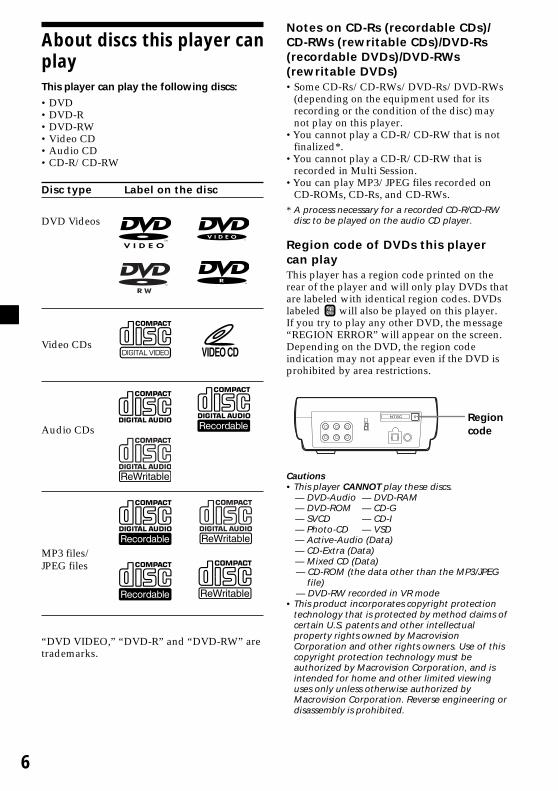
Regioncode
About discs this player canplayThis player can play the following discs:
•DVD•DVD-R•DVD-RW•Video CD•Audio CD•CD-R/CD-RW
Disc type Label on the disc
DVD Videos
Video CDs
Audio CDs
MP3 files/JPEG files
“DVD VIDEO,” “DVD-R” and “DVD-RW” aretrademarks.
Notes on CD-Rs (recordable CDs)/CD-RWs (rewritable CDs)/DVD-Rs(recordable DVDs)/DVD-RWs(rewritable DVDs)•Some CD-Rs/CD-RWs/DVD-Rs/DVD-RWs
(depending on the equipment used for itsrecording or the condition of the disc) maynot play on this player.
•You cannot play a CD-R/CD-RW that is notfinalized*.
•You cannot play a CD-R/CD-RW that isrecorded in Multi Session.
•You can play MP3/JPEG files recorded onCD-ROMs, CD-Rs, and CD-RWs.
* A process necessary for a recorded CD-R/CD-RWdisc to be played on the audio CD player.
Region code of DVDs this playercan playThis player has a region code printed on therear of the player and will only play DVDs thatare labeled with identical region codes. DVDslabeled ALL will also be played on this player.If you try to play any other DVD, the message“REGION ERROR” will appear on the screen.Depending on the DVD, the region codeindication may not appear even if the DVD isprohibited by area restrictions.
Cautions• This player CANNOT play these discs.
— DVD-Audio — DVD-RAM— DVD-ROM — CD-G— SVCD — CD-I— Photo-CD — VSD— Active-Audio (Data)— CD-Extra (Data)— Mixed CD (Data)— CD-ROM (the data other than the MP3/JPEG
file)— DVD-RW recorded in VR mode
• This product incorporates copyright protectiontechnology that is protected by method claims ofcertain U.S. patents and other intellectualproperty rights owned by MacrovisionCorporation and other rights owners. Use of thiscopyright protection technology must beauthorized by Macrovision Corporation, and isintended for home and other limited viewinguses only unless otherwise authorized byMacrovision Corporation. Reverse engineering ordisassembly is prohibited.
7
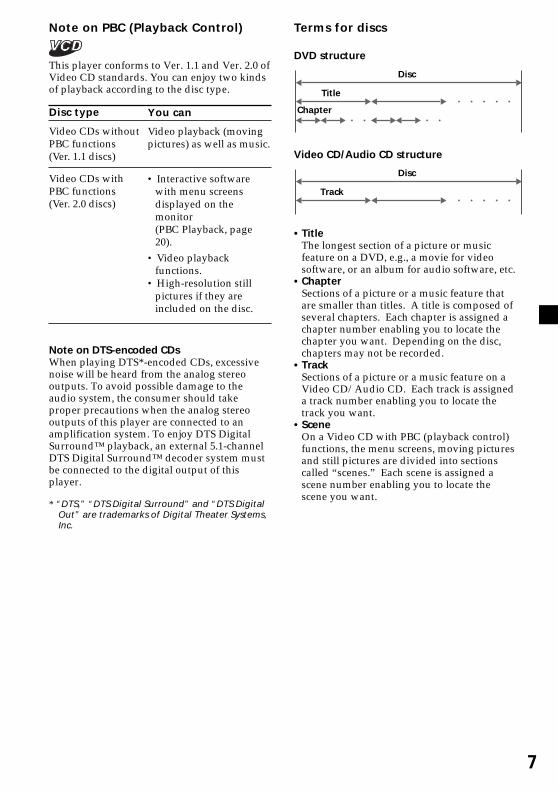
Note on PBC (Playback Control)
This player conforms to Ver. 1.1 and Ver. 2.0 ofVideo CD standards. You can enjoy two kindsof playback according to the disc type.
Disc type
Video CDs withoutPBC functions(Ver. 1.1 discs)
Video CDs withPBC functions(Ver. 2.0 discs)
Note on DTS-encoded CDsWhen playing DTS*-encoded CDs, excessivenoise will be heard from the analog stereooutputs. To avoid possible damage to theaudio system, the consumer should takeproper precautions when the analog stereooutputs of this player are connected to anamplification system. To enjoy DTS DigitalSurround™ playback, an external 5.1-channelDTS Digital Surround™ decoder system mustbe connected to the digital output of thisplayer.
* “DTS,” “DTS Digital Surround” and “DTS DigitalOut” are trademarks of Digital Theater Systems,Inc.
Terms for discs
DVD structure
Disc
Title
ChapterYou can
Video playback (movingpictures) as well as music.
• Interactive softwarewith menu screensdisplayed on themonitor(PBC Playback, page20).
• Video playbackfunctions.
• High-resolution stillpictures if they areincluded on the disc.
Video CD/Audio CD structure
• TitleThe longest section of a picture or musicfeature on a DVD, e.g., a movie for videosoftware, or an album for audio software, etc.
• ChapterSections of a picture or a music feature thatare smaller than titles. A title is composed ofseveral chapters. Each chapter is assigned achapter number enabling you to locate thechapter you want. Depending on the disc,chapters may not be recorded.
• TrackSections of a picture or a music feature on aVideo CD/Audio CD. Each track is assigneda track number enabling you to locate thetrack you want.
• SceneOn a Video CD with PBC (playback control)functions, the menu screens, moving picturesand still pictures are divided into sectionscalled “scenes.” Each scene is assigned ascene number enabling you to locate thescene you want.
Track
Disc
8
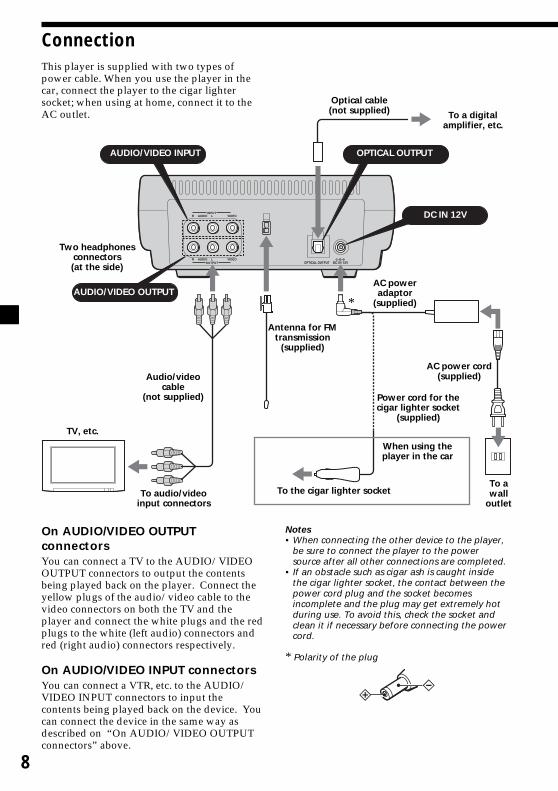
Connection
On AUDIO/VIDEO OUTPUTconnectorsYou can connect a TV to the AUDIO/VIDEOOUTPUT connectors to output the contentsbeing played back on the player. Connect theyellow plugs of the audio/video cable to thevideo connectors on both the TV and theplayer and connect the white plugs and the redplugs to the white (left audio) connectors andred (right audio) connectors respectively.
On AUDIO/VIDEO INPUT connectorsYou can connect a VTR, etc. to the AUDIO/VIDEO INPUT connectors to input thecontents being played back on the device. Youcan connect the device in the same way asdescribed on “On AUDIO/VIDEO OUTPUTconnectors” above.
Optical cable(not supplied) To a digital
amplifier, etc.
AUDIO/VIDEO INPUT OPTICAL OUTPUT
DC IN 12V
AUDIO/VIDEO OUTPUT
Two headphonesconnectors(at the side)
AC poweradaptor
(supplied)
Audio/videocable
(not supplied)
Antenna for FMtransmission
(supplied)
Power cord for thecigar lighter socket
(supplied)TV, etc.
To audio/videoinput connectors
To the cigar lighter socket
When using theplayer in the car
To awall
outlet
Notes• When connecting the other device to the player,
be sure to connect the player to the powersource after all other connections are completed.
• If an obstacle such as cigar ash is caught insidethe cigar lighter socket, the contact between thepower cord plug and the socket becomesincomplete and the plug may get extremely hotduring use. To avoid this, check the socket andclean it if necessary before connecting the powercord.
* Polarity of the plug
This player is supplied with two types ofpower cable. When you use the player in thecar, connect the player to the cigar lightersocket; when using at home, connect it to theAC outlet.
*
AC power cord(supplied)
9
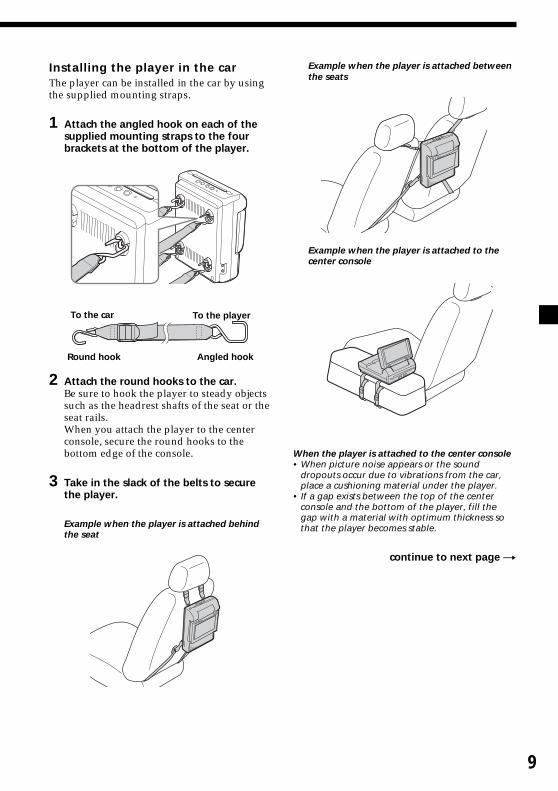
Installing the player in the carThe player can be installed in the car by usingthe supplied mounting straps.
1 Attach the angled hook on each of thesupplied mounting straps to the fourbrackets at the bottom of the player.
2 Attach the round hooks to the car.Be sure to hook the player to steady objectssuch as the headrest shafts of the seat or theseat rails.When you attach the player to the centerconsole, secure the round hooks to thebottom edge of the console.
3 Take in the slack of the belts to securethe player.
Example when the player is attached behindthe seat
Example when the player is attached betweenthe seats
Example when the player is attached to thecenter console
When the player is attached to the center console• When picture noise appears or the sound
dropouts occur due to vibrations from the car,place a cushioning material under the player.
• If a gap exists between the top of the centerconsole and the bottom of the player, fill thegap with a material with optimum thickness sothat the player becomes stable.
continue to next page t
To the car To the player
Round hook Angled hook
10
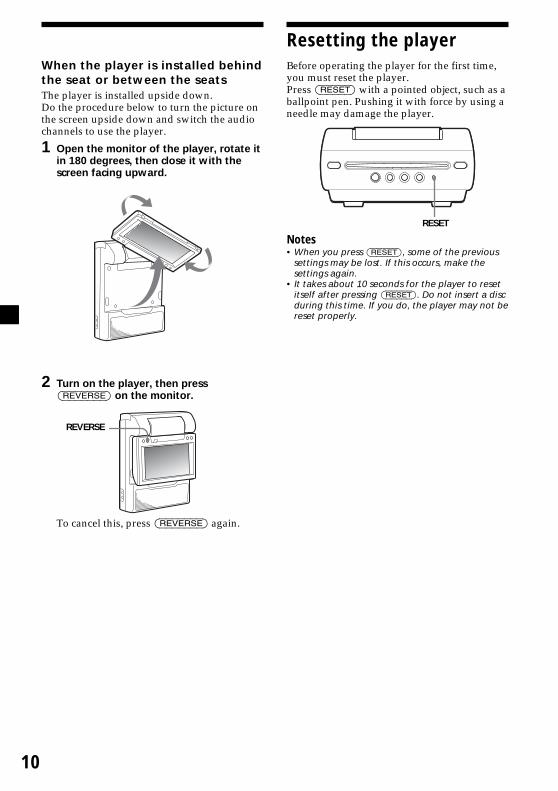
REVERSE
Resetting the playerBefore operating the player for the first time,you must reset the player.Press (RESET) with a pointed object, such as aballpoint pen. Pushing it with force by using aneedle may damage the player.
Notes• When you press (RESET), some of the previous
settings may be lost. If this occurs, make thesettings again.
• It takes about 10 seconds for the player to resetitself after pressing (RESET). Do not insert a discduring this time. If you do, the player may not bereset properly.
RESET
When the player is installed behindthe seat or between the seatsThe player is installed upside down.Do the procedure below to turn the picture onthe screen upside down and switch the audiochannels to use the player.
1 Open the monitor of the player, rotate itin 180 degrees, then close it with thescreen facing upward.
2 Turn on the player, then press(REVERSE) on the monitor.
To cancel this, press (REVERSE) again.
11
MV-65ST
DISC IN
RESET678
90
qa
qd
qs
qf
qg
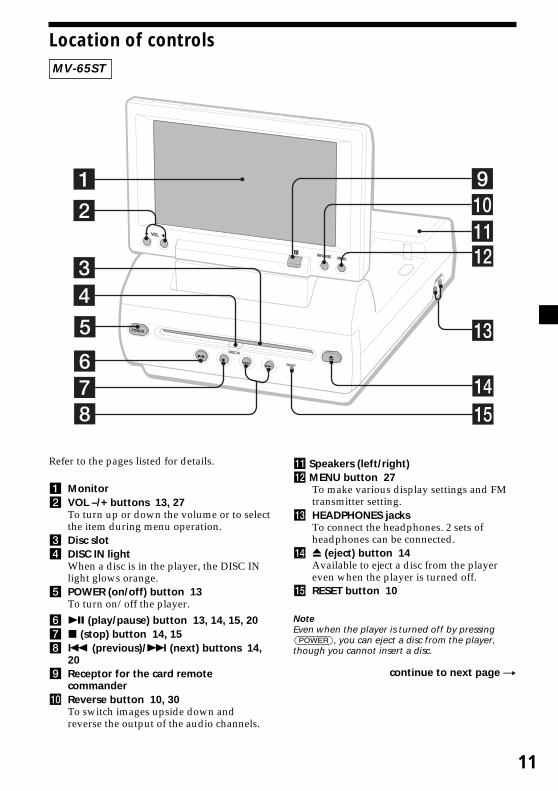
Refer to the pages listed for details.
1 Monitor2 VOL –/+ buttons 13, 27
To turn up or down the volume or to selectthe item during menu operation.
3 Disc slot4 DISC IN light
When a disc is in the player, the DISC INlight glows orange.
5 POWER (on/off) button 13To turn on/off the player.
6 u (play/pause) button 13, 14, 15, 207 x (stop) button 14, 158 . (previous)/> (next) buttons 14,
209 Receptor for the card remote
commanderq; Reverse button 10, 30
To switch images upside down andreverse the output of the audio channels.
qa Speakers (left/right)qs MENU button 27
To make various display settings and FMtransmitter setting.
qd HEADPHONES jacksTo connect the headphones. 2 sets ofheadphones can be connected.
qf Z (eject) button 14Available to eject a disc from the playereven when the player is turned off.
qg RESET button 10
NoteEven when the player is turned off by pressing(POWER), you can eject a disc from the player,though you cannot insert a disc.
continue to next page t
Location of controls

12
Card remote commander RM-X137
ENTER
SEARCH
POWERDISPLAY
CLEAR
SETUP
AUDIO
ANGLE
SUBTITLE
MENU
TOP MENU
INPUT
1 2 3
4 5 6
7 8 9 0
VOL
Refer to the pages listed for details.
1 DISPLAY button 16To display the time information of the disc.
2 Number buttons (0 to 9) 14, 20, 243 TOP MENU button 18
To display the top menu of a recordedDVD.
4 MENU button 18, 20To display the recorded DVD menu, or toturn on/off the PBC (Playback control)menu of a Video CD.
5 O (return) button 206 ./> (previous/next) buttons 14, 207 m (fast reverse)/
M (fast forward) buttons 148 M/,/m/< buttons 14, 15, 18, 219 POWER (on/off) button 13
To turn on/off the player.q; SEARCH button 14
To specify a desired point on a disc bychapter, title, or track.
qa CLEAR buttonqs SUBTITLE button 17
To change the subtitle language whileplaying a DVD.
qd ENTER button 14, 21To enter a setting.
qf ANGLE button 19To select the multiple angles of view whileplaying a DVD.
qg AUDIO button 19To change the audio output/audiolanguage.
qh (slow reverse)/y (slow forward)buttons 14
qj u (play/pause) button 13, 14, 15, 20qk x (stop) button 14, 15
ql SETUP button 22Used to perform menu operations.
w; INPUT button 26To select the input source.
wa VOL (–/+) buttons 13, 27To turn up or down the volume.
The corresponding buttons of the cardremote commander control the samefunctions as those on the player.Instructions in this manual describe how to usethe player by mainly using the card remotecommander.
TipRefer to “Replacing the lithium battery of the cardremote commander” for details on how to replacethe battery (page 31).

13
Various Playback
This chapter describes various functions forplayback.
Playing a disc
ENTER
SEARCH
POWERDISPLAY
CLEAR
SETUP
AUDIO
ANGLE
SUBTITLE
MENU
TOP MENU
INPUT
1 2 3
4 5 6
7 8 9 0
VOL
./>
u
x
POWER
SEARCH
M/m</,
/y
m/M
VOL
1 Open the monitor and adjust the tilt andswivel.
2 Press (POWER) to turn on the player.The monitor turns on and the green light ofthe POWER switch on the player lights up.
Numberbuttons
3 Insert the disc (labeled side up) into theplayer.
Playback starts automatically.If a disc is already inserted or playback doesnot start automatically, press u to startplayback.
4 Press (VOL) (+) or (VOL) (–) on the cardremote commander to adjust thevolume.
To turn off the powerPress (POWER) so that the green light of thePOWER switch on the player turns off.
After useTurn off the player and disconnect the powercord from the power source.
Note on using the player in the carUsing the player while the ignition key is inACC position and the engine is stopped maycause the car battery to run down.
Notes• Even when the player is turned off, you can eject
a disc from the player, though you cannot inserta disc.
• Read the instruction manual supplied with thedisc to play with this player.
• When you play an 8-cm disc (e.g., CD-single), besure to insert it to the center area of the disc slot.
• Depending on the recording method used on thedisc, it may take a minute or more beforeplaying.
• Depending on the condition of the disc, it maynot play back (page 32).
• A high-bit rate MP3 file such as 320 kbps may notplay back properly.
continue to next page t
14
Operation for playback
To Do thisStop playback Press x*1
Eject the disc Press Z on theplayer.
Pause Press u *2.Press again toresume playback.
Go to the next chapter, Press >track, or sceneGo back to the preceding Press .chapter, track, or sceneFast forward/ Press M/m whilefast reverse playing*3 *4
Each press changesthe playback speedas follows: 2 timesnormal speedt 4 times normalspeed t 8 timesnormal speed t 16times normal speedt 32 times normalspeed t normalplayback speed.
Slow forward Press y/ while(DVD/Video CD only)/ playing *4
Slow reverse Each press changes(DVD only) the playback speed
as follows: 1/2 timesnormal speed t 1/4times normalspeedt 1/8 timesnormal speedt 1/16 times normalspeedt 1/32 timesnormal speedtnormal playbackspeed.
*1 If the resume playback function is activated, youcan resume playback later by pressing u. Fordetails, see “Resume playback” (page 15).
*2 DVD/Video CD/Audio CD/MP3/JPEG“X” is displayed on the screen.
*3 DVD/Video CD/Audio CD/MP3/JPEGNo sound is output during fast forward or fastreverse.
*4 A disc other than a DVD returns to normalplayback when a track/MP3 file finishes.
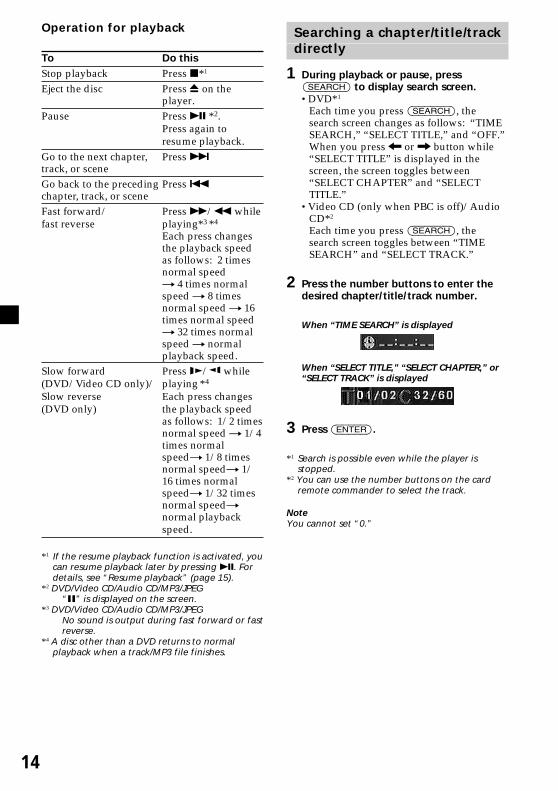
Searching a chapter/title/trackdirectly
1 During playback or pause, press(SEARCH) to display search screen.•DVD*1
Each time you press (SEARCH), thesearch screen changes as follows: “TIMESEARCH,” “SELECT TITLE,” and “OFF.”When you press < or , button while“SELECT TITLE” is displayed in thescreen, the screen toggles between“SELECT CHAPTER” and “SELECTTITLE.”
•Video CD (only when PBC is off)/AudioCD*2
Each time you press (SEARCH), thesearch screen toggles between “TIMESEARCH” and “SELECT TRACK.”
2 Press the number buttons to enter thedesired chapter/title/track number.
When “TIME SEARCH” is displayed
When “SELECT TITLE,” “SELECT CHAPTER,” or“SELECT TRACK” is displayed
3 Press (ENTER).
*1 Search is possible even while the player isstopped.
*2 You can use the number buttons on the cardremote commander to select the track.
NoteYou cannot set “0.”
15
Resume playbackYou can resume playback from the pointwhere the playback has been stopped. Theplayer memorizes the point even after thepower is turned off.
1 During playback, press x to stop.The player memorizes the point whereplayback is stopped.•DVD/Video CD/Audio CD
“PRESS PLAY KEY TO LASTPLAY”appears on the screen.
2 Press u to start playback.“LASTPLAY” appears on the screen andplayback starts from the point whereplayback has been stopped.•MP3/JPEG
When resume playback is activated,playback starts from the beginning of theMP3/JPEG file (track) during which youhave stopped playback.
Notes• To deactivate the resume function, press x again
while playback is stopped. “PRESS PLAY KEY TOPLAY” appears on the screen at this time.
• The resume function will be deactivated whenthe disc is ejected.
• The resume function will also be deactivatedwhen the ignition key is turned to OFF positionor when the player is disconnected from thepower source.
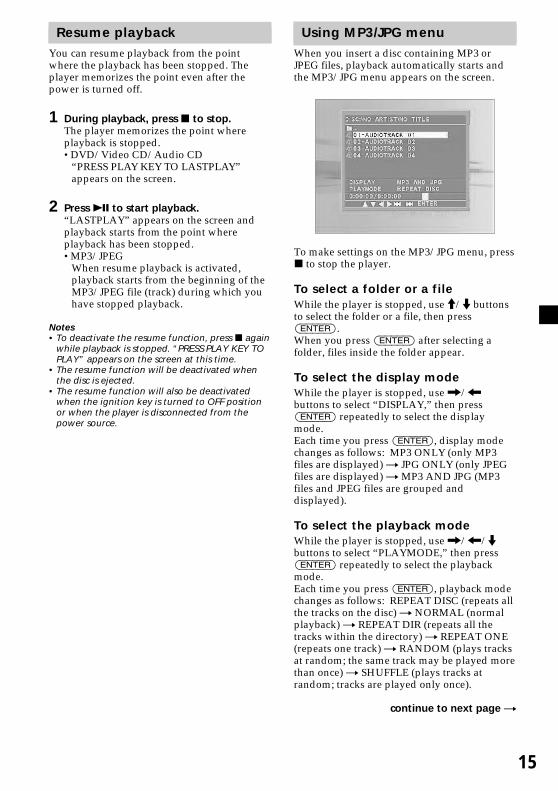
Using MP3/JPG menuWhen you insert a disc containing MP3 orJPEG files, playback automatically starts andthe MP3/JPG menu appears on the screen.
To make settings on the MP3/JPG menu, pressx to stop the player.
To select a folder or a fileWhile the player is stopped, use M/m buttonsto select the folder or a file, then press(ENTER).When you press (ENTER) after selecting afolder, files inside the folder appear.
To select the display modeWhile the player is stopped, use ,/<buttons to select “DISPLAY,” then press(ENTER) repeatedly to select the displaymode.Each time you press (ENTER), display modechanges as follows: MP3 ONLY (only MP3files are displayed) t JPG ONLY (only JPEGfiles are displayed) t MP3 AND JPG (MP3files and JPEG files are grouped anddisplayed).
To select the playback modeWhile the player is stopped, use ,/</mbuttons to select “PLAYMODE,” then press(ENTER) repeatedly to select the playbackmode.Each time you press (ENTER), playback modechanges as follows: REPEAT DISC (repeats allthe tracks on the disc) t NORMAL (normalplayback) t REPEAT DIR (repeats all thetracks within the directory) t REPEAT ONE(repeats one track) t RANDOM (plays tracksat random; the same track may be played morethan once) t SHUFFLE (plays tracks atrandom; tracks are played only once).
continue to next page t
16
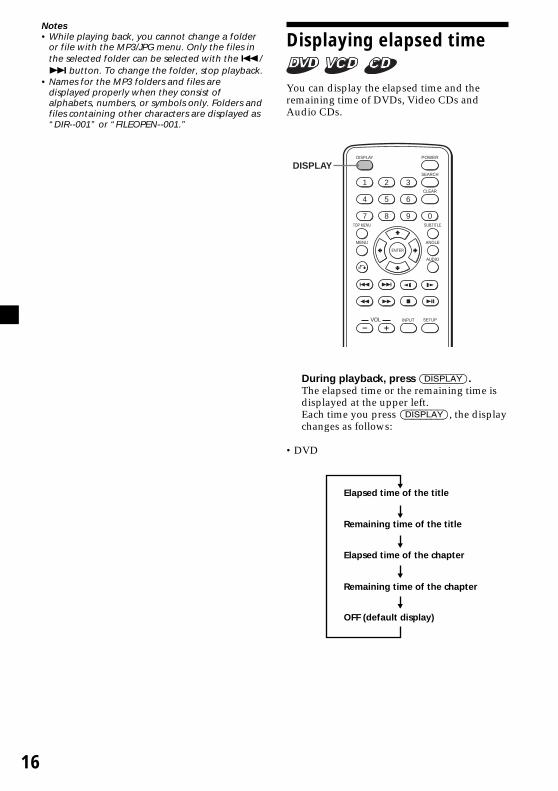
Displaying elapsed time
You can display the elapsed time and theremaining time of DVDs, Video CDs andAudio CDs.
ENTER
SEARCH
POWERDISPLAY
CLEAR
SETUP
AUDIO
ANGLE
SUBTITLE
MENU
TOP MENU
INPUT
1 2 3
4 5 6
7 8 9 0
VOL
DISPLAY
During playback, press (DISPLAY).The elapsed time or the remaining time isdisplayed at the upper left.Each time you press (DISPLAY), the displaychanges as follows:
•DVD
Elapsed time of the title
Remaining time of the title
Elapsed time of the chapter
Remaining time of the chapter
OFF (default display)
Notes• While playing back, you cannot change a folder
or file with the MP3/JPG menu. Only the files inthe selected folder can be selected with the ./> button. To change the folder, stop playback.
• Names for the MP3 folders and files aredisplayed properly when they consist ofalphabets, numbers, or symbols only. Folders andfiles containing other characters are displayed as“DIR--001” or “FILEOPEN--001.”
17
•Video CD
•Audio CD
To turn off the time informationPress (DISPLAY) repeatedly to select “OFF.”
Elapsed time of the disc
Elapsed time of the track and audiomode (stereo/mono)
Elapsed time of the track and PBCsetting (ON/OFF)
Remaining time of the track
OFF (default display)
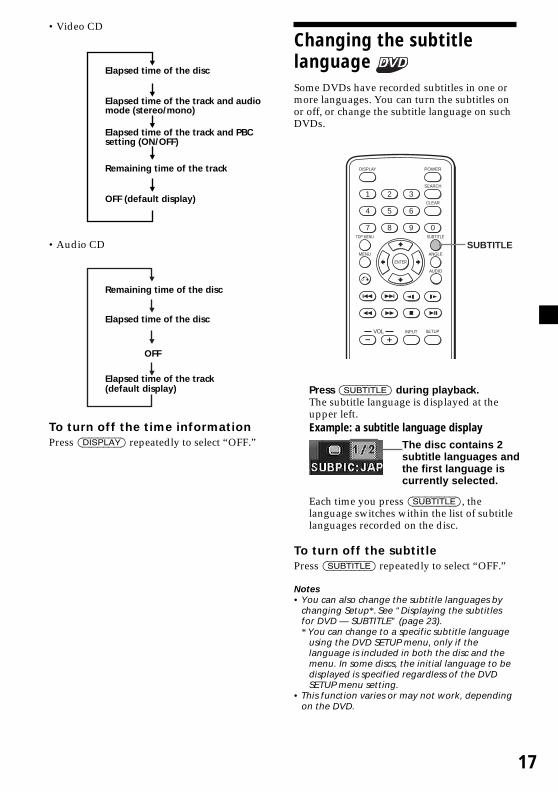
Changing the subtitlelanguage Some DVDs have recorded subtitles in one ormore languages. You can turn the subtitles onor off, or change the subtitle language on suchDVDs.
ENTER
SEARCH
POWERDISPLAY
CLEAR
SETUP
AUDIO
ANGLE
SUBTITLE
MENU
TOP MENU
INPUT
1 2 3
4 5 6
7 8 9 0
VOL
SUBTITLE
Press (SUBTITLE) during playback.The subtitle language is displayed at theupper left.Example: a subtitle language display
Each time you press (SUBTITLE), thelanguage switches within the list of subtitlelanguages recorded on the disc.
To turn off the subtitlePress (SUBTITLE) repeatedly to select “OFF.”
Notes• You can also change the subtitle languages by
changing Setup*. See “Displaying the subtitlesfor DVD — SUBTITLE” (page 23).* You can change to a specific subtitle language
using the DVD SETUP menu, only if thelanguage is included in both the disc and themenu. In some discs, the initial language to bedisplayed is specified regardless of the DVDSETUP menu setting.
• This function varies or may not work, dependingon the DVD.
The disc contains 2subtitle languages andthe first language iscurrently selected.
Remaining time of the disc
Elapsed time of the disc
OFF
Elapsed time of the track(default display)
18
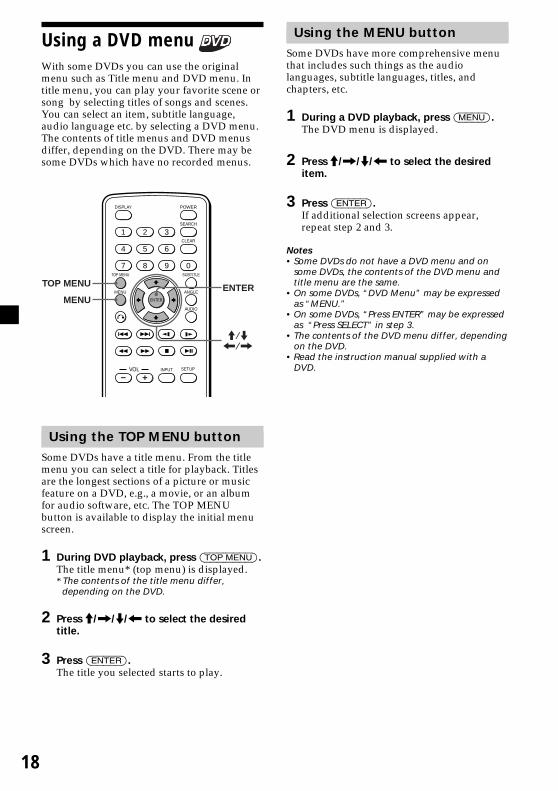
Using the MENU buttonSome DVDs have more comprehensive menuthat includes such things as the audiolanguages, subtitle languages, titles, andchapters, etc.
1 During a DVD playback, press (MENU).The DVD menu is displayed.
2 Press M/,/m/< to select the desireditem.
3 Press (ENTER).If additional selection screens appear,repeat step 2 and 3.
Notes• Some DVDs do not have a DVD menu and on
some DVDs, the contents of the DVD menu andtitle menu are the same.
• On some DVDs, “DVD Menu” may be expressedas “MENU.”
• On some DVDs, “Press ENTER” may be expressedas “Press SELECT” in step 3.
• The contents of the DVD menu differ, dependingon the DVD.
• Read the instruction manual supplied with aDVD.
Using a DVD menu With some DVDs you can use the originalmenu such as Title menu and DVD menu. Intitle menu, you can play your favorite scene orsong by selecting titles of songs and scenes.You can select an item, subtitle language,audio language etc. by selecting a DVD menu.The contents of title menus and DVD menusdiffer, depending on the DVD. There may besome DVDs which have no recorded menus.
ENTER
SEARCH
POWERDISPLAY
CLEAR
SETUP
AUDIO
ANGLE
SUBTITLE
MENU
TOP MENU
INPUT
1 2 3
4 5 6
7 8 9 0
VOL
TOP MENU
MENUENTER
M/m</,
Using the TOP MENU buttonSome DVDs have a title menu. From the titlemenu you can select a title for playback. Titlesare the longest sections of a picture or musicfeature on a DVD, e.g., a movie, or an albumfor audio software, etc. The TOP MENUbutton is available to display the initial menuscreen.
1 During DVD playback, press (TOP MENU).The title menu* (top menu) is displayed.* The contents of the title menu differ,
depending on the DVD.
2 Press M/,/m/< to select the desiredtitle.
3 Press (ENTER).The title you selected starts to play.
19
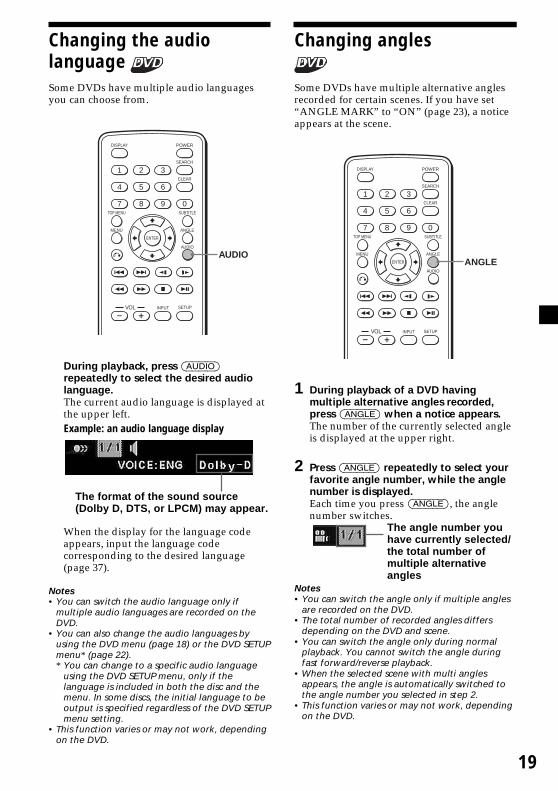
Changing the audiolanguage Some DVDs have multiple audio languagesyou can choose from.
ENTER
SEARCH
POWERDISPLAY
CLEAR
SETUP
AUDIO
ANGLE
SUBTITLE
MENU
TOP MENU
INPUT
1 2 3
4 5 6
7 8 9 0
VOL
AUDIO
During playback, press (AUDIO)repeatedly to select the desired audiolanguage.The current audio language is displayed atthe upper left.Example: an audio language display
When the display for the language codeappears, input the language codecorresponding to the desired language(page 37).
Notes• You can switch the audio language only if
multiple audio languages are recorded on theDVD.
• You can also change the audio languages byusing the DVD menu (page 18) or the DVD SETUPmenu* (page 22).* You can change to a specific audio language
using the DVD SETUP menu, only if thelanguage is included in both the disc and themenu. In some discs, the initial language to beoutput is specified regardless of the DVD SETUPmenu setting.
• This function varies or may not work, dependingon the DVD.
The format of the sound source(Dolby D, DTS, or LPCM) may appear.
Changing angles
Some DVDs have multiple alternative anglesrecorded for certain scenes. If you have set“ANGLE MARK” to “ON” (page 23), a noticeappears at the scene.
ENTER
SEARCH
POWERDISPLAY
CLEAR
AUDIO
ANGLE
SUBTITLE
MENU
TOP MENU
INPUT
1 2 3
4 5 6
7 8 9 0
VOL SETUP
ANGLE
1 During playback of a DVD havingmultiple alternative angles recorded,press (ANGLE) when a notice appears.The number of the currently selected angleis displayed at the upper right.
2 Press (ANGLE) repeatedly to select yourfavorite angle number, while the anglenumber is displayed.Each time you press (ANGLE), the anglenumber switches.
Notes• You can switch the angle only if multiple angles
are recorded on the DVD.• The total number of recorded angles differs
depending on the DVD and scene.• You can switch the angle only during normal
playback. You cannot switch the angle duringfast forward/reverse playback.
• When the selected scene with multi anglesappears, the angle is automatically switched tothe angle number you selected in step 2.
• This function varies or may not work, dependingon the DVD.
The angle number youhave currently selected/the total number ofmultiple alternativeangles
20
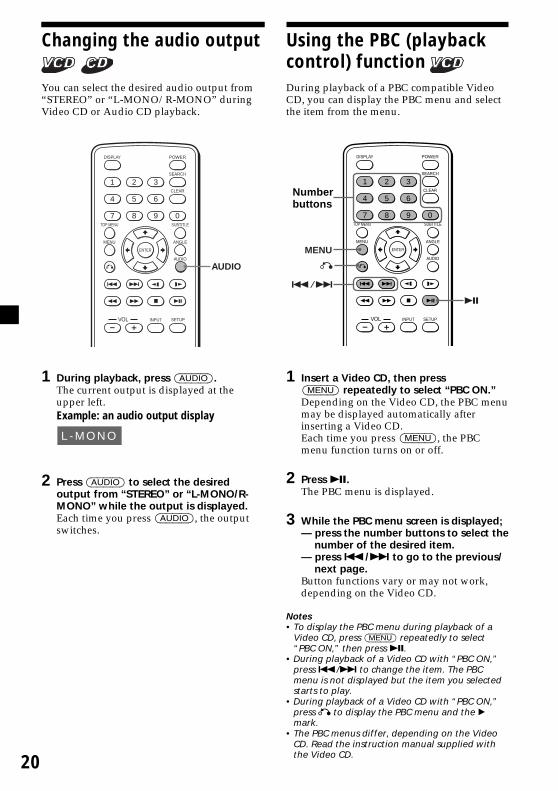
Using the PBC (playbackcontrol) function During playback of a PBC compatible VideoCD, you can display the PBC menu and selectthe item from the menu.
ENTER
SEARCH
POWERDISPLAY
CLEAR
SETUP
AUDIO
ANGLE
SUBTITLE
MENU
TOP MENU
INPUT
1 2 3
4 5 6
7 8 9 0
VOL
MENU
./>
u
O
1 Insert a Video CD, then press(MENU) repeatedly to select “PBC ON.”Depending on the Video CD, the PBC menumay be displayed automatically afterinserting a Video CD.Each time you press (MENU), the PBCmenu function turns on or off.
2 Press u.The PBC menu is displayed.
3 While the PBC menu screen is displayed;— press the number buttons to select the
number of the desired item.— press ./> to go to the previous/
next page.Button functions vary or may not work,depending on the Video CD.
Notes• To display the PBC menu during playback of a
Video CD, press (MENU) repeatedly to select“PBC ON,” then press u.
• During playback of a Video CD with “PBC ON,”press ./> to change the item. The PBCmenu is not displayed but the item you selectedstarts to play.
• During playback of a Video CD with “PBC ON,”press O to display the PBC menu and the Bmark.
• The PBC menus differ, depending on the VideoCD. Read the instruction manual supplied withthe Video CD.
Changing the audio output
You can select the desired audio output from“STEREO” or “L-MONO/R-MONO” duringVideo CD or Audio CD playback.
ENTER
SEARCH
POWERDISPLAY
CLEAR
SETUP
AUDIO
ANGLE
SUBTITLE
MENU
TOP MENU
INPUT
1 2 3
4 5 6
7 8 9 0
VOL
AUDIO
1 During playback, press (AUDIO).The current output is displayed at theupper left.Example: an audio output display
L - M O N O
2 Press (AUDIO) to select the desiredoutput from “STEREO” or “L-MONO/R-MONO” while the output is displayed.Each time you press (AUDIO), the outputswitches.
Numberbuttons

21
Changing Setup
You can set up and adjust this player using theon-screen setup menus. Most settings need tobe set when you first use this player.
Setup menus are:•SYSTEM menu (system settings)•DVD SETUP menu (settings for DVD
playback)•SPEAKER menu (setting for downmix mode)•AUDIO menu (settings for digital audio
output)•VIDEO menu (settings for video output)
ENTER
SEARCH
POWERDISPLAY
CLEAR
SETUP
AUDIO
ANGLE
SUBTITLE
MENU
TOP MENU
INPUT
1 2 3
4 5 6
7 8 9 0
VOL
ENTER
M/m</,
SETUP
Refer to “Settings by using the MENU buttonon the monitor” (page 27) for settings of themonitor.
System settings — SYSTEMmenu
Selecting the language onthe menus — OSD LANGUAGE
You can select the language used for themenus from the English and Japanese.
1 Press (SETUP).
2 Press M or m button repeatedly to select“OSD LANGUAGE.”
3 Press < or , button repeatedly toselect the language, then press (ENTER).
4 Press (SETUP) to exit the SYSTEM menu.

22
Setting the screen saver —SCREEN SAVER
If you set the “SCREEN SAVER” setting to“ON,” the screen saver image appears whenyou leave the player in pause or stop mode formore than 15 minutes. The screen saver willhelp prevent the monitor from becomingdamaged.
1 Press (SETUP).
2 Press M or m button repeatedly to select“SCREEN SAVER.”
3 Press < or , button repeatedly toselect “ON,” then press (ENTER).When 5 seconds elapse with no buttonpressed, the player exits the SYSTEM menuand normal display resumes.
4 Press (SETUP) to exit the SYSTEM menu.
To turn off the screen saver settingSelect “OFF” in step 3.
Returning this player to thefactory setting— LOAD SETUP DEF
You can return this player to the factory settingexcept your password (page 24) and parentalsetting (page 23). Follow the steps below.Note that this operation is possible only whenthe player is stopped.
1 Press (SETUP).
2 Press M or m button repeatedly to select“LOAD SETUP DEF,” then press (ENTER).
3 Press (SETUP) to exit the SYSTEM menu.
Settings for DVD playback— DVD SETUP menu
Selecting the audio languagefor DVD — AUDIO
Some DVDs have multiple audio languagesyou can select from.
1 Press (SETUP), then press < or ,button repeatedly until “DVD SETUP”menu appears on the screen.
2 Press M or m button repeatedly to select“AUDIO.”
3 Press < or , button repeatedly toselect the language, then press (ENTER).When you have selected “OTHER,” press Mor m button repeatedly to select “AUDIOCODE,” then enter the language code (page37).
4 Press (SETUP) to exit the DVD SETUPmenu.
Notes• Regardless of setting to the desired language,
other language may be automatically activated,depending on the DVD.
• Some DVDs are prohibited to change the audiolanguage output, even if multiple languages arerecorded.
23
Displaying the subtitles forDVD — SUBTITLE
If subtitles are recorded on the discs, you canchange the subtitles or turn the subtitles onand off.
1 Press (SETUP), then press < or ,button repeatedly until “DVD SETUP”menu appears on the screen.
2 Press M or m button repeatedly to select“SUBTITLE.”
3 Press < or , button repeatedly toselect the language, then press (ENTER).When you have selected “OTHER,” press Mor m button repeatedly to select “SUBTITLECODE,” then enter the language code (page37).
4 Press (SETUP) to exit the DVD SETUPmenu.
NoteRegardless of setting to the desired language,other language may be automatically activated,depending on the DVD.
Setting the aspect ratio forthe TV screen — TV SCREEN
When you connect the player to a TV to watchthe DVD on TV screen, make this settingaccording to the type of the TV screen.
1 Press (SETUP), then press < or ,button repeatedly until “DVD SETUP”menu appears on the screen.
2 Press M or m button repeatedly to select“TV SCREEN.”
3 Press < or , button repeatedly toselect “4:3 PS,” “4:3 LB,” or “16:9,” thenpress (ENTER).
4 Press (SETUP) to exit the DVD SETUPmenu.
Displaying the multi-anglenotice — ANGLE MARK
If various angles (multi-angles) for a scene arerecorded on the DVD and you have set the“ANGLE MARK” to “ON,” a notice appears atthe scene.
1 Press (SETUP), then press < or ,button repeatedly until “DVD SETUP”menu appears on the screen.
2 Press M or m button repeatedly to select“ANGLE MARK.”
3 Press < or , button repeatedly toselect “ON,” then press (ENTER).
4 Press (SETUP) to exit the DVD SETUPmenu.
To turn off the angle markSelect “OFF” in step 3.
Preparing for the initialparental setting — PARENTALCONTROL
Playback of some DVDs can be limitedaccording to a predetermined level, such as theage of the viewer. The Parental controlfunction allows you to set a playbacklimitation level.This setting is possible only when a passwordis entered as described in “Setting thepassword” (page 24).
1 Press (SETUP), then press < or ,button repeatedly until “DVD SETUP”menu appears on the screen.
2 Press M or m button repeatedly to select“PARENTAL CONTR.”
3 Press < or , button repeatedly toselect the limitation level, then press(ENTER).
4 Press (SETUP) to exit the DVD SETUPmenu.
continue to next page t
24
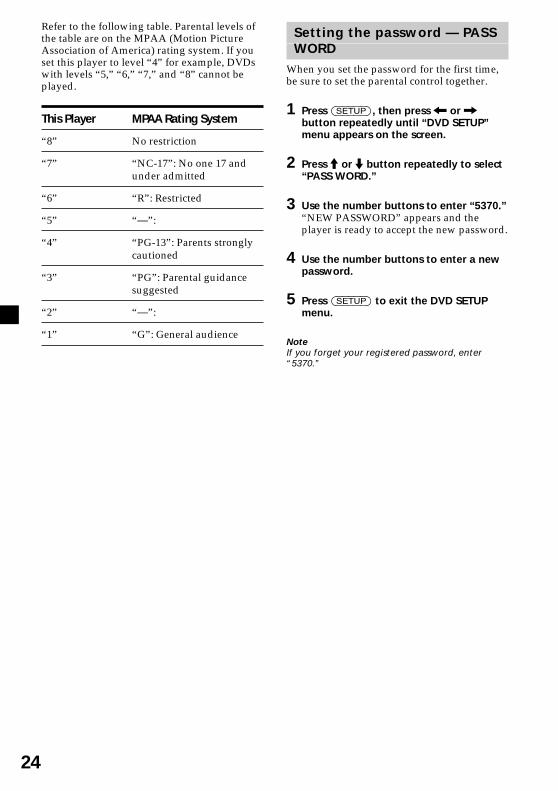
Refer to the following table. Parental levels ofthe table are on the MPAA (Motion PictureAssociation of America) rating system. If youset this player to level “4” for example, DVDswith levels “5,” “6,” “7,” and “8” cannot beplayed.
This Player MPAA Rating System
“8” No restriction
“7” “NC-17”: No one 17 andunder admitted
“6” “R”: Restricted
“5” “—”:
“4” “PG-13”: Parents stronglycautioned
“3” “PG”: Parental guidancesuggested
“2” “—”:
“1” “G”: General audience
Setting the password — PASSWORD
When you set the password for the first time,be sure to set the parental control together.
1 Press (SETUP), then press < or ,button repeatedly until “DVD SETUP”menu appears on the screen.
2 Press M or m button repeatedly to select“PASS WORD.”
3 Use the number buttons to enter “5370.”“NEW PASSWORD” appears and theplayer is ready to accept the new password.
4 Use the number buttons to enter a newpassword.
5 Press (SETUP) to exit the DVD SETUPmenu.
NoteIf you forget your registered password, enter“5370.”
25
Selecting the speakermode — SPEAKER menu
Selecting the downmix mode— DOWNMIX
You can select the downmix mode from“STEREO” or “LT/RT.” The downmixfunction is used to create stereo (2-channel)signals from more than 5 separated digitalsignals of a source.STEREO: Select this when the connected audio
equipment does not support DolbySurround (Pro Logic).
LT/RT: Select this when the connected audioequipment supports Dolby Surround(Pro Logic).
1 Press (SETUP), then press < or ,button repeatedly until “SPEAKER” menuappears on the screen.
2 Press M or m button repeatedly to select“DOWNMIX.”
3 Press < or , button repeatedly toselect “STEREO” or “LT/RT,” then press(ENTER).
4 Press (SETUP) to exit the SPEAKERmenu.
Selecting the digital audiooutput mode — AUDIO menu
You can set the mode of the audio signalsoutput from the OPTICAL OUTPUTconnector. “BITSTREAM” or “LPCM 48K” canbe selected.
1 Press (SETUP), then press < or ,button repeatedly until “AUDIO” menuappears on the screen.
2 Press M or m button repeatedly to select“DIGITAL OUTPUT.”
3 Press < or , button repeatedly toselect “BITSTREAM,” “LPCM 48K,” or“OFF,” then press (ENTER).
4 Press (SETUP) to exit the AUDIO menu.
Notes• When “OFF” is selected, no signal is output from
the OPTICAL OUTPUT connector.• When you connect the player and a digital
recording device such as an MD player throughan optical cable to record the CD contents withthat device, the contents will be recorded as onecontinuous track.
26
Selecting the color systemfor the output videosignal — VIDEO menu
When you connect the player to a TV to watchthe DVD on TV screen, make this settingaccording to the color system of your country.Note that this setting does not affect the screenof the player.AUTO: Changes the color system for the video
signal output from the playerautomatically according to the colorsystem recorded on the DVD.
NTSC: Always outputs the NTSC signal.PAL: Always outputs the PAL signal.
1 Press (SETUP), then press < or ,button repeatedly until “VIDEO” menuappears on the screen.
2 Press M or m repeatedly to select “COLORSYSTEM.”
3 Press < or , button repeatedly toselect “AUTO,” “NTSC,” or “PAL,” thenpress (ENTER).
4 Press (SETUP) to exit the VIDEO menu.
Monitoring video signalsinput from the connecteddeviceSwitch the input channel to monitor videosignals input from the device connected to theVIDEO INPUT connector of the player.
1 Press (POWER) to turn on the player.The current input channel (DVD) appearson the screen for 5 seconds.
2 Press (INPUT) repeatedly to select“VIDEO.”Each time you press the button, “DVD” and“VIDEO” alternate.
Be sure to change the input channel settingto “DVD” to play the DVD with this player.
27
Selecting the color systemfor the input video signalThe player detects the color system of theinput video signal (NTSC or PAL) and changesthe setting automatically (auto mode).Do the steps below to change the color systemsetting for the input video signal manually.
1 Press (POWER) to turn on the player.The current input channel (DVD) appearson the screen for 5 seconds.
2 Press (VOL) +/– on the monitorrepeatedly to select “NTSC” or “PAL.”
NoteWhen changed manually, color system setting forthe input video signal does not return to automode until the player is turned off or inputchannel setting is changed. Therefore, when it isset to “PAL,” the DVD recorded in NTSC systemcannot be viewed on the monitor of the playerunless you turn off the player, then turn it onagain.
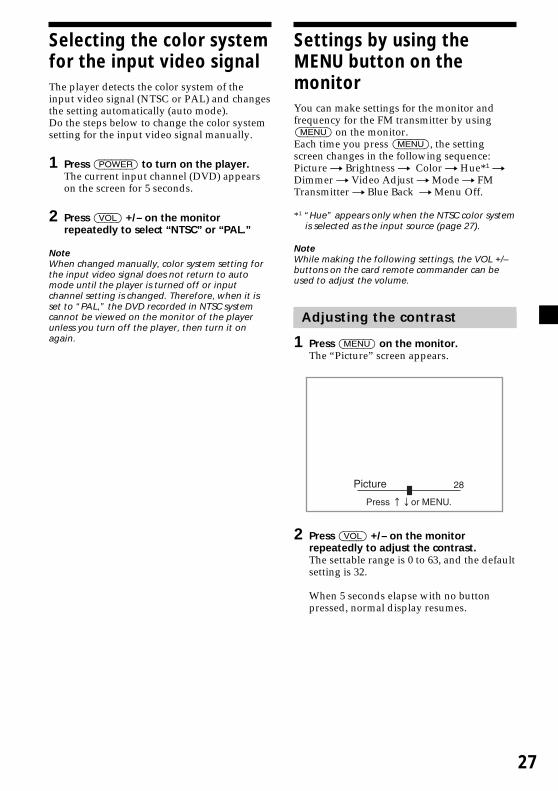
Settings by using theMENU button on themonitorYou can make settings for the monitor andfrequency for the FM transmitter by using(MENU) on the monitor.Each time you press (MENU), the settingscreen changes in the following sequence:Picture t Brightness t Color t Hue*1 tDimmer t Video Adjust t Mode t FMTransmitter t Blue Back t Menu Off.
*1 “Hue” appears only when the NTSC color systemis selected as the input source (page 27).
NoteWhile making the following settings, the VOL +/–buttons on the card remote commander can beused to adjust the volume.
Adjusting the contrast
1 Press (MENU) on the monitor.The “Picture” screen appears.
2 Press (VOL) +/– on the monitorrepeatedly to adjust the contrast.The settable range is 0 to 63, and the defaultsetting is 32.
When 5 seconds elapse with no buttonpressed, normal display resumes.
28
Adjusting the brightness
1 Press (MENU) on the monitor repeatedlyuntil the “Brightness” appears.
2 Press (VOL) +/– on the monitorrepeatedly to adjust the brightness.The settable range is 0 to 63, and the defaultsetting is 30.
When 5 seconds elapse with no buttonpressed, normal display resumes.
Adjusting the color
1 Press (MENU) on the monitor repeatedlyuntil the “Color” appears.
2 Press (VOL) +/– on the monitorrepeatedly to adjust the color.The settable range is 0 to 63, and the defaultsetting is 32.
When 5 seconds elapse with no buttonpressed, normal display resumes.
Adjusting the hue (NTSConly)
1 Press (MENU) on the monitor repeatedlyuntil the “Hue” appears.
2 Press (VOL) +/– on the monitorrepeatedly to adjust the color.The default setting is “CTR” (center).
When 5 seconds elapse with no buttonpressed, normal display resumes.
Adjusting the dimmer
1 Press (MENU) on the monitor repeatedlyuntil the “Dimmer” appears.
2 Press (VOL) +/– on the monitorrepeatedly to select “On” or “Off.”The default setting is “Off.”
When 5 seconds elapse with no buttonpressed, normal display resumes.
Resetting the adjustmentsYou can reset the picture, brightness, color,hue, dimmer settings at single operation.
1 Press (MENU) on the monitor repeatedlyuntil the “Video Adjust” appears.
2 Press (VOL) +/– on the monitor to resetthe settings.
When 5 seconds elapse with no buttonpressed, normal display resumes.
NoteInput channel, color system for the input videosignal (NTSC/PAL), screen mode, and bluebackground setting are not reset when you do thesteps above.
Setting the screen modeThe screen mode can be selected from the foursettings below:Normal: An image with an aspect ratio of 4 to
3 (regular image).Full: An image with an aspect ratio of 4 to
3 enlarged to the left and right edgesof the screen.
Zoom: An image with an aspect ratio of 4 to3 enlarged to the left and right edgesof the screen, with the overflowingparts (top and bottom) cut off to fillthe screen.
Wide: An image with an aspect ratio of 16to 9.
1 Press (MENU) on the monitor repeatedlyuntil the “Mode” appears.
2 Press (VOL) +/– on the monitorrepeatedly to select the screen mode.The default setting is “Full.”
When 5 seconds elapse with no buttonpressed, normal display resumes.
29
Setting the FM transmitterWhen using the player in the car, you cantransmit the audio signals to the FM radio andoutput the signals from the car stereo. Do theprocedure below to turn on or off the FMtransmitter and select the frequency.
1 Press (MENU) on the monitor repeatedlyuntil the “FM Transmitter” appears.
2 Press (VOL) +/– on the monitor to select“On” or “Off.”The default setting is “On.”
3 To select the frequency, press (REVERSE)on the monitor.“Frequency” screen appears.
4 Press (VOL) +/– on the monitor to selectthe frequency.The settable range is 88.3 MHz to 89.9 MHz,in 0.2-MHz steps.
5 Press (REVERSE) on the monitor toreturn to “FM Transmitter” screen.
When 5 seconds elapse with no buttonpressed, normal display resumes.
Notes• If headphones are connected to the player, FM
transmitter function does not work even when“On” is selected.
• Depending on the location in which this player isattached, FM signals may not reach the car radioand audio output from the car stereo maybecome interrupted. If this happens, adjust theposition of the FM transmission antenna or movethe reception antenna of the car radio closer tothe player.
• If noise is heard due to the interference with thelocal FM broadcast, change the FM transmissionfrequency.
• When the FM transmitter is turned off, youcannot change the frequency setting.
Setting the blue backgroundscreen
When this item is set to “On,” the bluebackground screen appears when no videosignal is received.
1 Press (MENU) on the monitor repeatedlyuntil the “Blue Back” appears.
2 Press (VOL) +/– on the monitor to select“On” or “Off.”The default setting is “Off.”
When 5 seconds elapse with no buttonpressed, normal display resumes.
Exiting the menu operation
1 Press (MENU) on the monitor repeatedlyuntil the “Menu Off” appears.
2 Press (MENU) on the monitor again.The normal screen resumes.
When 5 seconds elapse with no buttonpressed, normal display resumes.
30
Setting the referencevolumeYou can set the reference volume level foradjusting the volume by using (VOL) +/– onboth the monitor and the card remotecommander.
Press (POWER) and press (VOL) +/– onthe monitor while no menu screenappears.The settable range is 0 to 47, and the defaultsetting is 10.When you keep pressing down the button,the value changes continuously.
Turning the image upsidedownTo use the player in upright position, do thefollowing steps to turn the images on themonitor upside down and switch the audiochannels.
Press (REVERSE) on the monitor.“Reverse On” appears for 5 seconds and theimage on the monitor turns upside down.
To resume the normal images, press(REVERSE) on the monitor again.“Reverse Off” appears for 5 seconds.
31
Additionalinformation
Maintenance
Fuse replacementWhen replacing the fuse of the power cord forthe cigar lighter socket, be sure to use onematching the amperage rating stated on theoriginal fuse. If the fuse blows, check thepower connection and replace the fuse. If thefuse blows again after replacement, there maybe an internal malfunction. In such a case,consult your nearest Sony dealer.
x
WarningNever use a fuse with an amperage ratingexceeding the one supplied with the player asthis could damage the player.
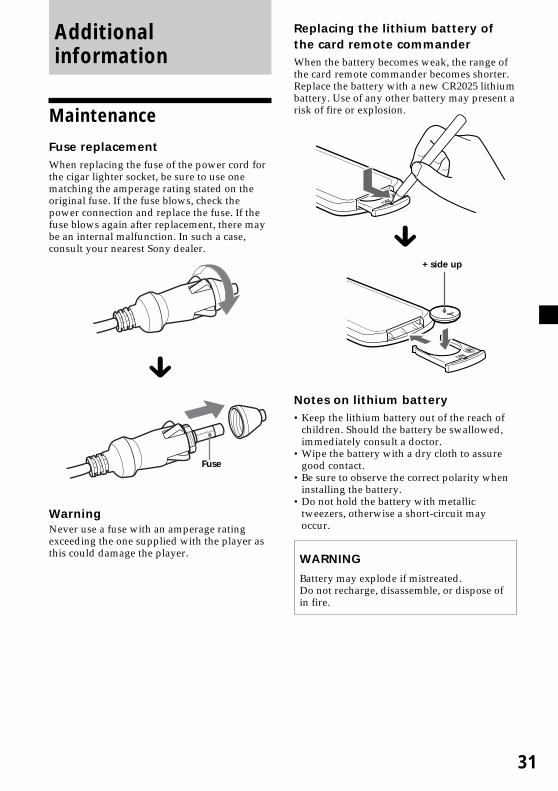
Replacing the lithium battery ofthe card remote commanderWhen the battery becomes weak, the range ofthe card remote commander becomes shorter.Replace the battery with a new CR2025 lithiumbattery. Use of any other battery may present arisk of fire or explosion.
x
Notes on lithium battery•Keep the lithium battery out of the reach of
children. Should the battery be swallowed,immediately consult a doctor.
•Wipe the battery with a dry cloth to assuregood contact.
•Be sure to observe the correct polarity wheninstalling the battery.
•Do not hold the battery with metallictweezers, otherwise a short-circuit mayoccur.
WARNING
Battery may explode if mistreated.Do not recharge, disassemble, or dispose ofin fire.
+ side up
Fuse
32
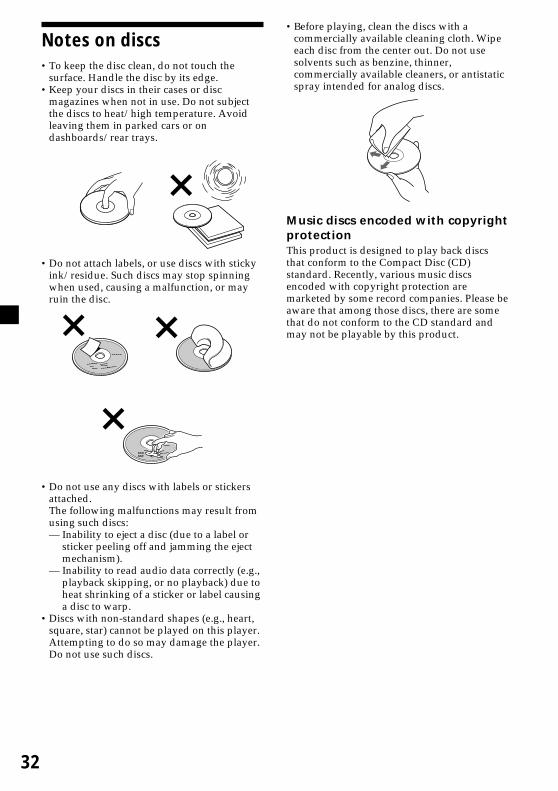
Notes on discs•To keep the disc clean, do not touch the
surface. Handle the disc by its edge.•Keep your discs in their cases or disc
magazines when not in use. Do not subjectthe discs to heat/high temperature. Avoidleaving them in parked cars or ondashboards/rear trays.
•Do not attach labels, or use discs with stickyink/residue. Such discs may stop spinningwhen used, causing a malfunction, or mayruin the disc.
•Do not use any discs with labels or stickersattached.The following malfunctions may result fromusing such discs:— Inability to eject a disc (due to a label or
sticker peeling off and jamming the ejectmechanism).
— Inability to read audio data correctly (e.g.,playback skipping, or no playback) due toheat shrinking of a sticker or label causinga disc to warp.
•Discs with non-standard shapes (e.g., heart,square, star) cannot be played on this player.Attempting to do so may damage the player.Do not use such discs.
•Before playing, clean the discs with acommercially available cleaning cloth. Wipeeach disc from the center out. Do not usesolvents such as benzine, thinner,commercially available cleaners, or antistaticspray intended for analog discs.
Music discs encoded with copyrightprotectionThis product is designed to play back discsthat conform to the Compact Disc (CD)standard. Recently, various music discsencoded with copyright protection aremarketed by some record companies. Please beaware that among those discs, there are somethat do not conform to the CD standard andmay not be playable by this product.
33
About MP3 filesMP3 (MPEG 1 Audio Layer-3) is a standardtechnology and format for compressing asound sequence. The file is compressed toabout 1/10 of its original size. Sounds outsidethe range of human hearing are compressedwhile the sounds we can hear are notcompressed.
Recommended MP3 file format
Sampling frequency 32k, 44.1k, 48k(Hz)
Bitrate (bps) 128k
Notes on discsYou can play MP3 files recorded on CD-ROMs,CD-Rs, and CD-RWs.The disc must be in the ISO 9660* level 1 orlevel 2 format, or Joliet in the expansionformat.
* ISO 9660 FormatThe most common international standardfor the logical format of files and folders ona CD-ROM.There are several specification levels. InLevel 1, file names must be in the 8.3 format(no more than 8 characters in the name, nomore than 3 characters in the extension“.MP3”) and in capital letters. Folder namescan be no longer than 8 characters. There canbe no more than 8 nested folder levels. Level2 specifications allow file names up to 31characters long.Each folder can have up to 8 trees.For Joliet in the expansion format, make sureof the contents of the writing software, etc.
Notes• With formats other than ISO 9660 level 1 and
level 2, folder names or file names may not bedisplayed correctly.
• When naming, be sure to add the file extension“.MP3” to the file name.
• If you put the extension “.MP3” to a file otherthan MP3, the player cannot recognize the fileproperly and will generate random noise thatcould damage your speakers.
• The following discs take a longer time to startplayback.— a disc recorded with complicated tree
structure.— a disc to which data can be added.
• A high-bit rate MP3 file such as 320 kbps may notplay back properly.
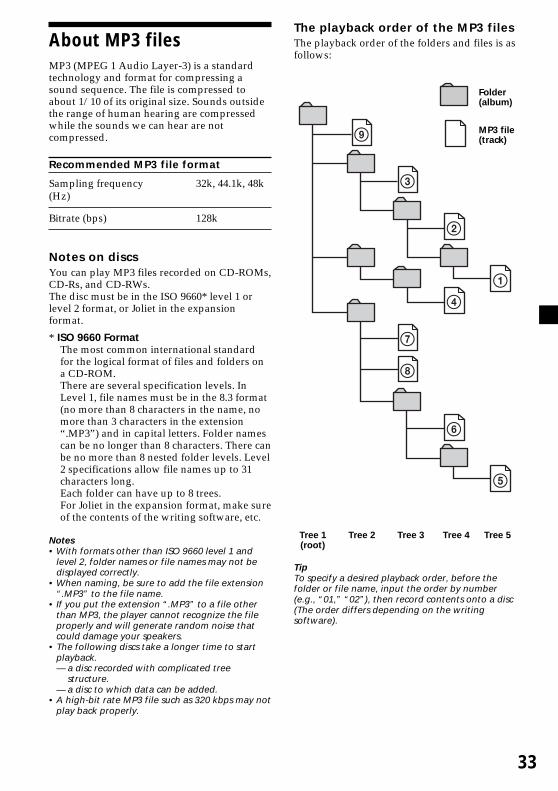
The playback order of the MP3 filesThe playback order of the folders and files is asfollows:
9
3
7
8
2
4
6
1
5
Tree 1 Tree 2 Tree 3 Tree 4 Tree 5(root)
TipTo specify a desired playback order, before thefolder or file name, input the order by number(e.g., “01,” “02”), then record contents onto a disc(The order differs depending on the writingsoftware).
Folder(album)
MP3 file(track)
34
Specifications
SystemLaser Semiconductor laserSignal format system NTSC/PAL
Audio characteristicsFrequency response 20 Hz to 20 kHzSignal to noise ratio 90dB (A)Harmonic distortion 0.03 %Dynamic range 90dBWow and flutter below measurable limits
(±0.001% W PEAK)
GeneralOutputs Audio output
Video outputOptical outputHeadphones output
Inputs Audio inputVideo inputDC 12V input
Power requirements 12 V DCDimensions Approx. 188 × 99 × 241 mm
(7 1/2 × 4 × 9 1/2 in)(w/h/d)
Mass Approx. 2.3 kg(5 lb 1 oz)
Operating temperature 0 ˚C to 45 ˚C(32 ˚F to 113 ˚F)
Supplied accessories Mounting straps (4)AC power adaptor (1)(including AC power cord(1))Power cord for the cigarlighter socket (1)Antenna for FMtransmission (1)Card remote commander RM-X137 (includinglithium battery (1))Carrying bag (1)Operating Instructions (1)
MonitorSystem Liquid crystal color displayDisplay Manual flipdown panelDrive system TFT-LCD active matrix
systemPicture size 6.5 inches wide screen
(16:9)Picture segment 280,800 (w 1200 × h 234)
dots
Design and specifications are subject to changewithout notice.
35
TroubleshootingThe following checklist will help you remedyproblems you may encounter with the player.Before going through the checklist below,check the connection and operatingprocedures.
General
This player does not turn on.•Check that the AC power adaptor or the
power cord for the cigar lighter socket isconnected correctly.
•If the power cord for the cigar lightersocket is used, check the fuse.t If the fuse is blown, replace it with a
correctly rated fuse.t If the fuse blows again, consult your
nearest Sony dealer.•The player may be overheated.t Make sure that the player is turned off.
Wait until the player cools off, thenpress (POWER) again.
Disc playback
A disc cannot be loaded.•Another disc is already loaded.•The disc is forcibly inserted upside down
or in the wrong way.
MP3 files cannot be played back.•Recording was not performed according to
the ISO 9660 level 1 or level 2 format, orthe Joliet convention in the expansionformat.
•The file extension “.MP3” is not added tothe file name.
•Files are not stored in MP3 format.
MP3 files take longer to play back thanothers.
The following discs take a longer time tostart playback.
— a disc recorded with a complicated treestructure.
— a disc to which data can be added.
Playback functions such as pause aredeactivated.
•The RESET button has been pressed.•The disc is ejected.
The sound skips.•Dirty or defective disc.•The player is installed in the place subject
to severe vibrations.
continue to next page t
Picture
There is no picture.•Color system setting has been changed
manually while playing a DVD.t Change the setting according to the
color system of the DVD, turn off theplayer and turn it on again, or switchthe input channel to “VIDEO,” thenswitch it to “DVD.”
•Check that the device connected to theAUDIO/VIDEO INPUT connectors isconnected correctly.
•If there is no picture on the TV screen, etc.connected to the player, check that thedevice connected to the AUDIO/VIDEOOUTPUT connectors is connectedcorrectly.
Picture noise appears.•Dirty or defective disc.•The player is installed in the place subject
to severe vibrations.
Operation
The card remote commander does notfunction.
•Remove any obstacles between the cardremote commander and this player.
•Use the card remote commander closer tothe remote control sensor.
•Point the light emitter of the commander atthe remote control sensor of the player.
•Replace the battery in the remote if it isweak.
The player does not play from thebeginning when playing a disc.
•Resume Playback may be activated.t Press x again or eject the disc.
•Depending on the DVD, a title menu or aDVD menu may automatically appear onthe monitor during playback.t Select the desired menu (page 18).
•Depending on the Video CD, the PBCmenu display automatically appears on themonitor during playback.t Select the desired menu (page 20).
36
Playback stops automatically.The disc may contain an auto pause signal.While playing such a disc, this player stopsplayback at the signal.
You cannot perform certain functions, suchas Stop or Search Playback.
With some discs, you cannot activate thesefunctions.
The language for the sound track cannot bechanged when you play a DVD.
• Multilingual tracks are not recorded onthe DVD.
• Changing the language for the track isprohibited on the DVD.
The subtitle language cannot be changedwhen you play a DVD.
•Multilingual subtitles are not recorded onthe DVD.
•Changing the language for the subtitles isprohibited on the DVD.
The subtitles cannot be turned off whenyou play a DVD.
Depending on the DVD, you may not beable to turn the subtitles off.
The angles cannot be changed when youplay a DVD.
•Multi-angles are not recorded on the DVD.•Change the angles at a scene recorded with
multiple angles (page 19).•Changing the angles is prohibited on the
DVD.
This player does not operate properly.Static electricity, etc., may affect this player’soperation.t Turn off the player, allow the player to
cool, then press (POWER) again.
Error display
Error displaysThe following indications will be displayed forabout 8 seconds.
POWER OFF OVERHEATThe player may be overheated.tAllow the player to cool off, then press(POWER) again.
REGION ERRORThe region code of the DVD currently in theplayer does not conform to the player.tMake sure the region code of the DVD
and the player (page 6).
DISC ERROR•The data recorded on the disc is damaged.•The player does not support the format in
which the data is recorded to the disc.
The operation cannot be done.
37
Language Code ListThe language spellings conform to the ISO 639: 1988 (E/F) standard.
Code Language Code Language Code Language Code Language
6565 Afar 7089 Frisian 7771 Malagasy 8382 Serbian6566 Abkhazian 7165 Irish 7773 Maori 8385 Sundanese6570 Afrikaans 7168 Scots/Gaelic 7775 Macedonian 8386 Swedish6577 Amharic 7176 Gallcian 7776 Malayalam 8387 Swahili6582 Arabic 7178 Guarani 7778 Mongolian 8465 Tamil6583 Assamese 7185 Gujarati 7779 Moldavian 8469 Tegule6588 Aymara 7265 Hausa 7782 Marathi 8471 Tajik6590 Azerbaijani 7273 Hindi 7783 Malay 8472 Thai6665 Bashkir 7282 Croatian 7784 Maltese 8473 Tigrinya6669 Byelorussian 7285 Hungarian 7789 Burmese 8475 Turkmen6671 Bulgarian 7289 Armenian 7865 Nauru 8476 Tagalog6672 Bislama 7365 Interlingua 7869 Nepali 8479 Tonga6678 Bengali 7378 Indonesian 7876 Dutch 8482 Turkish6679 Tibetan 7383 Icelandic 7879 Norwegian 8484 Tatar6682 Breton 7384 Italian 7982 Oriya 8487 Twi6765 Catalan 7387 Hebrew 8065 Punjabi 8575 Ukrainian6779 Corsican 7465 Japanese 8076 Polish 8582 Urdu6783 Czech 7473 Yiddish 8083 Pushto/Pashto 8590 Uzbek6789 Welsh 7487 Javanese 8084 Portuguese 8673 Vietnamese6865 Danish 7565 Georgian 8185 Quechua 8679 Volapük6869 German 7575 Kazakh 8277 Raeto-Romance 8779 Wolof6890 Bhutani 7576 Greenlandic 8279 Romanian 8872 Xhosa6976 Greek 7577 Cambodian 8285 Russian 8979 Yoruba6978 English 7578 Kannada 8365 Kinyarwanda 9072 Chinese6979 Esperanto 7579 Korean 8368 Sanskrit 9085 Zulu6983 Spanish 7583 Kashmiri 8372 Serbo-Croatian6984 Estonian 7585 Kurdish 8373 Sinhalese6985 Basque 7589 Kirghiz 8375 Slovak7065 Persian 7665 Latin 8376 Slovenian7073 Finnish 7678 Lingala 8377 Samoan7074 Fijian 7679 Laotian 8378 Shona7079 Faroese 7684 Lithuanian 8379 Somali7082 French 7686 Latvian Lettish 8381 Albanian
2
AdvertenciaSe le advierte de que la realización de cambioso modificaciones no aprobados explícitamenteen este manual puede anular su autorizaciónpara utilizar este equipo.
CAUTION INVISIBLEDO NOT STARE INTO BEAM OR
VIEW DIRECTLY WITH OPTICAL INSTRUMENTS
LASER RADIATION WHEN OPEN
Esta etiqueta está situada en el chasis interno de la unidad de activación.
Esta etiqueta está situada en la parte inferior del chasis.
3
Índice
Bienvenido ............................................................ 4Precauciones ......................................................... 4Acerca de este manual ......................................... 5Discos compatibles con este reproductor ......... 6Conexión ............................................................... 8Reinicio del reproductor ................................... 10Ubicación de los controles ................................ 11
Diversas funciones dereproducción
Reproducción de discos .................................... 13Búsqueda directa de capítulos/títulos/
pistas ................................................................ 14Reanudación de la reproducción ....................... 15Uso del menú MP3/JPG ..................................... 15
Visualización del tiempo transcurrido ............ 16Cambio del idioma de los subtítulos ............... 17Uso de un menú DVD ....................................... 18
Uso del botón TOP MENU ................................. 18Uso del botón MENU .......................................... 18
Cambio del idioma del audio ........................... 19Cambio del ángulo ............................................. 19Cambio de la salida de audio ........................... 20Uso de la función PBC
(control de reproducción) ............................ 20
Cambio de la configuraciónAjustes del sistema — Menú SYSTEM ............ 21
Selección del idioma de los menús— OSD LANGUAGE ..................................... 21
Ajuste del salvapantallas— SCREEN SAVER ........................................ 22
Restauración de los ajustes de fábrica delreproductor— LOAD SETUP DEF .................................... 22
Ajustes para la reproducción de DVD— Menú DVD SETUP .................................. 22Selección del idioma del audio de un DVD
— AUDIO ........................................................ 22Visualización de los
subtítulos de un DVD—SUBTITLE .................................................... 23
Ajuste del formato de la pantalla del televisor— TV SCREEN ............................................... 23
Visualización del aviso de varios ángulos— ANGLE MARK .......................................... 23
Preparación del ajuste inicial de la función decontrol de bloqueo— PARENTAL CONTROL ........................... 23
Ajuste de la contraseña — PASS WORD .......... 24Selección del modo de altavoz
— Menú SPEAKER ....................................... 25Selección del modo de mezcla
— DOWNMIX ................................................ 25Selección del modo de salida de audio digital
— Menú AUDIO ........................................... 25Selección del sistema de color para la señal de
salida de video — Menú VIDEO ................ 26
Control de las señales de video recibidas desdeel dispositivo conectado .............................. 26
Selección del sistema de color de la señal deentrada de video ........................................... 27
Ajustes con el botón MENU del monitor ....... 27Ajuste del contraste ............................................. 27Ajuste del brillo .................................................... 28Ajuste del color .................................................... 28Ajuste del tono (sólo NTSC) ............................... 28Ajuste del atenuador ........................................... 28Restauración de los ajustes ................................. 28Ajuste del modo de pantalla .............................. 28Ajuste del transmisor de FM .............................. 29Ajuste de la pantalla de fondo azul ................... 29Salir de las funciones de menú .......................... 29
Inversión de la imagen ...................................... 30Ajuste del volumen de referencia .................... 30
Información adicionalMantenimiento ................................................... 31Notas sobre los discos ....................................... 32Acerca de los archivos MP3 .............................. 33Especificaciones .................................................. 34Solución de problemas ...................................... 35Indicaciones de error ......................................... 36Lista de códigos de idiomas ............................. 37
4
PrecaucionesPara evitar el riesgo de lesiones graves oaccidentes, lea las siguientes advertenciasantes de instalar y poner en funcionamiento elreproductor.
SeguridadNo coloque ningún objeto extraño en la tomaDC IN 12V.
Fuentes de alimentación•Utilice la corriente doméstica o la batería del
automóvil (cc de 12 V).•Si utiliza la unidad en su casa, emplee el
adaptador de alimentación de casuministrado con el reproductor. No utiliceningún otro adaptador de alimentación de ca,ya que puede causar un mal funcionamientodel reproductor.
•Conecte el adaptador de alimentación de ca aun tomacorriente de ca de fácil acceso. Siobserva alguna anomalía en el adaptador dealimentación de ca, desconécteloinmediatamente del tomacorriente de ca.
•El reproductor no estará desconectado de lafuente de alimentación de ca (corriente)mientras esté conectado a un tomacorrientede pared, aunque haya sido apagado.
•Cuando no vaya a emplear el reproductordurante un largo período de tiempo,asegúrese de desconectarlo de la fuente dealimentación (adaptador de alimentación deca o cable de la batería del automóvil). Pararetirar el adaptador de alimentación de ca deltomacorriente de pared, tire del enchufe,nunca del cable.
Acumulación de calorSe puede acumular calor en el reproductor sise utiliza durante un período de tiempoprolongado. Sin embargo, no se trata de unafalla de funcionamiento.
Para la seguridad del conductorRespete las leyes y normas de tránsito locales.
•Mientras conduce— El conductor no debe mirar ni operar el
reproductor, ya que puede causardistracciones y provocar un accidente.
Gracias por adquirir este reproductor de DVDportátil de Sony. Disfrutará aún más de susdistintas funciones con:•Reproducción de DVD/Video CD/Audio
CD.•Compatibilidad con DTS/Dolby Digital a
través de un terminal de salida digital óptica.•Reproducción de archivos MP3/JPG
(grabados en CD-ROM/CD-R/CD-RW).•Accesorio controlador suministrado
Control remoto de tarjetaRM-X137
Antes de utilizar el reproductor, leaatentamente este manual de instrucciones yconsérvelo para consultarlo en el futuro.
Derechos de autorEste producto incorpora tecnología deprotección de derechos de autor (copyright)amparada por demandas de ciertas patentes deEE.UU., otros derechos de propiedadintelectual de Macrovision Corporation y otrospropietarios. El uso de dicha tecnología debecontar con la autorización de MacrovisionCorporation y está destinado únicamente parauso doméstico y otros usos de visualizaciónlimitados, a menos que MacrovisionCorporation autorice lo contrario. Estáprohibida la ingeniería inversa o el desmontajede la unidad.
Fabricado bajo licencia de Dolby Laboratories.“Dolby”, “Pro Logic” y el símbolo de la dobleD son marcas comerciales de DolbyLaboratories. Trabajos confidenciales nopublicados.
“DTS”, “DTS Digital Surround” y “DTS DigitalOut” son marcas comerciales de DigitalTheater Systems, Inc.
¡Bienvenido!
Polaridadde laclavija
5
Acerca de este manualConvenciones•Las instrucciones de este manual describen
cómo usar el reproductor empleandoprincipalmente los controles del controlremoto inalámbrico de tarjeta suministrado.
•En este manual se utilizan los iconossiguientes:
— El conductor no debe usar los auriculares,ya que puede causar distracciones yprovocar un accidente. Estacione elautomóvil en un lugar seguro cuando elconductor desee ver y operar elreproductor o usar los auriculares.
•Cuando utilice el reproductor— No introduzca las manos, los dedos ni
objetos extraños dentro del reproductor,ya que podría provocar lesiones graves odañar el reproductor.
— Tenga especial cuidado en no enredarse elcable de los auriculares en el cuello paraevitar lesiones o asfixia en caso de que elvehículo realice un movimiento súbito.
— Mantenga los objetos pequeños fuera delalcance de los niños.
•Si el reproductor no funciona, compruebe lasconexiones primero. Si todo está en orden,compruebe el fusible.
•Si el automóvil estuvo estacionado bajo la luzdirecta del sol, deje que el reproductor seenfríe antes de utilizarlo.
•Evite instalar el reproductor en lugares:— sujetos a temperaturas inferiores a 0 °C o
superiores a 45 °C— sujetos a la luz directa del sol— cercanos a fuentes de calor (como
calefactores)— expuestos a la lluvia o la humedad— expuestos a un exceso de polvo o suciedad— expuestos a un exceso de vibraciones— expuestos al calor:
Mantenga el reproductor alejado de loscomponentes del vehículo que secalientan con el tiempo como, porejemplo, tubos, cables de alto voltaje ycomponentes del sistema de frenos.Asegúrese de dejar espacio suficiente paraque haya ventilación en las ranuras yaberturas a fin de evitar elrecalentamiento.
Ante cualquier consulta o problemarelacionados con el reproductor, póngase encontacto con el distribuidor de Sony máspróximo.
Condensación de humedadEn días lluviosos o en zonas muy húmedas, esposible que se condense humedad dentro delas lentes. Si esto ocurre, el reproductor nofuncionará correctamente. En este caso,extraiga el disco y espere una horaaproximadamente hasta que se hayaevaporado la humedad.
Para mantener una alta calidad desonidoAsegúrese de no derramar jugos ni refrescossobre el reproductor o los discos.
Icono Significado
Funciones disponibles para DVDVIDEO o DVD-R/DVD-RW enmodo video
Funciones disponibles para VideoCD o CD-R/CD-RW en formato deCD de video
Funciones disponibles para CD demúsica o CD-R/CD-RW enformato de CD de música
Funciones disponibles paraarchivos en formato MP3almacenados en CD-ROM/CD-R/CD-RW
Funciones disponibles paraarchivos en formato JPEGalmacenados en CD-ROM/CD-R/CD-RW
6
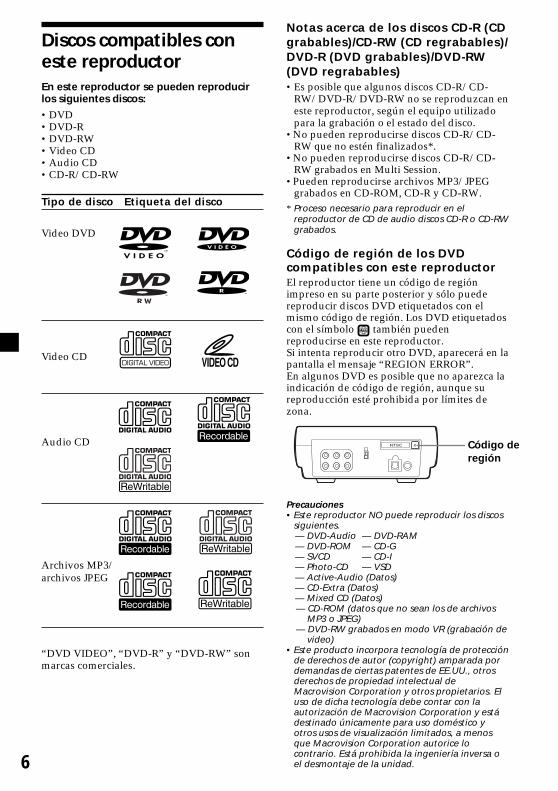
Discos compatibles coneste reproductorEn este reproductor se pueden reproducirlos siguientes discos:
•DVD•DVD-R•DVD-RW•Video CD•Audio CD•CD-R/CD-RW
Tipo de disco Etiqueta del disco
Video DVD
Video CD
Audio CD
Archivos MP3/archivos JPEG
“DVD VIDEO”, “DVD-R” y “DVD-RW” sonmarcas comerciales.
Notas acerca de los discos CD-R (CDgrabables)/CD-RW (CD regrabables)/DVD-R (DVD grabables)/DVD-RW(DVD regrabables)•Es posible que algunos discos CD-R/CD-
RW/DVD-R/DVD-RW no se reproduzcan eneste reproductor, según el equipo utilizadopara la grabación o el estado del disco.
•No pueden reproducirse discos CD-R/CD-RW que no estén finalizados*.
•No pueden reproducirse discos CD-R/CD-RW grabados en Multi Session.
•Pueden reproducirse archivos MP3/JPEGgrabados en CD-ROM, CD-R y CD-RW.
* Proceso necesario para reproducir en elreproductor de CD de audio discos CD-R o CD-RWgrabados.
Código de región de los DVDcompatibles con este reproductorEl reproductor tiene un código de regiónimpreso en su parte posterior y sólo puedereproducir discos DVD etiquetados con elmismo código de región. Los DVD etiquetadoscon el símbolo ALL también puedenreproducirse en este reproductor.Si intenta reproducir otro DVD, aparecerá en lapantalla el mensaje “REGION ERROR”.En algunos DVD es posible que no aparezca laindicación de código de región, aunque sureproducción esté prohibida por límites dezona.
Precauciones• Este reproductor NO puede reproducir los discos
siguientes.— DVD-Audio — DVD-RAM— DVD-ROM — CD-G— SVCD — CD-I— Photo-CD — VSD— Active-Audio (Datos)— CD-Extra (Datos)— Mixed CD (Datos)— CD-ROM (datos que no sean los de archivos
MP3 o JPEG)— DVD-RW grabados en modo VR (grabación de
video)• Este producto incorpora tecnología de protección
de derechos de autor (copyright) amparada pordemandas de ciertas patentes de EE.UU., otrosderechos de propiedad intelectual deMacrovision Corporation y otros propietarios. Eluso de dicha tecnología debe contar con laautorización de Macrovision Corporation y estádestinado únicamente para uso doméstico yotros usos de visualización limitados, a menosque Macrovision Corporation autorice locontrario. Está prohibida la ingeniería inversa oel desmontaje de la unidad.
Código deregión
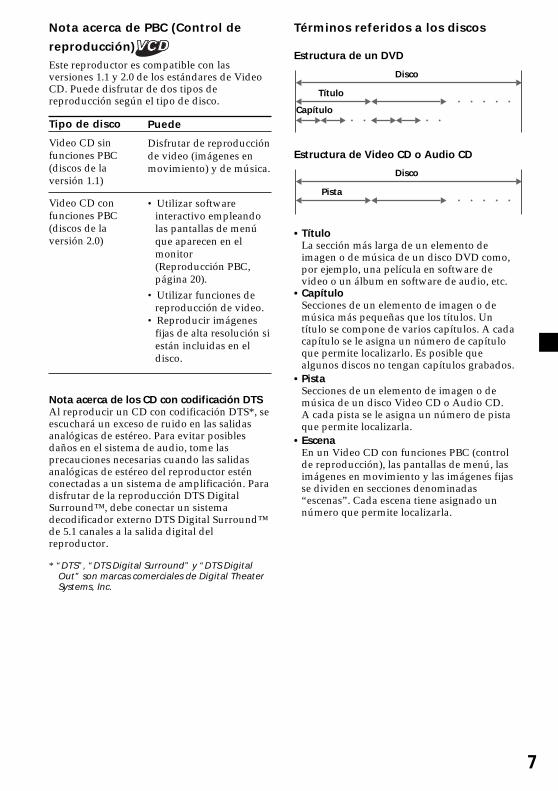
7
Nota acerca de PBC (Control de
reproducción)Este reproductor es compatible con lasversiones 1.1 y 2.0 de los estándares de VideoCD. Puede disfrutar de dos tipos dereproducción según el tipo de disco.
Tipo de disco
Video CD sinfunciones PBC(discos de laversión 1.1)
Video CD confunciones PBC(discos de laversión 2.0)
Nota acerca de los CD con codificación DTSAl reproducir un CD con codificación DTS*, seescuchará un exceso de ruido en las salidasanalógicas de estéreo. Para evitar posiblesdaños en el sistema de audio, tome lasprecauciones necesarias cuando las salidasanalógicas de estéreo del reproductor esténconectadas a un sistema de amplificación. Paradisfrutar de la reproducción DTS DigitalSurround™, debe conectar un sistemadecodificador externo DTS Digital Surround™de 5.1 canales a la salida digital delreproductor.
* “DTS”, “DTS Digital Surround” y “DTS DigitalOut” son marcas comerciales de Digital TheaterSystems, Inc.
Términos referidos a los discos
Estructura de un DVD
Disco
Título
Capítulo
Puede
Disfrutar de reproducciónde video (imágenes enmovimiento) y de música.
• Utilizar softwareinteractivo empleandolas pantallas de menúque aparecen en elmonitor(Reproducción PBC,página 20).
• Utilizar funciones dereproducción de video.
• Reproducir imágenesfijas de alta resolución siestán incluidas en eldisco.
Estructura de Video CD o Audio CD
• TítuloLa sección más larga de un elemento deimagen o de música de un disco DVD como,por ejemplo, una película en software devideo o un álbum en software de audio, etc.
• CapítuloSecciones de un elemento de imagen o demúsica más pequeñas que los títulos. Untítulo se compone de varios capítulos. A cadacapítulo se le asigna un número de capítuloque permite localizarlo. Es posible quealgunos discos no tengan capítulos grabados.
• PistaSecciones de un elemento de imagen o demúsica de un disco Video CD o Audio CD.A cada pista se le asigna un número de pistaque permite localizarla.
• EscenaEn un Video CD con funciones PBC (controlde reproducción), las pantallas de menú, lasimágenes en movimiento y las imágenes fijasse dividen en secciones denominadas“escenas”. Cada escena tiene asignado unnúmero que permite localizarla.
Pista
Disco

8
Conexión
Conectores AUDIO/VIDEO OUTPUTPuede conectar un televisor a los conectoresAUDIO/VIDEO OUTPUT para emitir elcontenido que se reproduce en el reproductor.Conecte las clavijas amarillas del cable deaudio/video a los conectores de video deltelevisor y del reproductor, y las clavijasblancas y rojas a los conectores blancos (audioizquierdo) y rojos (audio derecho)respectivamente.
Conectores AUDIO/VIDEO INPUTPuede conectar una videograbadora, etc. a losconectores AUDIO/VIDEO INPUT pararecibir el contenido que se reproduce en elreproductor. Puede conectar el dispositivo dela misma manera que se describe arriba en“Conectores AUDIO/VIDEO OUTPUT”.
Cable óptico(no suministrado) A un amplificador
digital, etc.
AUDIO/VIDEO INPUT OPTICAL OUTPUT
DC IN 12V
AUDIO/VIDEO OUTPUT
Dos conectores paralos auriculares(en el lateral)
Adaptador de alimentaciónde ca (suministrado)
Cable de audio/video(no suministrado)
Antena para latransmisión de FM
(suministrada)
Cable de alimentaciónpara la toma del
encendedor(suministrado)Televisor, etc.
A los conectoresde entrada deaudio/video
A la toma del encendedor
Si utiliza elreproductor en el
automóvil
A untomacorriente
de pared
Notas• Al conectar el otro dispositivo al reproductor,
asegúrese de conectarlo a la fuente dealimentación después de finalizar el resto deconexiones.
• Si algún objeto, como un cigarrillo, quedaatrapado dentro de la toma del encendedor, nose completa el contacto entre la clavija del cablede alimentación y la toma, y el enchufe puedecalentarse en exceso durante el uso. Paraevitarlo, compruebe la toma y, si es necesario,límpiela antes de conectar el cable dealimentación.
* Polaridad de la clavija
Este reproductor se suministra con dos tiposde cable de alimentación. Si va a utilizar elreproductor en el automóvil, conéctelo a latoma del encendedor; si lo utiliza en casa,conéctelo al tomacorriente de ca.
*
Cable de alimentaciónde ca (suministrado)
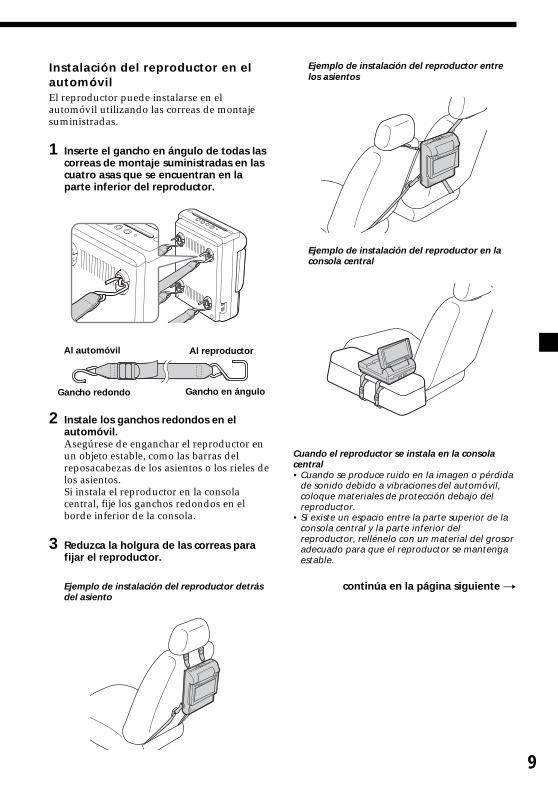
9
Instalación del reproductor en elautomóvilEl reproductor puede instalarse en elautomóvil utilizando las correas de montajesuministradas.
1 Inserte el gancho en ángulo de todas lascorreas de montaje suministradas en lascuatro asas que se encuentran en laparte inferior del reproductor.
2 Instale los ganchos redondos en elautomóvil.Asegúrese de enganchar el reproductor enun objeto estable, como las barras delreposacabezas de los asientos o los rieles delos asientos.Si instala el reproductor en la consolacentral, fije los ganchos redondos en elborde inferior de la consola.
3 Reduzca la holgura de las correas parafijar el reproductor.
Ejemplo de instalación del reproductor detrásdel asiento
Ejemplo de instalación del reproductor entrelos asientos
Ejemplo de instalación del reproductor en laconsola central
Cuando el reproductor se instala en la consolacentral• Cuando se produce ruido en la imagen o pérdida
de sonido debido a vibraciones del automóvil,coloque materiales de protección debajo delreproductor.
• Si existe un espacio entre la parte superior de laconsola central y la parte inferior delreproductor, rellénelo con un material del grosoradecuado para que el reproductor se mantengaestable.
continúa en la página siguiente t
Al automóvil Al reproductor
Gancho redondo Gancho en ángulo
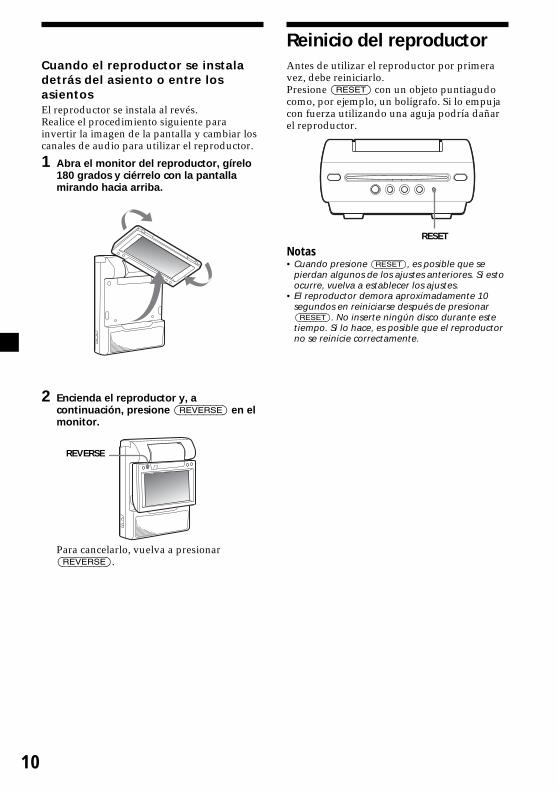
10
REVERSE
Reinicio del reproductorAntes de utilizar el reproductor por primeravez, debe reiniciarlo.Presione (RESET) con un objeto puntiagudocomo, por ejemplo, un bolígrafo. Si lo empujacon fuerza utilizando una aguja podría dañarel reproductor.
Notas• Cuando presione (RESET), es posible que se
pierdan algunos de los ajustes anteriores. Si estoocurre, vuelva a establecer los ajustes.
• El reproductor demora aproximadamente 10segundos en reiniciarse después de presionar(RESET). No inserte ningún disco durante estetiempo. Si lo hace, es posible que el reproductorno se reinicie correctamente.
RESET
Cuando el reproductor se instaladetrás del asiento o entre losasientosEl reproductor se instala al revés.Realice el procedimiento siguiente parainvertir la imagen de la pantalla y cambiar loscanales de audio para utilizar el reproductor.
1 Abra el monitor del reproductor, gírelo180 grados y ciérrelo con la pantallamirando hacia arriba.
2 Encienda el reproductor y, acontinuación, presione (REVERSE) en elmonitor.
Para cancelarlo, vuelva a presionar(REVERSE).
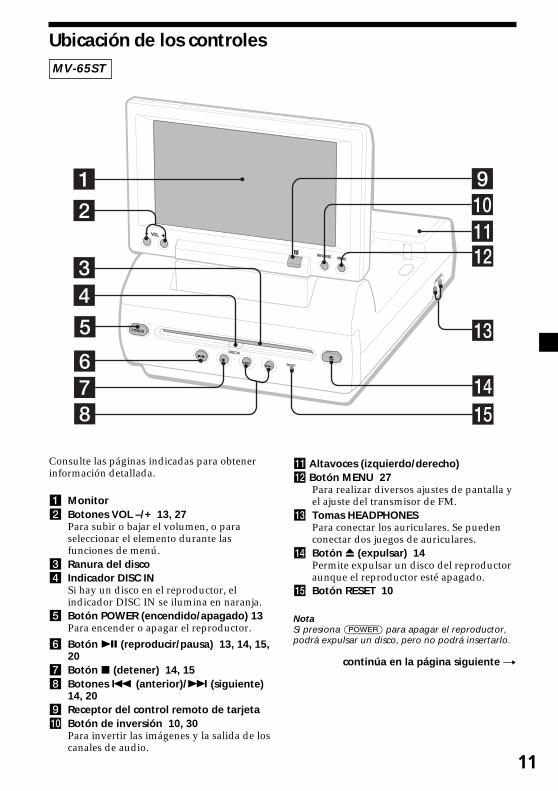
11
MV-65ST
DISC IN
RESET678
90
qa
qd
qs
qf
qg
Consulte las páginas indicadas para obtenerinformación detallada.
1 Monitor2 Botones VOL –/+ 13, 27
Para subir o bajar el volumen, o paraseleccionar el elemento durante lasfunciones de menú.
3 Ranura del disco4 Indicador DISC IN
Si hay un disco en el reproductor, elindicador DISC IN se ilumina en naranja.
5 Botón POWER (encendido/apagado) 13Para encender o apagar el reproductor.
6 Botón u (reproducir/pausa) 13, 14, 15,20
7 Botón x (detener) 14, 158 Botones . (anterior)/> (siguiente)
14, 209 Receptor del control remoto de tarjetaq; Botón de inversión 10, 30
Para invertir las imágenes y la salida de loscanales de audio.
qa Altavoces (izquierdo/derecho)qs Botón MENU 27
Para realizar diversos ajustes de pantalla yel ajuste del transmisor de FM.
qd Tomas HEADPHONESPara conectar los auriculares. Se puedenconectar dos juegos de auriculares.
qf Botón Z (expulsar) 14Permite expulsar un disco del reproductoraunque el reproductor esté apagado.
qg Botón RESET 10
NotaSi presiona (POWER) para apagar el reproductor,podrá expulsar un disco, pero no podrá insertarlo.
continúa en la página siguiente t
Ubicación de los controles
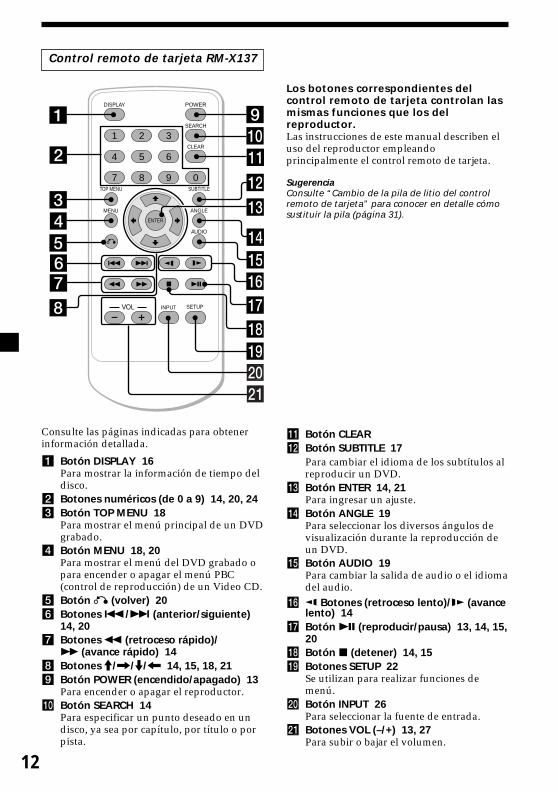
12
ENTER
SEARCH
POWERDISPLAY
CLEAR
SETUP
AUDIO
ANGLE
SUBTITLE
MENU
TOP MENU
INPUT
1 2 3
4 5 6
7 8 9 0
VOL
Consulte las páginas indicadas para obtenerinformación detallada.
1 Botón DISPLAY 16Para mostrar la información de tiempo deldisco.
2 Botones numéricos (de 0 a 9) 14, 20, 243 Botón TOP MENU 18
Para mostrar el menú principal de un DVDgrabado.
4 Botón MENU 18, 20Para mostrar el menú del DVD grabado opara encender o apagar el menú PBC(control de reproducción) de un Video CD.
5 Botón O (volver) 206 Botones ./> (anterior/siguiente)
14, 207 Botones m (retroceso rápido)/
M (avance rápido) 148 Botones M/,/m/< 14, 15, 18, 219 Botón POWER (encendido/apagado) 13
Para encender o apagar el reproductor.q; Botón SEARCH 14
Para especificar un punto deseado en undisco, ya sea por capítulo, por título o porpista.
qa Botón CLEARqs Botón SUBTITLE 17
Para cambiar el idioma de los subtítulos alreproducir un DVD.
qd Botón ENTER 14, 21Para ingresar un ajuste.
qf Botón ANGLE 19Para seleccionar los diversos ángulos devisualización durante la reproducción deun DVD.
qg Botón AUDIO 19Para cambiar la salida de audio o el idiomadel audio.
qh Botones (retroceso lento)/y (avancelento) 14
qj Botón u (reproducir/pausa) 13, 14, 15,20
qk Botón x (detener) 14, 15ql Botones SETUP 22
Se utilizan para realizar funciones demenú.
w; Botón INPUT 26Para seleccionar la fuente de entrada.
wa Botones VOL (–/+) 13, 27Para subir o bajar el volumen.
Los botones correspondientes delcontrol remoto de tarjeta controlan lasmismas funciones que los delreproductor.Las instrucciones de este manual describen eluso del reproductor empleandoprincipalmente el control remoto de tarjeta.
SugerenciaConsulte “Cambio de la pila de litio del controlremoto de tarjeta” para conocer en detalle cómosustituir la pila (página 31).
Control remoto de tarjeta RM-X137
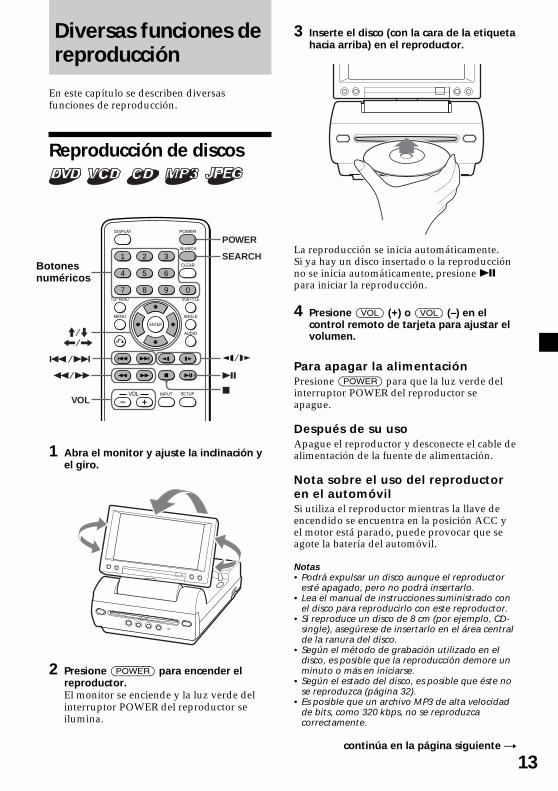
13
Diversas funciones dereproducción
En este capítulo se describen diversasfunciones de reproducción.
Reproducción de discos
ENTER
SEARCH
POWERDISPLAY
CLEAR
SETUP
AUDIO
ANGLE
SUBTITLE
MENU
TOP MENU
INPUT
1 2 3
4 5 6
7 8 9 0
VOL
./>
u
x
POWER
SEARCH
M/m</,
/y
m/M
VOL
1 Abra el monitor y ajuste la inclinación yel giro.
2 Presione (POWER) para encender elreproductor.El monitor se enciende y la luz verde delinterruptor POWER del reproductor seilumina.
Botonesnuméricos
3 Inserte el disco (con la cara de la etiquetahacia arriba) en el reproductor.
La reproducción se inicia automáticamente.Si ya hay un disco insertado o la reproducciónno se inicia automáticamente, presione upara iniciar la reproducción.
4 Presione (VOL) (+) o (VOL) (–) en elcontrol remoto de tarjeta para ajustar elvolumen.
Para apagar la alimentaciónPresione (POWER) para que la luz verde delinterruptor POWER del reproductor seapague.
Después de su usoApague el reproductor y desconecte el cable dealimentación de la fuente de alimentación.
Nota sobre el uso del reproductoren el automóvilSi utiliza el reproductor mientras la llave deencendido se encuentra en la posición ACC yel motor está parado, puede provocar que seagote la batería del automóvil.
Notas• Podrá expulsar un disco aunque el reproductor
esté apagado, pero no podrá insertarlo.• Lea el manual de instrucciones suministrado con
el disco para reproducirlo con este reproductor.• Si reproduce un disco de 8 cm (por ejemplo, CD-
single), asegúrese de insertarlo en el área centralde la ranura del disco.
• Según el método de grabación utilizado en eldisco, es posible que la reproducción demore unminuto o más en iniciarse.
• Según el estado del disco, es posible que éste nose reproduzca (página 32).
• Es posible que un archivo MP3 de alta velocidadde bits, como 320 kbps, no se reproduzcacorrectamente.
continúa en la página siguiente t
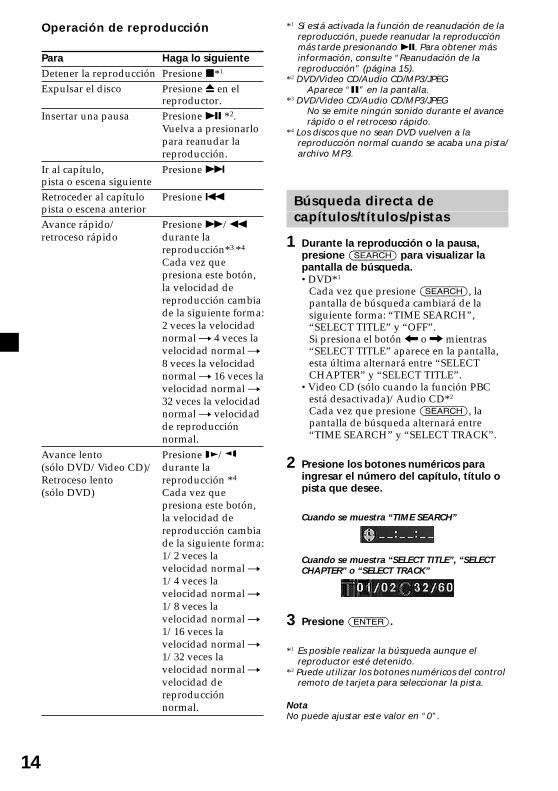
14
Operación de reproducción
Para Haga lo siguienteDetener la reproducción Presione x*1
Expulsar el disco Presione Z en elreproductor.
Insertar una pausa Presione u *2.Vuelva a presionarlopara reanudar lareproducción.
Ir al capítulo, Presione >pista o escena siguienteRetroceder al capítulo Presione .pista o escena anteriorAvance rápido/ Presione M/mretroceso rápido durante la
reproducción*3 *4
Cada vez quepresiona este botón,la velocidad dereproducción cambiade la siguiente forma:2 veces la velocidadnormal t 4 veces lavelocidad normal t8 veces la velocidadnormal t 16 veces lavelocidad normal t32 veces la velocidadnormal t velocidadde reproducciónnormal.
Avance lento Presione y/(sólo DVD/Video CD)/ durante laRetroceso lento reproducción *4
(sólo DVD) Cada vez quepresiona este botón,la velocidad dereproducción cambiade la siguiente forma:1/2 veces lavelocidad normal t1/4 veces lavelocidad normal t1/8 veces lavelocidad normal t1/16 veces lavelocidad normal t1/32 veces lavelocidad normal tvelocidad dereproducciónnormal.
*1 Si está activada la función de reanudación de lareproducción, puede reanudar la reproducciónmás tarde presionando u. Para obtener másinformación, consulte “Reanudación de lareproducción” (página 15).
*2 DVD/Video CD/Audio CD/MP3/JPEGAparece “X” en la pantalla.
*3 DVD/Video CD/Audio CD/MP3/JPEGNo se emite ningún sonido durante el avancerápido o el retroceso rápido.
*4 Los discos que no sean DVD vuelven a lareproducción normal cuando se acaba una pista/archivo MP3.
Búsqueda directa decapítulos/títulos/pistas
1 Durante la reproducción o la pausa,presione (SEARCH) para visualizar lapantalla de búsqueda.•DVD*1
Cada vez que presione (SEARCH), lapantalla de búsqueda cambiará de lasiguiente forma: “TIME SEARCH”,“SELECT TITLE” y “OFF”.Si presiona el botón < o , mientras“SELECT TITLE” aparece en la pantalla,esta última alternará entre “SELECTCHAPTER” y “SELECT TITLE”.
•Video CD (sólo cuando la función PBCestá desactivada)/Audio CD*2
Cada vez que presione (SEARCH), lapantalla de búsqueda alternará entre“TIME SEARCH” y “SELECT TRACK”.
2 Presione los botones numéricos paraingresar el número del capítulo, título opista que desee.
Cuando se muestra “TIME SEARCH”
Cuando se muestra “SELECT TITLE”, “SELECTCHAPTER” o “SELECT TRACK”
3 Presione (ENTER).
*1 Es posible realizar la búsqueda aunque elreproductor esté detenido.
*2 Puede utilizar los botones numéricos del controlremoto de tarjeta para seleccionar la pista.
NotaNo puede ajustar este valor en “0”.
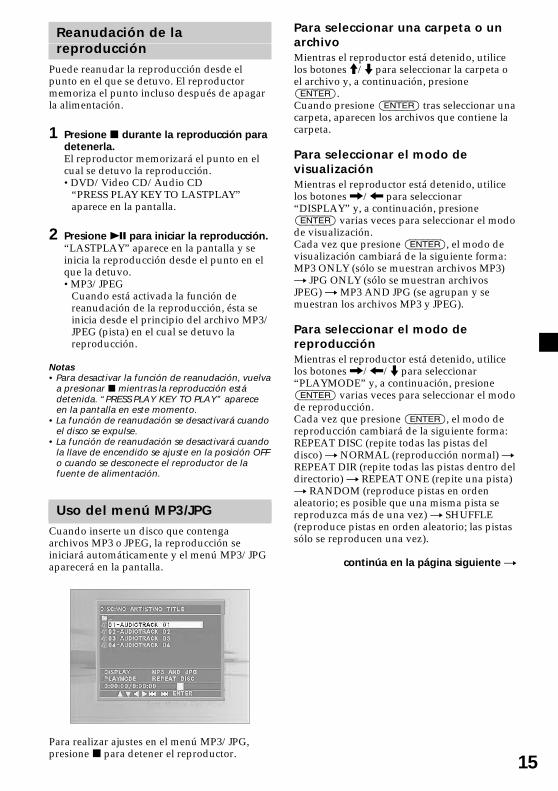
15
Reanudación de lareproducción
Puede reanudar la reproducción desde elpunto en el que se detuvo. El reproductormemoriza el punto incluso después de apagarla alimentación.
1 Presione x durante la reproducción paradetenerla.El reproductor memorizará el punto en elcual se detuvo la reproducción.•DVD/Video CD/Audio CD
“PRESS PLAY KEY TO LASTPLAY”aparece en la pantalla.
2 Presione u para iniciar la reproducción.“LASTPLAY” aparece en la pantalla y seinicia la reproducción desde el punto en elque la detuvo.•MP3/JPEG
Cuando está activada la función dereanudación de la reproducción, ésta seinicia desde el principio del archivo MP3/JPEG (pista) en el cual se detuvo lareproducción.
Notas• Para desactivar la función de reanudación, vuelva
a presionar x mientras la reproducción estádetenida. “PRESS PLAY KEY TO PLAY” apareceen la pantalla en este momento.
• La función de reanudación se desactivará cuandoel disco se expulse.
• La función de reanudación se desactivará cuandola llave de encendido se ajuste en la posición OFFo cuando se desconecte el reproductor de lafuente de alimentación.
Uso del menú MP3/JPGCuando inserte un disco que contengaarchivos MP3 o JPEG, la reproducción seiniciará automáticamente y el menú MP3/JPGaparecerá en la pantalla.
Para realizar ajustes en el menú MP3/JPG,presione x para detener el reproductor.
Para seleccionar una carpeta o unarchivoMientras el reproductor está detenido, utilicelos botones M/m para seleccionar la carpeta oel archivo y, a continuación, presione(ENTER).Cuando presione (ENTER) tras seleccionar unacarpeta, aparecen los archivos que contiene lacarpeta.
Para seleccionar el modo devisualizaciónMientras el reproductor está detenido, utilicelos botones ,/< para seleccionar“DISPLAY” y, a continuación, presione(ENTER) varias veces para seleccionar el modode visualización.Cada vez que presione (ENTER), el modo devisualización cambiará de la siguiente forma:MP3 ONLY (sólo se muestran archivos MP3)t JPG ONLY (sólo se muestran archivosJPEG) t MP3 AND JPG (se agrupan y semuestran los archivos MP3 y JPEG).
Para seleccionar el modo dereproducciónMientras el reproductor está detenido, utilicelos botones ,/</m para seleccionar“PLAYMODE” y, a continuación, presione(ENTER) varias veces para seleccionar el modode reproducción.Cada vez que presione (ENTER), el modo dereproducción cambiará de la siguiente forma:REPEAT DISC (repite todas las pistas deldisco) t NORMAL (reproducción normal) tREPEAT DIR (repite todas las pistas dentro deldirectorio) t REPEAT ONE (repite una pista)t RANDOM (reproduce pistas en ordenaleatorio; es posible que una misma pista sereproduzca más de una vez) t SHUFFLE(reproduce pistas en orden aleatorio; las pistassólo se reproducen una vez).
continúa en la página siguiente t
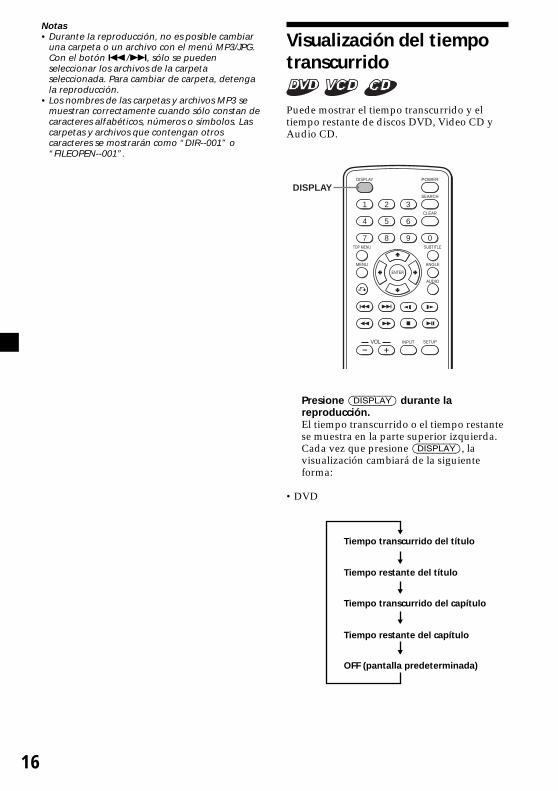
16
Visualización del tiempotranscurrido
Puede mostrar el tiempo transcurrido y eltiempo restante de discos DVD, Video CD yAudio CD.
ENTER
SEARCH
POWERDISPLAY
CLEAR
SETUP
AUDIO
ANGLE
SUBTITLE
MENU
TOP MENU
INPUT
1 2 3
4 5 6
7 8 9 0
VOL
DISPLAY
Presione (DISPLAY) durante lareproducción.El tiempo transcurrido o el tiempo restantese muestra en la parte superior izquierda.Cada vez que presione (DISPLAY), lavisualización cambiará de la siguienteforma:
•DVD
Tiempo transcurrido del título
Tiempo restante del título
Tiempo transcurrido del capítulo
Tiempo restante del capítulo
OFF (pantalla predeterminada)
Notas• Durante la reproducción, no es posible cambiar
una carpeta o un archivo con el menú MP3/JPG.Con el botón ./>, sólo se puedenseleccionar los archivos de la carpetaseleccionada. Para cambiar de carpeta, detengala reproducción.
• Los nombres de las carpetas y archivos MP3 semuestran correctamente cuando sólo constan decaracteres alfabéticos, números o símbolos. Lascarpetas y archivos que contengan otroscaracteres se mostrarán como “DIR--001” o“FILEOPEN--001”.
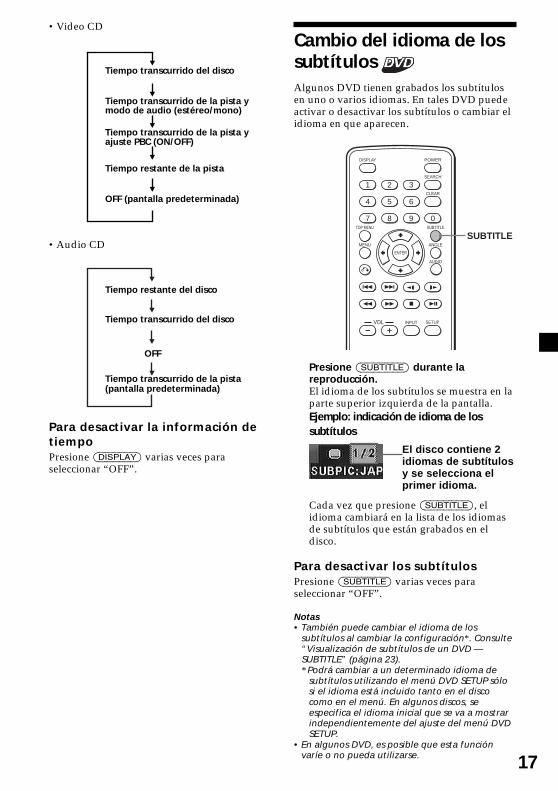
17
•Video CD
•Audio CD
Para desactivar la información detiempoPresione (DISPLAY) varias veces paraseleccionar “OFF”.
Tiempo transcurrido del disco
Tiempo transcurrido de la pista ymodo de audio (estéreo/mono)
Tiempo transcurrido de la pista yajuste PBC (ON/OFF)
Tiempo restante de la pista
OFF (pantalla predeterminada)
Cambio del idioma de lossubtítulos Algunos DVD tienen grabados los subtítulosen uno o varios idiomas. En tales DVD puedeactivar o desactivar los subtítulos o cambiar elidioma en que aparecen.
ENTER
SEARCH
POWERDISPLAY
CLEAR
SETUP
AUDIO
ANGLE
SUBTITLE
MENU
TOP MENU
INPUT
1 2 3
4 5 6
7 8 9 0
VOL
SUBTITLE
Presione (SUBTITLE) durante lareproducción.El idioma de los subtítulos se muestra en laparte superior izquierda de la pantalla.Ejemplo: indicación de idioma de lossubtítulos
Cada vez que presione (SUBTITLE), elidioma cambiará en la lista de los idiomasde subtítulos que están grabados en eldisco.
Para desactivar los subtítulosPresione (SUBTITLE) varias veces paraseleccionar “OFF”.
Notas• También puede cambiar el idioma de los
subtítulos al cambiar la configuración*. Consulte“Visualización de subtítulos de un DVD —SUBTITLE” (página 23).* Podrá cambiar a un determinado idioma de
subtítulos utilizando el menú DVD SETUP sólosi el idioma está incluido tanto en el discocomo en el menú. En algunos discos, seespecifica el idioma inicial que se va a mostrarindependientemente del ajuste del menú DVDSETUP.
• En algunos DVD, es posible que esta funciónvaríe o no pueda utilizarse.
Tiempo restante del disco
Tiempo transcurrido del disco
OFF
Tiempo transcurrido de la pista(pantalla predeterminada)
El disco contiene 2idiomas de subtítulosy se selecciona elprimer idioma.
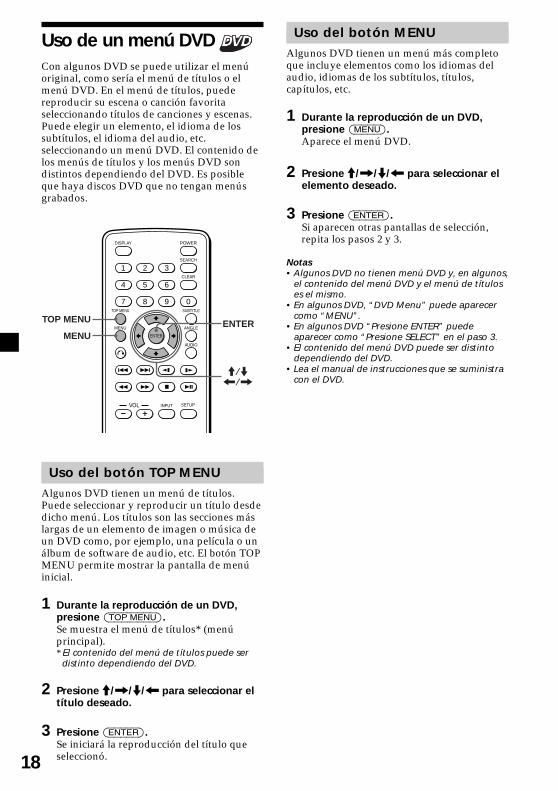
18
Uso del botón MENUAlgunos DVD tienen un menú más completoque incluye elementos como los idiomas delaudio, idiomas de los subtítulos, títulos,capítulos, etc.
1 Durante la reproducción de un DVD,presione (MENU).Aparece el menú DVD.
2 Presione M/,/m/< para seleccionar elelemento deseado.
3 Presione (ENTER).Si aparecen otras pantallas de selección,repita los pasos 2 y 3.
Notas• Algunos DVD no tienen menú DVD y, en algunos,
el contenido del menú DVD y el menú de títuloses el mismo.
• En algunos DVD, “DVD Menu” puede aparecercomo “MENU”.
• En algunos DVD “Presione ENTER” puedeaparecer como “Presione SELECT” en el paso 3.
• El contenido del menú DVD puede ser distintodependiendo del DVD.
• Lea el manual de instrucciones que se suministracon el DVD.
Uso de un menú DVD Con algunos DVD se puede utilizar el menúoriginal, como sería el menú de títulos o elmenú DVD. En el menú de títulos, puedereproducir su escena o canción favoritaseleccionando títulos de canciones y escenas.Puede elegir un elemento, el idioma de lossubtítulos, el idioma del audio, etc.seleccionando un menú DVD. El contenido delos menús de títulos y los menús DVD sondistintos dependiendo del DVD. Es posibleque haya discos DVD que no tengan menúsgrabados.
ENTER
SEARCH
POWERDISPLAY
CLEAR
SETUP
AUDIO
ANGLE
SUBTITLE
MENU
TOP MENU
INPUT
1 2 3
4 5 6
7 8 9 0
VOL
TOP MENU
MENUENTER
M/m</,
Uso del botón TOP MENUAlgunos DVD tienen un menú de títulos.Puede seleccionar y reproducir un título desdedicho menú. Los títulos son las secciones máslargas de un elemento de imagen o música deun DVD como, por ejemplo, una película o unálbum de software de audio, etc. El botón TOPMENU permite mostrar la pantalla de menúinicial.
1 Durante la reproducción de un DVD,presione (TOP MENU).Se muestra el menú de títulos* (menúprincipal).* El contenido del menú de títulos puede ser
distinto dependiendo del DVD.
2 Presione M/,/m/< para seleccionar eltítulo deseado.
3 Presione (ENTER).Se iniciará la reproducción del título queseleccionó.

19
Cambio del idioma delaudio Algunos DVD permiten escuchar el sonido envarios idiomas.
ENTER
SEARCH
POWERDISPLAY
CLEAR
SETUP
AUDIO
ANGLE
SUBTITLE
MENU
TOP MENU
INPUT
1 2 3
4 5 6
7 8 9 0
VOL
AUDIO
Presione (AUDIO) varias veces durante lareproducción para seleccionar el idiomadel audio que desea.El idioma del audio actual se muestra en laparte superior izquierda de la pantalla.Ejemplo: indicación de idioma del audio
Cuando aparezca la pantalla para el códigode idioma, ingrese el códigocorrespondiente al idioma que desea(página 37).
Notas• Sólo puede cambiar el idioma del audio si hay
varios idiomas grabados en el DVD.• También puede cambiar los idiomas del audio
utilizando el menú DVD (página 18) o el menúDVD SETUP * (página 22).* Podrá cambiar a un determinado idioma del
audio utilizando el menú DVD SETUP sólo si elidioma está incluido tanto en el disco como enel menú. En algunos discos, se especifica elidioma inicial que se va a emitirindependientemente del ajuste del menú DVDSETUP.
• En algunos DVD, es posible que esta funciónvaríe o no pueda utilizarse.
Es posible que aparezca el formatode la fuente de sonido (Dolby D, DTSo LPCM).
Cambio del ángulo
Algunos DVD tienen varios ángulosalternativos grabados para algunas escenas. Siajustó la opción “ANGLE MARK” en “ON”(página 23), aparecerá un aviso en la escena.
ENTER
SEARCH
POWERDISPLAY
CLEAR
AUDIO
ANGLE
SUBTITLE
MENU
TOP MENU
INPUT
1 2 3
4 5 6
7 8 9 0
VOL SETUP
ANGLE
1 Durante la reproducción de un DVD condiversos ángulos alternativos grabados,presione (ANGLE) cuando aparezca unaviso.El número del ángulo seleccionado semuestra en la parte superior derecha de lapantalla.
2 Presione (ANGLE) varias veces paraseleccionar su número de ángulopreferido mientras se esté mostrando elnúmero de ángulo.Cada vez que presione (ANGLE), cambiaráel número del ángulo.
Notas• Sólo puede cambiar el ángulo si hay varios
ángulos grabados en el DVD.• El número total de ángulos grabados puede
variar dependiendo del DVD y de la escena.• Sólo puede cambiar de ángulo durante la
reproducción normal. No podrá cambiarlocuando esté usando la reproducción con avanceo retroceso rápido.
• Cuando aparezca la escena con varios ánguloselegida, el ángulo cambiará automáticamente alque seleccionó en el paso 2.
• En algunos DVD, es posible que esta funciónvaríe o no pueda utilizarse.
Número de ánguloseleccionadoactualmente/númerototal de ángulosdistintos
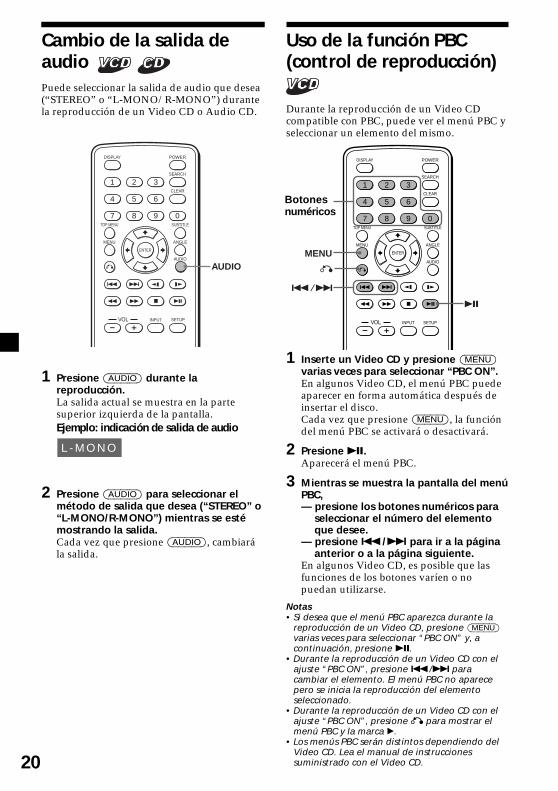
20
Uso de la función PBC(control de reproducción)
Durante la reproducción de un Video CDcompatible con PBC, puede ver el menú PBC yseleccionar un elemento del mismo.
ENTER
SEARCH
POWERDISPLAY
CLEAR
SETUP
AUDIO
ANGLE
SUBTITLE
MENU
TOP MENU
INPUT
1 2 3
4 5 6
7 8 9 0
VOL
MENU
./>
u
O
1 Inserte un Video CD y presione (MENU)varias veces para seleccionar “PBC ON”.En algunos Video CD, el menú PBC puedeaparecer en forma automática después deinsertar el disco.Cada vez que presione (MENU), la funcióndel menú PBC se activará o desactivará.
2 Presione u.Aparecerá el menú PBC.
3 Mientras se muestra la pantalla del menúPBC,— presione los botones numéricos para
seleccionar el número del elementoque desee.
— presione ./> para ir a la páginaanterior o a la página siguiente.
En algunos Video CD, es posible que lasfunciones de los botones varíen o nopuedan utilizarse.
Notas• Si desea que el menú PBC aparezca durante la
reproducción de un Video CD, presione (MENU)varias veces para seleccionar “PBC ON” y, acontinuación, presione u.
• Durante la reproducción de un Video CD con elajuste “PBC ON”, presione ./> paracambiar el elemento. El menú PBC no aparecepero se inicia la reproducción del elementoseleccionado.
• Durante la reproducción de un Video CD con elajuste “PBC ON”, presione O para mostrar elmenú PBC y la marca B.
• Los menús PBC serán distintos dependiendo delVideo CD. Lea el manual de instruccionessuministrado con el Video CD.
Cambio de la salida deaudio Puede seleccionar la salida de audio que desea(“STEREO” o “L-MONO/R-MONO”) durantela reproducción de un Video CD o Audio CD.
ENTER
SEARCH
POWERDISPLAY
CLEAR
SETUP
AUDIO
ANGLE
SUBTITLE
MENU
TOP MENU
INPUT
1 2 3
4 5 6
7 8 9 0
VOL
AUDIO
1 Presione (AUDIO) durante lareproducción.La salida actual se muestra en la partesuperior izquierda de la pantalla.Ejemplo: indicación de salida de audio
L - M O N O
2 Presione (AUDIO) para seleccionar elmétodo de salida que desea (“STEREO” o“L-MONO/R-MONO”) mientras se estémostrando la salida.Cada vez que presione (AUDIO), cambiarála salida.
Botonesnuméricos

21
Cambio de laconfiguración
Puede configurar y ajustar el reproductor conlos menús de ajustes en pantalla. La mayoríade los ajustes deben configurarse la primeravez que utilice el reproductor.
Los menús de ajustes son:•Menú SYSTEM (ajustes del sistema)•Menú DVD SETUP (ajustes para la
reproducción de DVD)•Menú SPEAKER (ajuste para el modo de
mezcla)•Menú AUDIO (ajustes para la salida de audio
digital)•Menú VIDEO (ajustes para la salida de
video)
ENTER
SEARCH
POWERDISPLAY
CLEAR
SETUP
AUDIO
ANGLE
SUBTITLE
MENU
TOP MENU
INPUT
1 2 3
4 5 6
7 8 9 0
VOL
ENTER
M/m</,
SETUP
Consulte “Ajustes con el botón MENU delmonitor” (página 27) para obtener informaciónsobre los ajustes del monitor.
Ajustes del sistema — MenúSYSTEM
Selección del idioma de losmenús — OSD LANGUAGE
Puede seleccionar el idioma que utilizará enlos menús (inglés o japonés).
1 Presione(SETUP).
2 Presione el botón M o m varias vecespara seleccionar “OSD LANGUAGE”.
3 Presione el botón < o , varias vecespara seleccionar el idioma y, acontinuación, presione (ENTER).
4 Presione (SETUP) para salir del menúSYSTEM.
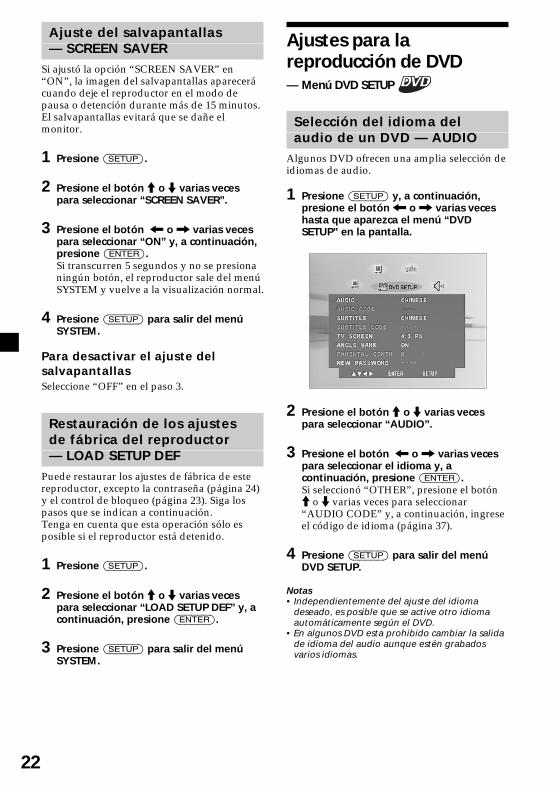
22
Ajuste del salvapantallas— SCREEN SAVER
Si ajustó la opción “SCREEN SAVER” en“ON”, la imagen del salvapantallas aparecerácuando deje el reproductor en el modo depausa o detención durante más de 15 minutos.El salvapantallas evitará que se dañe elmonitor.
1 Presione (SETUP).
2 Presione el botón M o m varias vecespara seleccionar “SCREEN SAVER”.
3 Presione el botón < o , varias vecespara seleccionar “ON” y, a continuación,presione (ENTER).Si transcurren 5 segundos y no se presionaningún botón, el reproductor sale del menúSYSTEM y vuelve a la visualización normal.
4 Presione (SETUP) para salir del menúSYSTEM.
Para desactivar el ajuste delsalvapantallasSeleccione “OFF” en el paso 3.
Restauración de los ajustesde fábrica del reproductor— LOAD SETUP DEF
Puede restaurar los ajustes de fábrica de estereproductor, excepto la contraseña (página 24)y el control de bloqueo (página 23). Siga lospasos que se indican a continuación.Tenga en cuenta que esta operación sólo esposible si el reproductor está detenido.
1 Presione (SETUP).
2 Presione el botón M o m varias vecespara seleccionar “LOAD SETUP DEF” y, acontinuación, presione (ENTER).
3 Presione (SETUP) para salir del menúSYSTEM.
Ajustes para lareproducción de DVD— Menú DVD SETUP
Selección del idioma delaudio de un DVD — AUDIO
Algunos DVD ofrecen una amplia selección deidiomas de audio.
1 Presione (SETUP) y, a continuación,presione el botón < o , varias veceshasta que aparezca el menú “DVDSETUP” en la pantalla.
2 Presione el botón M o m varias vecespara seleccionar “AUDIO”.
3 Presione el botón < o , varias vecespara seleccionar el idioma y, acontinuación, presione (ENTER).Si seleccionó “OTHER”, presione el botónM o m varias veces para seleccionar“AUDIO CODE” y, a continuación, ingreseel código de idioma (página 37).
4 Presione (SETUP) para salir del menúDVD SETUP.
Notas• Independientemente del ajuste del idioma
deseado, es posible que se active otro idiomaautomáticamente según el DVD.
• En algunos DVD esta prohibido cambiar la salidade idioma del audio aunque estén grabadosvarios idiomas.
23
Visualización de lossubtítulos de un DVD—SUBTITLE
Si el disco tiene subtítulos grabados, podrácambiar los subtítulos o activarlos ydesactivarlos.
1 Presione (SETUP) y, a continuación,presione el botón < o , varias veceshasta que aparezca el menú “DVDSETUP” en la pantalla.
2 Presione el botón M o m varias vecespara seleccionar “SUBTITLE”.
3 Presione el botón < o , varias vecespara seleccionar el idioma y, acontinuación, presione (ENTER).Si seleccionó “OTHER”, presione el botónM o m varias veces para seleccionar“SUBTITLE CODE” y, a continuación,ingrese el código de idioma (página 37).
4 Presione (SETUP) para salir del menúDVD SETUP.
NotaIndependientemente del ajuste del idiomadeseado, es posible que se active otro idiomaautomáticamente según el DVD.
Ajuste del formato de lapantalla del televisor — TVSCREEN
Cuando conecte el reproductor a un televisorpara ver el DVD en la pantalla del mismo,realice este ajuste según el tipo de pantalla deltelevisor.
1 Presione (SETUP) y, a continuación,presione el botón < o , varias veceshasta que aparezca el menú “DVDSETUP” en la pantalla.
2 Presione el botón M o m varias vecespara seleccionar “TV SCREEN”.
3 Presione el botón < o , varias vecespara seleccionar “4:3 PS”, “4:3 LB” o“16:9” y, a continuación, presione(ENTER).
4 Presione (SETUP) para salir del menúDVD SETUP.
Visualización del aviso devarios ángulos — ANGLEMARK
Si se grabaron varios ángulos para una escenaen un DVD y la opción “ANGLE MARK” seajustó en “ON”, aparecerá un aviso en laescena.
1 Presione (SETUP) y, a continuación,presione el botón < o , varias veceshasta que aparezca el menú “DVDSETUP” en la pantalla.
2 Presione el botón M o m varias vecespara seleccionar “ANGLE MARK”.
3 Presione el botón < o , varias vecespara seleccionar “ON” y, a continuación,presione (ENTER).
4 Presione (SETUP) para salir del menúDVD SETUP.
Para desactivar la marca de ánguloSeleccione “OFF” en el paso 3.
Preparación del ajuste inicialde la función de control debloqueo — PARENTALCONTROL
Es posible limitar la reproducción de ciertosDVD según un nivel predeterminado, como laedad de los usuarios. La función de control debloqueo permite establecer un nivel delimitación de reproducción.Este ajuste sólo es posible si se ingresó unacontraseña como se describe en “Ajuste de lacontraseña” (página 24).
1 Presione (SETUP) y, a continuación,presione el botón < o , varias veceshasta que aparezca el menú “DVDSETUP” en la pantalla.
2 Presione el botón M o m varias vecespara seleccionar “PARENTAL CONTR.”.
3 Presione el botón < o , varias vecespara seleccionar el nivel de limitación y,a continuación, presione (ENTER).
4 Presione (SETUP) para salir del menúDVD SETUP.
continúa en la página siguiente t
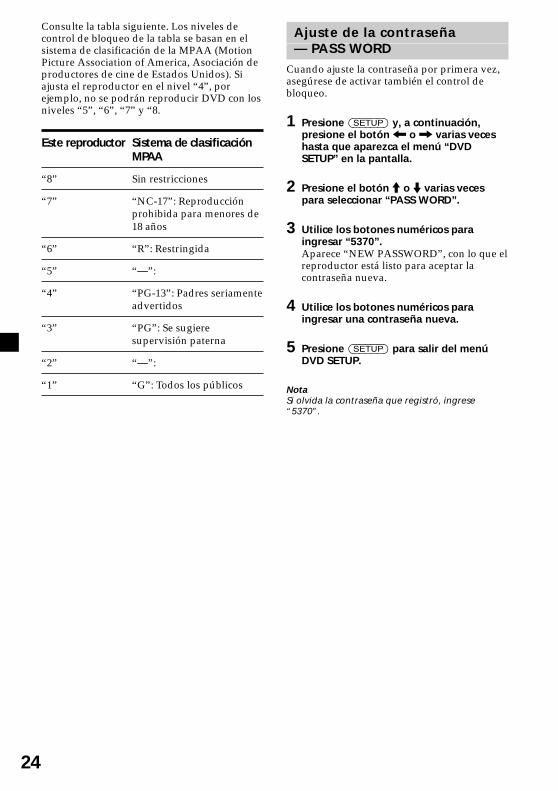
24
Consulte la tabla siguiente. Los niveles decontrol de bloqueo de la tabla se basan en elsistema de clasificación de la MPAA (MotionPicture Association of America, Asociación deproductores de cine de Estados Unidos). Siajusta el reproductor en el nivel “4”, porejemplo, no se podrán reproducir DVD con losniveles “5”, “6”, “7” y “8.
Este reproductor Sistema de clasificaciónMPAA
“8” Sin restricciones
“7” “NC-17”: Reproducciónprohibida para menores de18 años
“6” “R”: Restringida
“5” “—”:
“4” “PG-13”: Padres seriamenteadvertidos
“3” “PG”: Se sugieresupervisión paterna
“2” “—”:
“1” “G”: Todos los públicos
Ajuste de la contraseña— PASS WORD
Cuando ajuste la contraseña por primera vez,asegúrese de activar también el control debloqueo.
1 Presione (SETUP) y, a continuación,presione el botón < o , varias veceshasta que aparezca el menú “DVDSETUP” en la pantalla.
2 Presione el botón M o m varias vecespara seleccionar “PASS WORD”.
3 Utilice los botones numéricos paraingresar “5370”.Aparece “NEW PASSWORD”, con lo que elreproductor está listo para aceptar lacontraseña nueva.
4 Utilice los botones numéricos paraingresar una contraseña nueva.
5 Presione (SETUP) para salir del menúDVD SETUP.
NotaSi olvida la contraseña que registró, ingrese“5370”.
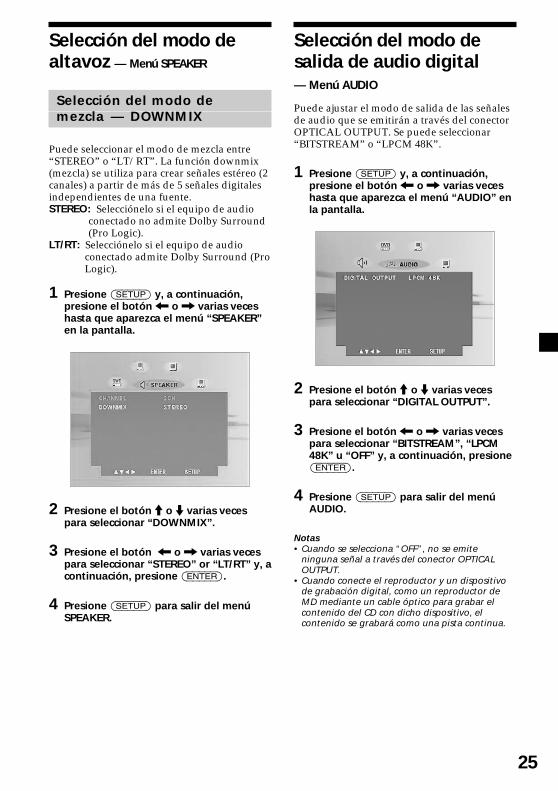
25
Selección del modo dealtavoz — Menú SPEAKER
Selección del modo demezcla — DOWNMIX
Puede seleccionar el modo de mezcla entre“STEREO” o “LT/RT”. La función downmix(mezcla) se utiliza para crear señales estéreo (2canales) a partir de más de 5 señales digitalesindependientes de una fuente.STEREO: Selecciónelo si el equipo de audio
conectado no admite Dolby Surround(Pro Logic).
LT/RT: Selecciónelo si el equipo de audioconectado admite Dolby Surround (ProLogic).
1 Presione (SETUP) y, a continuación,presione el botón < o , varias veceshasta que aparezca el menú “SPEAKER”en la pantalla.
2 Presione el botón M o m varias vecespara seleccionar “DOWNMIX”.
3 Presione el botón < o , varias vecespara seleccionar “STEREO” or “LT/RT” y, acontinuación, presione (ENTER).
4 Presione (SETUP) para salir del menúSPEAKER.
Selección del modo desalida de audio digital— Menú AUDIO
Puede ajustar el modo de salida de las señalesde audio que se emitirán a través del conectorOPTICAL OUTPUT. Se puede seleccionar“BITSTREAM” o “LPCM 48K”.
1 Presione (SETUP) y, a continuación,presione el botón < o , varias veceshasta que aparezca el menú “AUDIO” enla pantalla.
2 Presione el botón M o m varias vecespara seleccionar “DIGITAL OUTPUT”.
3 Presione el botón < o , varias vecespara seleccionar “BITSTREAM”, “LPCM48K” u “OFF” y, a continuación, presione(ENTER).
4 Presione (SETUP) para salir del menúAUDIO.
Notas• Cuando se selecciona “OFF”, no se emite
ninguna señal a través del conector OPTICALOUTPUT.
• Cuando conecte el reproductor y un dispositivode grabación digital, como un reproductor deMD mediante un cable óptico para grabar elcontenido del CD con dicho dispositivo, elcontenido se grabará como una pista continua.
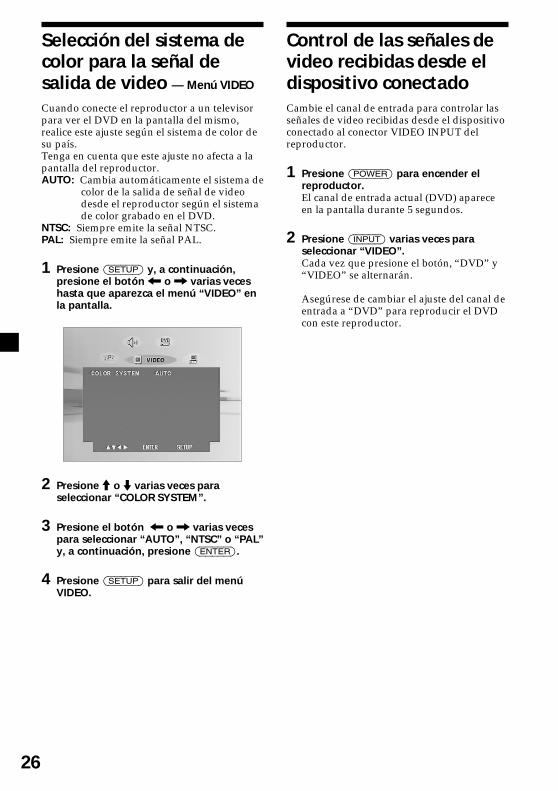
26
Selección del sistema decolor para la señal desalida de video — Menú VIDEO
Cuando conecte el reproductor a un televisorpara ver el DVD en la pantalla del mismo,realice este ajuste según el sistema de color desu país.Tenga en cuenta que este ajuste no afecta a lapantalla del reproductor.AUTO: Cambia automáticamente el sistema de
color de la salida de señal de videodesde el reproductor según el sistemade color grabado en el DVD.
NTSC: Siempre emite la señal NTSC.PAL: Siempre emite la señal PAL.
1 Presione (SETUP) y, a continuación,presione el botón < o , varias veceshasta que aparezca el menú “VIDEO” enla pantalla.
2 Presione M o m varias veces paraseleccionar “COLOR SYSTEM”.
3 Presione el botón < o , varias vecespara seleccionar “AUTO”, “NTSC” o “PAL”y, a continuación, presione (ENTER).
4 Presione (SETUP) para salir del menúVIDEO.
Control de las señales devideo recibidas desde eldispositivo conectadoCambie el canal de entrada para controlar lasseñales de video recibidas desde el dispositivoconectado al conector VIDEO INPUT delreproductor.
1 Presione (POWER) para encender elreproductor.El canal de entrada actual (DVD) apareceen la pantalla durante 5 segundos.
2 Presione (INPUT) varias veces paraseleccionar “VIDEO”.Cada vez que presione el botón, “DVD” y“VIDEO” se alternarán.
Asegúrese de cambiar el ajuste del canal deentrada a “DVD” para reproducir el DVDcon este reproductor.
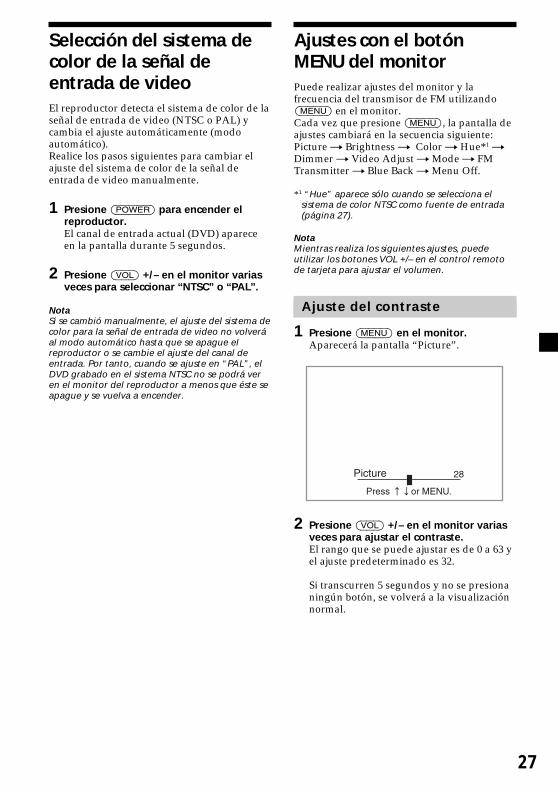
27
Selección del sistema decolor de la señal deentrada de videoEl reproductor detecta el sistema de color de laseñal de entrada de video (NTSC o PAL) ycambia el ajuste automáticamente (modoautomático).Realice los pasos siguientes para cambiar elajuste del sistema de color de la señal deentrada de video manualmente.
1 Presione (POWER) para encender elreproductor.El canal de entrada actual (DVD) apareceen la pantalla durante 5 segundos.
2 Presione (VOL) +/– en el monitor variasveces para seleccionar “NTSC” o “PAL”.
NotaSi se cambió manualmente, el ajuste del sistema decolor para la señal de entrada de video no volveráal modo automático hasta que se apague elreproductor o se cambie el ajuste del canal deentrada. Por tanto, cuando se ajuste en “PAL”, elDVD grabado en el sistema NTSC no se podrá veren el monitor del reproductor a menos que éste seapague y se vuelva a encender.
Ajustes con el botónMENU del monitorPuede realizar ajustes del monitor y lafrecuencia del transmisor de FM utilizando(MENU) en el monitor.Cada vez que presione (MENU), la pantalla deajustes cambiará en la secuencia siguiente:Picture t Brightness t Color t Hue*1 tDimmer t Video Adjust t Mode t FMTransmitter t Blue Back t Menu Off.
*1 “Hue” aparece sólo cuando se selecciona elsistema de color NTSC como fuente de entrada(página 27).
NotaMientras realiza los siguientes ajustes, puedeutilizar los botones VOL +/– en el control remotode tarjeta para ajustar el volumen.
Ajuste del contraste
1 Presione (MENU) en el monitor.Aparecerá la pantalla “Picture”.
2 Presione (VOL) +/– en el monitor variasveces para ajustar el contraste.El rango que se puede ajustar es de 0 a 63 yel ajuste predeterminado es 32.
Si transcurren 5 segundos y no se presionaningún botón, se volverá a la visualizaciónnormal.
28
Ajuste del brillo
1 Presione (MENU) en el monitor variasveces hasta que aparezca “Brightness”.
2 Presione (VOL) +/– en el monitor variasveces para ajustar el brillo.El rango que se puede ajustar es de 0 a 63 yel ajuste predeterminado es 30.
Si transcurren 5 segundos y no se presionaningún botón, se volverá a la visualizaciónnormal.
Ajuste del color
1 Presione (MENU) en el monitor variasveces hasta que aparezca “Color”.
2 Presione (VOL) +/– en el monitor variasveces para ajustar el color.El rango que se puede ajustar es de 0 a 63 yel ajuste predeterminado es 32.
Si transcurren 5 segundos y no se presionaningún botón, se volverá a la visualizaciónnormal.
Ajuste del tono (sólo NTSC)
1 Presione (MENU) en el monitor variasveces hasta que aparezca “Hue”.
2 Presione (VOL) +/– en el monitor variasveces para ajustar el color.El ajuste predeterminado es “CTR”(central).
Si transcurren 5 segundos y no se presionaningún botón, se volverá a la visualizaciónnormal.
Ajuste del atenuador
1 Presione (MENU) en el monitor variasveces hasta que aparezca “Dimmer”.
2 Presione (VOL) +/– en el monitor variasveces para seleccionar “On” u “Off”.El ajuste predeterminado es “Off”.
Si transcurren 5 segundos y no se presionaningún botón, se volverá a la visualizaciónnormal.
Restauración de los ajustesPuede restaurar los ajustes de imagen, brillo,color, tono y atenuador en una sola operación.
1 Presione (MENU) en el monitor variasveces hasta que aparezca “Video Adjust”.
2 Presione (VOL) +/– en el monitor pararestaurar los ajustes.
Si transcurren 5 segundos y no se presionaningún botón, se volverá a la visualizaciónnormal.
NotaLos ajustes de canal de entrada, sistema de colorde la señal de entrada de video (NTSC/PAL), modode pantalla y fondo azul no se restaurarán cuandorealice los pasos anteriores.
Ajuste del modo de pantallaEl modo de pantalla se puede seleccionar deentre los cuatro ajustes siguientes:Normal: Imagen con un formato de 4 a 3
(imagen común).Full: Imagen con un formato de 4 a 3
aumentada hacia los lados izquierdoy derecho de la pantalla.
Zoom: Imagen con un formato de 4 a 3aumentada hacia los lados izquierdoy derecho de la pantalla, con laspartes rebasadas (superior e inferior)cortadas para llenar la pantalla.
Wide: Imagen con un formato de 16 a 9.
1 Presione (MENU) en el monitor variasveces hasta que aparezca “Mode”.
2 Presione (VOL) +/– en el monitor variasveces para seleccionar el modo depantalla.El ajuste predeterminado es “Full”.
Si transcurren 5 segundos y no se presionaningún botón, se volverá a la visualizaciónnormal.
29
Ajuste del transmisor de FMSi utiliza el reproductor en el automóvil, puedetransmitir las señales de audio a la radio deFM y emitir las señales desde el equipo estéreodel automóvil. Realice el procedimientosiguiente para activar o desactivar eltransmisor de FM y seleccionar la frecuencia.
1 Presione (MENU) en el monitor variasveces hasta que aparezca “FMTransmitter”.
2 Presione (VOL) +/– en el monitor paraseleccionar “On” u “Off”.El ajuste predeterminado es “On”.
3 Para seleccionar la frecuencia, presione(REVERSE) en el monitor.Aparece la pantalla “Frequency”.
4 Presione (VOL) +/– en el monitor paraseleccionar la frecuencia.El rango que se puede ajustar es de 88,3MHz a 89,9 MHz, en incrementos de 0,2-MHz.
5 Presione (REVERSE) en el monitor paravolver a la pantalla “FM Transmitter”.
Si transcurren 5 segundos y no se presionaningún botón, se volverá a la visualizaciónnormal.
Notas• Si los auriculares están conectados al
reproductor, la función del transmisor de FM nose podrá utilizar aunque esté seleccionado “On”.
• Dependiendo de la ubicación del reproductor, esposible que las señales de FM no alcancen laradio del automóvil y que se interrumpa laemisión de audio desde el equipo estéreo delautomóvil. Si esto ocurre, ajuste la posición de laantena de transmisión de FM o acerque laantena de recepción de la radio del automóvil alreproductor.
• Si se oye ruido debido a las interferencias conemisoras locales de FM, cambie la frecuencia detransmisión de FM.
• Cuando el transmisor de FM se apague, no podrácambiar el ajuste de la frecuencia.
Ajuste de la pantalla defondo azul
Cuando este elemento se ajusta en “On”,aparece la pantalla de fondo azul si no serecibe ninguna señal de video.
1 Presione (MENU) en el monitor variasveces hasta que aparezca “Blue Back”.
2 Presione (VOL) +/– en el monitor paraseleccionar “On” u “Off”.El ajuste predeterminado es “Off”.
Si transcurren 5 segundos y no se presionaningún botón, se volverá a la visualizaciónnormal.
Salir de las funciones demenú
1 Presione (MENU) en el monitor variasveces hasta que aparezca “Menu Off”.
2 Vuelva a presionar (MENU) en elmonitor.Se vuelve a la pantalla normal.
Si transcurren 5 segundos y no se presionaningún botón, se volverá a la visualizaciónnormal.
30
Ajuste del volumen dereferenciaPuede establecer el nivel de volumen dereferencia para ajustar el volumen con el botón(VOL) +/– tanto en el monitor como en elcontrol remoto de tarjeta.
Presione (POWER) y (VOL) +/– en elmonitor mientras no aparezca ningunapantalla de menú.El rango que se puede ajustar es de 0 a 47 yel ajuste predeterminado es 10.Si mantiene presionado el botón, el valorcambia continuamente.
Inversión de la imagenPara utilizar el reproductor en posiciónvertical, realice los siguientes pasos parainvertir las imágenes del monitor y cambiar loscanales de audio.
Presione (REVERSE) en el monitor.“Reverse On” aparece durante 5 segundosy se invierte la imagen del monitor.
Para volver a la visualización normal deimágenes, vuelva a presionar (REVERSE)en el monitor.“Reverse Off” aparece durante 5 segundos.
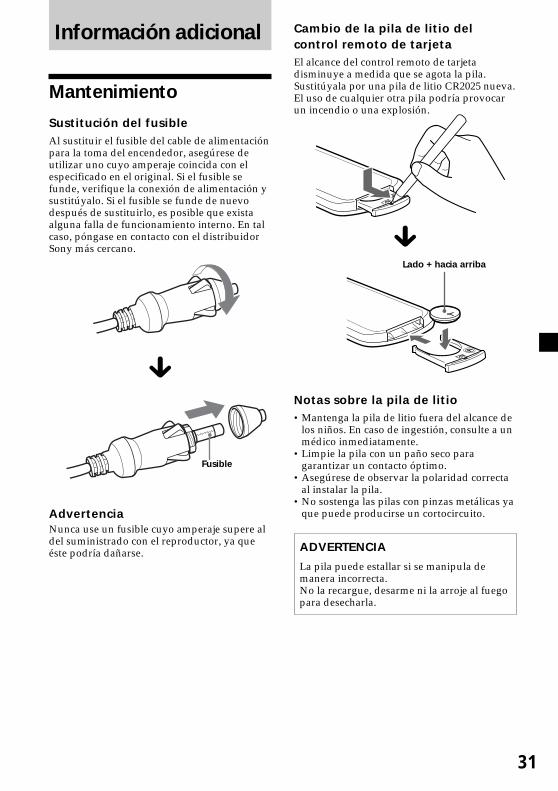
31
Información adicional
Mantenimiento
Sustitución del fusibleAl sustituir el fusible del cable de alimentaciónpara la toma del encendedor, asegúrese deutilizar uno cuyo amperaje coincida con elespecificado en el original. Si el fusible sefunde, verifique la conexión de alimentación ysustitúyalo. Si el fusible se funde de nuevodespués de sustituirlo, es posible que existaalguna falla de funcionamiento interno. En talcaso, póngase en contacto con el distribuidorSony más cercano.
x
AdvertenciaNunca use un fusible cuyo amperaje supere aldel suministrado con el reproductor, ya queéste podría dañarse.
Cambio de la pila de litio delcontrol remoto de tarjetaEl alcance del control remoto de tarjetadisminuye a medida que se agota la pila.Sustitúyala por una pila de litio CR2025 nueva.El uso de cualquier otra pila podría provocarun incendio o una explosión.
x
Notas sobre la pila de litio•Mantenga la pila de litio fuera del alcance de
los niños. En caso de ingestión, consulte a unmédico inmediatamente.
•Limpie la pila con un paño seco paragarantizar un contacto óptimo.
•Asegúrese de observar la polaridad correctaal instalar la pila.
•No sostenga las pilas con pinzas metálicas yaque puede producirse un cortocircuito.
ADVERTENCIA
La pila puede estallar si se manipula demanera incorrecta.No la recargue, desarme ni la arroje al fuegopara desecharla.
Lado + hacia arriba
Fusible
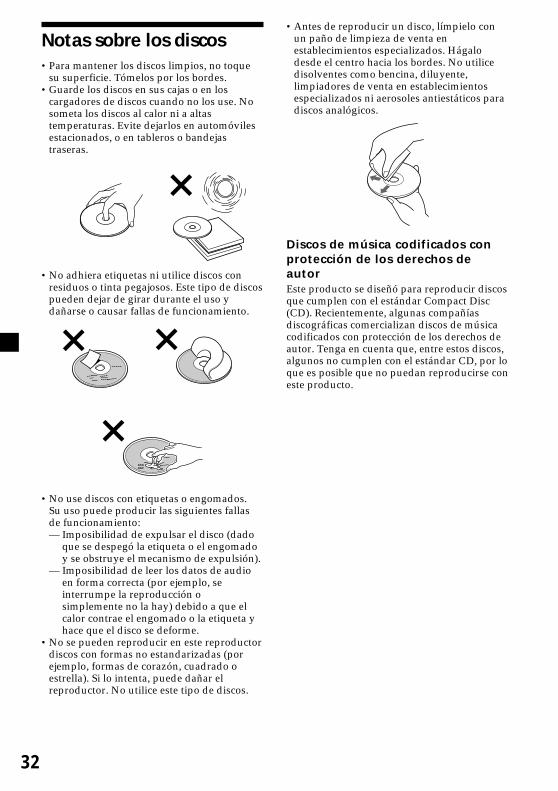
32
Notas sobre los discos•Para mantener los discos limpios, no toque
su superficie. Tómelos por los bordes.•Guarde los discos en sus cajas o en los
cargadores de discos cuando no los use. Nosometa los discos al calor ni a altastemperaturas. Evite dejarlos en automóvilesestacionados, o en tableros o bandejastraseras.
•No adhiera etiquetas ni utilice discos conresiduos o tinta pegajosos. Este tipo de discospueden dejar de girar durante el uso ydañarse o causar fallas de funcionamiento.
•No use discos con etiquetas o engomados.Su uso puede producir las siguientes fallasde funcionamiento:— Imposibilidad de expulsar el disco (dado
que se despegó la etiqueta o el engomadoy se obstruye el mecanismo de expulsión).
— Imposibilidad de leer los datos de audioen forma correcta (por ejemplo, seinterrumpe la reproducción osimplemente no la hay) debido a que elcalor contrae el engomado o la etiqueta yhace que el disco se deforme.
•No se pueden reproducir en este reproductordiscos con formas no estandarizadas (porejemplo, formas de corazón, cuadrado oestrella). Si lo intenta, puede dañar elreproductor. No utilice este tipo de discos.
•Antes de reproducir un disco, límpielo conun paño de limpieza de venta enestablecimientos especializados. Hágalodesde el centro hacia los bordes. No utilicedisolventes como bencina, diluyente,limpiadores de venta en establecimientosespecializados ni aerosoles antiestáticos paradiscos analógicos.
Discos de música codificados conprotección de los derechos deautorEste producto se diseñó para reproducir discosque cumplen con el estándar Compact Disc(CD). Recientemente, algunas compañíasdiscográficas comercializan discos de músicacodificados con protección de los derechos deautor. Tenga en cuenta que, entre estos discos,algunos no cumplen con el estándar CD, por loque es posible que no puedan reproducirse coneste producto.
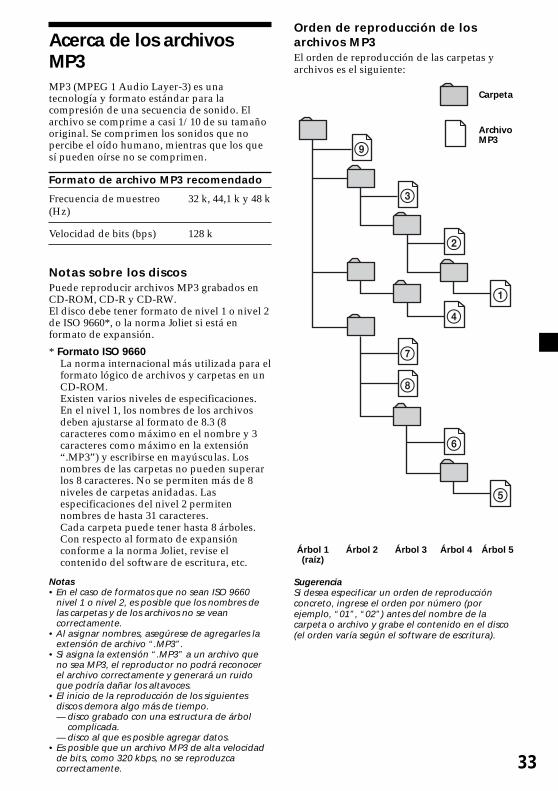
33
Acerca de los archivosMP3MP3 (MPEG 1 Audio Layer-3) es unatecnología y formato estándar para lacompresión de una secuencia de sonido. Elarchivo se comprime a casi 1/10 de su tamañooriginal. Se comprimen los sonidos que nopercibe el oído humano, mientras que los quesí pueden oírse no se comprimen.
Formato de archivo MP3 recomendado
Frecuencia de muestreo 32 k, 44,1 k y 48 k(Hz)
Velocidad de bits (bps) 128 k
Notas sobre los discosPuede reproducir archivos MP3 grabados enCD-ROM, CD-R y CD-RW.El disco debe tener formato de nivel 1 o nivel 2de ISO 9660*, o la norma Joliet si está enformato de expansión.
* Formato ISO 9660La norma internacional más utilizada para elformato lógico de archivos y carpetas en unCD-ROM.Existen varios niveles de especificaciones.En el nivel 1, los nombres de los archivosdeben ajustarse al formato de 8.3 (8caracteres como máximo en el nombre y 3caracteres como máximo en la extensión“.MP3”) y escribirse en mayúsculas. Losnombres de las carpetas no pueden superarlos 8 caracteres. No se permiten más de 8niveles de carpetas anidadas. Lasespecificaciones del nivel 2 permitennombres de hasta 31 caracteres.Cada carpeta puede tener hasta 8 árboles.Con respecto al formato de expansiónconforme a la norma Joliet, revise elcontenido del software de escritura, etc.
Notas• En el caso de formatos que no sean ISO 9660
nivel 1 o nivel 2, es posible que los nombres delas carpetas y de los archivos no se veancorrectamente.
• Al asignar nombres, asegúrese de agregarles laextensión de archivo “.MP3”.
• Si asigna la extensión “.MP3” a un archivo queno sea MP3, el reproductor no podrá reconocerel archivo correctamente y generará un ruidoque podría dañar los altavoces.
• El inicio de la reproducción de los siguientesdiscos demora algo más de tiempo.— disco grabado con una estructura de árbol
complicada.— disco al que es posible agregar datos.
• Es posible que un archivo MP3 de alta velocidadde bits, como 320 kbps, no se reproduzcacorrectamente.
Orden de reproducción de losarchivos MP3El orden de reproducción de las carpetas yarchivos es el siguiente:
9
3
7
8
2
4
6
1
5
Árbol 1 Árbol 2 Árbol 3 Árbol 4 Árbol 5(raíz)
SugerenciaSi desea especificar un orden de reproducciónconcreto, ingrese el orden por número (porejemplo, “01”, “02”) antes del nombre de lacarpeta o archivo y grabe el contenido en el disco(el orden varía según el software de escritura).
Carpeta
ArchivoMP3
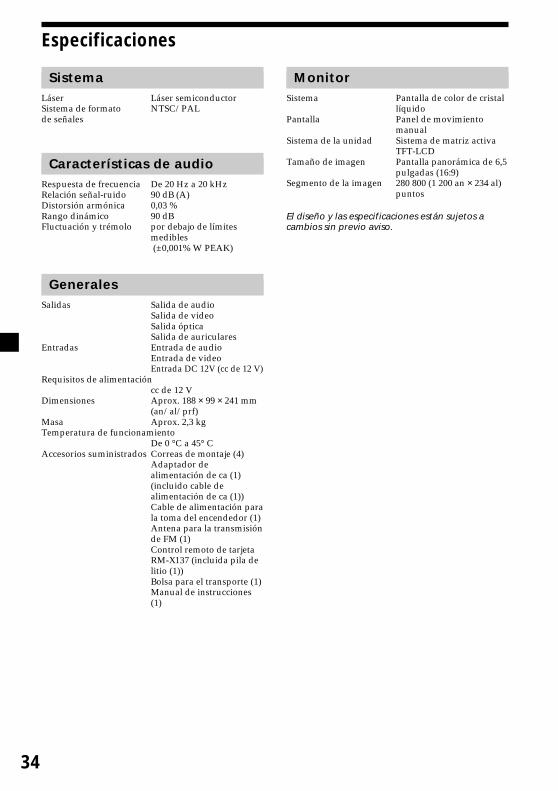
34
Especificaciones
SistemaLáser Láser semiconductorSistema de formato NTSC/PALde señales
Características de audioRespuesta de frecuencia De 20 Hz a 20 kHzRelación señal-ruido 90 dB (A)Distorsión armónica 0,03 %Rango dinámico 90 dBFluctuación y trémolo por debajo de límites
medibles (±0,001% W PEAK)
GeneralesSalidas Salida de audio
Salida de videoSalida ópticaSalida de auriculares
Entradas Entrada de audioEntrada de videoEntrada DC 12V (cc de 12 V)
Requisitos de alimentacióncc de 12 V
Dimensiones Aprox. 188 × 99 × 241 mm(an/al/prf)
Masa Aprox. 2,3 kgTemperatura de funcionamiento
De 0 °C a 45° CAccesorios suministrados Correas de montaje (4)
Adaptador dealimentación de ca (1)(incluido cable dealimentación de ca (1))Cable de alimentación parala toma del encendedor (1)Antena para la transmisiónde FM (1)Control remoto de tarjetaRM-X137 (incluida pila delitio (1))Bolsa para el transporte (1)Manual de instrucciones(1)
MonitorSistema Pantalla de color de cristal
líquidoPantalla Panel de movimiento
manualSistema de la unidad Sistema de matriz activa
TFT-LCDTamaño de imagen Pantalla panorámica de 6,5
pulgadas (16:9)Segmento de la imagen 280 800 (1 200 an × 234 al)
puntos
El diseño y las especificaciones están sujetos acambios sin previo aviso.
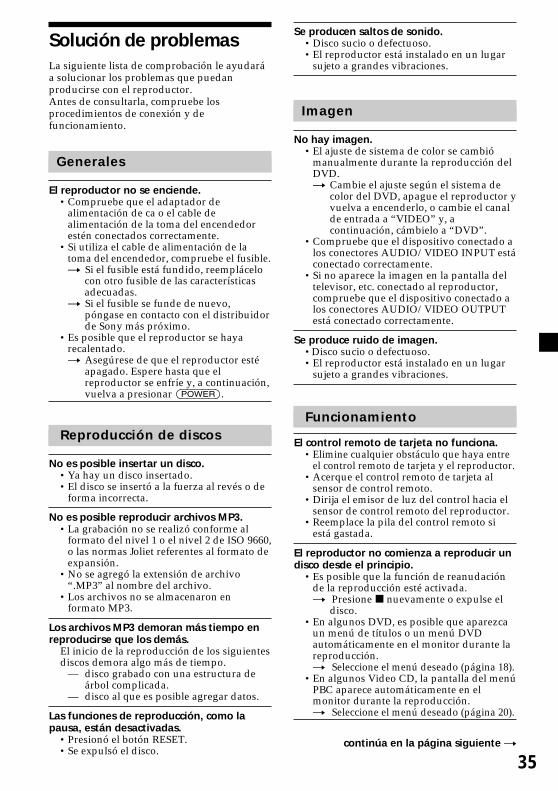
35
Solución de problemasLa siguiente lista de comprobación le ayudaráa solucionar los problemas que puedanproducirse con el reproductor.Antes de consultarla, compruebe losprocedimientos de conexión y defuncionamiento.
Generales
El reproductor no se enciende.•Compruebe que el adaptador de
alimentación de ca o el cable dealimentación de la toma del encendedorestén conectados correctamente.
•Si utiliza el cable de alimentación de latoma del encendedor, compruebe el fusible.t Si el fusible está fundido, reemplácelo
con otro fusible de las característicasadecuadas.
t Si el fusible se funde de nuevo,póngase en contacto con el distribuidorde Sony más próximo.
•Es posible que el reproductor se hayarecalentado.t Asegúrese de que el reproductor esté
apagado. Espere hasta que elreproductor se enfríe y, a continuación,vuelva a presionar (POWER).
Reproducción de discos
No es posible insertar un disco.•Ya hay un disco insertado.•El disco se insertó a la fuerza al revés o de
forma incorrecta.
No es posible reproducir archivos MP3.•La grabación no se realizó conforme al
formato del nivel 1 o el nivel 2 de ISO 9660,o las normas Joliet referentes al formato deexpansión.
•No se agregó la extensión de archivo“.MP3” al nombre del archivo.
•Los archivos no se almacenaron enformato MP3.
Los archivos MP3 demoran más tiempo enreproducirse que los demás.
El inicio de la reproducción de los siguientesdiscos demora algo más de tiempo.
— disco grabado con una estructura deárbol complicada.
— disco al que es posible agregar datos.
Las funciones de reproducción, como lapausa, están desactivadas.
•Presionó el botón RESET.•Se expulsó el disco.
Se producen saltos de sonido.•Disco sucio o defectuoso.•El reproductor está instalado en un lugar
sujeto a grandes vibraciones.
Imagen
No hay imagen.•El ajuste de sistema de color se cambió
manualmente durante la reproducción delDVD.t Cambie el ajuste según el sistema de
color del DVD, apague el reproductor yvuelva a encenderlo, o cambie el canalde entrada a “VIDEO” y, acontinuación, cámbielo a “DVD”.
•Compruebe que el dispositivo conectado alos conectores AUDIO/VIDEO INPUT estáconectado correctamente.
•Si no aparece la imagen en la pantalla deltelevisor, etc. conectado al reproductor,compruebe que el dispositivo conectado alos conectores AUDIO/VIDEO OUTPUTestá conectado correctamente.
Se produce ruido de imagen.•Disco sucio o defectuoso.•El reproductor está instalado en un lugar
sujeto a grandes vibraciones.
Funcionamiento
El control remoto de tarjeta no funciona.•Elimine cualquier obstáculo que haya entre
el control remoto de tarjeta y el reproductor.•Acerque el control remoto de tarjeta al
sensor de control remoto.•Dirija el emisor de luz del control hacia el
sensor de control remoto del reproductor.•Reemplace la pila del control remoto si
está gastada.
El reproductor no comienza a reproducir undisco desde el principio.
•Es posible que la función de reanudaciónde la reproducción esté activada.t Presione x nuevamente o expulse el
disco.•En algunos DVD, es posible que aparezca
un menú de títulos o un menú DVDautomáticamente en el monitor durante lareproducción.t Seleccione el menú deseado (página 18).
•En algunos Video CD, la pantalla del menúPBC aparece automáticamente en elmonitor durante la reproducción.t Seleccione el menú deseado (página 20).
continúa en la página siguiente t
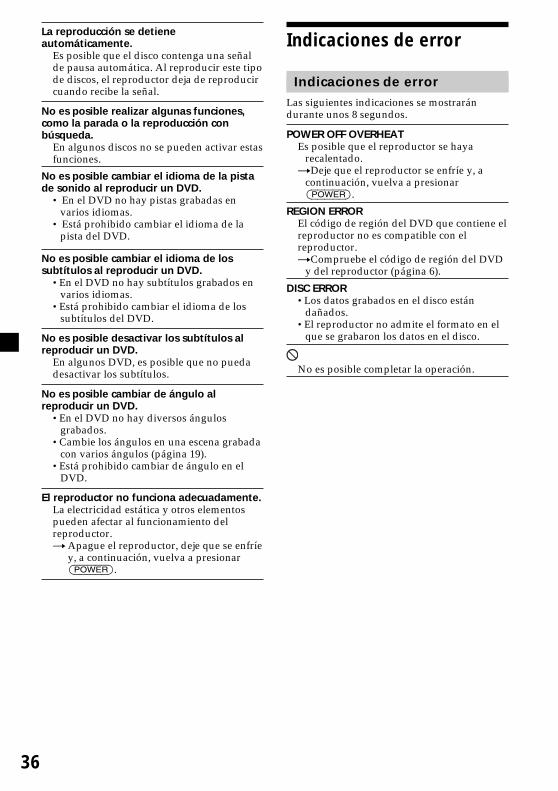
36
La reproducción se detieneautomáticamente.
Es posible que el disco contenga una señalde pausa automática. Al reproducir este tipode discos, el reproductor deja de reproducircuando recibe la señal.
No es posible realizar algunas funciones,como la parada o la reproducción conbúsqueda.
En algunos discos no se pueden activar estasfunciones.
No es posible cambiar el idioma de la pistade sonido al reproducir un DVD.
• En el DVD no hay pistas grabadas envarios idiomas.
• Está prohibido cambiar el idioma de lapista del DVD.
No es posible cambiar el idioma de lossubtítulos al reproducir un DVD.
•En el DVD no hay subtítulos grabados envarios idiomas.
•Está prohibido cambiar el idioma de lossubtítulos del DVD.
No es posible desactivar los subtítulos alreproducir un DVD.
En algunos DVD, es posible que no puedadesactivar los subtítulos.
No es posible cambiar de ángulo alreproducir un DVD.
•En el DVD no hay diversos ángulosgrabados.
•Cambie los ángulos en una escena grabadacon varios ángulos (página 19).
•Está prohibido cambiar de ángulo en elDVD.
El reproductor no funciona adecuadamente.La electricidad estática y otros elementospueden afectar al funcionamiento delreproductor.tApague el reproductor, deje que se enfríe
y, a continuación, vuelva a presionar(POWER).
Indicaciones de error
Indicaciones de errorLas siguientes indicaciones se mostrarándurante unos 8 segundos.
POWER OFF OVERHEATEs posible que el reproductor se haya
recalentado.tDeje que el reproductor se enfríe y, a
continuación, vuelva a presionar(POWER).
REGION ERROREl código de región del DVD que contiene elreproductor no es compatible con elreproductor.tCompruebe el código de región del DVD
y del reproductor (página 6).
DISC ERROR•Los datos grabados en el disco están
dañados.•El reproductor no admite el formato en el
que se grabaron los datos en el disco.
No es posible completar la operación.
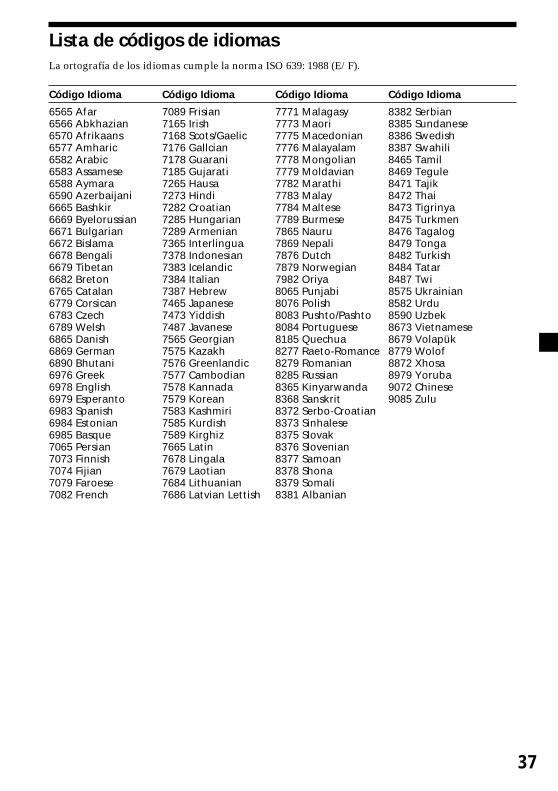
37
Lista de códigos de idiomasLa ortografía de los idiomas cumple la norma ISO 639: 1988 (E/F).
Código Idioma Código Idioma Código Idioma Código Idioma
6565 Afar 7089 Frisian 7771 Malagasy 8382 Serbian6566 Abkhazian 7165 Irish 7773 Maori 8385 Sundanese6570 Afrikaans 7168 Scots/Gaelic 7775 Macedonian 8386 Swedish6577 Amharic 7176 Gallcian 7776 Malayalam 8387 Swahili6582 Arabic 7178 Guarani 7778 Mongolian 8465 Tamil6583 Assamese 7185 Gujarati 7779 Moldavian 8469 Tegule6588 Aymara 7265 Hausa 7782 Marathi 8471 Tajik6590 Azerbaijani 7273 Hindi 7783 Malay 8472 Thai6665 Bashkir 7282 Croatian 7784 Maltese 8473 Tigrinya6669 Byelorussian 7285 Hungarian 7789 Burmese 8475 Turkmen6671 Bulgarian 7289 Armenian 7865 Nauru 8476 Tagalog6672 Bislama 7365 Interlingua 7869 Nepali 8479 Tonga6678 Bengali 7378 Indonesian 7876 Dutch 8482 Turkish6679 Tibetan 7383 Icelandic 7879 Norwegian 8484 Tatar6682 Breton 7384 Italian 7982 Oriya 8487 Twi6765 Catalan 7387 Hebrew 8065 Punjabi 8575 Ukrainian6779 Corsican 7465 Japanese 8076 Polish 8582 Urdu6783 Czech 7473 Yiddish 8083 Pushto/Pashto 8590 Uzbek6789 Welsh 7487 Javanese 8084 Portuguese 8673 Vietnamese6865 Danish 7565 Georgian 8185 Quechua 8679 Volapük6869 German 7575 Kazakh 8277 Raeto-Romance 8779 Wolof6890 Bhutani 7576 Greenlandic 8279 Romanian 8872 Xhosa6976 Greek 7577 Cambodian 8285 Russian 8979 Yoruba6978 English 7578 Kannada 8365 Kinyarwanda 9072 Chinese6979 Esperanto 7579 Korean 8368 Sanskrit 9085 Zulu6983 Spanish 7583 Kashmiri 8372 Serbo-Croatian6984 Estonian 7585 Kurdish 8373 Sinhalese6985 Basque 7589 Kirghiz 8375 Slovak7065 Persian 7665 Latin 8376 Slovenian7073 Finnish 7678 Lingala 8377 Samoan7074 Fijian 7679 Laotian 8378 Shona7079 Faroese 7684 Lithuanian 8379 Somali7082 French 7686 Latvian Lettish 8381 Albanian


Sony Corporation Printed in Korea