MANUAL DE INSTRUCCIONES NEVERA NO-FROST · MANUAL DE INSTRUCCIONES NEVERA NO-FROST NV-5211SS,...
21
MANUAL DE INSTRUCCIONES NEVERA NO-FROST NV-5211SS, NV-5212SS, NV-5213SS, NV-5214SS ESTIMADO CLIENTE Con el fin de que obtenga el mayor desempeño de su producto, por favor lea este manual de instrucciones cuidadosamente antes de comenzar a utilizarlo, y guárdelo para su futura referencia. Si necesita soporte adicional, no dude en escribir a: [email protected]
Transcript of MANUAL DE INSTRUCCIONES NEVERA NO-FROST · MANUAL DE INSTRUCCIONES NEVERA NO-FROST NV-5211SS,...

MANUAL DE INSTRUCCIONES NEVERA NO-FROST
NV-5211SS, NV-5212SS, NV-5213SS, NV-5214SS
ESTIMADO CLIENTE Con el fin de que obtenga el mayor desempeño de su producto, por favor lea este manual de instrucciones cuidadosamente antes de comenzar a utilizarlo, y guárdelo para su futura referencia. Si necesita soporte adicional, no dude en escribir a: [email protected]

P-1
ÍNDICE INSTRUCCIONES DE SEGURIDAD ......................................................................................................... 2 INSTRUCCIONES DE INSTALACIÓN ...................................................................................................... 2 DESCRIPCIÓN .......................................................................................................................................... 3 INSTRUCCIONES DE OPERACIÓN ......................................................................................................... 4 CONGELADOR ......................................................................................................................................... 5 LIMPIEZA Y MANTENIMIENTO ................................................................................................................ 5 TRANSPORTE ........................................................................................................................................... 6 CONSEJOS PARA AHORRAR ENERGÍA ............................................................................................... 6 BOMBILLA ................................................................................................................................................ 6 RESOLUCIÓN DE PROBLEMAS ............................................................................................................. 7 ESPECIFICACIONES ................................................................................................................................ 8
PRECAUCIÓN
RIESGO DE CHOQUE
ELÉCTRICO , NO ABRA
Precaución: Para reducir el riesgo de choque eléctrico, no retire la cubierta, no hay partes manipulables por el usuario al interior de la unidad. Refiera todo mantenimiento o intervención técnica a personal técnico calificado.
Este símbolo indica la existencia de voltaje peligroso al interior de esta unidad, que constituye un riesgo de choque eléctrico.
Este símbolo indica que hay importantes instrucciones de operación y mantenimiento en la literatura que acompaña a esta unidad.
LÍNEAS DE SERVICIO AL CLIENTE PREMIER Venezuela: 0800 – ELECTRIC (353-2874) Panamá: 300-5185 Sitio Web: www.premiermundo.com E-mail: [email protected] NOTA Nos reservamos el derecho de modificar las especificaciones, características y/u operación de este producto sin previo aviso, con el fin de continuar las mejoras y desarrollo del mismo.
P-2
INSTRUCCIONES DE SEGURIDAD • Tenga precaución con los niños por lo que no queden atrapados dentro de la nevera. • La nevera no debe ser utilizada por personas con capacidades físicas o mentales reducidas, a
menos que tenga supervisión estricta por parte de una persona entrenada. • No almacene sustancias explosivas, como por ejemplo, latas de aerosol. • La nevera está diseñada para uso doméstico y no para uso comercial. • Es importante que conecte la nevera al polo a tierra. No modifique el cable de poder. • No se recomienda el uso de un cable de extensión para conectar la nevera. • Asegúrese de que el cable de poder no quede expuesto para evitar que las personas se enreden. • El voltaje requerido para la unidad es AC115V/60Hz con un cable de poder de 3 patas. • No utilice la nevera si el cable de poder se encuentra dañado de alguna forma. Haga que sea
revisado y reparado. • No intente reparar la unidad usted mismo. Remita toda revisión, mantenimiento y reparación a
personal de servicio técnico calificado. INSTRUCCIONES DE INSTALACIÓN ANTES DE UTILIZAR LA NEVERA • Retire el empaque interior y exterior. • Antes de conectar la nevera al tomacorriente, permita que descanse al menos por 4 horas. Esto
reduce la posibilidad de mal funcionamiento en el sistema de enfriamiento debido a la manipulación durante el transporte.
• Limpie la superficie interior con agua tibia y una prenda suave. INSTALACIÓN DEL REFRIGERADOR • La nevera está diseñada para mantenerse sobre sí misma por lo cual no debe ser empotrada. • Coloque la nevera sobre una superficie plana y rígida. • Permita 10 cm libres alrededor de la nevera para la correcta ventilación del aire. • Ajuste las patas de la nevera para mantenerla nivelada. • No exponga la nevera a los rayos directos del sol o a fuentes de calor (estufa, calentador, radiador,
etc.). Los rayos directos del sol pueden afectar el acabado de la nevera y las fuentes de calor pueden aumentar el consumo eléctrico. Una temperatura ambiente por debajo de 50°F o por encima de 85ºF afectará el desempeño de la unidad. La nevera no está diseñada para ser utilizada en garajes o en instalaciones exteriores.
• No coloque la nevera en lugares con mucha humedad. • Conecte el cable de poder directamente al tomacorriente. Recuerde que no debe modificar el
enchufe eliminando la tercera pata. La nevera no está diseñada para ser utilizada con un inversor. • No toque el interior del congelador ni los alimentos congelados con las manos mojadas para evitar
quemarse por la escarcha. • Después de conectar el cable de poder al tomacorriente, encienda la nevera y permita que se enfríe
de 2 a 3 horas antes de colocar alimentos en los compartimientos.
P-3
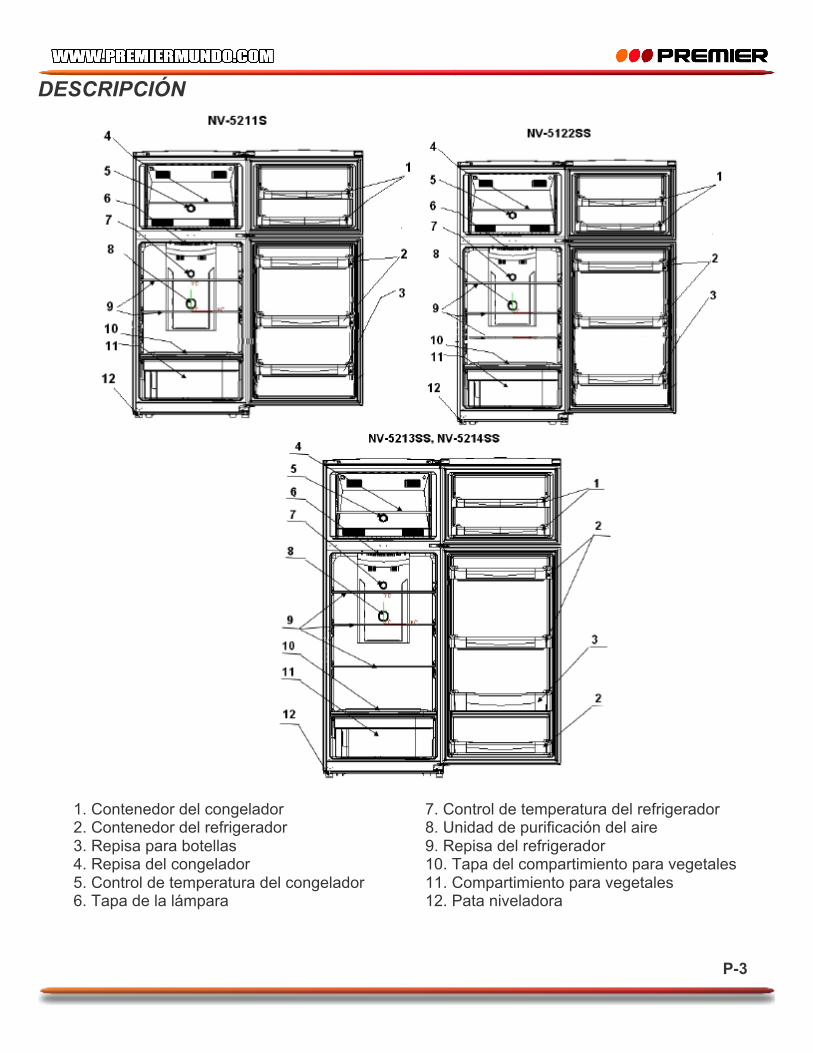
DESCRIPCIÓN
1. Contenedor del congelador 2. Contenedor del refrigerador 3. Repisa para botellas 4. Repisa del congelador 5. Control de temperatura del congelador 6. Tapa de la lámpara
7. Control de temperatura del refrigerador 8. Unidad de purificación del aire 9. Repisa del refrigerador 10. Tapa del compartimiento para vegetales 11. Compartimiento para vegetales 12. Pata niveladora

P-4
INSTRUCCIONES DE OPERACIÓN CONTROL DE TEMPERATURA • El refrigerador tiene un control para regular la temperatura
el cual está ubicado en la esquina superior izquierda del compartimiento del refrigerador.
• La primera vez que encienda la nevera, ajuste el control de temperatura en la posición ‘5’ y permita que la nevera funcione por 2 horas antes de colocar alimentos. Esto garantizará que el compartimiento esté completamente frío para recibir los alimentos.
• El rango del control de temperatura del refrigerador va de ‘1’ (el menos frío) a ‘5’ (el más frío). Ajuste del control de temperatura a la posición que se acomode a sus necesidades. Se recomienda la posición ‘3’ para uso en el hogar o la oficina.
Nota • Si la unidad se desconecta, o se interrumpe la corriente eléctrica, debe esperar de 3 a 5 minutos
antes de iniciar nuevamente la operación de la nevera. Si intenta iniciar la nevera antes de este periodo, la nevera no arrancará. Esto es una función de protección.
• Entre más alimentos coloque al interior de la nevera, menor será la eficiencia de refrigeración debido a la cantidad.
• No coloque alimentos en la salida del aire; permita espacios para la circulación del aire. • Si elige cambiar la configuración del termostato, haga los ajustes una posición a la vez. Permita
varias horas para que la temperatura se estabilice entre ajustes. • Al ajustar el control de temperatura en el compartimiento del refrigerador, también se afectará la
temperatura en el congelador. CAMBIAR LA LUZ La lámpara LED no puede ser reemplazada por el usuario. En caso de que esta lámpara se dañe por favor contacte a un distribuidor autorizado.
Más frío
Menos frío

P-5
CONGELADOR CONTROL DE TEMPERATURA • El congelador tiene un control para regular la temperatura
el cual está ubicado en la mitad del congelador. • La primera vez que encienda la unidad, ajuste este control
de temperatura a la posición máxima y permita que la unidad funcione al menos por 2 horas antes de colocar alimentos. Esto garantiza que el compartimiento esté completamente frío para recibir los alimentos.
• El rango de temperatura del congelador va de la posición mínima (la menos fría) a la posición máxima (la más fría). Se recomienda la posición media para uso en el hogar y la oficina.
CONGELADOR • Este compartimiento está diseñado para almacenar alimentos congelados por un largo periodo. • El almacenamiento de los alimentos congelados depende del tipo de alimento y las
recomendaciones; no se debe exceder el tiempo de almacenamiento recomendado. • Coloque los alimentos en el congelador tan pronto como sea posible después de comprarlos. Si
existen instrucciones adicionales en el empaque por favor sígalas. LIMPIEZA Y MANTENIMIENTO • Después de instalar la nevera se recomienda que la limpie por completo. • Apague el refrigerador y desconecte la unidad del tomacorriente. • Retire todos los alimentos. • Lave el interior con una prenda húmeda suave con una solución de bicarbonato de sodio. La
solución debe ser 2 cucharadas de bicarbonato de sodio por un cuarto de agua. • Asegúrese de mantener el empaque de caucho limpio para que la unidad funcione de manera
eficiente. • La parte exterior del refrigerador puede ser limpiada con detergente suave y agua tibia. • Seque el interior y el exterior de la nevera con una prenda suave. • Las serpentinas del condensador deben ser aspiradas cuando estén sucias o con polvo. VACACIONES • Apague la nevera y desconecte el cable de poder del tomacorriente. • Retire todos los alimentos. • Limpie el refrigerador. • Deje la puerta ligeramente abierta para evitar la formación de condensación, moho o malos olores. • Tenga precaución con los niños para que no jueguen con la nevera. • Vacaciones cortas: deje la nevera funcionando si las vacaciones son de menos de 3 semanas. • Vacaciones largas: si la nevera no va a ser utilizada por varios meses, retire todos los alimentos y
desconecte el cable de poder. Limpie y seque el interior completamente. Para prevenir los olores y el moho, deje la puerta ligeramente abierta.
P-6
TRANSPORTE • Apague la nevera y desconecte el cable de poder del tomacorriente. • Retire todos los alimentos. • Asegure todas las partes internas que están sueltas con cinta, como la repisas. • Asegure la puerta con cinta. • Asegúrese de que la nevera se mantiene en posición vertical durante todo el transporte. CONSEJOS PARA AHORRAR ENERGÍA • La nevera debe colocarse en el lugar más frío de la habitación, lejos de fuentes de calor y de los
rayos directos del sol. • Permita que los alimentos se enfríen a la temperatura ambiente antes de ubicarlos en el
refrigerador. Al sobrecargar la nevera se fuerza al compresor a operar por más tiempo. Los alimentos que se enfrían demasiado lento pueden perder calidad o dañarse.
• Asegúrese de envolver los alimentos de forma adecuada y seque los contenedores antes de ubicarlos en la nevera. Esto reduce la formación de escarcha dentro de la nevera.
• Organice y marque los alimentos para reducir el número de ocasiones y el tiempo de apertura de la nevera. Retire los alimentos necesarios en una sola apertura de la puerta, y ciérrela lo más pronto posible.
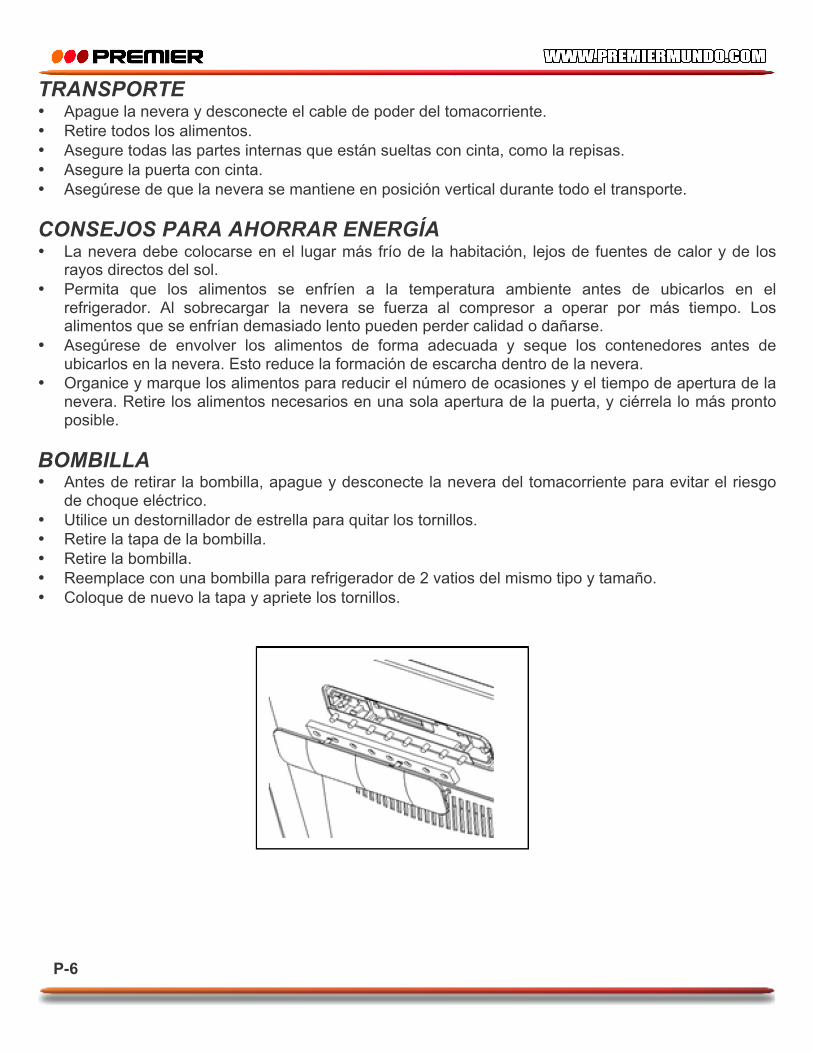
BOMBILLA • Antes de retirar la bombilla, apague y desconecte la nevera del tomacorriente para evitar el riesgo
de choque eléctrico. • Utilice un destornillador de estrella para quitar los tornillos. • Retire la tapa de la bombilla. • Retire la bombilla. • Reemplace con una bombilla para refrigerador de 2 vatios del mismo tipo y tamaño. • Coloque de nuevo la tapa y apriete los tornillos.

P-7
RESOLUCIÓN DE PROBLEMAS Esta lista es para ayudarle a resolver problemas simples que pueden presentarse en el uso del producto. Por favor léala y verifique estos puntos antes de solicitar ayuda de personal de servicio técnico autorizado.
PROBLEMA CAUSA Y SOLUCIÓN La nevera no funciona • Verifique la conexión del cable de poder, el
cortacircuitos y que el fusible no esté quemado.
El compresor se enciende y se apaga con frecuencia
• El compresor la temperatura ambiente es más caliente de lo normal.
• Hay una gran cantidad de alimentos en el refrigerador.
• La puerta se está abriendo con demasiada frecuencia.
• La puerta no está bien cerrada. • Verifique el ajuste del control de temperatura. • El empaque de caucho de la puerta no está
sellando apropiadamente. • La nevera no cuenta con suficiente espacio
libre alrededor. La temperatura al interior de la nevera es caliente • El control de temperatura se ha colocado en
una posición de poco frío. • La puerta se está abriendo con demasiada
frecuencia o se mantiene abierta. • Hay gran cantidad de alimentos en la nevera.
La temperatura al interior de la nevera es demasiado fría
• El ajuste de temperatura está en una posición demasiado fría; cambie el ajuste.
La temperatura de la parte exterior de la nevera es caliente
• La parte exterior de la nevera puede llegar hasta los 30 °F. Esto es normal mientras el compresor trabaja para transferir el calor de la parte interior a la parte exterior de la nevera.
Se escuchan sonidos extraños en la nevera • Las partes metálicas sufren un proceso de expansión y contracción, como en las tuberías de agua caliente. Esto es normal. El sonido se nivelará o desaparecerá un poco después mientras la nevera siga funcionando.
Se escuchan sonidos como de agua hirviendo • Significa que el refrigerante está circulando alrededor del sistema. Esto es normal.
Hay vibraciones • Verifique que la nevera está ubicada sobre una superficie plana y estable.
• Observe si la nevera está en contacto con algún objeto o con la pared.

P-8
Hay humedad al interior de la nevera • El clima está caliente y húmedo, lo cual
aumenta la tasa interna de formación de escarcha. Esto es normal.
• Verifique si la puerta está ligeramente abierta; ciérrela.
Se forma humedad en la parte exterior de la nevera
• Verifique si la puerta está ligeramente abierta, lo cual genera que el aire frío de la nevera se ponga en contacto con el aire húmedo del exterior, y por lo tanto se forma dicha humedad.
La puerta no cierra • Verifique que la nevera esté correctamente nivelada.
• Verifique el estado del empaque de caucho de la puerta.
ESPECIFICACIONES Modelo NV-5211SS NV-5212SS NV-5213SS NV-5214SS Tipo de Clima T T T T Capacidad total neta 311L/11cuft 340L/12cuft 453L/16cuft 481L/17cuft Voltaje (V) AC115V AC115V AC115V AC115V Frecuencia (Hz) 60 60 60 60 Potencia 155W 155W 155W 155W Consumo de energía (kW·h/24h ) 1.23 1.27 1.38 1.42 Refrigerante R134A R134A R134A R134A Dimensiones (mm) 645*600*1610 645*600*1730 680*700*1705 680*700*1845

P-9
DIAGRAMA DE CIRCUITOS
• Las personas y/o Marcas registradas en este manual de instrucciones no están afiliadas a Premier Electric Japan Corp. y aparecen en este Manual con propósitos ilustrativos únicamente.
Calentador de descongelamiento Enlace térmico
Termostato
Luz de conector Interruptor
de Luz
Enchufe
Motor de ventilación
Compresor
Temporizador de descongelamiento
Detector de temperatura
Term
osta
to

INSTRUCTION MANUAL
FROST FREE REFRIGERATOR
NV-5211SS NV-5212SS NV-5213SS NV-5214SS
DEAR CUSTOMER In order to achieve the best performance of your product, please read this instruction manual carefully before using, and keep it for future reference. If you need extra support, please write to [email protected]

P-1
CAUTION
RISK OF ELECTRIC SHOCK, DO NOT
OPEN
Caution: To reduce the risk of electric shock do not open this device, there are not serviceable parts for customers. Please refer any maintenance or repair to qualified personnel.
This sign means the existence of dangerous voltage at the inside of the unit, which states a risk of electric shock.
This sign means that there are important instructions of operation and handling in the manual that comes with this device.
PREMIER CUSTOMER SERVICE Venezuela: 0800 – ELECTRIC (353-2874) Panama: 300-5185 Website www.premiermundo.com E-mail: [email protected] NOTE This unit may be submitted to changes in specifications, characteristics and/or operation without prior notice to the user, in order to continue improving and developing its technology.

P-2
IMPORTANT SAFETY INSTRUCTIONS
WARNING
To reduce the risk of fire, electrical shock, or injury when using your refrigerator, follow these basic precautions:
1. Read all instructions before using the refrigerator. 2. DANGER or WARNING: Risk of child entrapment. 3. To avoid the possibility of child entrapment, please take the following precautions
before throwing out the refrigerator. - Remove all doors from the unit. - Leave the shelves in place so that children may not easily climb inside.
• This appliance is not intended for use by persons (including children) with reduced physical, sensory or mental capabilities, or lack of experience and knowledge, unless they have been given supervision or instruction concerning use of the appliance by a person responsible for their safety. Children should be supervised to ensure that they do not play with the appliance.
• Do not store explosive substances such as aerosol cans with a flammable propellant in this appliance.
• This appliance is intended to be used in household and similar applications such as - staff kitchen areas in shops, offices and other working environments; - farm houses and by clients in hotels, motels and other residential type
environments; - bed and breakfast type environments; - catering and similar non-retail applications.
-Save these instructions-
This refrigerator should be properly grounded for your safety. The power cord of this refrigerator is equipped with a three-prong plug which mates with standard three prong wall outlets to minimize the possibility of electrical shock. Do not, under any circumstances, cut or remove the third ground prong from the power cord supplied.
WARNING Improper use of the grounded plug can result in the risk of electrical shock. If the power cable is damaged, it must be replaced by the manufacturer, its service agent or similarly qualified persons in order to avoid a hazard. Do not use electrical appliances inside the food storage compartment of the appliance, unless they are of the type recommended by the manufacturer. For appliances which use flammable insulation blowing gases, the instructions shall include information regarding disposal of the appliance. The appliances is not to be used by children or persons with reduces physical, sensory or mental capabilities,or lack of experience and knowledge, unless they have been given supervision or instruction. Children being supervised not to play with the appliance. Replacement cord instructions, type Y attachment. If the supply cord is damaged, it must be replaced by the manufacture, its service agent or similarly qualified persons in order to avoid a hazard.

P-3
This refrigerator requires a standard AC115V/60Hz with 3 pin plug This refrigerator is not designed to be used with an inverter. The cord should be secured behind the refrigerator and not left exposed or dangling to prevent accidental injury. Never unplug the refrigerator by pulling the power cord. Always grip the plug firmly and pull straight out from the receptacle. Do not use an extension cord with this appliance. If the power cord is too short, have a qualified electrician or service technician install an outlet near the appliance. Use of an extension cord can negatively affect the performance of the unit. If the power cord is damaged , in order to avoid danger , by the manufacturer , a service center or similarly qualified persons to replace .
INSTALLATION INSTRUCTIONS
Before Using Your Refrigerator
• Remove the exterior and interior packing. • Before connecting the refrigerator to the power source, let it stand upright for approximately 4 hours.
This will reduce the possibility of a malfunction in the cooling system from improper handling during transportation.
• Clean the interior surface with lukewarm water using a soft cloth. (Cleaning instruction on page 6)
Installing Your Refrigerator • This appliance is designed to be free standing only, and should not be recessed or built-in. • Place your refrigerator on a floor that is strong enough to support the refrigerator when it is fully
loaded. • Allow 5 inches of space between the back and sides of the refrigerator, which allows the proper air
ventilation. Adjust the feet to keep the refrigerator level. • Locate the refrigerator away from direct sunlight and sources of heat (stove, heater, radiator, etc.).
Direct sunlight may affect the acrylic coating and heat sources may increase electrical consumption. Ambient temperature below 50°F or above 85°F will hinder the performance of this appliance. This unit is not designed for use in a garage or any other outside installation.
• Avoid locating the refrigerator in moist areas. • Plug the refrigerator into dedicated, properly installed-grounded wall outlet. Do not under any
circumstances cut or remove the third (ground) prong from the power cord. Any questions concerning power and/or grounding should be directed toward a certified electrician or an authorized service center. This unit is not designed to be installed in an RV or used with an inverter.
• After plugging the appliance into a wall outlet, turn the unit on and allow the unit to cool down for 2~3 hours under before placing food in the refrigerator or freezer compartment.

P-4
NAMES OF THE PARTS
1. FREEZER BIN 2. REFRIGERATOR BIN 3. BOTTLE SHELF 4. FREEZER SHELF 5. FREEZER TEMPERATURE CONTROL KNOB 6. LAMP COVER 7. REFRIGERATOR TEMPERATURE CONTROL KNOB 8. AIR PURIFICATION UNIT 9. REFRIGERATOR SHELF 10. CRISPER COVER 11. CRISPER 12. LEVELING LEG WARNING : Never touch the interior of the Freezer Chamber or frozen foods in the compartment with wet hands as this could result in frost bite.

P-5
OPERATING YOUR REFRIGERATOR
Temperature Control
• Your refrigerator has one control for regulating the temperature. The temperature control is located on the top left hand corner of the refrigerator compartment.
• The first time you turn the unit on, adjust the temperature control knob to “5” and run for at least 2 hours before putting foods inside. This will ensure the cabinet is thoroughly chilled before food is put in.
• The range of the REFRIGERATOR temperature control is from position "1" the warmest to "5" the coldest. Adjust the temperature control to the setting that best suits your needs. The setting of “3” should be appropriate for home or office refrigerator use.
• NOTE;
• If the unit is unplugged, loses power; you must wait 3 to 5 minutes before restarting the unit. If you attempt to restart before this time delay, the refrigerator will not start.
• Large amounts of food will lower the cooling efficiency of the appliance. • Do not place the foods on the air outlet, and leave spaces for airflow. • If you choose to change the thermostat setting, adjust thermostat control by one increment at a time. Allow
several hours for temperature to stabilize between adjustments. • Adjusting the temperature control in the refrigerator compartment will affect the temperature in both the
refrigerator and the freezer compartment.
Changing the Light board LED lamp can not replaced by user, if the LED lamp is damaged Please contact the nearest authority to replace it.

P-6
OPERATING FREEZER COMPARTMENT
Temperature Control
• Your refrigerator has one control for regulating the temperature. The temperature control is located on the middle of the freezing chamber.
• The first time you turn the unit on, adjust the temperature control knob to “MAX” and run for at least 2 hours before putting foods inside. This will ensure the cabinet is thoroughly chilled before food is put in.
• The range of the FREEZER temperature control is from position "MIN" the warmest to "MAX" the coldest. Adjust the temperature control to the setting that best suits your needs. The setting of “MED” should be appropriate for home or office refrigerator use.
The Freezer Compartment
• This compartment is designed for the long-term storage of frozen food. Storage time period is up to three months. • The storage life of frozen foods varies and the recommended storage time should not be exceeded. • Place frozen food into the freezer as quickly as possible after purchase. If there are instructions on the packet, carefully
follow these instructions regarding storage times.
CARE AND MAINTENANCE
Cleaning Your Refrigerator
• Upon installation of your new appliance, it is recommended that it be cleaned thoroughly. • Turn off the refrigerator first and then unplug the unit from the wall outlet. • Remove all food content. • Wash the inside with a damp warm cloth soaked in lukewarm water and baking soda solution. The solution should be
about 2 tablespoons of baking soda to a quart of water. • Be sure to keep the door gasket (seal) clean to keep the unit running efficiently. • The outside of the refrigerator should be cleaned with mild detergent and warm water. • Dry the interior and exterior with a soft cloth. • The condenser coils should be vacuumed when they are dusty or dirty.
Vacation Time • Turn off the refrigerator first and then unplug the unit from the wall outlet. • Remove all the food. • Clean the refrigerator. • Leave the lid open slightly to avoid possible formation of condensation, mold, or odors. • Use extreme caution in the case of children. The unit should not be accessible to child’s play. • Short vacations: Leave the refrigerator operating during vacations of less than three weeks. • Long vacations: If the appliance will not be used for several months, remove all food and unplug the power cord. Clean
and dry the interior thoroughly. To prevent odor and mold growth, leave the door open slightly: blocking it open if necessary or have the door removed.

P-7
Moving Your Refrigerator • Turn off the refrigerator first and then unplug the unit from the wall outlet. • Remove all the food. • Securely tape down all loose items inside your refrigerator. • Tape the doors shut. • Be sure the refrigerator stays in the upright position during transportation.
Energy Saving Tips • The refrigerator should be located in the coolest area of the room, away from heat producing appliances or heating ducts,
and out of the direct sunlight. • Let hot foods cool to room temperature before placing in the refrigerator. Overloading the refrigerator forces the
compressor to run longer. Foods that freeze too slowly may lose quality, or spoil. • Be sure to wrap foods properly, and wipe containers dry before placing them in the refrigerator. This cuts down on frost
build-up inside the refrigerator. • Organize and label food to reduce door openings and extended searches. Remove as many items as needed at one
time, and close the door as soon as possible.
Changing The Light Bulb
Before removing the light bulb, turn off the refrigerator first and then unplug the unit from the wall outlet. Failure to do so could result in electrical shock or personal injury. Use Phillips screwdriver to take out screw. Remove the light cover by pulling downwards gently Unscrew the bulb Replace with a 2 watt-refrigerator bulb that is the same shape and size. Replace the light bulb cover and tighten screw.
Note: Method to change the lamp explained by pictures. • This appliance is not intended for use by persons (including children) with reduced physical, sensory or mental
capabilities, or lack of experience and knowledge, unless they have been given supervision or instruction concerning use of the appliance by a person responsible for their safety. Children should be supervised to ensure that they do not play with the appliance.
• Do not store explosive substances such as aerosol cans with a flammable propellant in this appliance. • This appliance is intended to be used in household and similar applications such as
- staff kitchen areas in shops, offices and other working environments; - farm houses and by clients in hotels, motels and other residential type
environments;
P-8
- bed and breakfast type environments; - catering and similar non-retail applications.
Warning: Do not use electrical appliances inside the food storage compartment of the appliance, unless they are of the type recommended by the manufacturer. For appliances which use flammable insulation blowing gases, the instructions shall include information regarding disposal of the appliance. When unit becomes useless, don’t throw it in nature, it may contain harmful material for environment. Please make sure to dispose of unit as per applicable legal system that respects the environment. Note: Method to change the lamp explained by pictures.
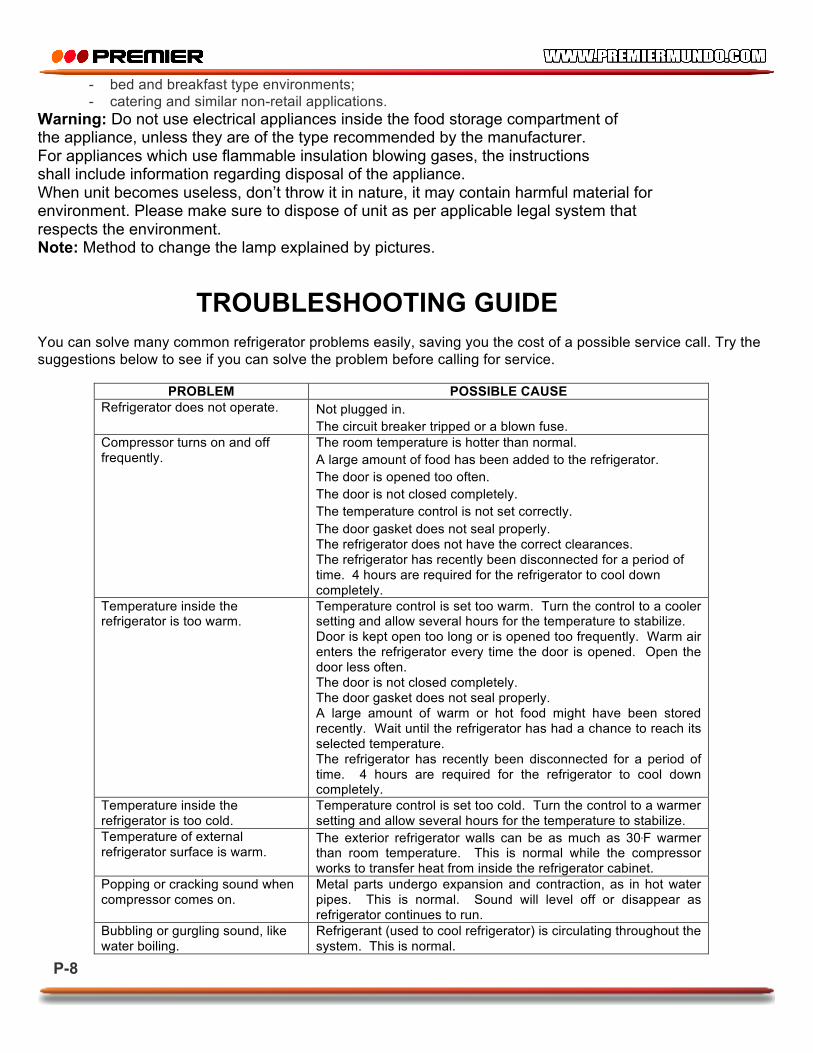
TROUBLESHOOTING GUIDE
You can solve many common refrigerator problems easily, saving you the cost of a possible service call. Try the suggestions below to see if you can solve the problem before calling for service.
PROBLEM POSSIBLE CAUSE
Refrigerator does not operate. Not plugged in. The circuit breaker tripped or a blown fuse.
Compressor turns on and off frequently.
The room temperature is hotter than normal. A large amount of food has been added to the refrigerator. The door is opened too often. The door is not closed completely. The temperature control is not set correctly. The door gasket does not seal properly. The refrigerator does not have the correct clearances. The refrigerator has recently been disconnected for a period of time. 4 hours are required for the refrigerator to cool down completely.
Temperature inside the refrigerator is too warm.
Temperature control is set too warm. Turn the control to a cooler setting and allow several hours for the temperature to stabilize. Door is kept open too long or is opened too frequently. Warm air enters the refrigerator every time the door is opened. Open the door less often. The door is not closed completely. The door gasket does not seal properly. A large amount of warm or hot food might have been stored recently. Wait until the refrigerator has had a chance to reach its selected temperature. The refrigerator has recently been disconnected for a period of time. 4 hours are required for the refrigerator to cool down completely.
Temperature inside the refrigerator is too cold.
Temperature control is set too cold. Turn the control to a warmer setting and allow several hours for the temperature to stabilize.
Temperature of external refrigerator surface is warm.
The exterior refrigerator walls can be as much as 30οF warmer than room temperature. This is normal while the compressor works to transfer heat from inside the refrigerator cabinet.
Popping or cracking sound when compressor comes on.
Metal parts undergo expansion and contraction, as in hot water pipes. This is normal. Sound will level off or disappear as refrigerator continues to run.
Bubbling or gurgling sound, like water boiling.
Refrigerant (used to cool refrigerator) is circulating throughout the system. This is normal.

P-9
Vibrations. Check to assure that the refrigerator is on a level surface. Floor is uneven or weak. Refrigerator rocks on the floor when it is moved slightly. Be sure floor can adequately support refrigerator. Level the refrigerator by putting wood or metal shims under part of the refrigerator. The refrigerator is touching the wall. Re-level the refrigerator and move it from the wall. See “Installation Instructions”.
Moisture forms on inside refrigerator walls.
Weather is hot and humid, which increases internal rate of frost build-up. This is normal. Door is slightly open. Door is kept open too long, or is opened too frequently. Open the door less often. The door is not sealed properly.
Moisture forms on outside of refrigerator.
Door is slightly open, causing cold air from inside the refrigerator to meet warm moist air from outside.
The door will not close properly. The refrigerator is not on a level surface. The gasket is dirty. The storage basket is out of position.
SPECIFICATIONS
Model No. NV-5211SS NV-5212SS NV-5213SS NV-5214SS
Climate Type T T T T
Total Net Capacity and cuft 311L/11cuft 340L/12cuft 453L/16cuft 481L/17cuft
Rated Voltage (V) AC115V AC115V AC115V AC115V
Rated Frequency (Hz) 60 60 60 60
Rated input power 155W 155W 155W 155W
Energy Consumption (kW·h/24h ) 1.23 1.27 1.38 1.42
Refrigerant R134A R134A R134A R134A
Overall Dimension (mm) DxWxH 645*600*1610 645*600*1730 680*700*1705 680*700*1845

P-10
CIRCUIT DIAGRAM