Forcetools Ferreteria Delicias Tarifa Distribucion 2012 Del009 Rect II

13Novedad / NewPáginas con información del producto y fotografías de ambiente / Pages with product information and ambience photografies
179
186569 Natasha 25x75cm. / 9,84”x29,52” D916
ceramics(Ceramica / Ceramic)
289
186541 Cosmopolitan Marfil 25x75cm. / 9,84”x29,52” M872
239
186729 Orsay 25x75cm. / 9,84”x29,52” D811
229
186775 Madeleine25x75cm. / 9,84”x29,52” D935
177
186570 Silk 25x75cm. / 9,84”x29,52” D900
177
186576 Listel Silk 7,9x75 cm. / 2,75”x29,52” D382
186595 Zocalo Cosmopolitan Marfil 10x75 cm. / 3,93”x29,52” D545
186599 London Cosmopolitan Marfil 5x75 cm. / 1,96”x29,52” D405
186659 Corner Zocalo Cosmopolitan Marfil 10x3 cm. / 3,93”x 1,18” D474
186661 Angulo Cosmopolitan Marfil 1,5x25 cm. / 0,39”x9,84” D205
186660 Corner London Cosmopolitan Marfil 5x3 cm. / 1,96”x1,18” D363
186574 Listel Oro Chiaro 1,5x75 cm. / 0,39” x 29,52” D299
169
186573 Listel Argento 1,5x75 cm. / 0,39” x 29,52” D299
186578 Strip Oro 2x75 cm. / 0,78” x 29,52” D432
163
186579 Strip Platino 2x75 cm. / 0,78” x 29,52” D412
281
186762 Renoir25x75cm. / 9,84”x29,52” D925
281
186774 Capitel Oro Viejo9x25cm. / 3,54”x9,84” D260
281
186773 Alzata Oro Viejo 15x25cm. / 5,91”x 9,84” D461
239229179177173 261 267 279 281
173 179 237 255
177 179 229
177 179 229
177 179
177 179
177 179
177 201

14Novedad / New Páginas con información del producto y fotografías de ambiente / Pages with product information and ambience photografies
ceramics(Ceramica / Ceramic)
289
186710 Cosmopolitan Travertino 25x75cm. / 9,84”x29,52” M872
186711 Cosmopolitan Onice 25x75cm. / 9,84”x29,52” M872
237 255
186754 Caesar25x75cm. / 9,84”x29,52” D926
186744 Qatif25x75cm. / 9,84”x29,52” D926
257
186753 Nuur25x75cm. / 9,84”x29,52” D935
253
186751 Dalias25x75cm. / 9,84”x29,52” ST987
237 253 255 257

15Novedad / NewPáginas con información del producto y fotografías de ambiente / Pages with product information and ambience photografies
ceramics(Ceramica / Ceramic)
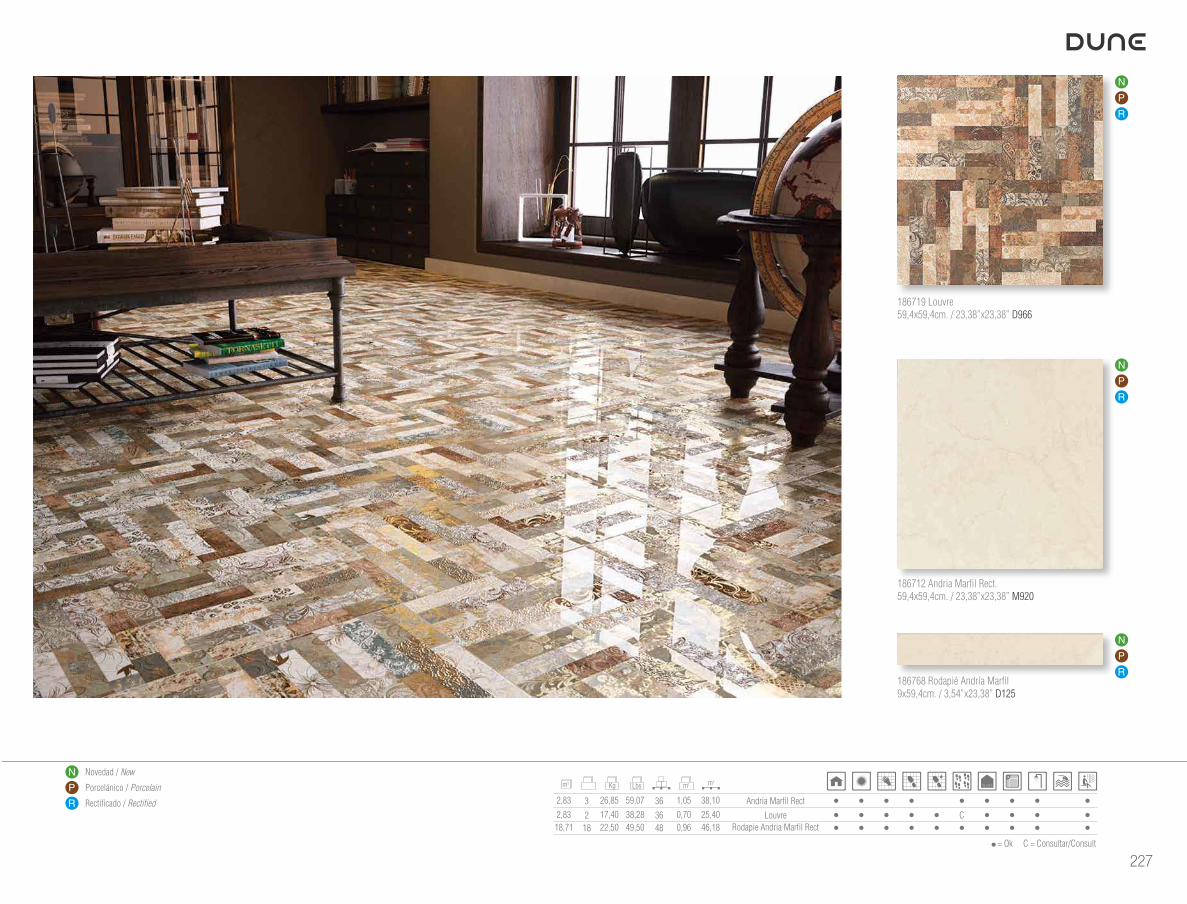
186719 Louvre 59,4x59,4cm. / 23,38”x23,38” D966
229
227
186718 Concordia 59,4x59,4cm. / 23,38”x23,38” D979
186770 Rodapié Vicenza Onice Rect.9x58,4cm. / 3,54”x22.99” D224
186768 Rodapié Andria Marfil Rect.9x59,4cm. / 3,54”x23,38” D125
235
186717 Perugia Deco58,4x58,4cm. / 22,99”x22.99” D966
186714 Vicenza Onice Rect.58,4x58,4cm. / 22,99”x22.99” M944
186712 Andria Marfil Rect. 59,4x59,4cm. / 23,38”x23,38” M920
235
186716 Perugia 58,4x58,4cm. / 22,99”x22.99” D966
289
227 229 239 267 281
235 255 257
227 239
235 255
16Novedad / New Páginas con información del producto y fotografías de ambiente / Pages with product information and ambience photografies
ceramics(Ceramica / Ceramic)
231
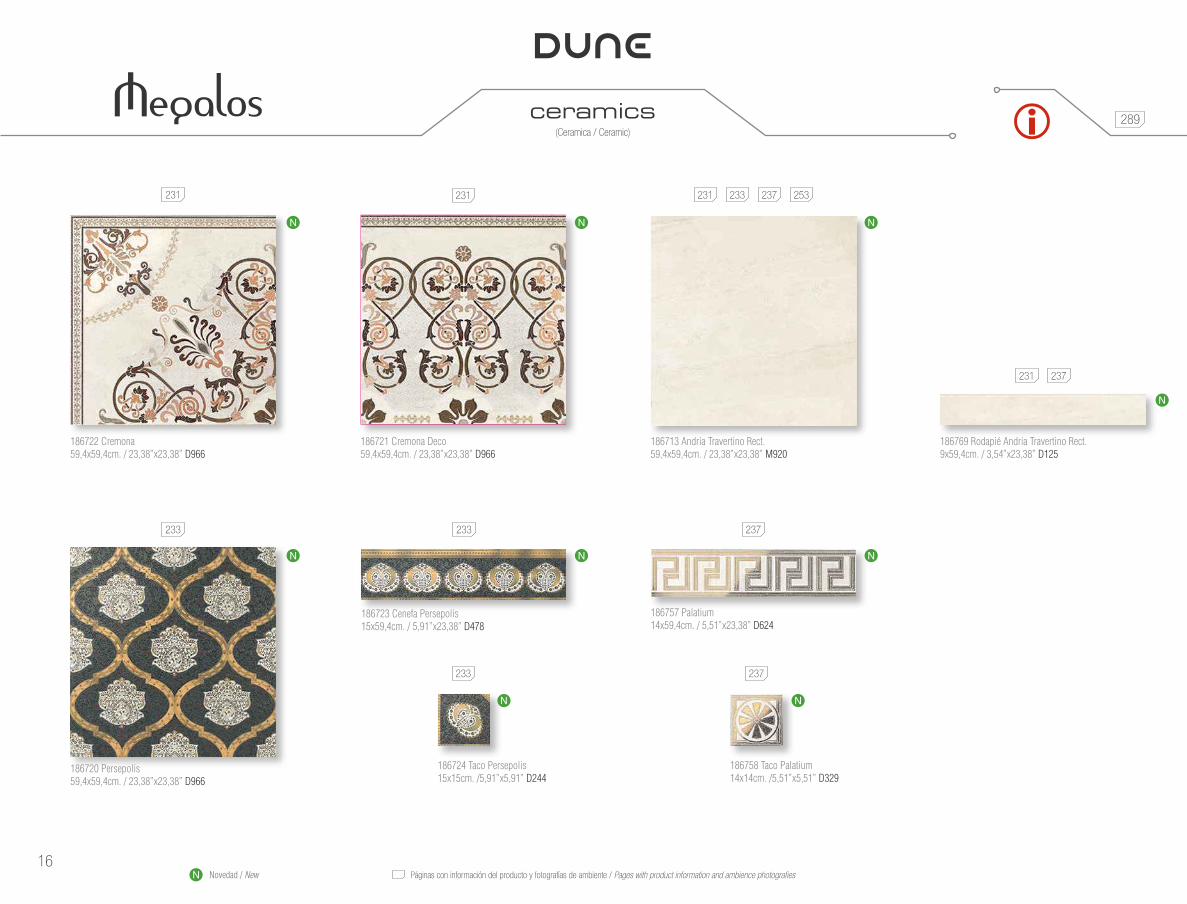
186722 Cremona59,4x59,4cm. / 23,38”x23,38” D966
233
233
186723 Cenefa Persepolis15x59,4cm. / 5,91”x23,38” D478
237
186757 Palatium14x59,4cm. / 5,51”x23,38” D624
186724 Taco Persepolis15x15cm. /5,91”x5,91” D244
237
186758 Taco Palatium14x14cm. /5,51”x5,51” D329
186713 Andria Travertino Rect.59,4x59,4cm. / 23,38”x23,38” M920
289
231
186721 Cremona Deco 59,4x59,4cm. / 23,38”x23,38” D966
233
186720 Persepolis 59,4x59,4cm. / 23,38”x23,38” D966
186769 Rodapié Andria Travertino Rect.9x59,4cm. / 3,54”x23,38” D125
231 233 237 253
231 237

110
Kg m2m2 m2
Lbs
= Ok C = Consultar/Consult
186637 Tiffany Black28,1x28,1 cm. / 11,02”x11,02” D920
Producto delicado / Delicate product
Contiene oro / Contains gold
Contiene platino / Contains platinum
111
Kg m2m2 m2
Lbs
Producto delicado / Delicate product
Contiene oro / Contains gold
Contiene platino / Contains platinum
= Ok C = Consultar/Consult
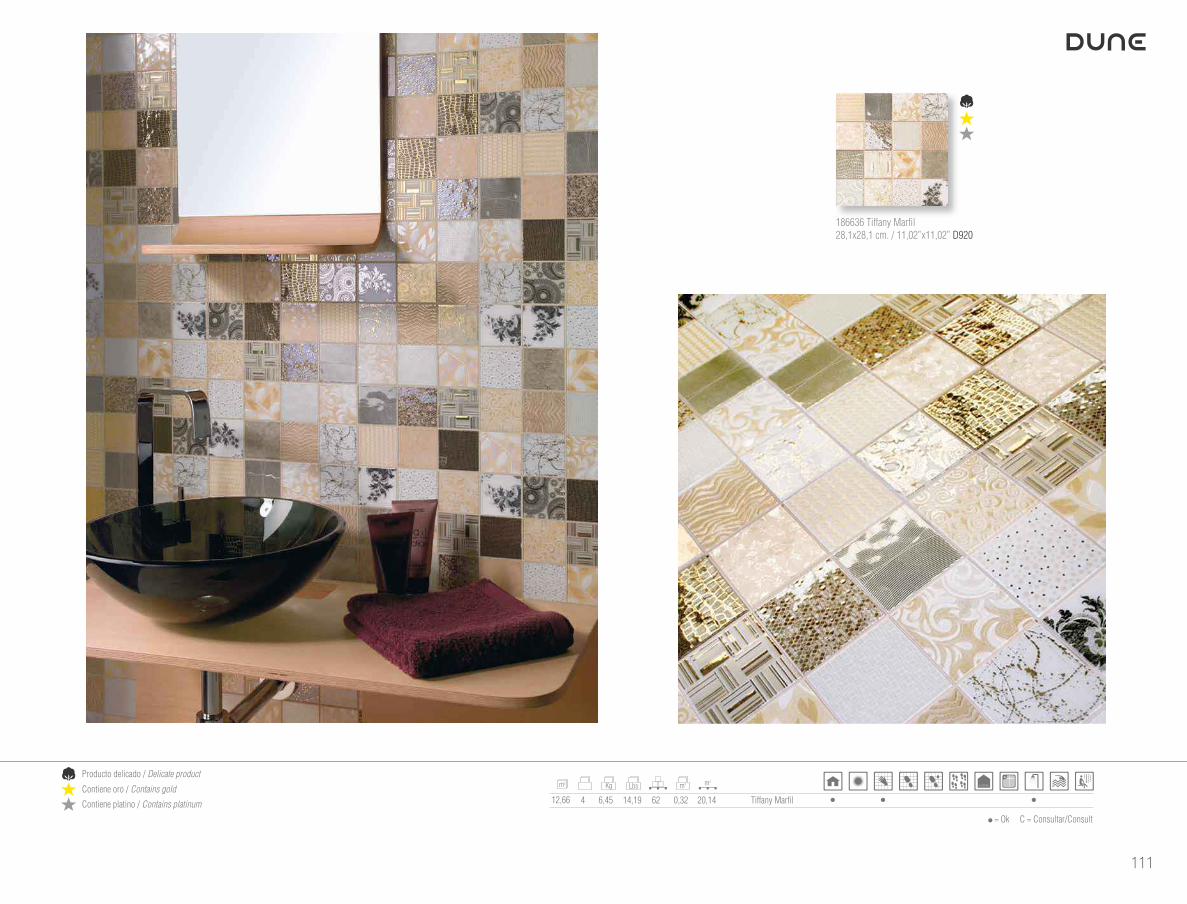
186636 Tiffany Marfil28,1x28,1 cm. / 11,02”x11,02” D920

112
Kg m2m2 m2
Lbs
= Ok C = Consultar/Consult
186662 Absolut25x27,1 cm. / 9,84”x10,62” D935
Producto delicado / Delicate product
Contiene oro / Contains gold
Contiene platino / Contains platinum

Kg m2m2 m2
Lbs
= Ok C = Consultar/Consult
178

179
Kg m2m2 m2
Lbs
Porcelánico / Porcelain
Producto delicado / Delicate product
Aplicación metálica PVD / Metalic application PVD (+info p.xxx)
= Ok C = Consultar/Consult
186595 Zocalo Cosmopolitan Marfil 10x75 cm. / 3,93”x29,52” D545
186541 Cosmopolitan Marfil 25x75cm. / 9,84”x29,52” M872
186569 Natasha 25x75cm. / 9,84”x29,52” D916
186599 London Cosmopolitan Marfil 5x75 cm. / 1,96”x29,52” D405
186565 Acanto 60x60cm. / 23,62”x23,62” D962
186542 Firenze Marfil 60x60cm. / 23,62”x23,62” M893
186578 Strip Oro 2x75 cm. / 0,78” x 29,52” D432
186648 Bañera Vintage Granito/Oro170x80x72 cm./ 66,92”x31,49”x28,34”
186661 Angulo Cosmopolitan Marfil 1,5x25 cm. / 0,39”x9,84” D205
186660 Corner London Cosmopolitan Marfil 5x3 cm. / 1,96”x1,18” D363
186659 Corner Zocalo Cosmopolitan Marfil 10x3 cm. / 3,93”x1,18” D474
186572 Rodapié Firenze Marfil9x60cm. / 3,54”x23,62” D125
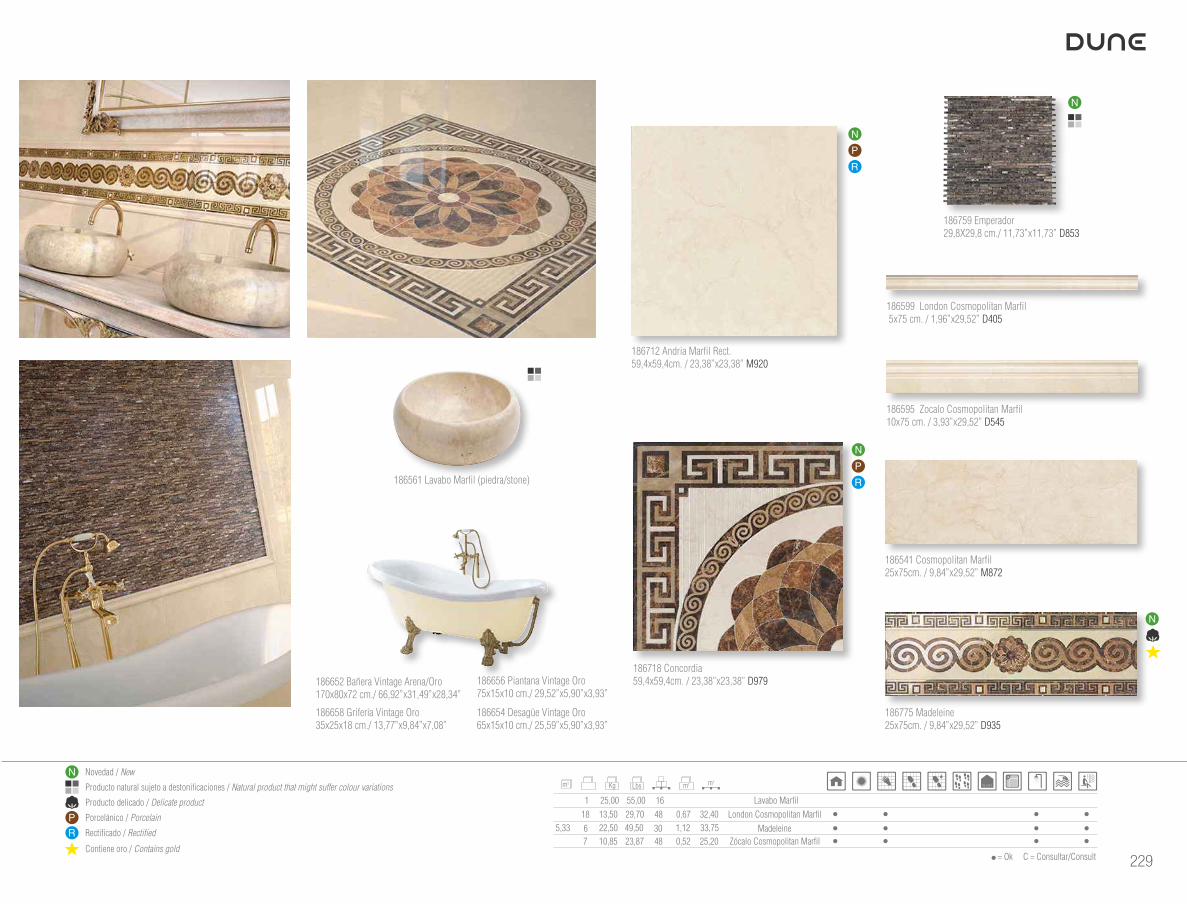
186561 Lavabo Marfil (piedra/stone)
186658 Grifería Vintage Oro35x25x18 cm./ 13,77”x9,84”x7,08”
186656 Piantana Vintage Oro75x15x10 cm./ 29,52”x5,90”x3,93”
186654 Desagüe Vintage Oro65x15x10 cm./ 25,59”x5,90”x3,93”
Producto natural sujeto a destonificaciones / Natural product that might suffer colour variations
Contiene oro / Contains gold

226
227
Kg m2m2 m2
Lbs
Novedad / New
Porcelánico / Porcelain
Rectificado / Rectified
= Ok C = Consultar/Consult
186719 Louvre 59,4x59,4cm. / 23,38”x23,38” D966
186768 Rodapié Andria Marfil9x59,4cm. / 3,54”x23,38” D125
186712 Andria Marfil Rect. 59,4x59,4cm. / 23,38”x23,38” M920

14,50 31,90
= Ok C = Consultar/Consult
Kg m2m2 m2
Lbs
228
229
Novedad / New
Porcelánico / Porcelain
Rectificado / Rectified
Producto delicado / Delicate product
Producto natural sujeto a destonificaciones / Natural product that might suffer colour variations
Contiene oro / Contains gold= Ok C = Consultar/Consult
Kg m2m2 m2
Lbs
186775 Madeleine25x75cm. / 9,84”x29,52” D935
186541 Cosmopolitan Marfil 25x75cm. / 9,84”x29,52” M872
186595 Zocalo Cosmopolitan Marfil 10x75 cm. / 3,93”x29,52” D545
186599 London Cosmopolitan Marfil 5x75 cm. / 1,96”x29,52” D405
186759 Emperador29,8X29,8 cm./ 11,73”x11,73” D853
186561 Lavabo Marfil (piedra/stone)
186718 Concordia 59,4x59,4cm. / 23,38”x23,38” D979
186712 Andria Marfil Rect. 59,4x59,4cm. / 23,38”x23,38” M920
186652 Bañera Vintage Arena/Oro170x80x72 cm./ 66,92”x31,49”x28,34”
186658 Grifería Vintage Oro35x25x18 cm./ 13,77”x9,84”x7,08”
186656 Piantana Vintage Oro75x15x10 cm./ 29,52”x5,90”x3,93”
186654 Desagüe Vintage Oro65x15x10 cm./ 25,59”x5,90”x3,93”

232

233
Kg m2m2 m2
Lbs
= Ok C = Consultar/Consult
186724 Taco Persepolis15x15cm. /5,91”x5,91” D244
186723 Cenefa Persepolis15x59,4cm. / 5,91”x23,38” D478
186720 Persepolis 59,4x59,4cm. / 23,38”x23,38” D966
186713 Andria Travertino Rect.59,4x59,4cm. / 23,38”x23,38” M920
Novedad / New
Porcelánico / Porcelain
Rectificado / Rectified
238

239
Kg m2m2 m2
Lbs
= Ok C = Consultar/Consult
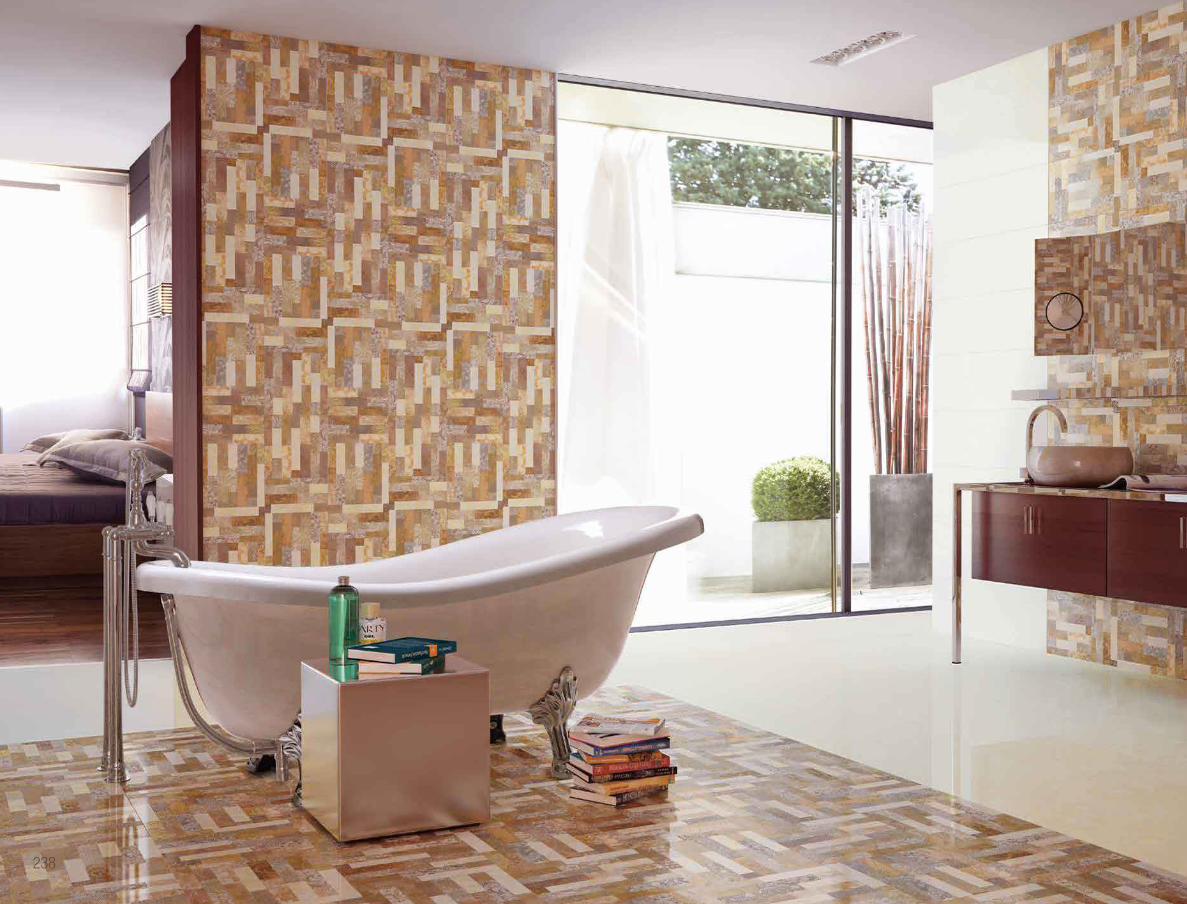
186729 Orsay 25x75cm. / 9,84”x29,52” D811
186719 Louvre 59,4x59,4cm. / 23,38”x23,38” D966
186712 Andria Marfil Rect. 59,4x59,4cm. / 23,38”x23,38” M920
Novedad / New
Porcelánico / Porcelain
Rectificado / Rectified
186652 Bañera Vintage Arena/Oro170x80x72 cm./ 66,92”x31,49”x28,34”
186658 Grifería Vintage Oro35x25x18 cm./ 13,77”x9,84”x7,08”
186656 Piantana Vintage Oro75x15x10 cm./ 29,52”x5,90”x3,93”
186654 Desagüe Vintage Oro65x15x10 cm./ 25,59”x5,90”x3,93”
186541 Cosmopolitan Marfil 25x75cm. / 9,84”x29,52” M872

285
Información Técnica / Technical Information
ADVERTENCIA: Siga atentamente estas instrucciones para asegurar una correcta colocación. - La instalación se debe realizar por un profesional cualificado.- Antes de la colocación, asegúrese de que el material esté en perfectas condiciones. Revise tonos, acabados y calibres ya que DUNE no aceptará reclamaciones o devoluciones de materiales ya colocados.- Antes de cada etapa, probar en una pieza todos los materiales y herramientas a utilizar y valorar el acabado final de la prueba. En caso de no conseguir el acabado deseado, no proseguir con la colocación y consultar con nuestro equipo comercial.
WARNING! For a proper installation, follow these instructions carefully:The installation must be performed by a skilled professional.DUNE will not accept any claims or returns of materials already installed. Before installation, make sure the material is in perfect condition. Check shades, finishes and sizes.Before each stage, take a piece and test all the materials and tools that you intend to use. If you don’t achieve the desired finish, do not proceed with the installation and contact our commercial staff for further advice.
1. PREPARACIÓN DE LA SUPERFICIE / PROPER PREPARATION OF SURFACE
La superficie donde se va a colocar el recubrimiento debe ser firme y estar perfectamente limpia y nivelada. Si existen desniveles superiores a 2 mm, utilizar productos adecuados para nivelar la superficie a recubrir. Se debe reparar cualquier grieta e imperfección, para que la pared quede totalmente lisa. La humedad de la pared debe ser inferior al 2%.
The wall must be firm, levelled, dry and clean. Uneven surfaces greater than 2 mm must be levelled with specific products. All cracks and imperfections should be repaired, so that the wall is completely smooth. The moisture content of the surface must be under 2%.
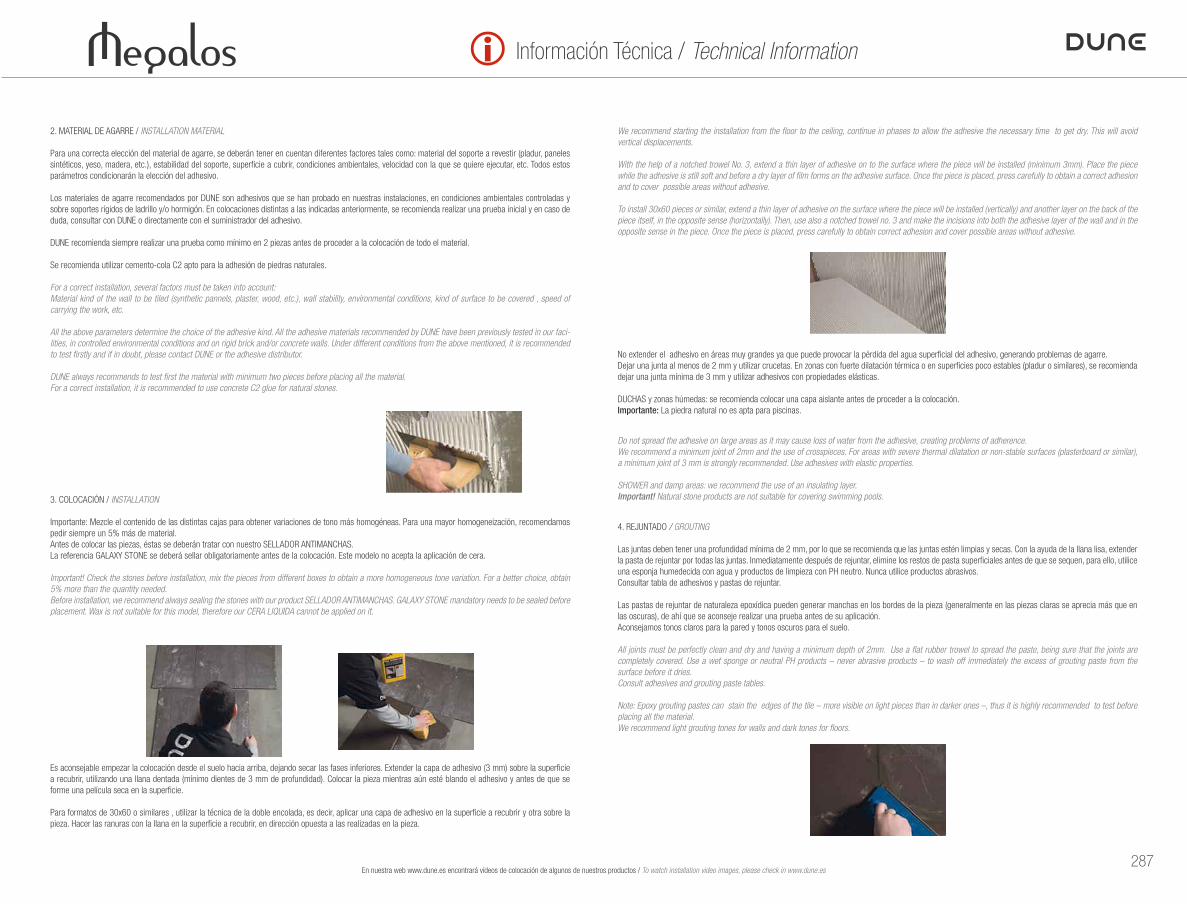
2. MATERIAL DE AGARRE / INSTALLATION MATERIAL
Para una correcta elección del material de agarre, se deberá tener en cuentan diferentes factores tales como: material del soporte a revestir (pladur, paneles sintéticos, yeso, madera, etc.), estabilidad del soporte, superficie a cubrir, condiciones ambientales, velocidad con la que se quiere ejecutar, etc. Todos estos parámetros condicionarán la elección del adhesivo.
Los materiales de agarre recomendados por DUNE son adhesivos que se han probado en nuestras instalaciones, en condiciones ambientales controladas y sobre soportes rígidos de ladrillo y/o hormigón. En colocaciones distintas a las indicadas anteriormente, se recomienda realizar una prueba inicial y en caso de duda, consultar con DUNE o directamente con el suministrador del adhesivo.
DUNE recomienda siempre realizar una prueba como mínimo en 2 piezas antes de proceder a la colocación de todo el material.Se recomienda utilizar adhesivos C2 o EPOXIDICOS blancos (para minimizar el cambio de tonalidad del cristal), cubriendo totalmente la superficie de la pieza a colocar (ver tabla adhesivos).
For a correct installation, several factors must be taken into account:Material kind of the wall to be tiled (synthetic pannels, plaster, wood, etc.), wall stability, environmental conditions, kind of surface to be covered , speed of carrying the work, etc.
All the above parameters determine the choice of the adhesive kind. All the adhesive materials recommended by DUNE have been previously tested in our faci-lities, in controlled environmental conditions and on rigid brick and/or concrete walls. Under different conditions from the above mentioned, it is recommended to test firstly and if in doubt, please contact DUNE or the adhesive distributor.
DUNE always recommends to test first the material with minimum two pieces before placing all the material. It is recommended to use white-coloured concrete C2 glue or white Exposy adhesives to minimize the change of the glass tone, covering the whole surface of the piece. Consult adhesives table.
En nuestra web www.dune.es encontrará vídeos de colocación de algunos de nuestros productos / To watch installation video images, please check in www.dune.es
3. COLOCACIÓN / INSTALLATION
Es aconsejable empezar la colocación desde el suelo hacia arriba, dejando secar las fases inferiores. Extender una fina capa de adhesivo sobre la superficie en la que se vaya a colocar la pieza (aprox. 3 mm) y colocar la pieza mientras aún esté blando el adhesivo y antes de que se forme una película seca en la superficie. Para el caso de formatos grandes (30x60 o similares) utilizar la técnica del doble encolado, extender una fina capa en la superficie a recubrir y otra sobre la pieza, haciendo las incisiones con la llana (llana nº 3) en direcciones opuestas. Una vez colocado, presione suavemente para obtener una correcta adhesión y eliminar los posibles huecos sin adhesivo.
Para mejorar la sujeción de las piezas mientras seca el adhesivo, se recomienda fijar las piezas con ayuda de un listón de madera o cinta adhesiva. Para corregir la posición de las bases, se recomienda quitarlas y limpiarlas bien por la parte de atrás antes de volver a colocarlas.
We recommend starting the installation from the floor to the ceiling, continue in phase to allow the adhesive the necessary time to get dry. Extend a thin layer of adhesive on to the surface where the piece will be installed (3mm approx.) Then, use a notched trowel no. 3 to make incisions into the adhesive layer. Place the piece while the adhesive is still soft and before a dry layer of film forms on the adhesive surface.
To install 30x60 pieces or similar, extend a thin layer of adhesive on the surface where the piece will be installed (vertically) and another layer on the back of the piece itself, in the opposite sense (horizontally). Then, use also a notched trowel no. 3 and make the incisions into both the adhesive layer of the wall and in the opposite sense in the piece. Once the piece is placed, press carefully to obtain correct adhesion and cover possible areas without adhesive.
For a better fixing, it is recommended to set the pieces by using some tape or a wooden strip. To correct the position of the bases, it is recommended to take them off and correctly clean their back part before placing them again.
Dejar una junta al menos de 2 mm y utilizar crucetas. En zonas con fuerte dilatación térmica o en superficies poco estables (pladur), se recomienda dejar una junta mínima de 3 mm y utilizar adhesivos con propiedades elásticas de naturaleza epoxidica.
La serie VITRA se puede combinar con el resto de series de MEGALOS, siempre que se utilicen crucetas para definir la junta.
We recommend a minimum joint of 2mm and the use of crosspieces. For areas with severe thermal dilatation or non-stable surfaces (plasterboard), a minimum joint of 3 mm is strongly recommended.
VITRA series’ items can be combined with the rest of MEGALOS tiles (Ceramics and Stone), as long as crosspieces are used to correctly define the joints.

286
Información Técnica / Technical Information
4. REJUNTADO / GROUTING
Las juntas deben estar limpias y secas, con una profundidad mínima de 2 mm. Con la ayuda de una llana lisa extender la pasta de rejuntar por todas las juntas. Ver tabla adhesivos y pastas de rejuntar.No dejar secar el material sobrante, limpiándolo lo antes posible.Para conseguir una mayor impermeabilización, se recomienda utilizar juntas epoxídicas, especialmente en zona de aguas.Importante: El color del material utilizado influirá en el aspecto final del producto. DUNE aconseja realizar una prueba antes de rejuntar toda la superficie.All joints must be perfectly clean and dry and having a minimum depth of 2mm. Use a flat rubber trowel to spread the paste, being sure that the joints are completely covered. Consult adhesives table. Use a sponge and clean water to wash off the excess of grout paste from the surface before it dries. For better waterproofing, we recommend an epoxy grouting paste, especially in water areas.Important: The colour of the grouting paste might change the product’s appearance. We recommend to test with some pieces before grouting the entire surface.
5. CORTE Y PERFORADO / CUTTING AND DRILLING
CORTES RECTOS:*cortador de vidrio (especial para piezas de más de 10 mm) de espesor. Con la ayuda de una regla, presionar suavemente mientras corta, siguiendo la línea de corte de un extremo a otro. Para las piezas de PRISMA (con telas dentro) necesitaremos un cutter, de modo que cortemos la tela por la parte de atrás de la pieza. STRIGHT CUTS:*glass cutter (especially for pieces over 10mm thick). With the help of a ruler, apply a soft pressure while cutting, following the cutting line from one end to the other. For PRISMA tiles (with fabrics inside) use a cutter to cut the back of the piece.
*radial con disco de diamante refrigerada con agua y de corona continua. Cortar la pieza por la costilla (cara no vista) para disminuir el descantillado. Las piezas de PRISMA (con telas dentro) no presentan dificultad de corte siempre que se corten lentamente y que el disco esté refrigerado por agua.
*diamond blade wheel fitted with water-cooling systems. It should be cut on the back of the piece to avoid scratching. PRISMA tiles (with fabrics inside) can be easily cut, as long as the cut is done slowly and the blade is cooled with water.
CORTES EN FORMA DE POLÍGONOS O FIGURAS:*utilizar sistemas hidráulicos.
CUTS IN POLYGONAL SHAPES: *to be made with hydraulic systems.
PETROGLYPHEAdvertencia: son piezas de piedra decoradas con un acabado metálico que se aplica en frío, sin una posterior cocción, por lo que su adherencia es más débil. Además, hay que tener en cuenta que, debido al relieve de la pizarra, pueden existir pequeñas zonas de la parte decorada no recubiertas completamente por el acabado metálico. Este tipo de imperfecciones son un efecto propio de la pieza y no se considerarán como defecto.
PETROGLYPHE Warning: They are natural stone tiles carved and decorated through a cold painting process, that means that the metal finish is delicate. Please consider that, due to irregular relief of the slate, some decorated areas might not be completely covered by the metal enamel. These kinds of imperfections are a particular property of the piece and thus it will not be considered as default.
1. PREPARACIÓN DE LA SUPERFICIE / PROPER PREPARATION OF SURFACE
La superficie donde se va a colocar el recubrimiento debe ser firme y estar perfectamente limpia y nivelada. Si existen desniveles superiores a 2 mm, utilizar productos adecuados para nivelar la superficie a recubrir. Se debe reparar cualquier grieta e imperfección, para que la pared quede totalmente lisa. La humedad de la pared debe ser inferior al 2%.
The wall must be firm, levelled, dry and clean. Uneven surfaces greater than 2 mm must be levelled with specific products. All cracks and imperfections should be repaired, so that the wall is completely smooth. The moisture content of the surface must be under 2%.
Perforado:Utilizar una broca específica para vidrio (se recomienda utilizar brocas huecas acabadas en diamante). La broca debe estar constantemente refrigerada por agua. Para las piezas de 30x60 o similares no realizar agujeros con diámetro superior a 8mm. Utilizar el taladro a bajas revoluciones y sin percutor. No presione con fuerza, deje que la broca vaya perforando gradualmente para evitar roturas en los bordes o grietas posteriores. Extremar las precauciones en la parte final del proceso de perforado.
Drilling :Use a drill bit for perforating glass. We recommend using hollow drills with a diamond finish. The drill bit must be constantly cooled. The diameter of holes on 30x60 tiles or similar must be smaller than 8mm. Use the drill at a low speed and without hammer action.Do not apply excessive pressure on the piece while drilling; allow the drill bit to gradually perforate. Otherwise, the edges can break or cracks can appear later on. Be especially careful when the hole is about to be finished, this is the most delicate step.
6. LIMPIEZA Y MANTENIMIENTO / CLEANING AND MAINTENANCE
Utilizar una esponja húmeda para limpiar el material sobrante tras la colocación. Es importante no dejarlo secar. En caso de que el material se seque, utilizar desincrustantes de cemento. La limpieza diaria se puede realizar con productos de limpieza estándares, sin utilizar materiales de limpieza abrasivos.
Use a damp sponge and clean water to wash off the excess of grouting paste from the surface. It is very important to do this before the paste dries. If this happens, use a cement remover to clean the surface. For everyday cleaning, use regular cleaners. Do not use abrasive products.
En nuestra web www.dune.es encontrará vídeos de colocación de algunos de nuestros productos / To watch installation video images, please check in www.dune.es
287
Información Técnica / Technical Information
2. MATERIAL DE AGARRE / INSTALLATION MATERIAL
Para una correcta elección del material de agarre, se deberán tener en cuentan diferentes factores tales como: material del soporte a revestir (pladur, paneles sintéticos, yeso, madera, etc.), estabilidad del soporte, superficie a cubrir, condiciones ambientales, velocidad con la que se quiere ejecutar, etc. Todos estos parámetros condicionarán la elección del adhesivo.
Los materiales de agarre recomendados por DUNE son adhesivos que se han probado en nuestras instalaciones, en condiciones ambientales controladas y sobre soportes rígidos de ladrillo y/o hormigón. En colocaciones distintas a las indicadas anteriormente, se recomienda realizar una prueba inicial y en caso de duda, consultar con DUNE o directamente con el suministrador del adhesivo.
DUNE recomienda siempre realizar una prueba como mínimo en 2 piezas antes de proceder a la colocación de todo el material.
Se recomienda utilizar cemento-cola C2 apto para la adhesión de piedras naturales.
For a correct installation, several factors must be taken into account:Material kind of the wall to be tiled (synthetic pannels, plaster, wood, etc.), wall stability, environmental conditions, kind of surface to be covered , speed of carrying the work, etc.
All the above parameters determine the choice of the adhesive kind. All the adhesive materials recommended by DUNE have been previously tested in our faci-lities, in controlled environmental conditions and on rigid brick and/or concrete walls. Under different conditions from the above mentioned, it is recommended to test firstly and if in doubt, please contact DUNE or the adhesive distributor.
DUNE always recommends to test first the material with minimum two pieces before placing all the material. For a correct installation, it is recommended to use concrete C2 glue for natural stones.
3. COLOCACIÓN / INSTALLATION
Importante: Mezcle el contenido de las distintas cajas para obtener variaciones de tono más homogéneas. Para una mayor homogeneización, recomendamos pedir siempre un 5% más de material.Antes de colocar las piezas, éstas se deberán tratar con nuestro SELLADOR ANTIMANCHAS. La referencia GALAXY STONE se deberá sellar obligatoriamente antes de la colocación. Este modelo no acepta la aplicación de cera.
Important! Check the stones before installation, mix the pieces from different boxes to obtain a more homogeneous tone variation. For a better choice, obtain 5% more than the quantity needed.Before installation, we recommend always sealing the stones with our product SELLADOR ANTIMANCHAS. GALAXY STONE mandatory needs to be sealed before placement. Wax is not suitable for this model, therefore our CERA LIQUIDA cannot be applied on it.
Es aconsejable empezar la colocación desde el suelo hacia arriba, dejando secar las fases inferiores. Extender la capa de adhesivo (3 mm) sobre la superficie a recubrir, utilizando una llana dentada (mínimo dientes de 3 mm de profundidad). Colocar la pieza mientras aún esté blando el adhesivo y antes de que se forme una película seca en la superficie.
Para formatos de 30x60 o similares , utilizar la técnica de la doble encolada, es decir, aplicar una capa de adhesivo en la superficie a recubrir y otra sobre la pieza. Hacer las ranuras con la llana en la superficie a recubrir, en dirección opuesta a las realizadas en la pieza.
We recommend starting the installation from the floor to the ceiling, continue in phases to allow the adhesive the necessary time to get dry. This will avoid vertical displacements.
With the help of a notched trowel No. 3, extend a thin layer of adhesive on to the surface where the piece will be installed (minimum 3mm). Place the piece while the adhesive is still soft and before a dry layer of film forms on the adhesive surface. Once the piece is placed, press carefully to obtain a correct adhesion and to cover possible areas without adhesive.
To install 30x60 pieces or similar, extend a thin layer of adhesive on the surface where the piece will be installed (vertically) and another layer on the back of the piece itself, in the opposite sense (horizontally). Then, use also a notched trowel no. 3 and make the incisions into both the adhesive layer of the wall and in the opposite sense in the piece. Once the piece is placed, press carefully to obtain correct adhesion and cover possible areas without adhesive.
No extender el adhesivo en áreas muy grandes ya que puede provocar la pérdida del agua superficial del adhesivo, generando problemas de agarre.Dejar una junta al menos de 2 mm y utilizar crucetas. En zonas con fuerte dilatación térmica o en superficies poco estables (pladur o similares), se recomienda dejar una junta mínima de 3 mm y utilizar adhesivos con propiedades elásticas.
DUCHAS y zonas húmedas: se recomienda colocar una capa aislante antes de proceder a la colocación. Importante: La piedra natural no es apta para piscinas.
Do not spread the adhesive on large areas as it may cause loss of water from the adhesive, creating problems of adherence.We recommend a minimum joint of 2mm and the use of crosspieces. For areas with severe thermal dilatation or non-stable surfaces (plasterboard or similar), a minimum joint of 3 mm is strongly recommended. Use adhesives with elastic properties.
SHOWER and damp areas: we recommend the use of an insulating layer.Important! Natural stone products are not suitable for covering swimming pools.
4. REJUNTADO / GROUTING
Las juntas deben tener una profundidad mínima de 2 mm, por lo que se recomienda que las juntas estén limpias y secas. Con la ayuda de la llana lisa, extender la pasta de rejuntar por todas las juntas. Inmediatamente después de rejuntar, elimine los restos de pasta superficiales antes de que se sequen, para ello, utilice una esponja humedecida con agua y productos de limpieza con PH neutro. Nunca utilice productos abrasivos.Consultar tabla de adhesivos y pastas de rejuntar.
Las pastas de rejuntar de naturaleza epoxídica pueden generar manchas en los bordes de la pieza (generalmente en las piezas claras se aprecia más que en las oscuras), de ahí que se aconseje realizar una prueba antes de su aplicación.Aconsejamos tonos claros para la pared y tonos oscuros para el suelo.
All joints must be perfectly clean and dry and having a minimum depth of 2mm. Use a flat rubber trowel to spread the paste, being sure that the joints are completely covered. Use a wet sponge or neutral PH products – never abrasive products – to wash off immediately the excess of grouting paste from the surface before it dries. Consult adhesives and grouting paste tables.
Note: Epoxy grouting pastes can stain the edges of the tile – more visible on light pieces than in darker ones –, thus it is highly recommended to test before placing all the material. We recommend light grouting tones for walls and dark tones for floors.
En nuestra web www.dune.es encontrará vídeos de colocación de algunos de nuestros productos / To watch installation video images, please check in www.dune.es

288
Información Técnica / Technical Information
5. LIMPIEZA Y MANTENIMIENTO / CLEANING AND MAINTENANCE
Utilice agua y/o productos de limpieza con PH neutro.Para el mantenimiento se recomiendan utilizar SELLADOR ANTIMANCHAS (mantiene el aspecto original de la piedra) o CERA LÍQUIDA PROTECTORA (realza los colores y el brillo de la piedra). Antes de aplicarlos es imprescindible que la superficie esté perfectamente limpia y seca.
Importante: Se recomienda probar en una pieza para ver el acabado final.
Ambos productos se pueden utilizar a la vez: primero el sellador (dejar secar) y luego la cera. La frecuencia de aplicación del sellador y/o la cera dependerá del uso que se le dé al material.
Use water and/or neutral pH cleaning products.For maintenance we recommend one of the following products:
SELLADOR ANTIMANCHAS (Stain -Proof Sealer), which does not change the appearance of the stones,CERA LIQUIDA (Liquid protective wax) this will enhance the colour of the stone.Both products may be used together: first the SELLADOR and, once dry, the wax CERA LIQUIDA. The application of these products must be repeated if, over time, they lose effectiveness. The frequency will depend on the use.
Before applying any of our stone products, make sure that the surface is perfectly clean and dry. Test the treatment products on a piece to see the result.
TECA NATURAAdvertencia: las variaciones de color en la madera es una característica propia de los productos naturales que debe ser entendida y aceptada. La teca con la que elaboramos nuestras referencias NATURA se ha sometido a un tratamiento tanto de secado como de esterilización, en el cual se queman sus carbohidratos mediante un proceso térmico, a fin de evitar futuras humedades y ataques de termitas y/u hongos.En el reverso llevan adherida una fibra fenólica, compuesta de papel kraft, impregnado con resina, que procede de bosques 100% reforestados.
Importante: Este producto está diseñado exclusivamente para uso en revestimiento interior de zonas secas. En el caso de querer disponer de material para colocarlo en el exterior, consultar con DUNE las distintas alternativas.
TECA NATURA Warning!: The teak wood used to make our NATURA reference is a natural product so colour variations are a normal feature. This fact should be understood and accepted. The wood has undergone a drying and sterilization process, in which carbohydrate is burned by a thermal process in order to prevent future moisture and termite attack and/or fungi.
On the rear face there is a phenolic fibre plate composed of kraft paper, which comes from 100% replanted forests. This paper is impregnated with phenol-formaldehyde resin, specially formulated for our teak products, to keep the wood well adhered. This product is only recommended for indoor use. If you require outdoor use, please contact our commercial staff to study your specific needs.
1. PREPARACIÓN DE LA SUPERFICIE / PROPER PREPARATION OF SURFACE
La superficie donde se va a colocar el recubrimiento debe ser firme y estar perfectamente limpia y nivelada. Si existen desniveles superiores a 2 mm, utilizar productos adecuados para nivelar la superficie a recubrir. Se debe reparar cualquier grieta e imperfección, para que la pared quede totalmente lisa. La humedad de la pared debe ser inferior al 2%.
The wall must be firm, levelled, dry and clean. Uneven surfaces greater than 2 mm must be levelled with specific products. All cracks and imperfections should be repaired, so that the wall is completely smooth. The moisture content of the surface must be under 2%.
2. MATERIAL DE AGARRE / INSTALLATION MATERIAL
Utilizar adhesivos de poliuretano con propiedades flexibles. No colocar exceso de material adhesivo y seguir las instrucciones del fabricante del adhesivo.
También, se puede utilizar un adhesivo epoxídico apto para maderas.Ver tabla de adhesivos recomendados.
Use polyurethane adhesive with flexible properties. Do not apply too much of this material and always follow the adhesive manufacturer’s instructions.
An epoxy adhesive suitable for wood can also be used.Consult adhesives table.
3. COLOCACIÓN / INSTALLATION
Antes de ser colocadas deben permanecer a temperatura ambiente durante al menos 48 horas.
Extender la capa de adhesivo (2 mm) sobre la superficie de recubrir, mediante una llana dentada (dientes de 3 mm de profundidad). Colocar la pieza mientras que el adhesivo aún esté blando y antes de que se forme una película seca en la superficie. Golpear suavemente con un martillo de goma, de modo que se eliminen los huecos que se hayan formado entre el soporte y la pieza.
The pieces should remain at room temperature for at least 48 hours before installation. With the help of a notched trowel no.3, extend a thin layer of adhesive (2 mm) on the surface where the piece will be installed. Place the piece while the adhesive is still soft and before a dry layer of film forms on the adhesive surface. Use a rubber hammer to press the pieces and cover possible areas without adhesive.
4. REJUNTADO / GROUTING
Este producto no necesita rejuntado.Do not grout.
5. LIMPIEZA Y MANTENIMIENTO / CLEANING AND MAINTENANCE
La limpieza se puede realizar mediante sistemas de vía seca (aspiradores, plumero, etc.) o mediante bayetas ligeramente húmedas.
Se recomienda FILA PARQUET NATURE para un adecuado mantenimiento, aplicándolo en función del desgaste del producto, y teniendo en cuenta que puede variar ligeramente el color.
Importante: Aconsejamos hacer una prueba en un trozo de pieza antes de aplicarlo a toda la superficie.
The cleaning might be done with dry systems (vacuum, duster, etc..) or with a wet soft sponge or slightly damp cloths.
We recommend the sealer FILA PARQUET NATURE. The application must be repeated if, over time, it loses effectiveness. The frequency will also depend on the use. Before applying, make sure the surface is perfectly clean and dry. Test firstly the product on a piece to see the result.
En nuestra web www.dune.es encontrará vídeos de colocación de algunos de nuestros productos / To watch installation video images, please check in www.dune.es

289
Información Técnica / Technical Information
1. PREPARACIÓN DE LA SUPERFICIE / PROPER PREPARATION OF SURFACE
La superficie donde se va a colocar el recubrimiento debe ser firme y estar perfectamente limpia y nivelada. Si existen desniveles superiores a 2 mm, utilizar productos adecuados para nivelar la superficie a recubrir. Se debe reparar cualquier grieta e imperfección, para que la pared quede totalmente lisa. La humedad de la pared debe ser inferior al 2%.
The wall must be firm, levelled, dry and clean. Uneven surfaces greater than 2 mm must be levelled with specific products. All cracks and imperfections should be repaired, so that the wall is completely smooth. The moisture content of the surface must be under 2%.
2. MATERIAL DE AGARRE / INSTALLATION MATERIAL
Para una correcta elección del material de agarre, se deberán tener en cuentan diferentes factores tales como: material del soporte a revestir (pladur, paneles sintéticos, yeso, madera, etc.), estabilidad del soporte, superficie a cubrir, condiciones ambientales, velocidad con la que se quiere ejecutar, etc. Todos estos parámetros condicionarán la elección del adhesivo.
Los materiales de agarre recomendados por DUNE son adhesivos que se han probado en nuestras instalaciones, en condiciones ambientales controladas y sobre soportes rígidos de ladrillo y/o hormigón. En colocaciones distintas a las indicadas anteriormente, se recomienda realizar una prueba inicial y en caso de duda, consultar con DUNE o directamente con el suministrador del adhesivo.DUNE recomienda siempre realizar una prueba como mínimo en 2 piezas antes de proceder a la colocación de todo el material.
Piezas con pasta porosa: colocar con cemento cola C1.Piezas con pasta no porosa: Gres y Porcelánico, colocar con cemento cola C2. Ver tabla de adhesivos recomendados.
For a correct installation, several factors must be taken into account:Material kind of the wall to be tiled (synthetic pannels, plaster, wood, etc.), wall stability, environmental conditions, kind of surface to be covered , speed of carrying the work, etc.
All the above parameters determine the choice of the adhesive kind. All the adhesive materials recommended by DUNE have been previously tested in our faci-lities, in controlled environmental conditions and on rigid brick and/or concrete walls. Under different conditions from the above mentioned, it is recommended to test firstly and if in doubt, please contact DUNE or the adhesive distributor. DUNE always recommends to test first the material with minimum two pieces before placing all the material.
White and Red body wall tile: C1 concrete glue. (Consult adhesives table)Stoneware and porcelain tile: C2 concrete glue. (Consult adhesives table)Consult adhesives table.
3. COLOCACIÓN / INSTALLATION
Extender una fina capa de adhesivo sobre la superficie en la que se vaya a colocar la pieza (aprox. 3 mm) y utilizar una llana nº 3 para realizar las incisiones. Colocar la pieza mientras aún esté blando el adhesivo y antes de que se forme una película seca en la superficie. Una vez colocado, presione suavemente para obtener una correcta adhesión y eliminar los posibles huecos sin adhesivo.
PRODUCTOS PVD Y DELICADOS Durante la colocación, limpiar los restos de materiales sobrantes antes de que endurezcan. No utilizar productos ácidos, como “quitacementos” ya que deteriorarían la superficie decorada. Para evitar el deterioro de la superficie, no se deben de apilar las piezas.
Para formatos de 30x60 o similares, utilizar la técnica de la doble encolada, es decir, aplicar una capa de cemento-cola en la superficie a recubrir y otra sobre la parte posterior de la pieza. Hacer las ranuras con la llana en la superficie a recubrir en dirección opuesta a las realizadas en la pieza.
No extender el adhesivo en superficies muy grandes ya que puede provocar la pérdida de agua de la superficie del cemento-cola, generando problemas de adherencia. Seguir las instrucciones del fabricante del adhesivo.
Se recomienda colocar el material con juntas de 2 mm como mínimo.
Observaciones: En las zonas con fuerte dilatación térmica o con superficies poco estables (pladur), se recomienda colocar con una junta mayor (mínimo 3 mm) y utilizar adhesivos con propiedades elásticas de naturaleza epoxídica.
With the help of a notched trowel no.3, extend a thin layer of adhesive (minimum 3mm) on the surface where the piece will be. Place the piece while the adhesive is still soft and before a dry layer of film forms on the adhesive surface. Once the piece is placed, press carefully to obtain a correct adhesion and to cover possible areas without adhesive.
PVD and DELICATE ITEMS : While installing, use a wet sponge and clean water to wash off the excess of grouting paste or concrete from the surface. It is very important to do this before the paste starts drying. Follow the adhesive manufacturer’s instructions. Avoid using abrasive cleaners as these may damage the surface. To prevent damage to the surface, do not pile pieces up.
To install 30x60 pieces or similar, extend a thin layer of adhesive on the surface where the piece will be installed (vertically) and another layer on the back of the piece itself, in the opposite sense (horizontally). Then, use also a notched trowel no. 3 and make the incisions into both the adhesive layer of the wall and in the opposite sense in the piece.
Do not spread the adhesive on large areas as this may cause loss of water from the adhesive, creating problems of adherence.
We recommend a minimum joint of 2mm and the use of crosspieces. For areas with severe thermal dilatation or non-stable surfaces (plasterboard), a minimum joint of 3 mm is strongly recommended. Use adhesives with elastic properties.
4. REJUNTADO / GROUTING
Las juntas deben estar limpias y secas, con una profundidad mínima de 2 mm. Con la ayuda de una llana lisa extender la pasta de rejuntar por todas las juntas. No dejar secar el material sobrante, limpiándolo lo antes posible.
Para conseguir una mayor impermeabilización, se recomienda utilizar juntas epoxídicas.
Ver tabla de adhesivos y juntas recomendadas.
Importante: El modelo MAYÓLICA está decorado mediante precortes, por lo que para conseguir un acabado correcto, es importante que se siga la linealidad de los mencionados precortes. Dejar juntas entre las piezas de igual tamaño que los precortes. No es necesario utilizar crucetas debido a que los precortes sirven de referencia.
Importante: Los modelos LOUVRE y ORSAY se pueden colocar de forma aleatoria con el fin de evitar la repetición de la misma secuencia en la superficie cubierta.
All the joints must be perfectly clean and dry and having a minimum depth of 2mm. Use a flat rubber trowel to spread the paste, making sure that all joints are completely covered. Use a sponge and clean water to immediately wash off the excess of grouting paste from the surface before it dries.
For a better waterproofing we recommend an epoxy grouting paste, especially in water areas.Consult adhesives and grouting materials tables.
Important: Item MAYOLICA is decorated by pre-cuts, so that it is recommended to follow the lines of those pre-cuts in order to get a correct finish. Make sure that the distance between one sheet and another is the same as the one of pre-cuts, so that all the joints look alike. It is not necessary to use crosspieces as the pre-cuts can be used as joining references. Items LOUVRE and ORSAY can be placed randomly in order to avoid sequences repetitions on surface.
5. LIMPIEZA Y MANTENIMIENTO / CLEANING AND MAINTENANCE
Utilizar una esponja húmeda y productos de limpieza estándares. No es preciso realizar ningún mantenimiento adicional. En caso de que el material se seque, utilizar desincrustantes de cemento.PRODUCTOS PVD Y DELICADOS: No utilizar productos agresivos ni utensilios de limpieza abrasivos.
Use regular cleaners. Additional maintenance is not required. If the paste dries on the surface, use a cement remover to clean the tiles. PVD and DELICATE ITEMS: Use neutral pH cleaning products and apply them with a soft cloth or sponge. Avoid using abrasive and anti-lime cleaners or steel wool.
En nuestra web www.dune.es encontrará vídeos de colocación de algunos de nuestros productos / To watch installation video images, please check in www.dune.es
290
Información Técnica / Technical Information
PREGUNTAS FRECUENTES / FAQ´S
¿Qué materiales se pueden utilizar en el EXTERIOR y cuáles no?El uso que se le vaya a dar una base depende de la porosidad. Por norma general, si la porosidad está por encima del 3% sólo se puede utilizar en el interior y si está por encima del 6% su uso se restringe a la pared.
Si la porosidad es baja (inferior al 3%), su uso se puede destinar tanto al interior como al exterior y tanto como revestimiento como pavimento.
No obstante, existen otros criterios para determinar el uso de los recubrimientos, pero el más utilizado es el de la absorción.
Consultar tabla de usos y, en caso de duda, contactar con su asesor comercial.
¿Qué es PVD? Es una técnica decorativa que recubre las piezas con una capa metálica. La película es tan fina que potencia cualquier característica de la superficie que cubre: el brillo, los detalles el relieve… cualquier irregularidad o matiz queda destacado.
Es especialmente espectacular el efecto del PVD en la serie EXTRAVAGANZA, donde el elevado volumen de las piezas se ve realzado por el brillo aporta el PVD, creando un interesante juego de luces y sombras.
A nivel técnico, PVD son las siglas del proceso Physical Vapour Deposition, en el que las piezas entran en un reactor donde se ha generado el vacío y reciben una especie de bombardeo de vapor metálico, realizado mediante un arco eléctrico.
Gracias a este proceso, las partículas metálicas quedan fuertemente adheridas a la superficie de la pieza. Este acabado no aumenta ni disminuye la resisten-cia de la pieza, por lo que los productos de PVD de nuestro catálogo no son aptos para exterior ya que, al estar realizados en porosa, no tienen el índice de absorción de agua requerido para tal uso.
Which materials can be installed OUTDOORS? This issue depends on the porosity of material itself. Generally, if the porosity is higher than 3%, materials are only suitable for indoor use, and if the rate is higher than 6%, they are only suitable for wall covering.
If the porosity is lower than 3%, products are suitable both for indoors and outdoors; as well as for floor and for wall coverings.
Nevertheless, there are other criteria that determinate the use of materials, being the most common one is water absorption.
See table of uses and contact our commercial staff for further information
What is PVD?It is a decorative technique that coats surfaces with a metal layer. The metal coat is so thin that it enhances all the surface features, such as brightness, details on the relief, etc. Any irregularity or shade is highlighted.
The result is especially spectacular in our PVD EXTRAVAGANZA series, where high volumes are enhanced by the brightness provided by PVD, creating an interesting contrast of lights and shadows.
Technically speaking, PVD is the shortening of Physical Vapour Deposition, a process in which the pieces enter a reactor where vacuum has been generated and they receive a kind of bombing with metal vapour carried out by an electric arc. Through this process, metallic particles are strongly attached to the surface of the piece. This finish does not increase or decrease the strength of the piece.
Please, notice that PVD products in our catalogue are not suitable for outdoor use because of the porous clay they are made of as they do not have the water absorption rates required for outdoor use.
En nuestra web www.dune.es encontrará vídeos de colocación de algunos de nuestros productos / To watch installation video images, please check in www.dune.es

291
Información Técnica / Technical Information
Referencia UNE-EN ISO 10545-2:97 UNE-EN ISO 10545-2:97 UNE-EN ISO 10545-3:97 EN- 101:91 UNE-EN ISO 10545-11:97 UNE-EN ISO 10545-14:98 UNE-EN ISO 10545-13:98 UNE-EN ISO 10545-13:98 UNE-ENV 12633:2003 UNE-EN ISO 10545-5:98
± 0,5 mm ± 0,3% <0,5% 3 Sin cuarteo 5 GA GLA
VITRA PAVIMENTO ± 0,8 mm ± 0,3% <0,5% 5 Sin cuarteo 5 GA GA 20 USRV (clase 1) 0,84
Referencia UNE-EN ISO 10545-2:97 UNE-EN ISO 10545-3:97 EN- 101:91 UNE-EN ISO 10545-14:98 UNE-EN ISO 10545-13:98 UNE-EN ISO 10545-13:98 UNE-ENV 12633:2003 UNE-EN 12372:1999 UNE-EN 12371:2002 UNE-EN 1341:2002
STONE ± 1 mm <0,5% > 3 5 UC UC 19 mm
Referencia UNE-EN ISO 10545-2:97 UNE-EN ISO 10545-2:97 UNE-EN ISO 10545-3:97 EN- 101:91 UNE-EN ISO 10545-11:97 UNE-EN ISO 10545-14:98 UNE-EN ISO 10545-13:98 UNE-EN ISO 10545-13:98 UNE-ENV 12633:2003 UNE-EN ISO 10545-4:97 UNE-EN ISO 10545-7:96
± 0,4 mm ± 0,3% PB: >10% 3 Sin cuarteo 5 GLA
± 0,65 mm ± 0,3% PB: >10% 3 Sin cuarteo 5 GLA - -
± 0,4 mm ± 0,3% PB: >10% 4 Sin cuarteo 5 GLA
SERIE TITAN ± 0,5 mm ± 0,3% < 0,5% 4 Sin cuarteo 5 GA GLA Clase 1
SERIE MILANO ± 0,2 mm ± 0,5 % < 0,5% 4 Sin cuarteo 5 GA GLA Clase 1
SERIE LIVING ±0,5 mm ± 0,5 % < 0,5% 4 Sin cuarteo 5 GA GLA Clase 1 > 30 N / mm2
FIRENZE MARFIL ±1 mm ± 0,5 % < 0,5% 4 Sin cuarteo 5 GA GLA Clase 1 > 40 N / mm2 4
SERIE LIVING ±0,5 mm ± 0,5 % < 0,5% 4 Sin cuarteo 5 GA GLA Clase 1 > 30 N / mm2
±0,2 mm ± 0,5 % < 3% 3 Sin cuarteo >3 GA GLA Clase 0 > 40 N / mm2 4
Tolerancia Dimensional Length & Wide
Planitud de Superficie Flatness
Absorción agua Water absortion
Dureza al rayado Scratch hardness (Mohs)
Resistencia al cuarteo Crazing resistance
Resistencia a las manchas Stain resistance
Resistencia prod. Piscina Household detergents and additives for swimming-pools
Resistencia química Chemical resistance
Resistencia al deslizamiento (clases) Friction resistance
Resistencia al impacto Impact resistance
VITRA REVESTIMIENTO
Tolerancia Dimensional Length & Wide
Absorción agua Water absortion
Dureza al rayado Scratch hardness (Mohs)
Resistencia a las manchas Stain resistance
Resistencia prod. Piscina Household detergents and additives for swimming-pools
Resistencia química Chemical resistance
Resistencia al deslizamiento (clases) Friction resistance
Resistencia a la flexión Breaking strenght
Resistencia a la abrasión Resistance to abrasion
En seco: 49 USRV (clase 3) En Humedo: 10 USRV (clase 0) Inicial: 18,9 MPa 48 ciclos hielo-deshielo: 20,5 MPa
Tolerancia Dimensional Length & Wide
Planitud de Superficie Flatness
Absorción agua Water absortion
Dureza al rayado Scratch hardness (Mohs)
Resistencia al cuarteo Crazing resistance
Resistencia a las manchas Stain resistance
Resistencia prod. Piscina Household detergents and additives for swimming-pools
Resistencia química Chemical resistance
Resistencia al deslizamiento (clases) Friction resistance
Resistencia a la flexión Breaking strenght
Resistencia a la abrasión Resistance to abrasion
(PEI)
CERAMICS REVESTIMIENTO
BRILLO > 15 N / mm2
SERIE COSMOPOLITAN > 15 N / mm2
CERAMICS REVESTIMIENTO
MATE > 15 N / mm2
> 50 N / mm2 Cement:: 3 Basalto: 2
> 40 N / mm2
Anthracite y Cement:: 3 Beige: 4
Grafito: 3, Beige: 4 y Blanco: 5
Grafito: 3, Beige: 4 y Blanco: 5
SERIE 60X60 RECTIFICADA
En nuestra web www.dune.es encontrará vídeos de colocación de algunos de nuestros productos / To watch installation video images, please check in www.dune.es

292
Información Técnica / Technical Information
ADVERTENCIA: Siga atentamente estas instrucciones para asegurar una correcta colocación. - La instalación se debe realizar por un profesional cualificado.- Antes de la colocación, asegúrese de que el material esté en perfectas condiciones. Revise tonos, acabados y calibres ya que DUNE no aceptará reclamaciones o devoluciones de materiales ya colocados.- Antes de cada etapa, probar en una pieza todos los materiales y herramientas a utilizar y valorar el acabado final de la prueba. En caso de no conseguir el acabado deseado, no proseguir con la colocación y consultar con nuestro equipo comercial.
WARNING! For a proper installation, follow these instructions carefully:The installation must be performed by a skilled professional.DUNE will not accept any claims or returns of materials already installed. Before installation, make sure the material is in perfect condition. Check shades, finishes and sizes.Before each stage, take a piece and test all the materials and tools that you intend to use. If you don’t achieve the desired finish, do not proceed with the installation and contact our commercial staff for further advice.
1. PREPARACIÓN DE LA SUPERFICIE / PROPER PREPARATION OF SURFACE
La superficie donde se va a colocar el recubrimiento debe ser firme y estar perfectamente limpia y nivelada. Si existen desniveles superiores a 2 mm, utilizar productos adecuados para nivelar la superficie a recubrir. Se debe reparar cualquier grieta e imperfección, para que la pared quede totalmente lisa. La humedad de la pared debe ser inferior al 2%.
Recomendamos pintar de blanco la pared para minimizar la visualización del adhesivo. Si la colocación es en zonas de aguas, impermeabilizar la superficie a recubrir.
The wall must be firm, levelled, dry and clean. Uneven surfaces greater than 2 mm must be levelled with specific products. All cracks and imperfections should be repaired, so that the wall is completely smooth. The moisture content of the surface must be under 2%.
We recommend you to paint the wall in white so that the adhesive used is visually concealed. For wet areas, the wall must be waterproofed before installation.
2. MATERIAL DE AGARRE / INSTALLATION MATERIAL
* Acabado rejuntado: Recomendamos adhesivos C2 (ver tabla adhesivos). Estos productos sirven a la vez de material de agarre como de rejuntado ya que, por rebose, pasa por los huecos de la malla y rellena los espacios entre piedras. * Acabado sin rejuntar: (para retro-iluminar o con fines decorativos), utilizar un adhesivo elástico de alta resistencia (poliuretano o epoxi).
*Grouted look: C2 adhesives (concrete glue C2) are recommended for this use (consult adhesives table). These products are suitable both for gluing and grouting at the same time, because when used on the wall and pressure is applied, the paste pours through the mesh holes and fills the spaces between the stones.*Non-grouted look: (for backlight or decorative use). Use an elastic adhesive of high strength (polyurethane or epoxy).
3. COLOCACIÓN / INSTALLATION
Antes de empezar a colocación, probar en una pieza para ver el efecto final. Recomendamos realizar la colocación desde el suelo hasta el techo y hacerlo por fases, dejando que se sequen las zonas ya colocadas. Ello evitará desplazamientos verticales.
* Acabado rejuntado: Aplicar con llana dentada, extender la capa del adhesivo (2 a 4 mm) sobre la superficie a recubrir. Colocar la pieza mientras que el adhe-sivo aún esté blando y antes de que se forme una película seca en la superficie. Una vez colocada la pieza sobre el adhesivo fresco, moverla de arriba abajo y de izquierda a derecha para rellenar los huecos existentes. A continuación, presionar suavemente para obtener una correcta adhesión y eliminar los posibles huecos sin adhesivo. Con la ayuda de un pincel húmedo, repartir posibles excesos del adhesivo.* Acabado sin rejuntar: Utilizar una pistola de silicona convencional. Distribuir adhesivo de manera que pueda estar en contacto con el mayor número posible de piedras.
En ambos casos recomendamos arrancar y recolocar alguna de las teselas de la zona de unión entre dos mallas, de modo que mejore el acabado del mosaico.
We recommend starting the installation from the floor to the ceiling, continuing in phases to allow the adhesive the necessary time to get dry. This will avoid vertical displacements.
*Grouted look: Use a notched trowel and extend a thin layer of adhesive (2-4 mm) on the surface on which the piece will be installed. Place the piece while the adhesive is still soft and before a dry layer of film forms on the adhesive surface. Once the piece is placed, move a little bit up and down and from left to right so that the product passes through the mesh. Then, press carefully to obtain a correct adhesion and to cover all possible areas without adhesive. With the aid of a wet brush, distribute and remove the excess paste that covers the stones.*Non-grouted look: Use a conventional silicone gun. Apply this product on the back of the piece, ensuring that it is in direct contact with the greatest possible number of stones.
For both options, we recommend pulling out some stones and relocating them in the joint between two mosaics to improve the finish.
4. REJUNTADO / GROUTING
No rejuntar por la superficie. Si se desea cubrir los huecos entre las piedras, consultar opciones del punto 3. COLOCACIÓN .Do not apply grouting paste on the surface. If you need to cover any empty space between the stones, please consult paragraph 3. INSTALLATION .
En nuestra web www.dune.es encontrará vídeos de colocación de algunos de nuestros productos / To watch installation video images, please check in www.dune.es

293
Información Técnica / Technical Information
5. LIMPIEZA Y MANTENIMIENTO / CLEANING AND MAINTENANCE
Utilizar una esponja húmeda para limpiar el material sobrante tras la colocación. Es importante no dejarlo secar. En caso de que el material se seque, nunca utilizar productos agresivos ya que dañarían a la piedra.
Para la limpieza diaria, utilizar una bayeta húmeda y productos con PH neutro. No utilizar productos agresivos.
Use a wet sponge and clean water to wash off the excess of grouting paste from the surface. It is very important to do this before the paste dries. Do not use abrasive cleaners to remove it as they will damage the stones.
For everyday cleaning, use a damp cloth and neutral pH products. Do not use abrasive products.
1. PREPARACIÓN DE LA SUPERFICIE / PROPER PREPARATION OF SURFACE
La superficie donde se va a colocar el recubrimiento debe ser firme y estar perfectamente limpia y nivelada. Si existen desniveles superiores a 2 mm, utilizar productos adecuados para nivelar la superficie a recubrir. Se debe reparar cualquier grieta e imperfección, para que la pared quede totalmente lisa. La humedad de la pared debe ser inferior al 2%.
The wall must be firm, levelled, dry and clean. Uneven surfaces greater than 2 mm must be levelled with specific products. All cracks and imperfections should be repaired, so that the wall is completely smooth. The moisture content of the surface must be under 2%.
2. MATERIAL DE AGARRE / INSTALLATION MATERIAL
Para una correcta elección del material de agarre, se deberán tener en cuentan diferentes factores tales como: material del soporte a revestir (pladur, paneles sintéticos, yeso, madera, etc.), estabilidad del soporte, superficie a cubrir, condiciones ambientales, velocidad con la que se quiere ejecutar, etc. Todos estos parámetros condicionarán la elección del adhesivo.
Los materiales de agarre recomendados por DUNE son adhesivos que se han probado en nuestras instalaciones, en condiciones ambientales controladas y sobre soportes rígidos de ladrillo y/o hormigón. En colocaciones distintas a las indicadas anteriormente, se recomienda realizar una prueba inicial y en caso de duda, consultar con DUNE o directamente con el suministrador del adhesivo.
DUNE recomienda siempre realizar una prueba como mínimo en 2 piezas antes de proceder a la colocación de todo el material.
Se recomienda utilizar cemento-cola C2 de color blanco para minimizar el cambio de tonalidad del crista o adhesivos EPOXIDICOS blancos (Ver tabla adhesivos).
En PISCINAS utilizar un cemento-cola C2 o adhesivos EPOXIDICOS. Se aconseja utilizar un material de rejuntar lo mas impermeable posible. DUNE recomienda productos de tipo epoxi. Importante: Es imprescindible que la superficie a recubrir sea impermeable, por lo que se aconseja realizar las pruebas pertinentes para asegurarse de ello.
For a correct installation, several factors must be taken into account:Material kind of the wall to be tiled (synthetic pannels, plaster, wood, etc.), wall stability, environmental conditions, kind of surface to be covered , speed of carrying the work, etc.
All the above parameters determine the choice of the adhesive kind. All the adhesive materials recommended by DUNE have been previously tested in our faci-lities, in controlled environmental conditions and on rigid brick and/or concrete walls. Under different conditions from the above mentioned, it is recommended to test firstly and if in doubt, please contact DUNE or the adhesive distributor.
DUNE always recommends to test first the material with minimum two pieces before placing all the material.
It is recommended to use white-coloured concrete C2 glue or white Exposy adhesives to minimize the change of the glass tone.For swimming pool walls, use a white-coloured concrete C2 glue or Epoxy adhesives and waterproof grouting materials. We also recommend an epoxy grouting paste. It is essential that the pool is completely waterproof. We recommend using specific sealing materials. Make as many tests as necessary to ensure the swimming pool walls are completely waterproof. Please, note levelling materials are not waterproof.
3. COLOCACIÓN / INSTALLATION
Es aconsejable empezar la colocación desde el suelo hacia arriba, dejando secar las fases inferiores. Extender una fina capa de adhesivo sobre la superficie en la que se vaya a colocar la pieza (aprox. 3 mm) y utilizar una llana nº 3 para realizar las incisiones. Colocar la pieza mientras aún esté blando el adhesivo y antes de que se forme una película seca en la superficie. Una vez colocado, presione suavemente para obtener una correcta adhesión y eliminar los posibles huecos sin adhesivo.
Importante: para mantener la uniformidad de las juntas, asegurarse de que la distancia entre las piezas es igual a la junta entre las teselas.
En mosaicos irregulares, recomendamos arrancar y recolocar alguna de las teselas de la zona de unión entre dos mallas, de modo que mejore el acabado del mosaico.
We recommend starting the installation from the floor to the ceiling, continue in phase to allow the adhesive the necessary time to get dry. This will avoid vertical displacements. Extend a thin layer of adhesive on to the surface where the piece will be installed (3mm approx.) Then, use a notched trowel no. 3 to make incisions into the adhesive layer. Place the piece while the adhesive is still soft and before a dry layer of film forms on the adhesive surface. Once the piece is placed, press carefully to obtain a correct adhesion and to cover possible areas without adhesive.
Important: make sure that the distance between one sheet and another is the same as the one among the components so that all the joints look alike.
For irregular mosaics, we recommend pulling out some components and relocating them in the joint between two sheets. This will improve the finish of the mosaic.
En nuestra web www.dune.es encontrará vídeos de colocación de algunos de nuestros productos / To watch installation video images, please check in www.dune.es
294
Información Técnica / Technical Information
4. REJUNTADO / GROUTING
Las juntas deben estar limpias y secas, con una profundidad mínima de 2 mm. Con la ayuda de una llana lisa extender la pasta de rejuntar por todas las juntas. No dejar secar el material sobrante, limpiándolo lo antes posible.
Para conseguir una mayor impermeabilización, se recomienda utilizar juntas epoxídicas, especialmente en zona de aguas.
Consultar tabla materiales para rejuntar.
Importante: El color del material utilizado influirá en el aspecto final del producto. DUNE aconseja realizar una prueba antes de rejuntar toda la superficie.
All joints must be perfectly clean and dry and having a minimum depth of 2mm. Use a flat rubber trowel to spread the paste, being sure that the joints are completely covered. Use a sponge and clean water to wash off the excess of grout paste from the surface before it dries.
For better waterproofing, we recommend an epoxy grouting paste, especially in water areas.
Consult the grouting materials table.
Important:The colour of the grouting paste might change the product’s appearance. We recommend to test with some pieces before grouting the entire surface.
5. CORTE / CUTTING Utilizar tenazas especiales para mosaico vítreo.Use special pliers for glass mosaics.
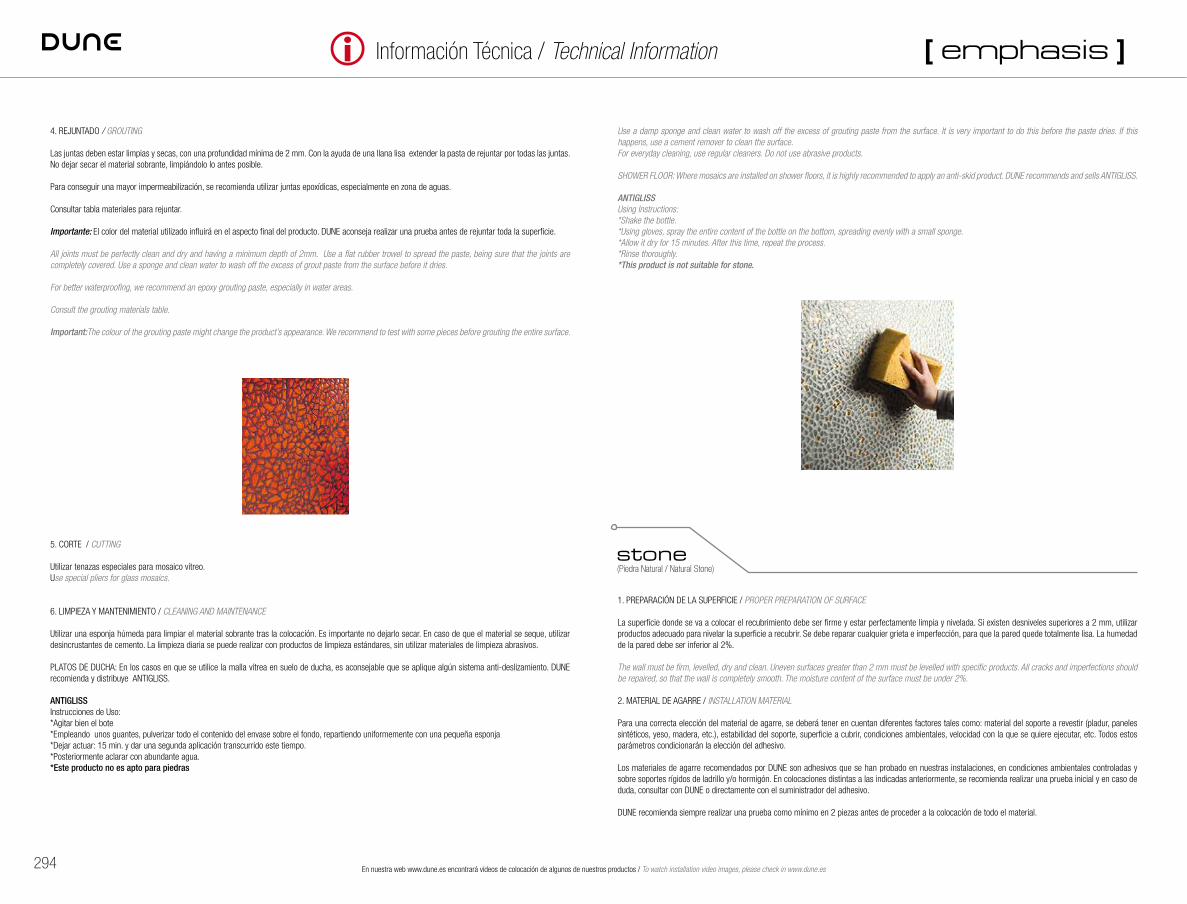
6. LIMPIEZA Y MANTENIMIENTO / CLEANING AND MAINTENANCE
Utilizar una esponja húmeda para limpiar el material sobrante tras la colocación. Es importante no dejarlo secar. En caso de que el material se seque, utilizar desincrustantes de cemento. La limpieza diaria se puede realizar con productos de limpieza estándares, sin utilizar materiales de limpieza abrasivos.
PLATOS DE DUCHA: En los casos en que se utilice la malla vítrea en suelo de ducha, es aconsejable que se aplique algún sistema anti-deslizamiento. DUNE recomienda y distribuye ANTIGLISS.
ANTIGLISSInstrucciones de Uso:*Agitar bien el bote*Empleando unos guantes, pulverizar todo el contenido del envase sobre el fondo, repartiendo uniformemente con una pequeña esponja*Dejar actuar: 15 min. y dar una segunda aplicación transcurrido este tiempo. *Posteriormente aclarar con abundante agua.*Este producto no es apto para piedras
Use a damp sponge and clean water to wash off the excess of grouting paste from the surface. It is very important to do this before the paste dries. If this happens, use a cement remover to clean the surface. For everyday cleaning, use regular cleaners. Do not use abrasive products.
SHOWER FLOOR: Where mosaics are installed on shower floors, it is highly recommended to apply an anti-skid product. DUNE recommends and sells ANTIGLISS.
ANTIGLISSUsing Instructions:*Shake the bottle.*Using gloves, spray the entire content of the bottle on the bottom, spreading evenly with a small sponge.*Allow it dry for 15 minutes. After this time, repeat the process. *Rinse thoroughly.*This product is not suitable for stone.
1. PREPARACIÓN DE LA SUPERFICIE / PROPER PREPARATION OF SURFACE
La superficie donde se va a colocar el recubrimiento debe ser firme y estar perfectamente limpia y nivelada. Si existen desniveles superiores a 2 mm, utilizar productos adecuado para nivelar la superficie a recubrir. Se debe reparar cualquier grieta e imperfección, para que la pared quede totalmente lisa. La humedad de la pared debe ser inferior al 2%.
The wall must be firm, levelled, dry and clean. Uneven surfaces greater than 2 mm must be levelled with specific products. All cracks and imperfections should be repaired, so that the wall is completely smooth. The moisture content of the surface must be under 2%.
2. MATERIAL DE AGARRE / INSTALLATION MATERIAL
Para una correcta elección del material de agarre, se deberá tener en cuentan diferentes factores tales como: material del soporte a revestir (pladur, paneles sintéticos, yeso, madera, etc.), estabilidad del soporte, superficie a cubrir, condiciones ambientales, velocidad con la que se quiere ejecutar, etc. Todos estos parámetros condicionarán la elección del adhesivo.
Los materiales de agarre recomendados por DUNE son adhesivos que se han probado en nuestras instalaciones, en condiciones ambientales controladas y sobre soportes rígidos de ladrillo y/o hormigón. En colocaciones distintas a las indicadas anteriormente, se recomienda realizar una prueba inicial y en caso de duda, consultar con DUNE o directamente con el suministrador del adhesivo.
DUNE recomienda siempre realizar una prueba como mínimo en 2 piezas antes de proceder a la colocación de todo el material.
En nuestra web www.dune.es encontrará vídeos de colocación de algunos de nuestros productos / To watch installation video images, please check in www.dune.es

295
Información Técnica / Technical Information
For a correct installation, several factors must be taken into account:Material kind of the wall to be tiled (synthetic pannels, plaster, wood, etc.), wall stability, environmental conditions, kind of surface to be covered , speed of carrying the work, etc.
All the above parameters determine the choice of the adhesive kind. All the adhesive materials recommended by DUNE have been previously tested in our faci-lities, in controlled environmental conditions and on rigid brick and/or concrete walls. Under different conditions from the above mentioned, it is recommended to test firstly and if in doubt, please contact DUNE or the adhesive distributor.
DUNE always recommends to test first the material with minimum two pieces before placing all the material. For a correct installation, it is recommended to use concrete C2 glue for natural stones.
3. COLOCACIÓN / INSTALLATION
Importante: Mezcle el contenido de las distintas cajas para obtener variaciones de tono más homogéneas. Para una mayor homogeneización, recomendamos pedir siempre un 5% más de material.Antes de colocar las piezas, éstas se deberán tratar con nuestro SELLADOR ANTIMANCHAS. La referencia GALAXY STONE MOSAIC se deberá sellar obligatoriamente antes de la colocación. Este modelo no acepta la aplicación de cera.MONTBLANC: No rejuntar y ayudarse con un martillo de goma para encajar las piezas entre sí.
Important:Check the stones before installation, mix the sheets from different boxes to obtain a more homogeneous tone variation. For a better choice, get 5% additional quantity to the one needed.Before installation, we recommend always sealing the stones with our product SELLADOR ANTIMANCHAS. GALAXY STONE MOSAIC mandatory needs to be sealed before placement. Wax is not suitable for this product, therefore our CERA LIQUIDA cannot be applied on it.MONTBLANC: Do not grout. Use a rubber mallet to fit the pieces together.
Es aconsejable empezar la colocación desde el suelo hacia arriba, dejando secar las fases inferiores. Extender la capa de cemento-cola (3 mm) sobre la su-perficie de recubrir, utilizando una llana dentada (mínimo dientes de 3 mm de profundidad). Colocar la pieza mientras aún esté blando el adhesivo y antes de que se forme una película seca en la superficie. No extender el cemento-cola en áreas muy grandes ya que puede provocar la pérdida del agua superficial del adhesivo, generando problemas de agarre.
Importante: para mantener la uniformidad de las juntas, asegurarse de que la distancia entre las piezas es igual a la junta entre las teselas. En mosaicos irregulares, recomendamos arrancar y recolocar alguna de las teselas de la zona de unión entre dos mallas, de modo que mejore el acabado del mosaico.
We recommend starting the installation from the floor to the ceiling, continue in phases to allow the adhesive the necessary time to get dry. This will avoid vertical displacements. With the help of a notched trowel No. 3, extend a thin layer of adhesive on to the surface where the piece will be installed (minimum 3mm). Place the piece while the adhesive is still soft and before a dry layer of film forms on the adhesive surface. Once the piece is placed, press carefully to obtain a correct adhesion and to cover possible areas without adhesive.Do not spread the adhesive on large areas as it may cause the adhesive loss of water creating problems of adherence.
Important: Make sure that the distance between one sheet and another is the same as the one among the components so that all the joints look alike. For irregular mosaics, we recommend pulling out some components and relocating them in the joint between two sheets. This will improve the finish.
DUCHAS y zonas húmedas: se recomienda colocar una capa aislante antes de proceder a la colocación. Importante: La piedra natural no es apta para piscinas.
SHOWER and damp areas: we recommend the use of an insulating layer. Important: Natural stone products are not suitable for covering swimming pools.
4. REJUNTADO / GROUTING
Las juntas deben tener una profundidad mínima de 2 mm, por lo que se recomienda que las juntas estén limpias y secas. Con la ayuda de la llana lisa, extender la pasta de rejuntar por todas las juntas. Inmediatamente después de rejuntar, elimine los restos de pasta superficiales antes de que se sequen (prestar especial atención a los huecos que puedan existir en las piedras). Para ello, utilice una esponja humedecida con agua y productos de limpieza con PH neutro. Nunca utilice productos abrasivos.
Consultar tabla pastas de rejuntar recomendadas.Aconsejamos tonos claros para la pared y tonos oscuros para el suelo.
All joints must be perfectly clean and dry and having a minimum depth of 2mm. Use a flat rubber trowel to spread the paste, being sure that the joints are completely covered. Use a wet sponge or neutral PH products – never abrasive products – to wash off immediately the excess of grouting paste from the surface before it dries. Pay special attention to the wholes that the stones may have.
Consult the grouting materials table.We recommend light grouting tones for walls and dark tones for floors.
GOLDENSTONE: lleva una aplicación decorativa superficial, por lo que es aconsejable rejuntar con una llana de goma, para evitar ser rayadas. Es muy impor-tante eliminar los restos de pasta antes de que se sequen sobre la superficie de la pieza, ya que una vez seca, para su eliminación habría que utilizar productos abrasivos que podrían dañar la pieza.
GOLDENSTONE: has a decorative application on its surface, thus we recommend applying the grout with the aid of a flat rubber trowel to avoid scratching. In this piece it is especially recommended to remove the paste before it dries on the surface of the piece. Once dry, the only option to eliminate the excess of grouting paste is using abrasive products that will damage the surface.
En nuestra web www.dune.es encontrará vídeos de colocación de algunos de nuestros productos / To watch installation video images, please check in www.dune.es

296
Información Técnica / Technical Information
5. LIMPIEZA Y MANTENIMIENTO / CLEANING AND MAINTENANCE
Utilice agua y/o productos de limpieza con PH neutro.Use water and/or neutral pH cleaning products.
Para el mantenimiento se recomienda utilizar los siguientes productos de sellado:
SELLADOR ANTI-MANCHAS, que mantiene el aspecto original de la piedra, o la CERA PROTECTORA, que realza los colores y el brillo de la piedra. Se pueden aplicar ambos productos, primero el sellador (dejar secar) y luego la cera. La frecuencia de aplicación del sellador y/o la cera dependerá del uso que se le dé al material.
Antes de aplicarlos es imprescindible que la superficie esté perfectamente limpia y seca. Importante: Se recomienda probar en una pieza para ver el acabado final.
For maintenance we recommend one of the following products:
SELLADOR ANTIMANCHAS (Stain -Proof Sealer), which does not change the appearance of the stones,CERA LIQUIDA (Liquid protective wax) this will enhance the colour of the stone.Both products may be used together: first the SELLADOR and, once dry, the wax CERA LIQUIDA. The application of these products must be repeated if, over time, they lose effectiveness. The frequency will depend on the use.
Before applying any of our stone products, make sure that the surface is perfectly clean and dry. Important: Test the treatment products on a piece to see the result.
AMAZONIA, BORNEO NATURE, TROPICANA NATURA Y TEAKAdvertencia: las variaciones de color en la madera son una característica propia de los productos naturales que debe ser entendida y aceptada. La teca con la que elaboramos nuestras referencias se ha sometido a un tratamiento tanto de secado como de esterilización, en el cual se queman sus carbohidratos mediante un proceso térmico, a fin de evitar futuras humedades y ataques de termitas y/u hongos.
En el reverso llevan adherida una fibra fenólica, compuesta de papel kraft, impregnado con resina, que procede de bosques 100% reforestados.
Importante: Estos productos están diseñados exclusivamente para uso en revestimiento interior de zonas secas. En el caso de querer disponer de material para colocarlo en el exterior, consultar con DUNE las distintas alternativas.
AMAZONIA, BORNEO NATURE,TROPICANA NATURA and TEAKWarning!: The teak wood used to make the three references above is a natural product so colour variations are a normal feature. This fact should be understood and accepted. The wood has undergone a drying and sterilization process, in which carbohydrate is burned by a thermal process in order to prevent future moisture and termite attack and/or fungi.
On the rear face there is a phenolic fibre plate composed of kraft paper, which comes from 100% replanted forests. This paper is impregnated with phenol-formaldehyde resin, specially formulated for our teak products, to keep the wood well adhered.
Important: These products are only recommended for indoor use. None of them is suitable for water areas. If you require outdoor use, please contact our commercial staff to study your specific needs.
1. PREPARACIÓN DE LA SUPERFICIE / PROPER PREPARATION OF SURFACE
La superficie donde se va a colocar el recubrimiento debe ser firme y estar perfectamente limpia y nivelada. Si existen desniveles superiores a 2 mm, utilizar productos adecuado para nivelar la superficie a recubrir. Se debe reparar cualquier grieta e imperfección, para que la pared quede totalmente lisa. La humedad de la pared debe ser inferior al 2%.
The wall must be firm, levelled, dry and clean. Uneven surfaces greater than 2 mm must be levelled with specific products. All cracks and imperfections should be repaired, so that the wall is completely smooth. The moisture content of the surface must be under 2%.
2. MATERIAL DE AGARRE / INSTALLATION MATERIAL
Para una correcta elección del material de agarre, se deberá tener en cuentan diferentes factores tales como: material del soporte a revestir (pladur, paneles sintéticos, yeso, madera, etc.), estabilidad del soporte, superficie a cubrir, condiciones ambientales, velocidad con la que se quiere ejecutar, etc. Todos estos parámetros condicionarán la elección del adhesivo.
Los materiales de agarre recomendados por DUNE son adhesivos que se han probado en nuestras instalaciones, en condiciones ambientales controladas y sobre soportes rígidos de ladrillo y/o hormigón. En colocaciones distintas a las indicadas anteriormente, se recomienda realizar una prueba inicial y en caso de duda, consultar con DUNE o directamente con el suministrador del adhesivo.
DUNE recomienda siempre realizar una prueba como mínimo en 2 piezas antes de proceder a la colocación de todo el material.
Consultar tabla de materiales de agarre recomendados.
Para BORNEO NATURE, AMAZONIA NATURA y TROPICANA NATURA utilizar adhesivos epoxidicos con propiedades flexibles y aptos para madera. No colocar exceso de material adhesivo y seguir las instrucciones del fabricante del adhesivo.
For a correct installation, several factors must be taken into account:Material kind of the wall to be tiled (synthetic pannels, plaster, wood, etc.), wall stability, environmental conditions, kind of surface to be covered , speed of carrying the work, etc.
All the above parameters determine the choice of the adhesive kind. All the adhesive materials recommended by DUNE have been previously tested in our faci-lities, in controlled environmental conditions and on rigid brick and/or concrete walls. Under different conditions from the above mentioned, it is recommended to test firstly and if in doubt, please contact DUNE or the adhesive distributor.
DUNE always recommends to test first the material with minimum two pieces before placing all the material. For a correct installation, it is recommended to use concrete C2 glue for natural stones.Consult adhesives table.
For BORNEO NATURE, AMAZONIA NATURA and TROPICANA NATURA use Epoxy adhesives with flexible properties apt for wood. Do not use too much product and always follow the adhesive manufacturer’s instructions.
3. COLOCACIÓN / INSTALLATION
Importante: Antes de empezar con la colocación, las mallas que tengan componentes de piedra, se deberán tratar con el sellador. DUNE recomienda y distribuye el SELLADOR ANTIMANCHAS y/o la CERA LÍQUIDA PROTECTORA.
Extender una fina capa de adhesivo sobre la superficie en la que se vaya a colocar la pieza (aprox. 3 mm) y utilizar una llana nº 3 para realizar las incisiones. Colocar la pieza mientras aún esté blando el adhesivo y antes de que se forme una película seca en la superficie. Una vez colocado, presione suavemente para obtener una correcta adhesión y eliminar los posibles huecos sin adhesivo.
Important! For mosaics with natural stone pieces we recommend always sealing them before installation. You can use our product SELLADOR ANTIMANCHAS and/or CERA LIQUIDA.
Start the installation from the floor to the ceiling, continue in phases to allow the time necessary for the adhesive to cure. This will avoid vertical displacements. With the aid of a notched trowel no.3, extend a thin layer of adhesive (minimum 3mm) on the substrate where the piece will be. Place the piece while the adhesive is still soft and before a dry layer of film forms on the adhesive surface. Once the piece is placed, press carefully to obtain correct adhesion and to eliminate possible areas without adhesive.
En nuestra web www.dune.es encontrará vídeos de colocación de algunos de nuestros productos / To watch installation video images, please check in www.dune.es

297
Información Técnica / Technical Information
No extender el cemento-cola en superficies muy grandes ya que puede provocar la pérdida de agua de la superficie del cemento-cola, generando problemas de adherencia.Importante: Para mantener la uniformidad de las juntas, asegurarse de que la distancia entre las piezas es igual a la junta entre las teselas.
En mosaicos irregulares, recomendamos arrancar y recolocar alguna de las teselas de la zona de unión entre dos mallas, de modo que mejore el acabado del mosaico.
AMAZONIA, BORNEO NATURE Y TROPICANA NATURA, deben permanecer a temperatura ambiente durante al menos 48 horas antes de ser colocadas. Extender el adhesivo del mismo modo y utilizar un martillo de goma, de modo que se eliminen los huecos que se hayan formado entre el soporte y la pieza.
Do not spread the adhesive on large areas as this may cause loss of water from the adhesive, creating problems of adherence.Important! Ensure the distance between one sheet and another is the same as the one among the tesseras so that all the joints look alike. For irregular mosaics, we recommend removing and relocating some tesseras from the join between two sheets, this will improve the finish of the mosaic.
AMAZONIA, BORNEO NATURE Y TROPICANA NATURA, should remain at room temperature for at least 48 hours before installation. Spread the adhesive as mentioned above and use a rubber hammer to ease the process.
4. REJUNTADO / GROUTING
Las juntas deben tener una profundidad mínima de 2 mm, por lo que se recomienda que las juntas estén limpias y secas. Con la ayuda de la llana de goma lisa, extender la pasta de rejuntar por todas las juntas. Se recomienda utilizar un material de rejuntar de árido fino. Inmediatamente después de rejuntar, elimine los restos de pasta superficiales antes de que se sequen. Para ello, utilice una esponja humedecida con agua y productos de limpieza con PH neutro. Nunca utilice productos abrasivos.
Consultar tabla de materiales de agarre recomendados.
Los modelos compuestos en su totalidad por componentes metálicos: METALIC GOLD Y SILVER, PURE BRONZE, PENNY COOPER y, en especial, MATRIX y DISCOVERY, presentan una baja resistencia al rayado. Para conseguir un acabado correcto, utilice un material de rejuntar de grano fino y limpie la pasta de rejuntar sobrante con una esponja y abundante agua, evitando presionar en exceso. Es durante esta etapa de la colocación cuando se generan la gran mayoría de la rayas. Importante: Se recomienda realizar una prueba de rejuntado en una pieza antes de proseguir con el proceso.
All the joints must be perfectly clean and dry and having a minimum depth of 2mm. Use a flat rubber trowel to spread the paste, making sure that all joints are completely covered. Use a sponge and clean water to immediately wash off the excess of grouting paste from the surface before it dries. Never use abrasive cleaners.
METALIC GOLD and SILVER, PURE BRONZE, PENNY COOPER and, in particular, MATRIX and DISCOVERY, are completely covered with a metallic coat and have a low resistance to scratching. For a proper finish, use a fine grouting material. Excess of grout must be immediately cleaned with a sponge and water, avoiding excessive pressure. Be especially careful as it is at this stage of the installation when scratching is more frequent.
Important: we recommend a test of grouting in one piece BEFORE grouting the whole surface.
Los modelos COCO MAT, COCO TISU, NACAR NATURAL, MADREPERLA, NEO, BORNEO NATURE, AMAZONIA NATURA y TROPICANA NATURA, no se colocan con junta.COCO MAT, COCO TISU, AMAZONIA NATURA, TROPICANA NATURA, MADREPERLA, NACAR NATURAL, and NEO: do not grout.
5. CORTE / CUTTING
Los modelos compuestos en su totalidad por componentes metálicos (DISCOVERY, MATRIX, METALIC GOLD y SILVER, NEO, PURE BRONZE y PENNY COOPER), se pueden cortar utilizando una radial con disco para metal; recomendamos la de corona continua.
Los modelos sobre base cerámica (MADREPERLA, NACAR NATURAL, COCO MAT y TISU), se deben cortar con una radial con disco para materiales cerámico porcelánicos y con corona continua.
DISCOVERY, MATRIX, METALIC GOLD and SILVER, NEO, PURE BRONZE and PENNY COOPER, can be cut using a metal radial disk.
MADREPERLA, NACAR NATURAL, COCO MAT and COCO TISU should be cut with a radial disk specific for porcelain and ceramic materials.
6. LIMPIEZA Y MANTENIMIENTO / CLEANING AND MAINTENANCE
Para la limpieza, utilice agua y/o productos de limpieza con PH neutro. No utilice productos anti-cal en aquellas piezas que tengan componentes de piedra y/o metal.
Use water and/or neutral pH cleaning products and apply them with a soft cloth or sponge. Avoid using abrasive and anti-lime cleaners or steel wool. Metallic mosaics can also be cleaned with specific cleaners for metal.
Para el mantenimiento de los productos de madera, se recomienda utilizar el impermeabilizante FILA PARQUET BASE. En función del uso del material, se deberá aplicar con mayor o menor frecuencia.
Antes de aplicar cualquiera de estos productos, es imprescindible que la superficie esté perfectamente limpia y seca. Importante: Se recomienda probar en una pieza para ver el acabado final.Para los modelos compuestos en su totalidad por componentes metálicos, utilizar producto para la limpieza de metales.
Wood products: We recommend the sealer FILA PARQUET NATURE. The application must be repeated if, over time, it loses effectiveness. The frequency will also depend on the use. Before applying, make sure the surface is perfectly clean and dry. Test the product on a piece to see the result.
1. PREPARACIÓN DE LA SUPERFICIE / PROPER PREPARATION OF SURFACE
La superficie donde se va a colocar el recubrimiento debe ser firme y estar perfectamente limpia y nivelada. Si existen desniveles superiores a 2 mm, utilizar productos adecuados para nivelar la superficie a recubrir. Se debe reparar cualquier grieta e imperfección, para que la pared quede totalmente lisa. La humedad de la pared debe ser inferior al 2%.
The wall must be firm, levelled, dry and clean. Uneven surfaces greater than 2 mm must be levelled with specific products. All cracks and imperfections should be repaired, so that the wall is completely smooth. The moisture content of the surface must be under 2%.
2. MATERIAL DE AGARRE / INSTALLATION MATERIAL
Para una correcta elección del material de agarre, se deberá tener en cuentan diferentes factores tales como: Material del soporte a revestir (pladur, paneles sintéticos, yeso, madera, etc.), estabilidad del soporte, superficie a cubrir, condiciones ambientales, velocidad con la que se quiere ejecutar, etc. Todos estos parámetros condicionarán la elección del adhesivo.
Los materiales de agarre recomendados por DUNE son adhesivos que se han probado en nuestras instalaciones, en condiciones ambientales controladas y sobre soportes rígidos de ladrillo y/o hormigón. En colocaciones distintas a las indicadas anteriormente, se recomienda realizar una prueba inicial y en caso de duda, consultar con DUNE o directamente con el suministrador del adhesivo.
En nuestra web www.dune.es encontrará vídeos de colocación de algunos de nuestros productos / To watch installation video images, please check in www.dune.es

298
Información Técnica / Technical Information
DUNE recomienda siempre realizar una prueba como mínimo en 2 piezas antes de proceder a la colocación de todo el material. Piezas con pasta porosa: Pasta blanca y roja, colocar con cemento cola C1 (ver tabla adhesivos).Piezas con pasta no porosa: Gres y Porcelánico, colocar con cemento cola C2 (ver tabla adhesivos).
For a correct installation, several factors must be taken into account:Material kind of the wall to be tiled (synthetic pannels, plaster, wood, etc.), wall stability, environmental conditions, kind of surface to be covered , speed of carrying the work, etc.
All the above parameters determine the choice of the adhesive kind. All the adhesive materials recommended by DUNE have been previously tested in our faci-lities, in controlled environmental conditions and on rigid brick and/or concrete walls. Under different conditions from the above mentioned, it is recommended to test firstly and if in doubt, please contact DUNE or the adhesive distributor.
DUNE always recommends to test first the material with minimum two pieces before placing all the material. White and Red body wall tile: C1 concrete glue. (Consult adhesives table).Stoneware and porcelain tile: C2 concrete glue. (Consult adhesives table).
3. COLOCACIÓN / INSTALLATION
Extender una fina capa de adhesivo sobre la superficie en la que se vaya a colocar la pieza (aprox. 3 mm) y utilizar una llana nº 3 para realizar las incisiones. Colocar la pieza mientras aún esté blando el adhesivo y antes de que se forme una película seca en la superficie. Una vez colocado, presione suavemente para obtener una correcta adhesión y eliminar los posibles huecos sin adhesivo.
TIFFANY, BRUSSELS y ANDY: colocar las piezas de forma aleatoria con el fin de evitar que haya continuidad en el diseño. ABSOLUT, ANDY, BRUSSELS y TIFFANY: Colocar el material con junta de 2 mm para mantener la linealidad de los precortes.
With the aid of a notched trowel no.3, extend a thin layer of adhesive (minimum 3mm) on the surface where the piece will be. Place the piece while the adhesive is still soft and before a dry layer of film forms on the adhesive surface. Once the piece is placed, press carefully to obtain a correct adhesion and to eliminate possible areas without adhesive.
TIFFANY, BRUSSELS and ANDY: Lay the pieces in a random way in order to avoid the continuity of the design. ABSOLUT, ANDY, BRUSSELS y TIFFANY: We recommend a minimum joint of 2 mm and the use of crosspieces to keep the linearity of the pre-cuts.
4. REJUNTADO / GROUTING
Las juntas deben estar limpias y secas, con una profundidad mínima de 2 mm. Con la ayuda de una llana lisa extender la pasta de rejuntar por todas las juntas. No dejar secar el material sobrante, limpiándolo lo antes posible.
Para conseguir una mayor impermeabilización, se recomienda utilizar juntas epoxídicas.Se recomienda ver la tabla de adhesivos y pastas de rejuntar.
All the joints must be perfectly clean and dry and having a minimum depth of 2mm. Use a flat rubber trowel to spread the paste, making sure that all joints are completely covered. Use a sponge and clear water to immediately wash off the excess of grout paste from the surface before it dries.
For a better waterproofing we recommend an epoxy grouting paste, especially in damp areas.Consult adhesives and grouting materials tables.
5. LIMPIEZA Y MANTENIMIENTO / CLEANING AND MAINTENANCE
Utilizar productos de limpieza estándares. No es preciso realizar ningún mantenimiento adicional.CAPITONÉ ARGENT y CAPITONÉ OR: No utilizar productos agresivos así como utensilios de limpieza abrasivos.
Use regular cleaners. Additional maintenance is not required.CAPITONÉ ARGENT and CAPITONÉ OR: Use neutral pH cleaning products and apply them with a soft cloth or sponge. Avoid using abrasive and anti-lime cleaners or steel wool.
PREGUNTAS FRECUENTES / FAQ´S
¿Qué materiales se pueden utilizar en el EXTERIOR y cuáles no?El uso que se le vaya a dar una base depende de la porosidad. Por norma general, si la porosidad está por encima del 3% solo se puede utilizar en el interior y si está por encima del 6% su uso se restringe a la pared.Si la porosidad es baja (inferior al 3%), su uso se puede extender tanto al interior como al exterior y tanto como revestimiento como pavimento.No obstante existen otros criterios para determinar el uso de los recubrimientos, pero el más utilizado es el de la absorción.Consultar tabla de usos y, en caso de duda, contactar con su asesor comercial.
¿Cómo proteger las piezas MATRIX y DISCOVERY durante la colocación?Ambas piezas están compuestas por teselas de metal de gran tamaño. Las superficies metálicas son muy sensibles al rayado (valor 1 en la escala Mohs), para minimizar este efecto es muy importante poner el máximo cuidado en el proceso de colocación y limpieza. DUNE recomienda utilizar material de rejuntar de grano fino y limpiar la pieza con esponja y productos neutros. Evite el uso de estropajos o productos anti-cal. También puede utilizar productos de limpieza específicos para metal.
Which materials can be installed OUTDOORS? This issue depends on the porosity. Generally, if the porosity is higher than 3%, materials are only suitable indoors, and if the rate is higher than 6%, they are only suitable for wall covering. If the porosity is lower than 3%, products are suitable both for indoors and outdoors; for floor and for wall coverings. Nevertheless, there are other criteria that determinate the use of materials, but the most common one is water absorption. See table of uses and contact our commercial staff for further information
How to protect DISCOVERY and MATRIX from scratching? Both pieces are made of large metal chips. Metal surfaces are very sensitive to scratching (rate 1 on the Mohs scale). To minimize this effect it is very important to take care during the installation and cleaning. DUNE recommends using a fine grouting material and cleaning with a sponge and product neutral Ph cleaning products. Avoid using abrasive and anti-lime cleaners.They can also be cleaned with specific cleaners for metal.
En nuestra web www.dune.es encontrará vídeos de colocación de algunos de nuestros productos / To watch installation video images, please check in www.dune.es

299
Información Técnica / Technical Information
En nuestra web www.dune.es encontrará vídeos de colocación de algunos de nuestros productos / To watch installation video images, please check in www.dune.es