Pulverizador Smartselect™ de alto volumen y baja presión ... 0406.pdf · Pulverizador...
27
Pulverizador Smartselect™ de alto volumen y baja presión (HVLP) MANUAL DE INSTRUCCIONES MANUAL DE INSTRUÇÕES INSTRUCTION MANUAL Cat. N° BDPH200B ADVERTENCIA: LEASE ESTE INSTRUCTIVO ANTES DE USAR EL PRODUCTO. ADVERTÊNCIA: LEIA ESTAS INSTRUÇÕES ANTES DE USAR O PRODUTO. WARNING: READ INSTRUCTION MANUAL BEFORE USING PRODUCT. Español 6 Português 13 English 20
-
Upload
vuongnguyet -
Category
Documents
-
view
225 -
download
0
Transcript of Pulverizador Smartselect™ de alto volumen y baja presión ... 0406.pdf · Pulverizador...

Pulverizador Smartselect™ de altovolumen y baja presión (HVLP)
MANUAL DE INSTRUCCIONESMANUAL DE INSTRUÇÕES
INSTRUCTION MANUALCat. N° BDPH200B
ADVERTENCIA: LEASE ESTE INSTRUCTIVO ANTES DE USAR EL PRODUCTO.ADVERTÊNCIA: LEIA ESTAS INSTRUÇÕES ANTES DE USAR O PRODUTO.
WARNING: READ INSTRUCTION MANUAL BEFORE USING PRODUCT.
Español 6Português 13 English 20
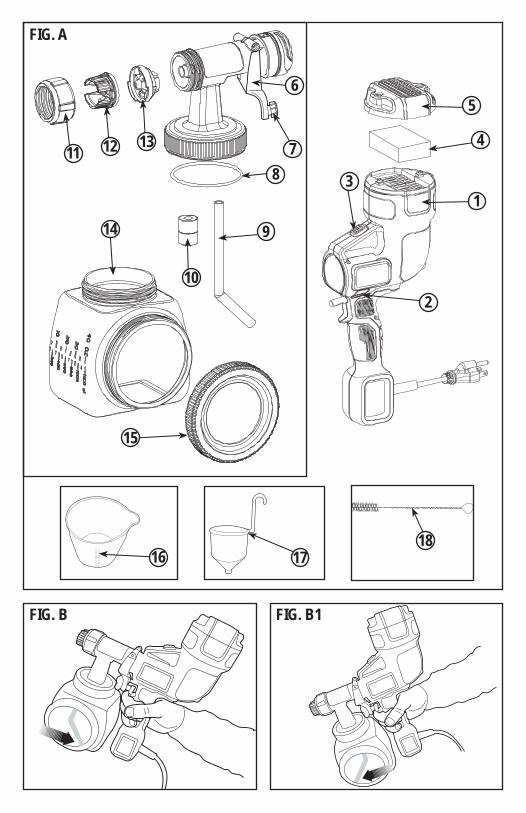
FIG. A
FIG. B FIG. B1
7 4
9
811
13
210
5
1312
15
14
6
16 1718

FIG. C
FIG. E
FIG. C1
FIG. E1
FIG. C2
FIG. F
FIG. D
FIG. F1

FIG. G
FIG. K
FIG. H
FIG. L
FIG. I
FIG. M
FIG. J
FIG. N

FIG. O
FIG. S
FIG. P
FIG. T
FIG. Q
FIG. U
FIG. R
FIG. V

6 • ESPAÑOLNO DEVUELVA ESTE PRODUCTO A LA TIENDA,
comuníquese antes a las oficinas locales o con el Centro de Servicio Black & Decker más cercano a usted.
PAUTAS DE SEGURIDAD/DEFINICIONES
Es importante que lea y comprenda este manual. La información que contiene se relaciona con la protección de SU SEGURIDAD y la PREVENCIÓN DE PROBLEMAS. Los símbolos que siguen se utilizan para ayudarlo a reconocer esta información.
¡Peligro!: indica una situación de peligro inminente que, si no se evita, provocará la muerte o lesiones graves.
¡Advertencia!: indica una situación de peligro potencial que, si no se evita, provocará la muerte o lesiones graves.
¡Precaución!: indica una situación de peligro potencial que, si no se evita, provocará lesiones leves o moderadas.Aviso: utilizado sin el símbolo de alerta de seguridad indica una situación de peligro potencial que, si no se evita, puede provocar daños en la propiedad.Las siguientes son explicaciones de importantes gráficos de los peligros para la seguridad contenidos en este manual.
1. Lea y comprenda el manual de instrucciones.
2. Peligro de incendio.
3. Peligro de explosión.
4. Peligro para las vías respiratorias.
5. Peligro de descarga
INSTRUCCIONES DE SEGURIDAD IMPORTANTES
CONSERVE ESTAS INSTRUCCIONES: Para reducir los peligros de incendio o explosión, descarga eléctrica y lesiones a personas, lea y comprenda todas las instrucciones incluidas en este manual. Familiarícese con los controles y con el uso adecuado del equipo.
f Este producto está diseñado únicamente para uso doméstico.
¡Advertencia! PELIGRO DE INCENDIO O EXPLOSIÓN. Los vapores de los solventes y los materiales pulverizados pueden explotar o encenderse. Esto puede provocar lesiones graves o daños a la propiedad.
Para evitar estos peligros, tome las precauciones siguientes:
f Se deberá evacuar el aire e introducir aire fresco para mantener el aire en el área de pulverización libre de la acumulación de vapores inflamables.
f Evite todas las fuentes de ignición como las chispas de la electricidad estática, las llamas expuestas, las llamas piloto, los objetos calientes, los productos de tabaco encendidos y las chispas producidas por la conexión y desconexión de cables de alimentación o interruptores de luz de trabajo.
f Deberá haber presentes equipos de extinción de incendios y estos deben estar en buenas condiciones.
f Respete las precauciones y advertencias de seguridad del fabricante de los materiales y los solventes.
f No pulverice materiales inflamables o combustibles cerca de una llama expuesta o de fuentes de ignición como productos de tabaco encendidos, motores y equipos eléctricos.
f Infórmese del contenido de los materiales pulverizados y de sus solventes de limpieza. Lea todas las hojas de datos de seguridad del material (HDSM) y las etiquetas de los envases que vienen con el material pulverizado y los solventes. Siga las instrucciones de seguridad del fabricante para los materiales pulverizados y los solventes.
f No utilice materiales con un punto de ignición inferior a 60 °C (140 °F). El punto de ignición es la temperatura a la que un líquido puede producir suficientes vapores para arder (consulte el proveedor del revestimiento).
¡Advertencia! PELIGRO DE EXPLOSIÓN DEBIDO A MATERIALES INCOMPATIBLES. Esto puede provocar lesiones graves o daños a la propiedad.
Para evitar estos peligros, tome las precauciones siguientes:
f No utilice lejía. f No utilice solventes de hidrocarburo halogenado como
el cloruro de metileno y el 1,1,1-tricloroetano. Estos no son compatibles con el aluminio y pueden provocar una explosión. Si no está seguro de la compatibilidad de un material con el aluminio, comuníquese con el proveedor del revestimiento.
¡Advertencia! VAPORES PELIGROSOS. Los materiales pulverizados, los solventes, los insecticidas y otros materiales pueden ser perjudiciales si se inhalan o entran en contacto con el cuerpo. Los vapores pueden provocar graves náuseas, desmayos o envenenamiento.
Para evitar estos peligros, tome las precauciones siguientes:

ESPAÑOL • 7 f Utilice un respirador o máscara si se pueden inhalar
los vapores. Lea todas las instrucciones que vienen con la máscara para asegurarse de que proporcionará la protección necesaria.
f Use anteojos de protección. f Use ropa de protección según lo requiera el fabricante
del revestimiento. ¡Advertencia! PELIGRO DE DESCARGA
ELÉCTRICA. Puede provocar lesiones graves. Para evitar estos peligros, tome las precauciones siguientes:
f Mantenga el enchufe del cable eléctrico y el gatillo de la pistola pulverizadora libres de materiales pulverizados y de otros líquidos. Nunca sostenga el cable por las conexiones del enchufe para sujetar el mismo. El incumplimiento de esta instrucción puede provocar una descarga eléctrica.
f Nunca sumerja las piezas eléctricas en agua ni en ningún otro líquido. Pase un paño húmedo por el exterior del pulverizador para limpiarlo. Siempre asegúrese de que el pulverizador esté desenchufado antes de desarmarlo para limpiarlo.
f No exponga la unidad a la lluvia ni a condiciones de humedad.
f No maltrate al cable. Nunca use el cable para transportar la unidad ni para sacar el enchufe del tomacorriente. Mantenga el cable alejado del calor, el aceite, los bordes filosos o las piezas móviles. Reemplace los cables dañados inmediatamente.
ADVERTENCIAS DE SEGURIDAD GENERAL
¡Advertencia!: General. Puede provocar lesiones graves o daños a la propiedad.Para evitar estos peligros, tome las precauciones siguientes:
f No apunte la pistola ni pulverice con ella a ninguna persona, incluido usted mismo, ni a un animal.
f No pulverice al aire libre en días ventosos. f Use ropa de protección para mantener el material
pulverizado lejos de la piel y el cabello. f Respete todos los códigos locales, estatales y
nacionales correspondientes que rigen la ventilación, la prevención de incendios y el funcionamiento.
f Siempre use guantes, protección para los ojos y un respirador o máscara adecuados al pulverizar, diluir, mezclar, verter o limpiar.
f No opere ni pulverice cerca de niños. Mantenga a los niños alejados del equipo en todo momento. Mantenga el pulverizador fuera del alcance de los niños.
f No se estire ni se pare sobre una base inestable. Conserve el equilibrio y párese adecuadamente en todo momento.
f Manténgase alerta y fíjese en lo que está haciendo. f No opere la unidad cuando esté cansado o bajo la
influencia de alcohol o drogas. f Lea todas las instrucciones y las precauciones
de seguridad para el equipo y el material de pulverización antes de operar cualquier equipo.
f Para uso prolongado, se recomienda el uso de protección para los oídos.
SEGURIDAD ELÉCTRICA
Esta herramienta lleva un doble aislamiento;por lo tanto, no requiere una toma de tierra.Compruebe siempre que la tensión de la redcorresponda con el valor indicado en la placa dedatos de la herramienta.
f Si el cable de alimentación está dañado, haga que lo sustituya el fabricante o un centro de asistencia técnica autorizado de Black & Decker para evitar cualquier situación de riesgo.
f Cuando utilice la herramienta en exteriores, utilice solamente cables de prolongación destinados al uso en exteriores. Se puede utilizar un cable de prolongación de Black & Decker con la potencia adecuada de hasta 30 m sin sufrir pérdida de potencia.
f Se puede incrementar la seguridad eléctrica mediante la utilización de un dispositivo de corriente residual (RCD) de alta sensibilidad de 30 mA.
CABLES PROLONGADORESUtilice únicamente un cable prolongador trifilar que tenga un enchufe de conexión a tierra de 3 patas y un receptáculo de 3 ranuras compatible con el enchufe del producto. Asegúrese de que el cable prolongador esté en buenas condiciones. Cuando utilice un cable prolongador, cerciórese de que tenga la capacidad para conducir la corriente que su producto exige. Un cable de menor capacidad provocará una caída en el voltaje de la línea, lo cual producirá una pérdida de potencia y sobrecalentamiento. Si va a utilizarse un cable prolongador al aire libre, éste deberá estar marcado con el sufijo W-A de acuerdo con la designación del tipo de cable. Por ejemplo, una designación SJTW-A indicaría que el cable es adecuado para uso al aire libre. Consulte la tabla a continuación para conocer los cables con la capacidad adecuada.

8 • ESPAÑOLCalibre mínimo para cables de extensión
Volts Longitud total del cable en pies120V 0-25 26-50 51-100 101-150
(0-7,6m) (7,6-15,2m) 15,2-30,4m) 30,4-45,7m)240V 0-50 51-100 101-200 201-300
(0-15,2m) (15,2-30,4m) (30,4-60,9m) (60,9-91,4m)
AmperajeMás de No más de American Wire Gages0 - 6 18 16 16 146 - 10 18 16 14 12
10 - 12 16 16 14 1212 - 16 14 12 No se recomienda
¡Advertencia! Algunos materiales pulverizados contienen sustancias químicas reconocidas por el Estado de California como causantes de cáncer, defectos de nacimiento u otros problemas reproductivos. Para reducir la exposición, use equipos de seguridad apropiados, como máscaras faciales, guantes y otros equipos de protección adecuados. Revise y respete las precauciones de seguridad que aparecen en el recipiente del material pulverizado.
CARACTERISTICAS (Fig. A)1. Caja del motor2. Indicador de control de flujo3. Botón de liberación4. Filtro5. Cubierta de filtro6. Gatillo7. Perilla de ajuste del material8. Junta tórica9. Tubo de recogida10. Válvula de control11. Collar de la punta12. Boquilla de pulverización13. Punta de pulverización14. Deposito de llenado lateral15. Tapa16. Cubo para mezcla de 2,6 I (2-3/4 cuartos de galón)17. Vaso de viscosidad18. Cepillo de limpieza
INSTALACIÓN ¡Advertencia! Asegúrese de usar el equipo protector
adecuado y desenchufe la unidad.
¡Advertencia! Asegúrese de que el área esté bien ventilada y sin vapores inflamables.
Alineación del tubo de recogida (FIG B y B1)El tubo de recogida se puede alinear en la dirección en la cual se realizará la mayor parte de la pulverización para ayudar a minimizar la cantidad de veces que deberá rellenar el depósito.
f Si está pulverizando en un ángulo ascendente o en forma recta, ubique el tubo de recogida (Figura B) hacia la parte trasera del depósito.
f Si está pulverizando en un ángulo descendente, ubique el tubo de recogida (Figura B1) hacia la parte delantera del depósito. Esto asegurará que pulverice tanto material como sea posible antes de que necesite rellenar.
Preparación de materiales líquidos (FIG C, C1 y C2)Consejo: Asegúrese de que el tipo de material que utiliza se pueda limpiar con alcoholes minerales o solventes (para pinturas a base de aceite) o una solución de agua tibia y jabón (para pinturas solubles en agua como el látex). Para proteger los pisos y cualquier otra cosa en el área de pulverización que desee mantener intacta, utilice paños atrapagotas al verter, mezclar y probar la viscosidad de los materiales que se van a pulverizar.Es posible que necesite diluir el líquido que se pulveriza antes de comenzar. Al diluir utilice el solvente líquido adecuado que el fabricante del material recomienda en el envase.
¡Advertencia! No utilice materiales con un punto de ignición inferior a 60ºC (140ºF).
Se proporciona un cubo para mezcla de 2,6 L (2-3/4 cuartos de galón) para su uso al transferir material de pulverización desde el envase original al cubo para fines de dilución y medición (Figura C).
Se proporciona un vaso de prueba de viscosidad para determinar el “tiempo de descarga” del material que se utiliza.
f Antes de medir si existe la viscosidad adecuada, revuelva bien el material.
f Sumerja el vaso de viscosidad en el material que se está pulverizando y llénelo completamente.
f Sostenga el vaso sobre el envase del material y mida la cantidad de tiempo que tarda el chorro de material que fluye, hasta que se “interrumpe” o dejar de ser un chorro constante que sale de la parte inferior del vaso (2 minutos o menos) (Fig. C1). Este es el “tiempo de descarga”. Consulte la tabla de dilución para obtener información sobre la dilución necesaria para distintos materiales.
f Si el material necesita dilución, agregue el solvente líquido adecuado recomendado por el fabricante (Fig. C2).
f Es posible pulverizar pintura látex con esta unidad; sin embargo, la dilución requerida del material puede

ESPAÑOL • 9exceder la recomendación del fabricante. Diluya la pintura látex de manera que fluya por el vaso de viscosidad en menos de 2 minutos. El operador debe tener en cuenta el tipo de aplicación y la ubicación final del proyecto al pulverizar un material que requiera más de 2 minutos para fluir por el vaso de viscosidad.
TABLA DE DILUCIÓNMATERIAL DE
PULVERIZACIÓNTIEMPO DE DESCARGA
Tintes y selladores transparentes y semitransparentes Imprimadores a base de aceite, barnices y poliuretano
No requieren dilución(descarga en menos de 2 minutos)
Tintes de un solo color a base de agua.Pinturas látex o a base de agua.
Pueden requerir dilución (descarga en más de 2 minutos)
Nota: No se recomienda para pintura granulada.
CONSEJOS DE PREPARACIÓN f Siempre revuelva y cuele bien el material antes del
uso. f En cada trabajo de pulverización, siempre debe
asegurarse de haber preparado correctamente la superficie para obtener el mejor acabado. Es decir, que todas las superficies estén libres de polvo, suciedad, óxido y grasa. Lave las cubiertas o las superficies exteriores a presión leve y asegúrese de que estén secas antes de pulverizar.
f Aunque los pulverizadores de alto volumen y baja presión (HVLP) presentan muy poca sobrepulverización, se le recomienda cubrir todos los bordes y demás áreas, y utilizar paños atrapagotas para proteger los pisos y cualquier otra cosa en el área de pulverización que desee mantener intacta.
f La película que se forma en la parte superior de la pintura puede obstruir el pulverizador. Elimine la película antes de mezclar. Cuele utilizando un embudo con un filtro instalado o a través de calcetería para eliminar toda impureza que pudiera obstruir el sistema.
f Antes de comenzar, disponga de guantes, toallas de papel, trapos, etc. para derrames inesperados.
LLENADO DEL DEPÓSITO (FIGURA D) f Revise para asegurarse de que el depósito esté
completamente enroscado sobre el pulverizador. f Apoye el pulverizador sobre un costado con el tapón
lateral del depósito mirando hacia arriba. f Desenrosque el tapón del costado del depósito.
f Vierta el material a pulverizar debidamente diluido y colado dentro del depósito de llenado lateral (Fig. D). Consejo: Utilice el cubo para mezcla provisto para verter el material del envase original en el depósito de llenado lateral.
f Limpie todo residuo de líquido de las roscas o los lados del depósito y el pulverizador.
f Con las roscas bien alineadas, enrosque la tapa completamente sobre el depósito de llenado lateral. Revise la tapa para asegurarse de que esté pareja y completamente enroscada antes de levantar el pulverizador.
FUNCIONAMIENTOAJUSTE DE FLUJO DEL MATERIALRegule el volumen del material girando la perilla de ajuste del material en el gatillo del pulverizador.
f Para un flujo máximo del material, enrosque completamente la perilla como se muestra en la Fig. E.
f Para un flujo mínimo del material, desenrosque completamente la perilla como se muestra en la Fig. E1.
El indicador de flujo en la parte lateral del pulverizador se mueve hacia adelante (flujo mínimo de líquido) y hacia atrás (flujo máximo de líquido) cuando se oprime el gatillo.
Consejo: Siempre pruebe el patrón de pulverización primero sobre cartón desechable o un material similar. Comience con la perilla de ajuste del material en la regulación más alta de flujo (enroscada completamente). Si se desea menor flujo, desenrosque la perilla de ajuste del material. Los materiales más pesados y espesos deben pulverizarse con la perilla más enroscada. Los materiales más diluidos deben pulverizarse con la perilla menos enroscada.
SELECCIÓN DE BOQUILLA SMARTSELECT (FIG. F)Existen tres patrones de pulverización entre los cuales elegir. Estos están marcados como 1, 2 y 3 en la etiqueta SmartSelect ubicada en la parte superior del pulverizador (Fig. F). Para seleccionar el patrón número 1, gire la boquilla de pulverización y alinee el indicador de color verde de ésta con el número 1 de la etiqueta (Fig. F1).Nota: La boquilla de pulverización puede ensamblarse en una dirección únicamente. Consulte la Figura S para conocer el ensamblaje adecuado.
Patrón número 1: Chorro plano vertical para aplicar de arriba a abajo en una superficie.

10 • ESPAÑOLPatrón número 2: Chorro circular para esquinas, bordes y superficies angostas.Consejo: La posición número 2 tiene un tope que puede notar al girar la boquilla de pulverización.Asegúrese de ubicarla en el tope.
Patrón número 3: Chorro plano horizontal para aplicar de un lado a otro.
¡Advertencia! Peligro de lesión. Nunca apunte el pulverizador a ninguna parte del cuerpo. Nunca oprima el gatillo mientras regula el ajuste de pulverización.
DESARROLLO DE LA TÉCNICA DE PULVERIZACIÓN ADECUADA
f Practique la pulverización sobre una pieza de material desechable como un cartón para probar el patrón de pulverización y familiarícese con la función de control de flujo del pulverizador.
f Asegúrese de que la superficie a pulverizar esté libre de polvo, suciedad y grasa.
f Asegúrese de que la superficie a pintar esté libre de polvo, suciedad y grasa.
f Asegúrese de que el área de pulverización esté limpia y libre de polvo que podría soplarse sobre las superficies recién pintadas.
f Cubra todas las áreas que no vaya a pulverizar f Siempre pulverice desde una distancia mínima de
25 mm (1 pulgada) hasta una distancia máxima de 355 mm (14 pulgadas) (Fig. G).
f Un método comúnmente utilizado para pulverizar una superficie grande es el patrón “entrecruzado”. Esto se hace pulverizando en franjas horizontales y luego cruzando sobre éstas con franjas verticales.
f Para lograr una distribución uniforme de la pulverización, siempre mantenga su brazo a la misma distancia (Fig. G) de la superficie que pulveriza y evite mover su muñeca (Fig. H).
f Mantenga una velocidad suave y constante que le ayudará a evitar inconsistencias. Comience a pulverizar después de iniciar la pasada y suelte el gatillo antes de terminar la pasada.
f Evite pulverizar demasiado en una sola área. Varias capas más delgadas son mejores que una capa gruesa que puede producir escurrimiento y goteo. Recuerde que la perilla de control de flujo regula la cantidad de líquido que se puede pulverizar. Al girar la perilla de flujo hacia la derecha se aumenta el flujo de líquido. Al girar la perilla hacia la izquierda se reduce
el flujo de líquido. Si se producen escurrimientos o goteos, tenga a mano una brocha seca para emparejarlos.
f Apague la unidad de alimentación cuando no pulverice durante cualquier cantidad de tiempo.
LIMPIEZA ¡Advertencia! Asegúrese de usar el equipo protector
adecuado.Para proteger los pisos y cualquier otra cosa en el área de pulverización que desee mantener intacta, utilice paños atrapagotas al verter, mezclar y probar la viscosidad de los materiales que se van a pulverizar.
f No utilice materiales con un punto de ignición inferior a 60 °C (140 °F). El punto de ignición es la temperatura a la que un líquido puede producir suficientes vapores para arder (consulte el proveedor del revestimiento).
f Asegúrese de que el área de limpieza esté bien ventilada y libre de vapores inflamables.
f Siempre pulverice al aire libre cuando expulse la solución de limpieza a través del pulverizador.
f No sumerja la unidad motriz.
Para iniciar la limpieza: f Desenchufe el cable de la fuente de alimentación. f Desenrosque la tapa del costado del depósito y vierta
todo el líquido restante de vuelta en el envase original (Fig. I).
f Vierta una cantidad pequeña de la solución de limpieza adecuada dentro del depósito (Fig. J).
f Agua tibia jabonosa para materiales a base de agua. f Solución de limpieza recomendada por el
fabricante para los materiales a base de aceite. f Vuelva a colocar firmemente la tapa en el depósito y
agite vigorosamente el pulverizador. f Desenrosque la tapa del costado del depósito y
deseche adecuadamente la solución de limpieza. f Rellene el depósito con una cantidad pequeña de
solución de limpieza nueva (Fig. J). Enrosque la tapa firmemente sobre el depósito.
f Enchufe el cable de alimentación. f Pulverice la solución de limpieza a través del
pulverizador sobre material desechable durante 2 a 3 segundos (Fig. K).
f Desenchufe el cable de la fuente de alimentación. f Quite el depósito y desenrosque la tapa lateral.
Quite la válvula de control, el tubo de recogida y la junta tórica del pulverizador. Limpie las piezas con el cepillo de limpieza en la solución de limpieza adecuada (Fig. L).
f Desenrosque el anillo de la punta y quite la boquilla de pulverización y la punta de pulverización. Limpie todas las piezas con el cepillo de limpieza en la solución de limpieza adecuada (Fig. M).

ESPAÑOL • 11 f Separe la sección de la boquilla del motor del
pulverizador oprimiendo el botón de liberación de la caja del motor como se muestra en la Fig. N.
f Sujete la sección de la boquilla y gírela hasta que esté a 90 grados en relación con la caja y luego extráigala tirando hacia afuera (Fig. O).
f Si utiliza un material a base de agua, limpie el pulverizador dejando correr agua a través de la entrada del tubo de recogida como se muestra en la Fig. P. Si utiliza materiales a base de aceite, limpie la entrada del tubo de recogida con la solución de limpieza adecuada. Repita hasta que el pulverizador esté completamente limpio.
f Seque bien todas las piezas. f Deseche debidamente la solución de limpieza. f Ponga una gota de aceite de uso doméstico sobre la
bola metálica de la válvula de control (Fig. Q).
¡Importante! : La lubricación de la bola de la válvula de control, después de la limpieza, ayudará a evitar que se pegue, ya que esto puede obstruir la válvula e impedir el flujo adecuado del material pulverizado. Nota: Al reensamblar, coloque el extremo de la bola metálica de la válvula de control dentro del pulverizador.
f Reensamble el pulverizador (Fig. R). Nota: La punta de pulverización puede entrar únicamente de una manera. La marca S en la punta de pulverización, que se muestra en la Figura S, deberá alinearse con la cavidad en las roscas del pulverizador.
f Alinee la sección de la boquilla a 90 grados en relación con la caja del motor e introdúzcala completamente en ella como se muestra en la Fig. T.
f Sujete la sección de la boquilla y gírela hacia abajo hasta que el punto indicador de ésta se alinee con el símbolo de bloqueo de la caja del motor Fig. U.
f Cuando se acoplan correctamente, ambas piezas encajarán en su lugar produciendo un chasquido.
MANTENIMIENTO Y ALMACENAMIENTOPara limpiar la unidad motriz, utilice únicamente jabón suave y un paño húmedo. Nunca permita que penetre ningún líquido dentro de la unidad motriz; nunca sumerja ninguna pieza de la unidad motriz en un líquido.
¡Importante! Para garantizar la SEGURIDAD y CONFIABILIDAD del producto, las reparaciones, el mantenimiento y los ajustes (distintos de los enumerados en este manual) deben realizarse en los centros de mantenimiento autorizados o en otras organizaciones de mantenimiento calificadas, siempre utilizando piezas de repuesto idénticas.
El pulverizador contiene un filtro lavable/reutilizable (Fig. V). Revise el filtro antes y después de cada uso. Si está
sucio, lávelo con agua tibia y déjelo secar al aire antes de reinstalarlo o reemplácelo si es necesario.
f Para revisar el filtro, quite la cubierta del filtro soltando ambos tornillos de ésta y separándola del pulverizador. Extraiga el filtro como se muestra en la Fig. V e inspecciónelo. Vuelva a colocar el filtro y la cubierta del filtro. Ajuste bien los tornillos. Nunca opere el pulverizador sin el filtro en su lugar. Podrían absorberse residuos e interferir con el funcionamiento del pulverizador.
Asegúrese de que la unidad esté limpia y seca antes de guardarla. Guarde la unidad bajo techo en un lugar seco. Para evitar daños, enrolle el cable eléctrico de manera que no se doble durante el almacenamiento.
ACCESORIOSLos accesorios recomendados para uso con el producto están disponibles en su distribuidor local o centro de mantenimiento autorizado.
¡Advertencia! El uso de cualquier accesorio no recomendado con este producto puede ser peligroso.
PROTECCIÓN DEL MEDIO AMBIENTESeparación de desechos. Este producto no debe desecharse con la basura doméstica normal. Si llega el momento de reemplazar su producto Black & Decker o éste ha dejado de tener utilidad para usted, no lo deseche con la basura doméstica normal. Asegúrese de que este producto se deseche por separado.
La separación de desechos de productos usados y embalajes permite que los materiales puedan reciclarse y reutilizarse. La reutilización de materiales reciclados ayuda a evitar la contaminación medioambiental y reduce la demanda de materias primas. La normativa local puede ofrecer la separación de desechos de productos eléctricos de uso doméstico en centros municipales de recogida de desechos o a través del distribuidor cuando adquiere un nuevo producto.
INFORMACIÓN DE SERVICIOTodos los Centros de Servicio de Black & Decker cuentan con personal altamente capacitado dispuesto a brindar a todos los clientes un servicio eficiente y confiable en la reparación de herramientas eléctricas. Para mayor informacion acerca de nuestros centros de servicio autorizados y si necesita consejo técnico, reparaciones o piezas de repuesto originales de fábrica, comuniquese a su oficina local o visitenos en: www.BlackandDecker-la.com

12 • ESPAÑOLGUÍA DE RESOLUCIÓN DE PROBLEMAS
¡PROBLEMA¡ EL MATERIAL ESCURRE O GOTEA
¿QUÉ SUCEDE? QUÉ HACER…
Se está pulverizando demasiado material. Reduzca el flujo de aire girando la perilla de ajuste del material.
Se está pulverizando demasiado lento. Aumente la velocidad de aplicación.
Se está pulverizando demasiado cerca. Aumente la distancia desde la superficie.
Viscosidad demasiado diluida Verifique la recomendación de dilución.
¡PROBLEMA¡ DEMASIADA SOBREPULVERIZACIÓN.
¿QUÉ SUCEDE? QUÉ HACER…
El pulverizador está demasiado lejos de la superficie. Reduzca la distancia a la superficie.
Se está pulverizando demasiado material. Reduzca el flujo de aire girando la perilla de ajuste del material.
¡PROBLEMA¡ SE EXPULSA POCO O NADA DEL MATERIAL.
¿QUÉ SUCEDE? QUÉ HACER…
Bola de válvula de control obstruida. Quite la válvula de control. Oprima la bola para soltarla. Agregue lubricante. Consulte la Figura Q.
Boquilla/Punta de pulverización obstruida. Limpie las boquillas.
Tubo de recogida suelto u obstruido. Revise el tubo.
Regulación demasiado baja de la perilla de ajuste del material. Aumentar regulación.
Entrada de aire bloqueada. Limpie o cambie el filtro de aire.
Material demasiado espeso. Verifique la recomendación de viscosidad.
¡PROBLEMA¡ MATERIAL PULVERIZADO ESTÁ SALPICANDO.
¿QUÉ SUCEDE? QUÉ HACER…
Viscosidad del material está muy alta. Diluya el material según la recomendación del fabricante.
¡PROBLEMA¡ EL PULVERIZADOR VIBRA.
¿QUÉ SUCEDE? QUÉ HACER…
Filtro de aire obstruido. Limpie o cambie el filtro.
Material en el depósito casi agotado. Rellene el depósito.
¡PROBLEMA¡ EL LÍQUIDO SE SALE DEL DEPÓSITO.
¿QUÉ SUCEDE? QUÉ HACER…
La tapa no está pareja o suficientemente ajustada. Quite la tapa y vuelva a colocarla en forma pareja y uniforme, luego ajuste firmemente el tapón.
Hay pintura en las roscas del depósito y del tapón. Limpie las roscas en la parte superior y los lados del depósito y el tapón.

PORTUGUÊS • 13DO NOT RETURN THIS PRODUCT TO THE STORE,
first contact your local Black & Decker officeor nearest authorized service center.
SAFETY GUIDELINES - DEFINITIONS
It is important for you to read and understand this manual. The information it contains relates to protecting YOUR SAFETY and PREVENTING PROBLEMS. The symbols below are used to help you recognize this information.
Danger!: Indicates an imminently hazardous situation which, if not avoided, will result in death or serious injury.
Warning!: Indicates a potentially hazardous situation which, if not avoided, could result in death or serious injury. Caution!: Indicates a potentially hazardous situation which, if not avoided, may result in minor or moderate injury.Notice: Used without the safety alert symbol indicates a potentially hazardous situation which, if not avoided, may result in property damage.The following are explanations of important safety hazard pictorials in this manual.
1. Read and understand the instruction manual.
2. Fire hazard.
3. Explosion hazard.
4. Respiratory hazard.
5. Electric shock hazard.
IMPORTANT SAFETY INSTRUCTIONSSAVE THESE INSTRUCTIONS: To reduce the risks of fire or explosion, electrical shock and the injury to persons, read and understand all instructions included in this manual. Be familiar with the controls and the proper usage of the equipment.
f This product is intended for household use only.
Warning! FIRE OR EXPLOSION HAZARD. Solvent and spray material fumes can explode or ignite. Severe injury or property damage can occur.
To avoid these risks, take the following preventions:
f Exhaust and fresh air introduction must be provided to keep the air within the spray area free from accumulation of flammable vapors.
f Avoid all ignition sources such as static electricity sparks, open flames, pilot lights, hot objects, lit tobacco products, and sparks from connecting and disconnecting power cords or working light switches.
f Fire extinguishing equipment must be present and in good working order.
f Follow the material and solvent manufacturer´s safety precautions and warnings.
f Do not spray flammable or combustible materials near an open flame or sources of ignition such as lit tobacco products, motors, and electrical equipment.
f Know the contents of the spray materials and their cleaning solvents. Read all Material Safety Data Sheets (MSDS) and container labels provided with the spray materials and solvents. Follow the spray material and solvent manufacturer´s safety instructions.
f Do not use materials with a flashpoint higher than 60°C (140°F). Flashpoint is the temperature that a fluid can produce enough vapors to ignite (see coating supplier).
Warning! EXPLOSION HAZARD DUE TO INCOMPATIBLE MATERIALS. Severe injury or property damage can occur.
To avoid these risks, take the following preventions: f Do not use bleach. f Do not use halogenated hydrocarbon solvents such
as methylene chloride and 1,1,1 - trichloroethane. They are not compatible with aluminum and may cause an explosion. If you are unsure of a material´s compatibility with aluminum, contact your coating supplier.
Warning! HAZARDOUS VAPORS. Spray materials, solvents, and other materials can be harmful if inhaled or come in contact with the body. Vapors can cause severe nausea, fainting, or poisoning.
To avoid these risks, take the following preventions: f Use a respirator or mask if vapors can be inhaled.
Read all instructions supplied with the mask to be sure it will provide the necessary protection.
f Wear protective eyewear. f Wear protective clothing as required by coating
manufacturer. Warning! ELECTRIC SHOCK HAZARD.
May cause severe injury. To avoid these risks, take the following preventions:
f Keep electrical cord plug and spray gun trigger free from spray material and other liquids. Never hold cord at plug connections to support cord. Failure to observe may result in an electrical shock.

14 • PORTUGUÊS f Never immerse electrical parts in water or any other
liquid. Wipe the exterior of the sprayer with a damp cloth for cleaning. Always make sure the sprayer is unplugged before taking it apart for cleaning.
f Do not expose unit to rain or wet conditions. f Do not abuse the cord. Never use the cord to carry
the unit or pull the plug from an outlet. Keep cord away from heat, oil, sharp edges or moving parts.Replace damaged cords immediately.
GENERAL SAFETY WARNINGS
Warning!: General. Can cause severe injury or property damage.
To avoid these risks, take the following preventions: f Do not aim the gun at, or spray any person, including
self, or animal. f Do not spray outdoors on windy days. f Wear protective clothing to keep spray material off
skin and hair. f Follow all appropriate local, state, and national codes
governing ventilation, fire prevention, and operation. f Always use appropriate gloves, eye protection and a
respirator or mask when spraying, thinning, mixing, pouring, or cleaning.
f Do not operate or spray near children. Keep children away from equipment at all times. Keep sprayer out of the reach of children.
f Do not overreach or stand on an unstable support. Keep effective footing and balance at all times.
f Stay alert and watch what you are doing. f Do not operate the unit when fatigued or under the
influence of drugs or alcohol. f Read all instructions and safety precautions for
equipment and spray material before operating any equipment.
f Hearing protection is recommended for extended use.
ELECTRICAL SAFETY
Esta ferramenta tem um isolamento duplo e, porisso, não é necessário um fio de terra. Verifiquesempre se a fonte de alimentação corresponde à tensão indicada na placa de especificações.
f Se o cabo de alimentação estiver danificado, terá de ser substituído pelo fabricante ou por um centro de assistência autorizado Black & Decker para evitar acidentes.
f Quando utilizar com a ferramenta ao ar livre, utilize cabos de extensão apropriados para esse fim. Pode utilizar um cabo de extensão Black & Decker com a classificação adequada até 30 m sem perda de
energia. f A segurança eléctrica pode ser melhorada mediante o
uso de um Dispositivo de Corrente Residual (RCD) de alta sensibilida de (30 mA/30 mS).
EXTENSION CORDS
grounding plug and a 3-slot receptacle that will accept the plug on the product. Make sure your extension cord is ingood condition. When using an extension cord, be sure to use one heavy enough to carry the current your product will draw. An undersized cord will cause a drop in line voltage resulting in loss of power and overheating. If an extension cord is to be used outdoors, it must be marked with the suffix W-A after the cord type designation. For example, a designation of SJTW-A would indicate that the cord would be appropriate for outdoor use. For proper size cords see chart below.
Minimum Gauge for Cord SetsVolts Total length of cord in feet120V 0-25 26-50 51-100 101-150
(0-7,6m) (7,6-15,2m) 15,2-30,4m) 30,4-45,7m)240V 0-50 51-100 101-200 201-300
(0-15,2m) (15,2-30,4m) (30,4-60,9m) (60,9-91,4m)
Ampere RatingMore than Not more than American Wire Gauge
0 - 6 18 16 16 146 - 10 18 16 14 12
10 - 12 16 16 14 1212 - 16 14 12 No se recomienda
Warning! ome spray materials contain chemicals known to the State of California to cause cancer, birth defects or other reproductive harm. To reduce your exposure wear appropriate safety equipment such as face masks, gloves, and other appropriate protective equipment. Please review and follow the safety precautions on the paint container.
FEATURES (Fig. A)1. Motor housing2. Flow control indicator3. Release button4. Filter5. Filter cover6. Trigger7. Material adjustment jnob8. O-ring9. Pickup tube10. Check valve11. Tip collar12. Spray nozzle13. Spray tip14. Side fill canister

PORTUGUÊS • 1515. Lid16. 2 quart mixing bucket17. Viscosity cup18. Cleaning brush
SET-UP Warning! Be sure to use appropriate protective gear
and unplug unit.
Warning! Make sure area is well ventilated and free of flammable vapors.
Aligning the pickup tube (FIG B and B1)The pickup tube can be aligned in the direction that you will be doing the most spraying to help minimize the amount of times that you will have to refill the canister.
f If you are spraying at an upward angle or straight on, position the pickup tube (Figure B) toward the back of the canister.
f If you are spraying at a downward angle, position the pickup tube (Figure B1) toward the front of the canister.
This will ensure you spray as much material as possible before you need to refill.
Liquid material preparation (FIG C, C1 and C2) Tip: Make sure the type of material you use can be cleaned with either mineral spirits or paint thinner (for oil-based paints) or a warm water and soap solution (for water soluble paints like latex). Use drop cloths during pouring, mixing, and viscosity testing of materials to be sprayed to protect your floors and anything else in the spraying area that you wish to remain untouched.The liquid being sprayed may need to be thinned (diluted) before starting. When thinning, use the proper liquid thinner recommended on the container by the material manufacture.
Warning! Do not use materials with a flashpoint higher than 60ºC (140ºF).
A 2- 3/4 quart mixing bucket is provided to use when transferring spray material from the original container into the bucket for thinning and measuring purposes (Fig. C).
A viscosity test cup is provided to determine the “runout time” of the material being used.
f Before measuring for the proper viscosity, stir the material thoroughly.
f Dip the viscosity cup into the material being sprayed and fill the cup completely.
f With the cup held over the material container, measure the amount of time it takes for the stream of material flowing out to “break” or stop being a constant stream out of the bottom of the cup (2 minutes or less) (Fig. C1). This is the “runout time” Refer to the thinning table for information on the thinning required for different materials.
f If material needs thinning, add the appropriate liquid thinning material recommended by the manufacturer (Fig. C2).
f It is possible to spray latex paint with this unit, however, the required thinning may exceed material manufacturer´s recommendation. Thin latex paint so that it runs through viscosity cup in under 2 minutes. The operator should con- sider the type of application and final location of the project when spraying a material that requires more than 2 min- utes to run through the viscosity cup.
THINNING TABLESPRAY MATERIAL RUNOUT TIME
Clear and semi-transparent stains and sealers Oil based primers, varnishes and polyurethane
No thinning required(Less than 2 minute runout)
Solid color water based stainsWater based or latex paints
May require thinning(More than 2 minute runout)
Note: Not recommended for textured paint.
PREPARATION TIPS f Always stir and strain the material thoroughly before
use. f With any spraying job you should always ensure that
you have properly prepared the surface to get the best finish. That is, all surfaces are free from dust, dirt, rust and grease. Lightly pressure wash decks or exterior surfaces and ensure that they are dry before spraying.
f Even though HVLP sprayers have very little overspray, it is recommended that you mask all edges and other areas and use drop cloths to protect your floors and anything else in the spraying area that you wish to remain untouched.
f Skin that forms on the top of paint can clog the sprayer. Remove skin before mixing. Strain with a funnel with a filter attached or through hosiery to remove any impurities that could clog system.
f Before starting have gloves, paper towels, rags etc. available for unexpected spills.
FILLING THE CANISTER (FIG. D) f Check to make sure that the canister is completely
screwed onto the sprayer.

16 • PORTUGUÊS f Lay the sprayer on its side with the canister side lid
facing up. f Unscrew the lid on the side of the canister. f Pour the properly thinned and strained material to be
sprayed into the side fill canister (Fig. D). Tip: Use the mixing bucket provided to pour material from the original material container into the side fill canister.
f Clean any residual liquid from the threads or sides of the canister and sprayer.
f Starting the threads evenly, screw the lid completely onto the side fill canister. Check the lid to make sure it is threaded on squarely and completery before picking up the sprayer.
OPERATIONMATERIAL FLOW ADJUSTMENTSet the material volume by turning the material adjustment knob on the trigger of the sprayer.
f For maximum material flow, thread knob all the way in as shown in Fig. E.
f For minimum material flow, thread knob all the way out as shown in Fig. E1.
The flow indicator on the side of the sprayer moves forward (minimal liquid flow) and backward (maximum liquid flow) as the triggTip: Always test the spray pattern on scrap cardboard or similar material first. Begin with the material adjustment knob on the highest flow setting (threaded all the way in). If less flow is desired, dial the material adjustment knob out. Heavier, thicker materials should be sprayed with the knob dialed farther in. Thinner materials should be sprayed with the knob dialed farther out.
SMART SELECT NOZZLE SELECTION (FIG.F)There are three spray patterns to choose from. They are marked as 1, 2 and 3 on the Smart Select label located on the top of the sprayer (Fig. F). To select pattern number 1, turn the spray nozzle and align the green indicator on the spray nozzle with the number 1 on the label (Fig. F1).Note: Spray nozzle can only be assembled in one direction. Refer to figure S for proper assembly.
Pattern numbre 1: Horizontal flat Jet - Apply up and down a surface.
Pattern numbre 2: Circular Jet - for corners, edges and narrow suface. para esquinas, bordes y superficies angostas.Tip: Position number 2 has a detent
that you can feel when you turn the spray nozzle. Make sure it locates in the detent.
Pattern numbre 3: Vertical Flat Jet Apply side to side.
Warning! Risk of injury. Never point the sprayer ay any part of the body. Never pull the trigger while adjusting the spray setting.
DEVELOPING THE PROPER SPRAYING TECHNIQUE
f Practice spraying on a piece of scrap material such as cardboard to test your spray pattern and become familiar with the flow control feature of the sprayer.
f Ensure surface to be sprayed is free of dust, dirt, and grease.
f Ensure spray area is clean and free of dust that could be blown onto newly sprayed surfaces.
f Cover any areas not intended to be sprayed. f Always spray from a minimum of 1 inch (25mm) to a
maximum of 14 inches (355mm) (Fig. G). f A commonly used method for spraying a large surface
is the “crisscross” pattern. This is done by spraying in horizontal strips and then crossing over these strips with vertical strips.
f To get an even spray distribution, always keep your arm at the same distance (Fig. G) from the surface you are spraying and avoid moving your wrist (Fig. H).
f Maintain smooth and consistent speed which will help avoid inconsistencies. Begin spraying after the pass has begun and release trigger before stopping the pass.
f Avoid spraying too heavily in any one area. Several lighter coats are better than one heavy coat which can lead to running and dripping. Remember that the flow control knob regulates the amount of liquid that can be sprayed. Turning the flow knob clockwise increases the flow of liquid. Turning the knob counterclockwise decreases the flow of liquid. If runs or drips do occur, have a dry paint brush on hand to smooth them out.
f Turn the power unit off when not spraying for any length of time.
CLEANING Warning! Be sure to use appropriate protective gear.
Use drop cloths during pouring, mixing, and viscosity testing of materials to be sprayed to protect your floors and anything else in the spraying area that you wish to remain untouched.
f Do not use materials with a flashpoint higher than

PORTUGUÊS • 1760°C (140°F) . Flashpoint is the temperature that a fluid can produce enough vapors to ignite (see coating supplier).
f Make sure clean up area is well ventilated and free of flammable vapors.
f Always spray outdoors when spraying cleaning solution through sprayer.
f Do not submerse power unit.
To begin cleaning: f Unplug the cord from the power source. f Unscrew the lid from the side of the canister and pour
any remainingliquid back into the original container (Fig. I).
f Pour a small amount of the appropriate cleaning solution into the canister (Fig. J).
f Warm soapy water for water based materials f Manufacturers recommended cleaning solution for
oil based materials f Replace the lid on the canister securely and vigorously
shake the sprayer. f Unscrew the lid from the side of the canister and
properly dispose of cleaning solution. f Refill the canister with a small amount of new
cleaning solution (Fig. J). Screw lid securely on canister.
f Plug in the power cord. f Spray the cleaning solution through the sprayer onto
scrap material for 2 to 3 seconds (Fig. K). f Unplug the cord from the power source. f Remove the canister and unscrew the side lid.
Remove the check valve, pickup tube and o-ring from the sprayer (Fig. L). Clean the parts with the cleaning brush in the appropriate cleaning solution
f Unscrew the tip collar and remove the spray nozzle and spray tip (Fig. M). Clean all parts with the cleaning brush in the appropriate cleaning solution.
f Separate the nozzle section from the sprayer motor by pressing the release button on the motor housing as shown in Fig. N.
f Grasp the nozzle section and twist until it is 90 degrees to the housing, then pull straight out (Fig. O).
f If using water based material, clean the nozzle section by running water through pickup tube inlet as shown in Fig. P. If using oil based materials, clean pickup tube inlet with the appropriate cleaning solution. Repeat until sprayer is completely clean.
f Dry all parts thoroughly. f Properly dispose of cleaning solution. f Place a drop of household oil onto the metal ball in the
check valve (Fig. Q).
Important!: Lubricating the ball in check valve, after cleanup, will help to prevent it from sticking which can clog the valve and prevent adequate
flow of spray material. f Note: When reassembling, place metal ball end of
check valve into sprayer. f Reassemble sprayer (Fig. R).
Note: The spray tip can only go in one way. The notch on the spray tip, shown in Figure S must align with the recess in the threads of the sprayer.
f Align the nozzle section 90 degrees to the motor housing and press it fully into the motor housing as shown in Fig. T.
f Grasp the nozzle section and twist it downward until the pointer on the nozzle section aligns with the lock symbol on the motor housing (Fig. U).
When properly connected, the two pieces will “snap” into place.
MAINTENANCE AND STORAGEUse only mild soap and damp cloth to clean the power unit. Never let any liquid get inside the power unit; never immerse any part of the power unit into a liquid.
Important!: To assure product SAFETY and RELIABILITY, repairs, maintenance and adjustment (other than those listed in this manual) should be performed by authorized service centers or other qualified service organizations, always using identical replacement parts.
The sprayer contains a washable/reuseable filter (Fig. V). Check the filter before and after each use. If dirty, wash with warm water and allow to air dry before re-installing or replace if necessary.
f To check the filter, remove the filter cover by loosening the two screws in the cover and pulling the cover off the sprayer. Remove the filter as shown in figure V and inspect. Replace filter and filter cover. Snugly tighten screws. Never operate the sprayer without the filter in place. Debris could be sucked in and interfere with the function of the sprayer.
Make sure unit is clean and dry before storing. Store unit indoors in a dry location. To prevent damage, wrap the electrical cord so that it is not crimped during storage.
ACCESSORIESThe performance of your tool depends on the accessory used. Black & Decker and Piranha accessories are engineered to high quality standards and designed to enhance the performance of your tool. By using these accessories you will get the very best from your tool.
Warning! The use of any accessory not recommended for use with this product could be hazardous.

18 • PORTUGUÊS PROTECTING THE ENVIRONMENT
Separate collection. This product must not be disposed of with normal household waste.Should you find one day that your Black & Decker product needs replacement, or if it is of no further use to you, do not dispose of it with household waste. Make this product available for separate collection.
Separate collection of used products and packaging allows materials to be recycled and used again. Re-use of recycled materials helps prevent environmental pollution and reduces the demand for raw materials. Local regulations may provide for separate collection of electrical products from the household, at municipal waste sites or by the retailer when you purchase a new product.
SERVICE INFORMATIONBlack & Decker offers a full network of company-owned and authorized service locations. All Black & Decker Service Centers are staffed with trained personnel to provide customers with efficient and reliable power tool service. For more information about our authorized service centers and if you need technical advice, repair, or genuine factory replacement parts, contact the Black & Decker location nearest you, or visit us at www.BlackandDecker-la.com

PORTUGUÊS • 19TROUBLESHOOTING
TROUBLE! MATERIAL RUNS OR DRIPS.
WHAT’S WRONG? WHAT TO DO…
Spraying too much material. Reduce air flow by turning material adjustment knob.
Spraying too slowly. Increase speed of application.
Spraying too close. Increase distance from surface.
Viscosity too thin. Check dilution recommendation.
TROUBLE! TOO MUCH OVER SPRAY.
WHAT’S WRONG? WHAT TO DO…
Sprayer too far from surface. Reduce distance to surface.
Too much material being sprayed. Reduce air flow by turning material adjustment knob.
TROUBLE! LITTLE OR NO MATERIAL BEING RELEASED.
WHAT’S WRONG? WHAT TO DO…
Check valve ball stuck. Remove check valve. Depress ball to loosen. Add lubricant Figure Q.
Spray nozzle/tip clogged. Clean nozzles.
Pickup tube loose or clogged. Check tube.
Material adjustment knob setting too low. Increase setting
Air inlet blocked. Clean or change air filter.
Material too thick. Check viscosity recommendation
TROUBLE! MATERIAL BEING SPRAYED IS SPLATTERING.
WHAT’S WRONG? WHAT TO DO…
Viscosity of material is too high. Thin material per manufacturer recommendation.
TROUBLE! SPRAYER PULSATES.
WHAT’S WRONG? WHAT TO DO…
Air filter clogged. Clean or change filter.
Material in canister almost empty. Refill canister.
TROUBLE! LIQUID COMES OUT SIDE OF CANISTER.
WHAT’S WRONG? WHAT TO DO…
Lid not on square or tight enough. Remove lid and reattach squarely and evenly, then tighten lid securely.
Paint on threads of canister and lid. Clean threads on top and sides of canister and lid.

20 • ENGLISHDO NOT RETURN THIS PRODUCT TO THE STORE,
first contact your local Black & Decker officeor nearest authorized service center.
SAFETY GUIDELINES - DEFINITIONS
It is important for you to read and understand this manual. The information it contains relates to protecting YOUR SAFETY and PREVENTING PROBLEMS. The symbols below are used to help you recognize this information.
Danger!: Indicates an imminently hazardous situation which, if not avoided, will result in death or serious injury.
Warning!: Indicates a potentially hazardous situation which, if not avoided, could result in death or serious injury. Caution!: Indicates a potentially hazardous situation which, if not avoided, may result in minor or moderate injury.Notice: Used without the safety alert symbol indicates a potentially hazardous situation which, if not avoided, may result in property damage.The following are explanations of important safety hazard pictorials in this manual.
1. Read and understand the instruction manual.
2. Fire hazard.
3. Explosion hazard.
4. Respiratory hazard.
5. Electric shock hazard.
IMPORTANT SAFETY INSTRUCTIONSSAVE THESE INSTRUCTIONS: To reduce the risks of fire or explosion, electrical shock and the injury to persons, read and understand all instructions included in this manual. Be familiar with the controls and the proper usage of the equipment.
f This product is intended for household use only.
Warning! FIRE OR EXPLOSION HAZARD. Solvent and spray material fumes can explode or ignite. Severe injury or property damage can occur.
To avoid these risks, take the following preventions:
f Exhaust and fresh air introduction must be provided to keep the air within the spray area free from accumulation of flammable vapors.
f Avoid all ignition sources such as static electricity sparks, open flames, pilot lights, hot objects, lit tobacco products, and sparks from connecting and disconnecting power cords or working light switches.
f Fire extinguishing equipment must be present and in good working order.
f Follow the material and solvent manufacturer´s safety precautions and warnings.
f Do not spray flammable or combustible materials near an open flame or sources of ignition such as lit tobacco products, motors, and electrical equipment.
f Know the contents of the spray materials and their cleaning solvents. Read all Material Safety Data Sheets (MSDS) and container labels provided with the spray materials and solvents. Follow the spray material and solvent manufacturer´s safety instructions.
f Do not use materials with a flashpoint higher than 60°C (140°F). Flashpoint is the temperature that a fluid can produce enough vapors to ignite (see coating supplier).
Warning! EXPLOSION HAZARD DUE TO INCOMPATIBLE MATERIALS. Severe injury or property damage can occur.
To avoid these risks, take the following preventions: f Do not use bleach. f Do not use halogenated hydrocarbon solvents such
as methylene chloride and 1,1,1 - trichloroethane. They are not compatible with aluminum and may cause an explosion. If you are unsure of a material´s compatibility with aluminum, contact your coating supplier.
Warning! HAZARDOUS VAPORS. Spray materials, solvents, and other materials can be harmful if inhaled or come in contact with the body. Vapors can cause severe nausea, fainting, or poisoning.
To avoid these risks, take the following preventions: f Use a respirator or mask if vapors can be inhaled.
Read all instructions supplied with the mask to be sure it will provide the necessary protection.
f Wear protective eyewear. f Wear protective clothing as required by coating
manufacturer. Warning! ELECTRIC SHOCK HAZARD.
May cause severe injury. To avoid these risks, take the following preventions:
f Keep electrical cord plug and spray gun trigger free from spray material and other liquids. Never hold cord at plug connections to support cord. Failure to observe may result in an electrical shock.

ENGLISH • 21 f Never immerse electrical parts in water or any other
liquid. Wipe the exterior of the sprayer with a damp cloth for cleaning. Always make sure the sprayer is unplugged before taking it apart for cleaning.
f Do not expose unit to rain or wet conditions. f Do not abuse the cord. Never use the cord to carry
the unit or pull the plug from an outlet. Keep cord away from heat, oil, sharp edges or moving parts.Replace damaged cords immediately.
GENERAL SAFETY WARNINGS
Warning!: General. Can cause severe injury or property damage.
To avoid these risks, take the following preventions: f Do not aim the gun at, or spray any person, including
self, or animal. f Do not spray outdoors on windy days. f Wear protective clothing to keep spray material off
skin and hair. f Follow all appropriate local, state, and national codes
governing ventilation, fire prevention, and operation. f Always use appropriate gloves, eye protection and a
respirator or mask when spraying, thinning, mixing, pouring, or cleaning.
f Do not operate or spray near children. Keep children away from equipment at all times. Keep sprayer out of the reach of children.
f Do not overreach or stand on an unstable support. Keep effective footing and balance at all times.
f Stay alert and watch what you are doing. f Do not operate the unit when fatigued or under the
influence of drugs or alcohol. f Read all instructions and safety precautions for
equipment and spray material before operating any equipment.
f Hearing protection is recommended for extended use.
ELECTRICAL SAFETYThis tool is double insulated; therefore no earthwire is required. Always check that the powersupply corresponds to the voltage on the ratingplate.
f If the supply cord is damaged, it must be replaced by the manufacturer or an authorised Black & Decker Service Centre in order to avoid a hazard.
f When using the tool outdoors, only use extension cables intended for outdoor use. A suitable rated Black & Decker extension cable of up to 30 m can be used without loss of power.
f Electric safety can be further improved by using a highsensitivity
30 mA residual current device (RCD).EXTENSION CORDS
grounding plug and a 3-slot receptacle that will accept the plug on the product. Make sure your extension cord is ingood condition. When using an extension cord, be sure to use one heavy enough to carry the current your product will draw. An undersized cord will cause a drop in line voltage resulting in loss of power and overheating. If an extension cord is to be used outdoors, it must be marked with the suffix W-A after the cord type designation. For example, a designation of SJTW-A would indicate that the cord would be appropriate for outdoor use. For proper size cords see chart below.
Minimum Gauge for Cord SetsVolts Total length of cord in feet120V 0-25 26-50 51-100 101-150
(0-7,6m) (7,6-15,2m) 15,2-30,4m) 30,4-45,7m)240V 0-50 51-100 101-200 201-300
(0-15,2m) (15,2-30,4m) (30,4-60,9m) (60,9-91,4m)
Ampere RatingMore than Not more than American Wire Gauge
0 - 6 18 16 16 146 - 10 18 16 14 12
10 - 12 16 16 14 1212 - 16 14 12 No se recomienda
Warning! ome spray materials contain chemicals known to the State of California to cause cancer, birth defects or other reproductive harm. To reduce your exposure wear appropriate safety equipment such as face masks, gloves, and other appropriate protective equipment. Please review and follow the safety precautions on the paint container.
FEATURES (Fig. A)1. Motor housing2. Flow control indicator3. Release button4. Filter5. Filter cover6. Trigger7. Material adjustment jnob8. O-ring9. Pickup tube10. Check valve11. Tip collar12. Spray nozzle13. Spray tip14. Side fill canister15. Lid16. 2 quart mixing bucket17. Viscosity cup18. Cleaning brush

22 • ENGLISHSET-UP
Warning! Be sure to use appropriate protective gear and unplug unit.
Warning! Make sure area is well ventilated and free of flammable vapors.
Aligning the pickup tube (FIG B and B1)The pickup tube can be aligned in the direction that you will be doing the most spraying to help minimize the amount of times that you will have to refill the canister.
f If you are spraying at an upward angle or straight on, position the pickup tube (Figure B) toward the back of the canister.
f If you are spraying at a downward angle, position the pickup tube (Figure B1) toward the front of the canister.
This will ensure you spray as much material as possible before you need to refill.
Liquid material preparation (FIG C, C1 and C2) Tip: Make sure the type of material you use can be cleaned with either mineral spirits or paint thinner (for oil-based paints) or a warm water and soap solution (for water soluble paints like latex). Use drop cloths during pouring, mixing, and viscosity testing of materials to be sprayed to protect your floors and anything else in the spraying area that you wish to remain untouched.The liquid being sprayed may need to be thinned (diluted) before starting. When thinning, use the proper liquid thinner recommended on the container by the material manufacture.
Warning! Do not use materials with a flashpoint higher than 60ºC (140ºF).
A 2- 3/4 quart mixing bucket is provided to use when transferring spray material from the original container into the bucket for thinning and measuring purposes (Fig. C).
A viscosity test cup is provided to determine the “runout time” of the material being used.
f Before measuring for the proper viscosity, stir the material thoroughly.
f Dip the viscosity cup into the material being sprayed and fill the cup completely.
f With the cup held over the material container, measure the amount of time it takes for the stream of material flowing out to “break” or stop being a constant stream out of the bottom of the cup (2
minutes or less) (Fig. C1). This is the “runout time” Refer to the thinning table for information on the thinning required for different materials.
f If material needs thinning, add the appropriate liquid thinning material recommended by the manufacturer (Fig. C2).
f It is possible to spray latex paint with this unit, however, the required thinning may exceed material manufacturer´s recommendation. Thin latex paint so that it runs through viscosity cup in under 2 minutes. The operator should con- sider the type of application and final location of the project when spraying a material that requires more than 2 min- utes to run through the viscosity cup.
THINNING TABLESPRAY MATERIAL RUNOUT TIME
Clear and semi-transparent stains and sealers Oil based primers, varnishes and polyurethane
No thinning required(Less than 2 minute runout)
Solid color water based stainsWater based or latex paints
May require thinning(More than 2 minute runout)
Note: Not recommended for textured paint.
PREPARATION TIPS f Always stir and strain the material thoroughly before
use. f With any spraying job you should always ensure that
you have properly prepared the surface to get the best finish. That is, all surfaces are free from dust, dirt, rust and grease. Lightly pressure wash decks or exterior surfaces and ensure that they are dry before spraying.
f Even though HVLP sprayers have very little overspray, it is recommended that you mask all edges and other areas and use drop cloths to protect your floors and anything else in the spraying area that you wish to remain untouched.
f Skin that forms on the top of paint can clog the sprayer. Remove skin before mixing. Strain with a funnel with a filter attached or through hosiery to remove any impurities that could clog system.
f Before starting have gloves, paper towels, rags etc. available for unexpected spills.
FILLING THE CANISTER (FIG. D) f Check to make sure that the canister is completely
screwed onto the sprayer. f Lay the sprayer on its side with the canister side lid
facing up. f Unscrew the lid on the side of the canister. f Pour the properly thinned and strained material to be

ENGLISH • 23sprayed into the side fill canister (Fig. D). Tip: Use the mixing bucket provided to pour material from the original material container into the side fill canister.
f Clean any residual liquid from the threads or sides of the canister and sprayer.
f Starting the threads evenly, screw the lid completely onto the side fill canister. Check the lid to make sure it is threaded on squarely and completery before picking up the sprayer.
OPERATIONMATERIAL FLOW ADJUSTMENTSet the material volume by turning the material adjustment knob on the trigger of the sprayer.
f For maximum material flow, thread knob all the way in as shown in Fig. E.
f For minimum material flow, thread knob all the way out as shown in Fig. E1.
The flow indicator on the side of the sprayer moves forward (minimal liquid flow) and backward (maximum liquid flow) as the triggTip: Always test the spray pattern on scrap cardboard or similar material first. Begin with the material adjustment knob on the highest flow setting (threaded all the way in). If less flow is desired, dial the material adjustment knob out. Heavier, thicker materials should be sprayed with the knob dialed farther in. Thinner materials should be sprayed with the knob dialed farther out.
SMART SELECT NOZZLE SELECTION (FIG.F)There are three spray patterns to choose from. They are marked as 1, 2 and 3 on the Smart Select label located on the top of the sprayer (Fig. F). To select pattern number 1, turn the spray nozzle and align the green indicator on the spray nozzle with the number 1 on the label (Fig. F1).Note: Spray nozzle can only be assembled in one direction. Refer to figure S for proper assembly.
Pattern numbre 1: Horizontal flat Jet - Apply up and down a surface.
Pattern numbre 2: Circular Jet - for corners, edges and narrow suface. para esquinas, bordes y superficies angostas.Tip: Position number 2 has a detent that you can feel when you turn the spray nozzle. Make sure it locates in the detent.
Pattern numbre 3: Vertical Flat Jet Apply side to side.
Warning! Risk of injury. Never point the sprayer ay any part of the body. Never pull the trigger while adjusting the spray setting.
DEVELOPING THE PROPER SPRAYING TECHNIQUE
f Practice spraying on a piece of scrap material such as cardboard to test your spray pattern and become familiar with the flow control feature of the sprayer.
f Ensure surface to be sprayed is free of dust, dirt, and grease.
f Ensure spray area is clean and free of dust that could be blown onto newly sprayed surfaces.
f Cover any areas not intended to be sprayed. f Always spray from a minimum of 1 inch (25mm) to a
maximum of 14 inches (355mm) (Fig. G). f A commonly used method for spraying a large surface
is the “crisscross” pattern. This is done by spraying in horizontal strips and then crossing over these strips with vertical strips.
f To get an even spray distribution, always keep your arm at the same distance (Fig. G) from the surface you are spraying and avoid moving your wrist (Fig. H).
f Maintain smooth and consistent speed which will help avoid inconsistencies. Begin spraying after the pass has begun and release trigger before stopping the pass.
f Avoid spraying too heavily in any one area. Several lighter coats are better than one heavy coat which can lead to running and dripping. Remember that the flow control knob regulates the amount of liquid that can be sprayed. Turning the flow knob clockwise increases the flow of liquid. Turning the knob counterclockwise decreases the flow of liquid. If runs or drips do occur, have a dry paint brush on hand to smooth them out.
f Turn the power unit off when not spraying for any length of time.
CLEANING Warning! Be sure to use appropriate protective gear.
Use drop cloths during pouring, mixing, and viscosity testing of materials to be sprayed to protect your floors and anything else in the spraying area that you wish to remain untouched.
f Do not use materials with a flashpoint higher than 60°C (140°F) . Flashpoint is the temperature that a fluid can produce enough vapors to ignite (see coating supplier).

24 • ENGLISH f Make sure clean up area is well ventilated and free of
flammable vapors. f Always spray outdoors when spraying cleaning
solution through sprayer. f Do not submerse power unit.
To begin cleaning: f Unplug the cord from the power source. f Unscrew the lid from the side of the canister and pour
any remainingliquid back into the original container (Fig. I).
f Pour a small amount of the appropriate cleaning solution into the canister (Fig. J).
f Warm soapy water for water based materials f Manufacturers recommended cleaning solution for
oil based materials f Replace the lid on the canister securely and vigorously
shake the sprayer. f Unscrew the lid from the side of the canister and
properly dispose of cleaning solution. f Refill the canister with a small amount of new
cleaning solution (Fig. J). Screw lid securely on canister.
f Plug in the power cord. f Spray the cleaning solution through the sprayer onto
scrap material for 2 to 3 seconds (Fig. K). f Unplug the cord from the power source. f Remove the canister and unscrew the side lid.
Remove the check valve, pickup tube and o-ring from the sprayer (Fig. L). Clean the parts with the cleaning brush in the appropriate cleaning solution
f Unscrew the tip collar and remove the spray nozzle and spray tip (Fig. M). Clean all parts with the cleaning brush in the appropriate cleaning solution.
f Separate the nozzle section from the sprayer motor by pressing the release button on the motor housing as shown in Fig. N.
f Grasp the nozzle section and twist until it is 90 degrees to the housing, then pull straight out (Fig. O).
f If using water based material, clean the nozzle section by running water through pickup tube inlet as shown in Fig. P. If using oil based materials, clean pickup tube inlet with the appropriate cleaning solution. Repeat until sprayer is completely clean.
f Dry all parts thoroughly. f Properly dispose of cleaning solution. f Place a drop of household oil onto the metal ball in the
check valve (Fig. Q).
Important!: Lubricating the ball in check valve, after cleanup, will help to prevent it from sticking which can clog the valve and prevent adequate flow of spray material.
f Note: When reassembling, place metal ball end of check valve into sprayer.
f Reassemble sprayer (Fig. R). Note: The spray tip can only go in one way. The notch on the spray tip, shown in Figure S must align with the recess in the threads of the sprayer.
f Align the nozzle section 90 degrees to the motor housing and press it fully into the motor housing as shown in Fig. T.
f Grasp the nozzle section and twist it downward until the pointer on the nozzle section aligns with the lock symbol on the motor housing (Fig. U).
When properly connected, the two pieces will “snap” into place.
MAINTENANCE AND STORAGEUse only mild soap and damp cloth to clean the power unit. Never let any liquid get inside the power unit; never immerse any part of the power unit into a liquid.
Important!: To assure product SAFETY and RELIABILITY, repairs, maintenance and adjustment (other than those listed in this manual) should be performed by authorized service centers or other qualified service organizations, always using identical replacement parts.
The sprayer contains a washable/reuseable filter (Fig. V). Check the filter before and after each use. If dirty, wash with warm water and allow to air dry before re-installing or replace if necessary.
f To check the filter, remove the filter cover by loosening the two screws in the cover and pulling the cover off the sprayer. Remove the filter as shown in figure V and inspect. Replace filter and filter cover. Snugly tighten screws. Never operate the sprayer without the filter in place. Debris could be sucked in and interfere with the function of the sprayer.
Make sure unit is clean and dry before storing. Store unit indoors in a dry location. To prevent damage, wrap the electrical cord so that it is not crimped during storage.
ACCESSORIESThe performance of your tool depends on the accessory used. Black & Decker and Piranha accessories are engineered to high quality standards and designed to enhance the performance of your tool. By using these accessories you will get the very best from your tool.
Warning! The use of any accessory not recommended for use with this product could be hazardous.

ENGLISH • 25PROTECTING THE ENVIRONMENT
Separate collection. This product must not be disposed of with normal household waste.Should you find one day that your Black & Decker product needs replacement, or if it is of no further use to you, do not dispose of it with household waste. Make this product available for separate collection.
Separate collection of used products and packaging allows materials to be recycled and used again. Re-use of recycled materials helps prevent environmental pollution and reduces the demand for raw materials. Local regulations may provide for separate collection of electrical products from the household, at municipal waste sites or by the retailer when you purchase a new product.
SERVICE INFORMATIONBlack & Decker offers a full network of company-owned and authorized service locations. All Black & Decker Service Centers are staffed with trained personnel to provide customers with efficient and reliable power tool service. For more information about our authorized service centers and if you need technical advice, repair, or genuine factory replacement parts, contact the Black & Decker location nearest you, or visit us at www.BlackandDecker-la.com

26 • ENGLISHTROUBLESHOOTING
TROUBLE! MATERIAL RUNS OR DRIPS.
WHAT’S WRONG? WHAT TO DO…
Spraying too much material. Reduce air flow by turning material adjustment knob.
Spraying too slowly. Increase speed of application.
Spraying too close. Increase distance from surface.
Viscosity too thin. Check dilution recommendation.
TROUBLE! TOO MUCH OVER SPRAY.
WHAT’S WRONG? WHAT TO DO…
Sprayer too far from surface. Reduce distance to surface.
Too much material being sprayed. Reduce air flow by turning material adjustment knob.
TROUBLE! LITTLE OR NO MATERIAL BEING RELEASED.
WHAT’S WRONG? WHAT TO DO…
Check valve ball stuck. Remove check valve. Depress ball to loosen. Add lubricant Figure Q.
Spray nozzle/tip clogged. Clean nozzles.
Pickup tube loose or clogged. Check tube.
Material adjustment knob setting too low. Increase setting
Air inlet blocked. Clean or change air filter.
Material too thick. Check viscosity recommendation
TROUBLE! MATERIAL BEING SPRAYED IS SPLATTERING.
WHAT’S WRONG? WHAT TO DO…
Viscosity of material is too high. Thin material per manufacturer recommendation.
TROUBLE! SPRAYER PULSATES.
WHAT’S WRONG? WHAT TO DO…
Air filter clogged. Clean or change filter.
Material in canister almost empty. Refill canister.
TROUBLE! LIQUID COMES OUT SIDE OF CANISTER.
WHAT’S WRONG? WHAT TO DO…
Lid not on square or tight enough. Remove lid and reattach squarely and evenly, then tighten lid securely.
Paint on threads of canister and lid. Clean threads on top and sides of canister and lid.

Solamente para propósito de Argentina:Importado por: Black & Decker Argentina S.A.Pacheco Trade CenterColectora Este de Ruta PanamericanaKm. 32.0 El Talar de PachecoPartido de TigreBuenos Aires (B1618FBQ)República de ArgentinaNo. de Importador: 1146/66Tel.: (011) 4726-4400
Imported by/Importado por:Black & Decker do Brasil Ltda.Rod. BR 050, s/n°- Km 167Dist. Industrial IIUberaba ˆ MG ˆ Cep: 38064-750CNPJ: 53.296.273/0001-91Insc. Est.: 701.948.711.00-98S.A.C.: 0800-703-4644
Solamente para propósitos de ColombiaImportado por: Black & Decker de Colombia, S.A.Carrera 85D # 51-65, Bodega 23Complejo Logístico San CayetanoBogotá - ColombiaTel.: 744-7100
Solamente para propósito de Chile:Importado por: Black & Decker de Chile, S.A.Av. Pdte. Eduardo Frei M. 6001-67 ConchalíSantiago de ChileTel.: (56-2) 687 1700
Impreso en ChinaImpresso em ChinaPrinted in China
12/06/12
Solamente para propósito de México:Importado por: Black & Decker S.A. de C.V.Avenida Antonio Dovali Jaime # 70 Torre B Piso 9Colonia La Fe, Santa FeDelegación Álvaro Obregón,México D.F. 01210Tel. (52) 555-326-7100R.F.C.: BDE810626-1W7
Black & Decker del Perú S.A.Av. Enrique Meiggs 227.Pque. Industrial - CallaoTel.: (511) 614-4242RUC 20266596805