M A N U A L D E U S U A R I O - INICIO | NZI Helmets · Tire con el pulgar de la pestaña situada...
44
-
Upload
nguyendang -
Category
Documents
-
view
214 -
download
0
Transcript of M A N U A L D E U S U A R I O - INICIO | NZI Helmets · Tire con el pulgar de la pestaña situada...

2
ES
M A N U A L D E U S U A R I O
Muchas gracias por la compra de este nuevo producto NZI.Para un mejor aprovechamiento de este casco, le recomendamos leer este manual de instrucciones.
CONSEJOS PARA EL USO Y MANTENIMIENTO DEL CASCOCuide su casco, protegerá su cabeza en caso de accidente. Este casco está provisto de una fina capa de pintura de acabado. Como cualquier superficie pintada, el maltrato y el descuido al transportarlo, como por ejemplo llevarlo sujeto al antirrobo de la moto, puede estropear el acabado. No modifique la estructura del casco. Nunca lo lance contra el suelo. Su casco está diseñado para absorber la energía del impacto mediante la destrucción parcial de algunos de sus componentes, si recibe un impacto violento, debe sustituirlo, aunque parezca intacto. Nunca deje el casco cerca de una fuente de calor. Temperaturas por encima de 50°C podrían dañar seriamente su casco. No aplique pinturas, adhesivos, combustibles o disolventes, pueden afectar a la estructura de la carcasa.
CARACTERISTICASCarcasa externa ultraligera de composite de fibras; relleno protector de impactos multi-densidad; sistema de retención con cierre doble D; pantalla homologada “mist retardant” (antivaho certificado ECE/ONU R22.05) con seguro de cierre de pantalla; ventilación ‘One-Push’ frontal, superior y lateral; interior en Outlast® y Dry Fast Dry System® extraible y lavable; almohadillas laterales GP-1.
LA TALLA DEL CASCO Es importante escoger la talla adecuada del casco para que le proteja adecuadamente en caso de impacto. La talla viene determinada por el perímetro mayor del cráneo. Para saber cual es su talla rodee su cabeza por encima de los ojos y las orejas con una cinta métrica y obtendrá una medida en cm. (Fig. 1). Elija un casco de esa medida y si le aprieta demasiado escoja una talla superior. No olvide que el interior del casco cede con el uso. Si duda entre dos tallas elija la más ajustada.
AJUSTE DEL CASCO Para ajustar el casco colóquelo en la cabeza

3
ES
M A N U A L D E U S U A R I O
y abróchese el cierre sin que quede holgura entre la correa y el mentón. El casco debe colocarse de forma que proteja la frente y la nuca correctamente. (Fig. 2). Nunca inclinarlo hacia atrás o hacia adelante. (Fig. 3 y 4).
PANTALLALas pantallas de los cascos NZI se fabrican termoformando la materia prima y están
revestidas para resistir las rayaduras y la formación de vaho, evitando de esta manera que la visión y la seguridad queden comprometidas en situaciones críticas. Con este proceso productivo se aumenta la transparencia, resistencia a la rotura y a la abrasión.Las pantallas NZI “Mist Retardant” están homologadas según ECE/ONU R22.05 y tienen un alto grado de transmisión luminosa, reconocimiento fiel de las señales luminosas, buena transmisión espectral, baja difusión de la luz y calidad óptica.
Normas para el cuidado de la pantalla. Limpiar con agua y jabón. Para secarla no se debe frotar si no tan solo tamponar. Evite terminantemente el uso de alcohol, detergentes para vidrios o productos abrasivos.Le recomendamos cambiar la pantalla cuando aparezcan rayaduras o marcas por efecto del uso o desgaste que puedan dificultar la visión.
Seguro de cierre de pantalla.La pantalla dispone en su parte lateral
cm.
Fig. 1 Fig. 2
Fig. 3 Fig. 4

4
ES
M A N U A L D E U S U A R I O
izquierda de un dispositivo para asegurar el cierre y la hermeticidad de ésta.
Para abrir la pantalla:Tire con el pulgar de la pestaña situada al lado del seguro hacia afuera y hacia arriba hasta desmontar el seguro. (Fig.5 - 6).
Para cerrar la pantalla:Cierre la pantalla completamente hasta que la pestaña se acople en su alojamiento.
Tear-off. (Retirable)Su casco tiene la posibilidad de incorporar láminas “Tear-off”* que protegen la pantalla de agentes externos y que se pueden retirar sobre la marcha cuando la suciedad impide
una correcta visión. Su uso más común es en competición donde la acumulación de suciedad en la pantalla del casco impide una visión óptima.
Desmontaje:Para retirar la lámina “Tear-off” basta con tirar del extremo izquierdo de ésta (fig 7).
Montaje:Para acoplar el “Tear-off” a la pantalla de su casco retire la protección de las dos caras de la lámina y encájela en los soportes que lleva su pantalla teniendo en cuenta que el extremo mas largo debe quedar en la parte izquierda de la misma
*Las láminas tear-off se venden como accesorio.
Cambio de pantalla.Desmontaje:Coloque el casco sobre una superficie plana
Fig. 5 Fig. 6
Fig. 7

5
ES
M A N U A L D E U S U A R I O
y firme, abra completamente la pantalla (Fig.8), en la zona del mecanismo que la une al casco presione con firmeza en la dirección que marca la flecha de la figura 9 hasta su
máximo recorrido y tire hacia fuera de la pantalla en la zona del mecanismo marcada con la flecha haciendo que el mecanismo salga de su alojamiento (Fig.10). Repita la misma
operación en el otro lado de la pantalla.
Montaje:Coloque la pantalla alrededor del casco en la posición que tendría abierta enfrentando los mecanismos de ajuste presentes en el casco y en la pantalla. Presione la leva que empuja el muelle hasta su máximo recorrido tal como muestra la flecha amarilla de la figura 11, empujar entonces, sin dejar de hacer presión, hacia adentro de la pantalla en la zona del mecanismo, marcada con la flecha roja de la figura 11, haciendo que el mecanismo entre en su alojamiento. Abra y cierre la pantalla varias veces para asegurarse de haberla montado correctamente.
TAPICERIA DESMONTABLESu casco dispone de tapicería interior desmontable para su limpieza.Usted puede lavar la tapicería desmontable. Una vez desmontado el interior lavar a mano con jabón neutro dejando secar sin escurrir y sin exponer directamente a los rayos del sol.
Fig. 8 Fig. 9
Fig. 10 Fig. 11

6
ES
M A N U A L D E U S U A R I O
Cambio de tapicería.Desmontaje:Saque de su alojamiento la pieza de tapicería frontal-superior. (Fig.12). Saque la pieza de la
tapicería que la sujeta a la parte posterior. (Fig.13).
Montaje:Encaje la parte frontal de la tapicería en su alojamiento y la parte posterior de la tapicería en su alojamiento.
Montaje:Encaje la parte frontal de la tapicería en su alojamiento y la parte posterior de la tapicería en su alojamiento.
Deflector de mentonera.Para reducir la presión del viento en el cuello y el ruido en el interior del casco este dispone de un deflector en la zona del mentón
Desmontaje:Tire con cuidado del deflector hasta sacarlo de su alojamiento. (Fig. 14).
Montaje:Introduzca la parte plástica del deflector en
su alojamiento. Para facilitar esta operación desmonte las almohadillas. (Fig.15).
Almohadillas laterales GP-1.Especialmente diseñadas para optimizar el confort y la estabilidad posicional del
Fig. 12 Fig. 13
Fig. 14 Fig. 15

7
ES
M A N U A L D E U S U A R I O
casco durante la conducción. Tapizadas con Outlast®.
Desmontaje: Desmonte la almohadilla tirando de ella, con cuidado, por la parte trasera de esta y sacándola de su alojamiento (Fig. 15). ¡Atención! Nunca desensamble la almohadilla tirando de su parte delantera, podría forzarla y romper el relleno de protección de esta.
Montaje:Siga los pasos anteriores de manera inversa, teniendo en cuenta que primero debe encajar la parte delantera de la almohadilla en su alojamiento y después la posterior.
Limpieza de las almohadillas.Usted puede lavar la funda tapizada de las almohadillas. Una vez desmontadas abra los cierres de velcro y retire la funda. Lavar a mano con jabón neutro dejando secar sin escurrir y sin exponer directamente a los rayos del sol.
SISTEMA DE RETENCIONSu casco dispone de un sistema de retención que evita que el casco se desprenda de la cabeza en caso de accidente.
Cierre con anillas.Para cerrar:Pase la cinta del cierre por ambas anillas. (Fig. 16). Seguidamente de la vuelta a la cinta y
Fig. 16 Fig. 17
Fig. 18 Fig. 19
8
ES
M A N U A L D E U S U A R I O
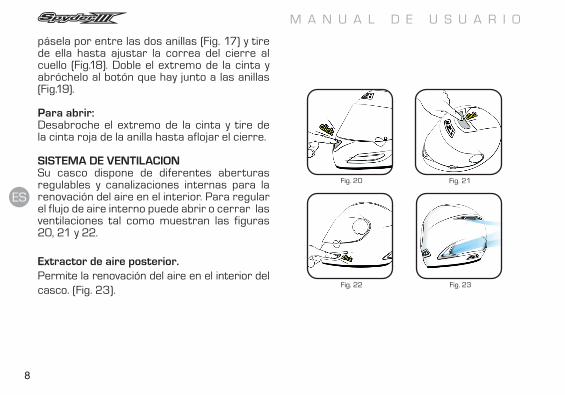
pásela por entre las dos anillas (Fig. 17) y tire de ella hasta ajustar la correa del cierre al cuello (Fig.18). Doble el extremo de la cinta y abróchelo al botón que hay junto a las anillas (Fig.19).
Para abrir:Desabroche el extremo de la cinta y tire de la cinta roja de la anilla hasta aflojar el cierre.
SISTEMA DE VENTILACIONSu casco dispone de diferentes aberturas regulables y canalizaciones internas para la renovación del aire en el interior. Para regular el flujo de aire interno puede abrir o cerrar las ventilaciones tal como muestran las figuras 20, 21 y 22.
Extractor de aire posterior.Permite la renovación del aire en el interior del casco. (Fig. 23).
Fig. 20 Fig. 21
Fig. 22 Fig. 23
9
O W N E R S M A N U A L
GB
Congratulations for purchasing this new NZI product. In order to enjoy the best features of this helmet, we strongly recommend you to carefully read this instruction manual.
ADVISE HOW TO USE AND MAINTAIN YOUR HELMETTake care of your helmet; it will protect you in case of a crash. This helmet has been finished with a thin paint coating. Just like any other painted surface rough handling or careless-ness when using the helmet (like, for example, having the helmet fastened together with the lock) could damage this coating. Do not modify the main helmet structure. Do not throw it against the floor, nor expose your helmet to temperatures higher than 50ºC, because, be-sides damaging the paint coating, the level of protection of your helmet could decrease. Do not apply paints, self-adhesives, combustibles or solvents on your helmet, the degree of pro-tection may diminish.
SPECIFICATIONSUltra light carbon composite external shell, painted and varnished; multi-density protec-
tion liner; chin strap with micrometric quick release; thermoformed visor with “mist re-tardant” ECE/UN R22.05 homologated anti-mist properties; multiple ventilation; comfort padding out of Outlast® and Dry Fast Dry Sys-tem® material; GP-1 cheek pads; detachable and washable interior; visor block button.
HELMET SIZEIt is important to choose the correct helmet size, so that it will protect you adequately in case of an impact. The helmet size is deter-mined by the largest perimeter of the skull. Surround your head with a measure tape, just above the eyes and ears, and you will obtain a measure in centimetres (Fig. 1). Choose a hel-met that corresponds to this size, and if the helmet is too tight, opt for a larger size. Please do not forget that the helmet interior stretch-es when being used. If you hesitate between two sizes, opt for the smaller one.
PUTTING THE HELMET ONTo put the helmet on correctly, place it onto your head and fasten the chinstrap without leaving any clearance between the strap and

10
O W N E R S M A N U A L
GB
the chin. The helmet should be placed on your head in such a way that it protects both the forehead and neck (Fig. 2). Do not incline the helmet forwards or backwards (Fig. 3 & 4).
VISORNZI visors are made by thermoforming raw material that is already completely coated with an anti-scratch and “mist-retardant”
treatment; these coatings avoid loss of vi-sion and enhance safety in critical situations. By using the thermoforming process flex-ibility, transparency, scratch resistance and abrasion resistance are increased. NZI “mist retardant” visors are ECE/ONU R22.05 ho-mologated; having high light transmission, ac-curate luminous road sign recognition, good spectral transmission, low light diffusion and good optical quality.
Instructions for taking care of your visor.Clean the visor only with water and neutral soap. To dry the visor it is not necessary to rub; dabbing will do. We strongly recommend you to avoid the use of any kind of solvents, alcohol or abrasive products on the visor. It is recommended to replace the visor when scratches or marks appear during the use; they can impair your view.
Visor lock.The left side of the helmet has a lock mecha-nism to secure the visor in its place. By secur-ing the visor the sealing is assured.Opening the visor:
cm.
Fig. 1 Fig. 2
Fig. 3 Fig. 4
11
O W N E R S M A N U A L
GB
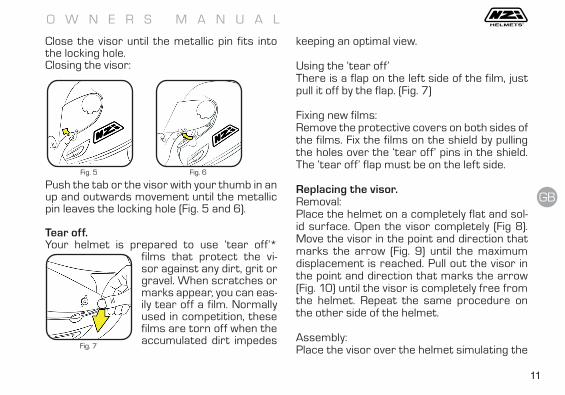
Close the visor until the metallic pin fits into the locking hole.Closing the visor:
Push the tab or the visor with your thumb in an up and outwards movement until the metallic pin leaves the locking hole (Fig. 5 and 6).
Tear off.Your helmet is prepared to use ‘tear off’*
films that protect the vi-sor against any dirt, grit or gravel. When scratches or marks appear, you can eas-ily tear off a film. Normally used in competition, these films are torn off when the accumulated dirt impedes
keeping an optimal view.
Using the ‘tear off’There is a flap on the left side of the film, just pull it off by the flap. (Fig. 7)
Fixing new films:Remove the protective covers on both sides of the films. Fix the films on the shield by pulling the holes over the ‘tear off’ pins in the shield. The ‘tear off’ flap must be on the left side.
Replacing the visor.Removal:Place the helmet on a completely flat and sol-id surface. Open the visor completely (Fig 8). Move the visor in the point and direction that marks the arrow (Fig. 9) until the maximum displacement is reached. Pull out the visor in the point and direction that marks the arrow (Fig. 10) until the visor is completely free from the helmet. Repeat the same procedure on the other side of the helmet.
Assembly:Place the visor over the helmet simulating the Fig. 7
Fig. 5 Fig. 6

12
O W N E R S M A N U A L
GB
open position. Press the bolt with the notch of the visor until the maximum displacement is
reached, as shown by the yellow arrow of Fig 10. Keeping the pressure on the bolt, place the mechanism part of the visor in the mechanism part of the helmet, as shown by the red arrow of Fig. 11. Release the pressure on the bolt and turn the visor slightly towards its closed
position. Repeat the procedure on the other side. Open and close the visor several times to confirm that the visor is correctly mounted.
COMFORT LINERYour helmet has a detachable comfort liner. You can easily take it out and clean it. Wash it by hand with neutral soap, don’t wring it out and avoid exposing it to direct sunlight while letting it dry.
Comfort liner replacementRemoval:It is recommended to remove the cheek pads first. Pull the frontal part of the liner out of its slot (Fig. 12); then pull the rear part out of its slot (Fig 13).
Assembly:It is recommended to remove the cheek pads first. Insert the frontal part of the comfort lin-er into its slot; then insert the rear part of the comfort padding into its slot. If necessary, use a flat screwdriver (carefully).
Fig. 8 Fig. 9
Fig. 10 Fig. 11

13
O W N E R S M A N U A L
GB
Chin air deflector.This helmet includes an air deflector to reduce wind pressure in the chin-neck zone and the noise level in the helmet.
Removal:Carefully pull the deflector until it is completely out of its slot (Fig. 14).
Assembly:It is recommended to remove the cheek pads first. Insert the plastic part of the deflector into its slot.
Side cheek pads GP-1.Your helmet has especially designed cheek pads to optimize comfort and the positional stability of the helmet while riding.
Replacing the cheek pads.Removal:Pull out the cheek pad by its rear part (Fig. 15). Never pull at the front part, by doing this you can apply to much force and break the inner protective liner.
Assembly:Insert the front part of the cheek pad in its place; then push the rear part into its place.
Cheek pad cleaning.You can wash the comfort liner of the cheek pads. Detach the Velcro and take the comfort liner of. Wash it by hand with neutral soap, don’t wring it out and avoid exposing it to di-
Fig. 12 Fig. 13
Fig. 14 Fig. 15

14
O W N E R S M A N U A L
GB
rect sunlight while letting it dry.
RETENTION SYSTEMThis helmet has a retention system that pre-vents the helmet flying of your head in case of an accident.
Duble-d ringsClosing:
The chin strap has to be guided trough the D-rings (Fig. 16) and routed back through only one (Fig. 17-18) until the fitting is tight. You can avoid the flapping of the chin strap by clicking it into the button next to the D-rings (Fig. 19).
Opening:Pull the red release tab to help loosening the chin strap. Pull it until the chin strap is loose.
VENTILATION SYSTEMThis helmet has several air intakes and inner ventilation channels that assure a good air ren-ovation inside. In order to adjust the inner air flow you can open and close the air intakes as shown in Fig. 20, 21 and 22.
Rear air outletThe rear air outlet allows hot air to flow out of the helmet providing a good air renovation (Fig. 23).
Fig. 16 Fig. 17
Fig. 18 Fig. 19

15
O W N E R S M A N U A L
GB
Fig. 20 Fig. 21 Fig. 22 Fig. 23

16
M A N U E L D ’ U T I L I S A T I O N
FR
Nous vous remercions pour l’achat de ce nou-veau produit NZI. Pour un meilleur usage de ce casque, nous vous recommandons de lire attentivement ce manuel d’instructions.
CONSEILS POUR L’USAGE ET L’ENTRETIEN DU CASQUEPrenez soin de votre casque, il protègera votre tête en cas d’accident. Ce casque est pourvu d’une fine couche de peinture de fini-tion. Comme pour toute surface peinte, une mauvaise utilisation comme pare exemple at-tacher votre casque à l’antivol de votre moto, peut endommager la finition. Ne modifiez pas la structure du casque. Ne le jetez jamais au sol. Votre casque est conçu pour absorber l’énergie de l’impact par la destruction partiel-le de certains de ses composants, s’il reçoit un choc violent vous devez le changer même s’il paraît intact. Ne laissez jamais votre cas-que près d’une source de chaleur. Les tempé-ratures au delà de 50°C pourraient l’abîmer sérieusement. N’appliquez pas de peintures, d’adhésifs, de combustibles ou de dissolvants car ils peuvent affecter la structure de la co-que.
CARACTÉRISTIQUESCoque très légère en fibres composites; ca-lotin protecteur multi-densité; boucle double anneaux; ecran plat, thermoformé, homolo-gué ‘mist retardant (Antibuée certifié ECE/ONU R22.05); ventilation frontale, supérieure et latérale ‘One-Push’; extracteurs arrières. Intérieur démontable et lavable Outlast® et Dryfast; mousses de joue démontables et la-vables GP-1; protège-nez; verrouillage d’écran; préparé pour Tear-Off.
LA TAILLE DU CASQUEIl est important de choisir correctement votre casque pour une protection optimale en cas d’impact. La taille est définie par le périmètre supérieur du crâne. Pour connaître votre taille, mesurez votre tour de tête en passant par dessus les yeux et les oreilles et vous ob-tiendrez votre taille en cm. (Fig.1) Choisissez alors un casque de cette taille et s’il vous serre trop prenez la taille au-dessus. N’oubliez pas que l’intérieur du casque se tasse avec le temps. Si vous doutez entre 2 tailles, prenez la plus ajustée.

17
FR
M A N U E L D ’ U T I L I S A T I O N
AJUSTEMENT DU CASQUE
Pour ajuster votre casque positionnez le sur votre tête et fermez le sans laisser de jeu dans la courroie de serrage. Le casque doit se placer de façon à ce qu’il protège le front et la nuque correctement. (Fig.2) Ne pas l’incliner vers l’arrière ou vers l’avant. (Fig.3 et 4)
ECRANLes écrans des casques NZI sont conçus en thermoformant la matière première et sont revêtues d’un traitement anti-rayures et anti-buée, évitant ainsi que la visibilité et la sécurité ne soient compromises dans des situations critiques. Avec ce procédé de conception, la transparence augmente, l’écran est plus ré-sistant à la cassure et à l’abrasion.Les écrans NZI « mist retardant » sont homo-logués selon les normes ECE / ONU R22.05 et ont un haut degré de transmission lumineuse, une parfaite transmission spectrale, basse diffusion de lumière et une qualité optique.
Normes pour l’entretien de l’écran :Le nettoyer avec de l’eau et du savon. Pour le sécher il suffit simplement de tamponner. Evi-ter absolument l’usage de l’alcool, de produits lave vitres, ou abrasifs.Nous vous recommandons de changer l’écran lorsque des rayures ou des marques commen-cent à apparaître dus aux effets de l’usure qui peuvent causer des problèmes de visibilité.
cm.
Fig. 1 Fig. 2
Fig. 3 Fig. 4

18
M A N U E L D ’ U T I L I S A T I O N
FR
Verrouillage d’écran.
L’écran possède sur sa partie latérale gauche un dispositif qui assure la parfaite fermeture de l’écran et donc son herméticité. Pour ouvrir l’écran.Tirez avec le pouce sur la pastille située sur le côté de la sécurité, vers l’extérieur puis vers le haut. (Fig.5 et 6)
Pour fermer l’écran.Fermez l’écran jusqu’à ce que l’onglet soit pla-cé dans le logement.
Tear Off.Votre casque est vendu avec plusieurs lami-nés tear off qui protègent l’écran des agents
extérieurs et qui peuvent se retirer à tout mo-ment lorsque la saleté empêche une visibilité correcte. Son usage plus commun est en com-pétition.
DémontagePour retirer le laminé tear off , il suffit de ti-rer sur son extrémité gauche. (Fig. 7)
MontagePour placer le tear off sur l’écran, ôtez la pro-
tection des 2 faces du laminé et positionnez le sur les supports de votre écran en tenant en compte que l’extrémité la plus large doit être positionnée sur le côté gauche.
Changement de l’écran.Démontage :Placez le casque sur une surface plane et ou-vrez complètement l’écran. (Fig. 8) Tirez sur la sécurité dans le sens indiqué par la flèche jaune jusqu’à son maximum et retirez l’écran. (Fig. 9 et 10) Répétez la même opération pour
Fig. 7
Fig. 5 Fig. 6

19
FR
M A N U E L D ’ U T I L I S A T I O N
l’autre côté.
Montage :Placez l’écran autour du casque dans la posi-tion ouverte en présentant les mécanismes en face de leur logement sur l’écran. Tirez sur la sécurité dans le sens indiqué par la flèche jaune jusqu’à son maximum en emboîtant l’écran dans son logement. Pour cela introdui-sez en premier la partie circulaire dans son
emplacement et ensuite la zone dentée. (Fig. 11) Fermez et ouvrez l’écran à plusieurs re-prises afin de vous assurer du montage cor-rect.
INTERIEUR DEMONTABLEVotre casque dispose d’une tapisserie d’inté-rieur démontable. Vous pouvez la laver. Pour son nettoyage, une fois l’intérieur démonté, nous vous recommandons de le nettoyer à la main avec un savon neutre en le laissant sé-cher sans l’exposer directement aux rayons du soleil.
Démontage et montage de la tapisserie d’in-térieur.
Démontage :Sortez la partie frontale de la tapisserie de son logement, de même avec la partie arrière. (Fig. 12 et 13)
Montage :Positionnez la partie frontale dans son loge-ment puis la partie arrière.
Fig. 8 Fig. 9
Fig. 10 Fig. 11

20
M A N U E L D ’ U T I L I S A T I O N
FR
Déflecteur du menton.Pour réduire la pression du vent dans le cou et le bruit dans l’intérieur du casque, celui-ci dispose d’un déflecteur sur le menton
Démontage :Tirez délicatement sur le déflecteur jusqu’à le sortir de son logement. (Fig. 14)
Montage :Introduisez la partie plastique du déflecteur dans son logement. Pour faciliter cette opéra-tion démontez les mousses de joues.
Mousses de joues GP-1.Démontage :Démontez la mousse de joue en tirant déli-catement sur sa partie arrière et en la sor-tant de son logement. (Fig.15) Attention !! Ne désassemblez jamais la mousse de joue en tirant par la partie avant, vous pourriez rompre le pain de protection.
Montage:Suivez les étapes antérieurement décrites en sens inverse en tenant bien en compte que vous devez d’abord emboîter la partie avant de la mousse de joue puis seulement ensuite sa partie arrière.
Nettoyage des mousses de joues.Vous pouvez nettoyer la housse tapissée des mousses de joues. Une fois démontées ouvrez les velcros et retirer la housse. Laver à la main avec un savon neutre en laissant sécher sans
Fig. 12 Fig. 13
Fig. 14 Fig. 15

21
FR
M A N U E L D ’ U T I L I S A T I O N
essorer et sans exposer directement aux rayons du soleil.
SYSTEME DE RETENTIONVotre casque possède un système de ferme-ture qui évite qu’il soit éjecté en cas d’accident.
Boucle double anneaux.Pour fermer:Passez la courroie de fermeture dans les 2 anneaux. (Fig. 16) Repassez ensuite la sangle entre les 2 anneaux (Fig. 17) et tirez dessus jusqu’à ajuster correctement sa longueur. (Fig. 18) Pliez l’extrémité et accrochez la au bouton pression qui se trouve près des an-neaux. (Fig. 19)
Pour ouvrirDécrochez l’extrémité de la courroie et tirez
sur la petite sangle rouge de l’anneau jusqu’à donner du jeu dans la sangle.
SYSTEME DE VENTILATIONVotre casque dispose de différentes ouvertures réglables et de canalisations internes pour le renouvellement de l’air à l’intérieur. Pour régu-ler le flux d’air interne, vous pouvez ouvrir ou fermer les ventilations tel que le montrent les figures 20, 21 et 22.
Extracteurs d’air arrières.Il permettent le renouvellement de l’air à l’inté-rieur du casque. (Fig. 23)
Fig. 16 Fig. 17
Fig. 18 Fig. 19

22
M A N U E L D ’ U T I L I S A T I O N
FR
Fig. 20 Fig. 21 Fig. 22 Fig. 23
IT
M A N U A L E D ’ U S O
23
La ringraziamo per aver acquistato questo nuovo prodotto NZI.Per un miglior utilizzo di questo casco le raccomandiamo di leggere questo manuale di istruzioni.
CONSIGLI PER L’ USO E IL MANTENIMENTO DEL CASCOFaccia attenzione al suo casco, proteggerà la sua testa in caso di incidente. Questo casco è provvisto di un fine strato di vernice di finitura. Come ogni superficie verniciata, il maltrattamento e la negligenza nel trasportarlo, come per esempio lasciarlo vicino alla marmitta della moto, può rovinare la finitura. Non modificare la struttura del casco. Mai lasciarlo cadere al suolo. Il casco è studiato per assorbire l’ energia dell’ impatto mediante la distruzione parziale di alcuni suoi componenti, se subisce un impatto violento, bisogna sostituirlo, anche se all’ apparenza è intatto. Mai lasciare il casco vicino a una fonte di calore. Temperature superiori a 50°C possono danneggiare seriamente il casco. Non utilizzare vernici, adesivi, liquidi combustibili o solventi, possono danneggiare
la struttura della calotta.
CARATTERISTICHECalotta esterna in fibre composite ultraleggere; imbottitura di protezione a multidensità; chiusura a doppio anello; visiera piana, thermoformata, omologata “mist retardant” (Certificato Antiappannamento ECE/ONU R22.05); ventilazione ‘One-Push’ frontale, superiore e latarali; estrattori d’ aria posteriori; interno Outlast® e Dry Fast Dry System® estraibile e lavabile; guanciali laterali GP-1; paranaso; chiusura di sicurezza della visiera; predisposizione per Tear Off;
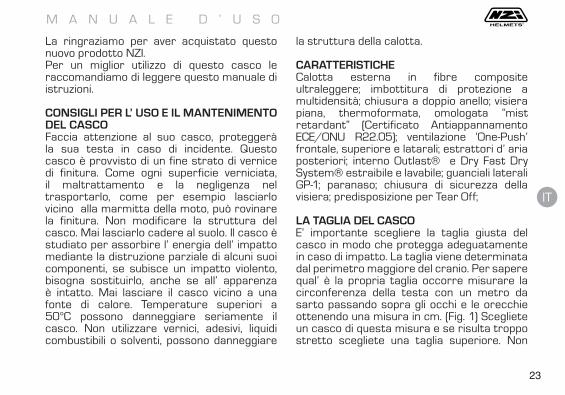
LA TAGLIA DEL CASCO E’ importante scegliere la taglia giusta del casco in modo che protegga adeguatamente in caso di impatto. La taglia viene determinata dal perimetro maggiore del cranio. Per sapere qual’ è la propria taglia occorre misurare la circonferenza della testa con un metro da sarto passando sopra gli occhi e le orecchie ottenendo una misura in cm. (Fig. 1) Scegliete un casco di questa misura e se risulta troppo stretto scegliete una taglia superiore. Non
M A N U A L E D ’ U S O
IT
24
dimenticate che l’ interno di un casco cede con l’ uso. Se avete un dubbio tra due taglie scegliete la più aderente.
COME CALZARE IL CASCO
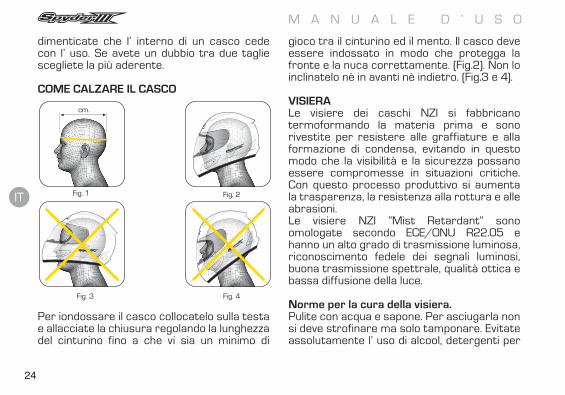
Per iondossare il casco collocatelo sulla testa e allacciate la chiusura regolando la lunghezza del cinturino fino a che vi sia un minimo di
gioco tra il cinturino ed il mento. Il casco deve essere indossato in modo che protegga la fronte e la nuca correttamente. (Fig.2). Non lo inclinatelo nè in avanti nè indietro. (Fig.3 e 4).
VISIERALe visiere dei caschi NZI si fabbricano termoformando la materia prima e sono rivestite per resistere alle graffiature e alla formazione di condensa, evitando in questo modo che la visibilità e la sicurezza possano essere compromesse in situazioni critiche. Con questo processo produttivo si aumenta la trasparenza, la resistenza alla rottura e alle abrasioni.Le visiere NZI “Mist Retardant” sono omologate secondo ECE/ONU R22.05 e hanno un alto grado di trasmissione luminosa, riconoscimento fedele dei segnali luminosi, buona trasmissione spettrale, qualità ottica e bassa diffusione della luce.
Norme per la cura della visiera.Pulite con acqua e sapone. Per asciugarla non si deve strofinare ma solo tamponare. Evitate assolutamente l’ uso di alcool, detergenti per
cm.
Fig. 1 Fig. 2
Fig. 3 Fig. 4

IT
M A N U A L E D ’ U S O
25
vetri o prodotti abrasivi. Raccomandiamo di cambiare la visiera quando appaiono rigature o segni per effetto dell’ uso o logorio che possano render difficoltosa la visibilità.
Sicura di chiusura della visiera.La visiera dispone nella sua parte laterale sinistra di un dispositivo per assicurare la sua chiusura e ermeticità.
Per aprire la visiera:Tirate con il pollice il ciglio posto al lato della sicura verso l’ esterno e verso l’ alto. (Fig.5).
Per chiudere la visiera:Chiudete la visiera completamente fino a che
la sporgenza metallica si alloggi nella sede della visiera.
Tear-off.Il suo casco ha la possibilità di mettere pellicole “Tear off”* che proteggono la visiera dagli agenti esterni e che si possono togliere durante la guida quando lo sporco accumulato impedisce una buona
visibilità. L’uso più comune è nelle competizioni dove l’ accumulo di sporcizia sulla visiera del casco impedisce una visibilità ottimale.
Smontaggio:Per togliere la pellicola “Tear off” è sufficiente tirarla dal lato sinistro (fig 7).
Montaggio:Per accoppiare il “Tear off” alla visiera del suo casco, tolga la protezione dalle due facce della pellicola e la inserisca nei supporti di cui dispone la visiera, tenendo presente che l’ esterno più lungo deve trovarsi nella parte
Fig. 7
Fig. 5 Fig. 6
M A N U A L E D ’ U S O
IT
26
sinistra della stessa. *Le pellicole Tear-off si vendono come accessorio.
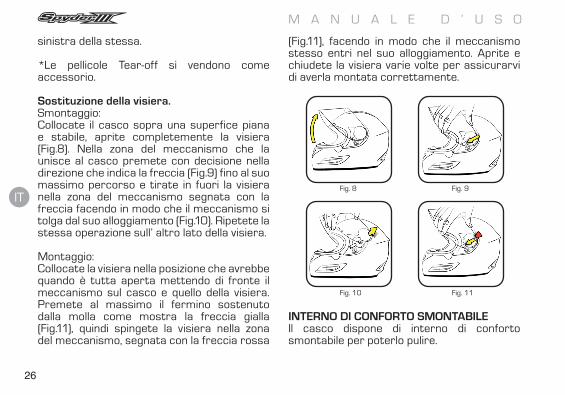
Sostituzione della visiera.Smontaggio:Collocate il casco sopra una superfice piana e stabile, aprite completemente la visiera (Fig.8). Nella zona del meccanismo che la unisce al casco premete con decisione nella direzione che indica la freccia (Fig.9) fino al suo massimo percorso e tirate in fuori la visiera nella zona del meccanismo segnata con la freccia facendo in modo che il meccanismo si tolga dal suo alloggiamento (Fig.10). Ripetete la stessa operazione sull’ altro lato della visiera.
Montaggio:Collocate la visiera nella posizione che avrebbe quando è tutta aperta mettendo di fronte il meccanismo sul casco e quello della visiera. Premete al massimo il fermino sostenuto dalla molla come mostra la freccia gialla (Fig.11), quindi spingete la visiera nella zona del meccanismo, segnata con la freccia rossa
(Fig.11), facendo in modo che il meccanismo stesso entri nel suo alloggiamento. Aprite e chiudete la visiera varie volte per assicurarvi di averla montata correttamente.
INTERNO DI CONFORTO SMONTABILEIl casco dispone di interno di conforto smontabile per poterlo pulire.
Fig. 8 Fig. 9
Fig. 10 Fig. 11
IT
M A N U A L E D ’ U S O
27
Potete lavare l’ interno smontabile. Una volta smontato l’ interno, lavatelo a mano con sapone neutro lasciandolo asciugare senza strizzarlo e senza esporlo direttamente ai raggi del sole.
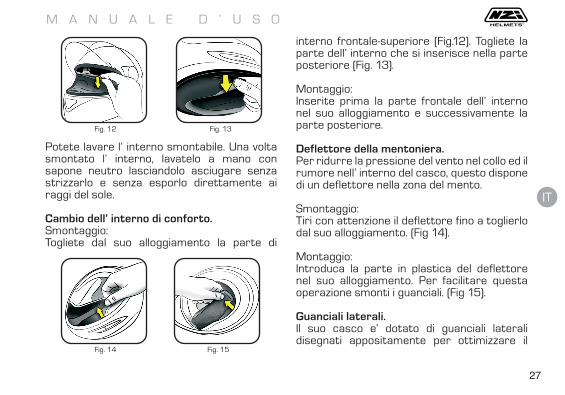
Cambio dell’ interno di conforto.Smontaggio:Togliete dal suo alloggiamento la parte di
interno frontale-superiore (Fig.12). Togliete la parte dell’ interno che si inserisce nella parte posteriore (Fig. 13).
Montaggio:Inserite prima la parte frontale dell’ interno nel suo alloggiamento e successivamente la parte posteriore.
Deflettore della mentoniera.Per ridurre la pressione del vento nel collo ed il rumore nell’ interno del casco, questo dispone di un deflettore nella zona del mento.
Smontaggio:Tiri con attenzione il deflettore fino a toglierlo dal suo alloggiamento. (Fig 14).
Montaggio:Introduca la parte in plastica del deflettore nel suo alloggiamento. Per facilitare questa operazione smonti i guanciali. (Fig 15).
Guanciali laterali.Il suo casco e’ dotato di guanciali laterali disegnati appositamente per ottimizzare il
Fig. 12 Fig. 13
Fig. 14 Fig. 15

M A N U A L E D ’ U S O
IT
28
comfort e la stabilità posizionale del casco durante la guida.
Cambio dei guanciali. Smontaggio: Smontare il guanciale tirandolo dalla parte posteriore, facendo attenzione, fuori dal suo alloggiamento (Fig. 16). Attenzione! Non smontare il guanciale tirandolo dalla sua parte anteriore, si potrebbe forzare e rompere il polistirolo di protezione del guanciale.
Montaggio:Seguire i passi precedenti in maniera inversa, tenendo presente che come prima cosa si deve incastrare la parte anteriore del guanciale nel suo alloggiamento e poi la posteriore.
Pulizia dei guanciali.Si può lavare la fodera dei guanciali. Una volta smontato aprire la chiusura in velcro e togliere la fodera. Lavare a mano con sapone neutro lasciando asciugare senza strizzare e senza esporre direttamente ai raggi del sole.
SISTEMA DE RITENZIONEIl casco dispone di un sistema di retenzione che evita al casco di togliersi dalla testa in caso di incidente.
Chiusura con anelli.Per chiudere:Passi la cinghia della chiusura in entrambi gli anelli. (Fig 16). Successivamente giri la cinghia e la passi tra i due anelli (Fig 17) e la
Fig. 16 Fig. 17
Fig. 18 Fig. 19

IT
M A N U A L E D ’ U S O
29
tiri fino a farla aderire al collo. (Fig 18). Doppi l’ estremità della cinghia e la fissi al bottone presente assieme al doppio anello. (Fig 19).Per aprire:Sbottoni l’ estremità della cinghia e tiri la cinghietta rossa fino a mollare la chiusura.
SISTEMA DI VENTILAZIONEIl casco dispone di diverse aperture regolabili e canalizzazioni interne per il ricambio dell’ aria al suo interno. Per regolare l’ afflusso d’ aria all’ interno del casco si possono aprire o chiudere le prese d’ aria come mostrano le figure 20, 21 e 22.
Estrattore d’ aria posteriore.Permette il ricambio dell’ aria all’ interno del casco. (Fig. 23).
Fig. 20 Fig. 21
Fig. 22 Fig. 23

30
B E N U T Z E R H A N D B U C H
DE
Herzlichen Glückwunsch zum Erwerb des neuen NZI Poduktes. Um den bestmöglichen Umgang mit ihrem neu erworbenen Helm zu gewährleisten, empfehlen wir Ihnen dringend dieses Benutzerhandbuch gründlich durchzu-lesen.
GEBRAUCHS- UND WARTUNGSANWEISUN-GENSie sollten stets die bestmögliche Instandhal-tung Ihres Helmes gewährleisten, nur so wird er Sie im Falle eines Unfalls optimal schützen. Dieser Helm wurde mit einer dünnen Lack-schicht überzogen, die, genau wie jede andere bemalte Oberfläche, durch unvorsichtigen und unzweckmässigen Umgang (z.B. dem Helm be-festigen zusammen mit den Schloss) beschä-digt werden kann. Ändern Sie nichts and der grundsätzlichen Struktur des Helmes. Werfen Sie ihn nicht zu Boden und setzen Sie ihn kei-nen Temperaturen über 50ºC aus; da dadurch neben den Lackschäden auch die struckturel-le Integrität vermindert werden könnte. Fügen Sie nachträglich keine Zeichnungen oder Auf-kleber hinzu und behandeln Sie den Helm nicht mit Lösungsmitteln oder anderen brennbaren
Flüssigkeiten – der Schutz Ihres Helmes könn-te sich verringern.
SPECIFIKATIONENSehr leichte Helmaussenschale aus Carbon Composite; Überlackiertes Design; Helmin-nenschale in verschiedenen Materialdichten; Kinnriemen mit Doppel-D Verschluss, Flaches, thermoformiert ‘mist-retardant’ homologier-tes Visier (ECE/ONU R22.05 zertifizierte Be-schlaghemmung); verschiedene Lüftungen; komfort Innenausstattung aus Outlast® and Dry Fast Dry System® Material, austrennbar und waschbar; GP-1 Wangenpolster; extra Vi-siersperre.
GRÖSSE DES HELMESEs ist sehr wichtig die für Sie passende Helm-grösse zu wählen, um Sie im Falle eines Auf-schlages optimal schützen zu können. Die Helmgrösse wird anhand der Stelle des gröss-ten Umfangs Ihres Kopfes gemessen. Be-nutzen Sie hierzu ein Massband welches Sie etwas über Ihren Augen und Ohren anlegen, um den Umfang in Zentimetern zu bestimmen (Abb. 1). Wählen Sie einen Helm, der diesen

31
DE
B E N U T Z E R H A N D B U C H
Massen entspricht. Falls der Helm zu eng sitzen sollte, wählen Sie die nächstgrössere Einheit. Vergessen Sie hierbei bitte nicht, dass sich das Helminnere bei Gebrauch ausdehnt. Falls Sie sich zwischen zwei Grössen nicht si-cher sein sollten, empfehlen wir die Kleinere.
ANPASSUNG DES HELMES Um den Helm auf Sie abzustimmen, setzen Sie
ihn auf und schliessen das Kinnband. Lassen sie dabei keinen Freiraum zwischen Ihrem Kinn und dem Band. Der Helm sollte so an-gebracht werden, dass er sowohl Ihren Kopf als auch Ihr Genick schützt (Abb. 2). Gehen Sie sicher, dass Sie den Helm gerade aufsetzen (Abb. 3 & 4).
VISIERNZI Visiere sind thermisch geformt, kratzfest und beschlaghemmend damit Sie jederzeit eine gute Sicht haben. Die Visiere sind flexibel, bruchsicher und abriebfest. NZI Visiere wer-den nach dem Mist Retardant Standard gefer-tigt (ECE/ONU R22.05 ) sind optisch korrekt, sehr lichtdurchlässig, farbgetreue Wiederga-be von Lichtsignalen und zeichnen sich durch geringe Lichtstreuung aus.
Anweisungen für die Pflege des Visiers.Zur Reinigung des Visiers ist ausschliesslich Wasser und neutrale Seife zu benutzen. Es ist nicht notwendig am Visier zu reiben um es abzutrocknen, einfaches Abtupfen reicht völlig aus. Wir empfehlen dringend, den Gebrauch von Lösungsmitteln, Alkohol oder anderen ät-
cm.
Fig. 1 Fig. 2
Fig. 3 Fig. 4

32
B E N U T Z E R H A N D B U C H
DE
zenden Mitteln zur Reinigung des Visiers zu unterlassen. Es ist empfohlen das Visier zu wechseln, sobald Kratzer oder andere sicht-einschänkende Abnutzungserscheinungen auftreten sollten.
Visier Sicherung.Visier Sicherung.Das Visier hat auf der linken Seite eine Vorrichtung um das Visier zu sichern und die bestmögliche Dichtheit zu gewährleisten.
Schließen des Visiers:Drücken Sie das Visier nach unten bis es in den Metallmechanismus einrastet.
Öffnen des Visiers:Drücken Sie mit dem Daumen das Visier nach
außen und oben (Abb. 5 & 6).Tear-offIhr Helm ist bereit für ‘Tear-off’* Filme, die das Vi-sier gegen Schmutz, Sand oder Split schützen. Wann Kratzern oder Flecken sich anzeigen, können Sie leicht einem Film abreissen.
Diese Filme werden normalerweise im Renn-sport eingesetzt; wenn die angesammelten Schmutz eine optimale Sicht behindert, kön-nen Sie eine Filme abreissen.
Ein Film abreissenEs gibt eine Klappe auf der linken Seite des Films, gerade abziehen durch die Klappe. (Abb. 7)
Neue Filme montieren:Nehmen Sie die Abdeckungen auf beiden Sei-ten der Filme ab. Befestigen Sie die Filme auf das Vizier, durch der Film über die ‘Tear-off’ Stifte in das Vizier zu ziehen. Die Klappe muss
Fig. 7
Fig. 5 Fig. 6

33
DE
B E N U T Z E R H A N D B U C H
auf der linken Seite sein.* Tear-off Filme werden als Zubehör verkauft.
Visier wechseln.Demontage:Legen Sie den Helm auf eine stabile und gera-de Oberfläche. Öffnen sie das Visier vollstän-dig (Abb. 8) und betätigen sie den Riegel wie vom die Pfeil indiziert (Abb. 9) bis er zum ma-
ximalen Anschlag kommt. Nun entnehmen Sie das Visier aus dem Mechanismus wie Abb. 10 beschreibt. Wiederholen Sie diesen Vorgang auf der gegenüberligenden Seite.
Montage:Legen Sie das Visier so über den Helm, als wäre es in gänzlich geöffneter Position. Nun drücken Sie das Visier mit der Rasterung in den Mechanismus der Außenseite des Hel-mes, wie vom die gelbe Pfeil von Abb.11 indi-ziert, bis sie den maximalen Anschlag erreicht haben und setzen das Visier an seinen Platz, wie vom die roten Pfeil von Abb. 11 indiziert. Wiederholen Sie diesen Vorgang auf der ge-genüberligenden Seite. Öffnen und schliessen sie das Visier einige Male um sichherzustellen, dass es auch ordnungsgemäss eingesetzt wurde.
HERAUSNEHMBARES INNENFUTTERIhr Helm hat ein herausnehmbares und wasch-bares Komfort Innenfutter. Handwäsche mit neutraler Seife. An der Luft trocknen lassen, nicht auswringen und nicht direktem Sonnen-licht aussetzen.
Fig. 8 Fig. 9
Fig. 10 Fig. 11

34
B E N U T Z E R H A N D B U C H
DE
Wechseln des Innenfutters.Demontage:Entnehmen Sie die Wangenpolsterung. Ziehen sie die Vorseite des Innenfutters vorsichtig aus dem Schlitz (Abb. 12). Um die Polsterung komplett zu entnehmen, lösen sie den hinte-ren Teil der Polsterung aus dem Schlitz (Abb. 13).
Montage:Entnehmen Sie die Wangenpolsterung. Fügen Sie zuerst den Vorderteil des Innenfutters in den Schlitz ein und dann den hinteren Teil des Innenfutters. Falls nötig mit einem stumpfen Werkzeug nachhelfen (Vorsicht).
Windabweiser.Dieser Helm wurde mit einer Windabweiser ausgerüstet um den Druck des Windes in der Halszone und die Lautstärke in der Helm zu reduzieren.
Demontage:Ziehen sie die Windabweiser vorsichtig aus dem Schlitz (Fig. 14).
Montage:Entnehmen Sie die Wangenpolsterung. Fügen Sie den Plasticteil des Windabweisers an sei-nen Schlitz ein (Fig. 15).
GP-1 Wangenpolster.Ihre Helm hat speziell entwickelte Wangen-polster um den Komfort zu optimieren und die Stabilität zu garantieren während der Fahrt.
Fig. 12 Fig. 13
Fig. 14 Fig. 15

35
DE
B E N U T Z E R H A N D B U C H
Wechseln des Wangenpolsters.Demontage:Ziehen sie vorsichtig der Wangenpolster am hinteren Teil (Fig. 15). Attention! Ziehen sie es niemals an die Vorseite, sie könnten zu viel Kraft brauchen und das Wangenpolster be-schädigen.
Montage:Fügen Sie zuerst den Vorderteil des Wangen-polster an seinen Platz ein und dann den hin-teren Teil.
Wangenpolster waschen.Sie können die Wangenpolster waschen. Lö-sen Sie das Klettband und nehmen das Futter heraus. Handwäsche mit neutraler Seife. An der Luft trocknen lassen, nicht auswringen und nicht direktem Sonnenlicht aussetzen.
SICHERUNGDer Kinnriemen ihres Helmes verhindert im Falle eines Unfalls das “ Wegfliegen “ ihres Helmes.
Doppel-D VerschlussSchliessen:Fädeln Sie das freie Kinnriemenende, wie auf den nebenstehendenBildern dargestellt, durch den Doppel-D-Verschluss. (Fig. 16-17-18) Ziehen Sie am freien Ende des Gurtbandes den Kinnriemen straff... Das freie Kinnriemenende wird umgelegt und mit Hilfe des eingenähten
Fig. 16 Fig. 17
Fig. 18 Fig. 19

36
B E N U T Z E R H A N D B U C H
DE
Druckknopfes befestigt. Ein Flattern des Kinnriemen im Fahrtwind wird so verhindert. (Abb. 19).
Öffnen:Ziehen Sie an der kleinen roten Fahne des Doppel-D-Verschlusses so, dass sich der Kinnriemen lockert.
VENTILATION SYSTEMEIhr Helm hat diverse Belüftungssysteme und interne Lüftungssysteme die ein gutes Klima in ihrem Helm sicherstellen. Die Ventilationen können wahlweise zu – und abgeschaltet wer-den (fig. 20, 21 und 22).
EntlüftungssystemFür eine gute Luftzirkulation sorgen die hinte-ren Ventilationen (Fig. 23).
Fig. 20 Fig. 21
Fig. 22 Fig. 23

37
NL
G E B R U I K S A A N W I J Z I N G
Gefeliciteerd met de aanschaf van dit nieuwe NZI product. Voor een goed gebruik van deze helm adviseren wij u om deze gebruiksaanwijzing aandachtig te lezen.
GEBRUIK- EN ONDERHOUDAANWIJZINGENPas goed op uw helm; hij beschermt u in geval van een impact. Deze helm heeft een beschermende dunne laklaag. Zoals elk ander oppervlak met een laklaag kan het beschadigd worden door er onvoorzichtig of hardhandig mee om te gaan (bijvoorbeeld, als u uw helm samen met een slot vastmaakt). Verander niets aan de structuur van de helm. Gooi uw helm niet op de grond en stel uw helm niet bloot aan temperaturen hoger dan 50ºC, want, behalve dat de laklaag beschadigd wordt, kan het niveau van bescherming van uw helmen afnemen. Verf de helm niet, plak er geen stickers op en stel uw helm niet bloot aan oplosmiddelen of brandstoffen, het niveau van bescherming kan hierdoor afnemen.
SPECIFICATIESLichte, carbon composiet buitenschaal;
geverfd en gelakt; binnenschaal met verschillende dichtheden; kinriem met Dubbel-D kinriem; thermoformed “mist-retardant” gehomologeerd vizier (ECE/ONU R.22.05 gecertificeerd, anti-condens vizier); verschillende ventilaties; binnenvoering van Outlast® en Dry Fast Dry System® materiaal; GP-1 wangstukken; uitneembare en wasbare binnenvoering; dubbele viziersluiting.
DE JUISTE MAATHet is erg belangrijk dat u de goede maat helm kiest, zodat u de beste bescherming heeft, mocht u een ongeval hebben. Een helm is ontworpen naar de grootste omtrek van het hoofd. Om deze maat te nemen, doet u een centimeter om uw hoofd, net boven de oren en ogen (Fig. 1). Het aantal centimeters wat u nu heeft moet corresponderen met de maat van de helm die u kiest. Als deze te krap is, kies dan een grotere maat. Houd er rekening mee dat de helm iets ruimer wordt bij gebruik. Als u twijfelt tussen twee maten, kies dan de kleinere.

38
G E B R U I K S A A N W I J Z I N G
NL
OPZETTEN VAN DE HELMAls u de helm wilt opzetten, doe hem dan over uw hoofd en maak de kinband vast. De kinband moet zodanig vastzitten dat er geen ruimte is tussen uw kin en de band. De helm moet zo op uw hoofd zitten dat hij de nek en het voorhoofd beschermt (Fig. 2). De helm mag niet naar voren of naar achteren hangen (Fig. 3 & 4).
VIZIERNZI vizieren worden gemaakt door ruw materiaal door middel van warmte te vormen, ‘thermoformed’. Het materiaal heeft verschillende coatings, anti-kras en ‘mist-retardant’, deze coatings verminderen het verlies van zicht en verbeteren de veiligheid in kritieke situaties. Door gebruik te maken van het thermoform proces worden de flexibiliteit, transparentie, krasbestendigheid en slijtage verbeterd. NZI ‘mist retardant’ vizieren zijn ECE/ONU R22.05 gehomologeerd; ze hebben een hoge lichttransmissie, goed zicht op verlichte verkeersborden, hoge spectrale transmissie, lage lichtdiffusie en een goede optische kwaliteit.
Instructies voor het onderhoud van uw vizier.Maak het vizier alleen met water en neutrale zeep schoon. Als u het vizier droog wil maken hoeft u niet te wrijven, debben is voldoende. Het is ten sterkste afgeraden om oplosmiddelen, alcohol of ruwe materialen te gebruiken bij het schoonmaken. Het is aangeraden om het vizier te vervangen wanneer er krassen of beschadigingen op komen, deze kunnen uw
cm.
Fig. 1 Fig. 2
Fig. 3 Fig. 4

39
NL
G E B R U I K S A A N W I J Z I N G
zicht beperken.
Visierslot.Aan de linkerkant van het vizier zit een sluit mechanisme. Hierdoor is de goede sluiting van het vizier gegarandeerd.
Het vizier openen:Duw het vizier met uw duim omhoog en naar buiten zodat het klemmetje los gaat en het vizier open.
Het vizier sluiten:Sluit het vizier totdat de klem over het randje van de helm klikt (Fig. 5-6).
Tear-off.Met deze helm is het mogelijk ‘Tear-off’* films
over uw vizier te plaatsen. Deze films beschermen het vizier tegen modder, grint en elk ander iets wat uw vizier kan beschadigen of vervuilen. U kunt de films van het vizier trekken als geen optimaal zicht meer hebt. Normaliter worden
deze films in de racerij gebruikt om een optimaal zicht te waarborgen.
Verwijderen:Om een ‘Tear-off’ van het vizier te trekken voldoet het om aan de flap aan de linkerkant te trekken. (Fig. 7)
Plaatsen:Voordat de ‘Tear-offs’ op uw vizier zet, moet u eerst de beschermende plastics van beide kanten verwijderen. Daarna dient u de gaten in de ‘Tear-offs’ over de pinnen in het vizier te trekken. De flap moet altijd links zitten.
*De ‘Tear-offs’ worden ook after market verkocht
Fig. 7
Fig. 5 Fig. 6

40
G E B R U I K S A A N W I J Z I N G
NL
Vizier vervangen.Verwijderen:Plaats de helm op een platte en solide ondergrond. Open het vizier totdat het helemaal open is (Fig. 7). Duw het vizier bij het mechanisme in de richting van de pijl (Fig. 8) totdat het niet meer verder kan. Beweeg het vizier nu naar buiten en in de richting die Fig. 9 aangeeft zodat het vizier uit het mechanisme
komt. Herhaal deze procedure aan de andere zijde van de helm.
Plaatsen:Plaats het vizier zo over the helm, zoals die in de open positie zou zijn. Duw de grendel met de daarvoor bestemde inkeping in het viziermechanisme in de richting aangegeven door de gele pijl in Fig. 10. Terwijl u druk houdt op de grendel, moet u het viziermechanisme in het deel van het mechanisme op de helm drukken, zoals de rode pijl in Fig. 10 aangeeft. Verminder nu de druk op de grendel en draai het vizier een beetje richting de dichte stand. Herhaal deze procedure aan de andere kant. Open en sluit het vizier verschillende malen om er zeker van te zijn dat het vizier correct gemonteerd is.
UITNEEMBAAR INTERIEURUw helm heeft een uitneembaar interieur. U kunt het makkelijk uit de helm halen en wassen. Was het met de hand en met een neutrale zeep, wring het niet uit en laat het niet drogen in direct zonlicht.
Fig. 8 Fig. 9
Fig. 10 Fig. 11
41
NL
G E B R U I K S A A N W I J Z I N G
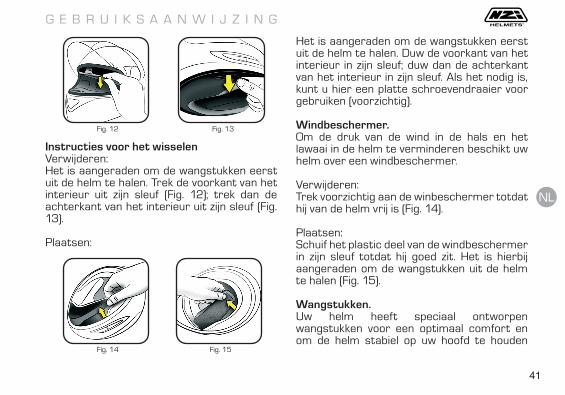
Instructies voor het wisselenVerwijderen:Het is aangeraden om de wangstukken eerst uit de helm te halen. Trek de voorkant van het interieur uit zijn sleuf (Fig. 12); trek dan de achterkant van het interieur uit zijn sleuf (Fig. 13).
Plaatsen:
Het is aangeraden om de wangstukken eerst uit de helm te halen. Duw de voorkant van het interieur in zijn sleuf; duw dan de achterkant van het interieur in zijn sleuf. Als het nodig is, kunt u hier een platte schroevendraaier voor gebruiken (voorzichtig).
Windbeschermer.Om de druk van de wind in de hals en het lawaai in de helm te verminderen beschikt uw helm over een windbeschermer.
Verwijderen:Trek voorzichtig aan de winbeschermer totdat hij van de helm vrij is (Fig. 14).
Plaatsen:Schuif het plastic deel van de windbeschermer in zijn sleuf totdat hij goed zit. Het is hierbij aangeraden om de wangstukken uit de helm te halen (Fig. 15).
Wangstukken.Uw helm heeft speciaal ontworpen wangstukken voor een optimaal comfort en om de helm stabiel op uw hoofd te houden
Fig. 12 Fig. 13
Fig. 14 Fig. 15

42
G E B R U I K S A A N W I J Z I N G
NL
tijdens het rijden.
Wangstukken wisselenVerwijderen:Haal het wangstuk voorzichting van zijn plek door aan het achterste deel te trekken (Fig. 16). Attentie! Trek nooit aan het voorste deel van het wangstuk, u kunt dan teveel kracht zetten waardoor het wangstuk breekt.
Plaatsen:Schuif het voorste deel van het wangstuk in het gleufje; duw het achterste deel van het wangstuk op zijn plek.
Wangstukken wassen.U kunt de hoesjes van de wangstukken wassen. Haal het klittenband los en verwijder de hoes. Was het met de hand en met een neutrale zeep, wring het niet uit en laat het niet drogen in direct zonlicht.
BEVEILIGINGDeze helm heeft een kinriem om te zorgen dat de helm niet van uw hoofd vliegt in het geval van een ongeluk.
Dubbel-D kinriem
Sluiten:Haal de losse kinriem door de twee ringen (Fig. 16) om deze vervolgens tussen de twee ringen door terug te halen (Fig. 17). Trek daarna aan de kinriem tot hij strak om uw kin zit (Fig. 18). Om geen last van een in de wind flapperende kinriem te hebben kunt u hem vastzetten met de drukknop (Fig. 19).
Fig. 16 Fig. 17
Fig. 18 Fig. 19
43
NL
G E B R U I K S A A N W I J Z I N G
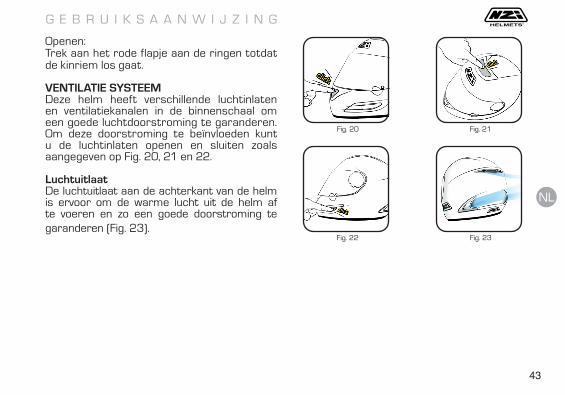
Openen:Trek aan het rode flapje aan de ringen totdat de kinriem los gaat.
VENTILATIE SYSTEEMDeze helm heeft verschillende luchtinlaten en ventilatiekanalen in de binnenschaal om een goede luchtdoorstroming te garanderen. Om deze doorstroming te beïnvloeden kunt u de luchtinlaten openen en sluiten zoals aangegeven op Fig. 20, 21 en 22.
LuchtuitlaatDe luchtuitlaat aan de achterkant van de helm is ervoor om de warme lucht uit de helm af te voeren en zo een goede doorstroming te garanderen (Fig. 23).
Fig. 20 Fig. 21
Fig. 22 Fig. 23


![COMUNICACIîN - cobachsonora.edu.mx · 2019. 1. 21. · > }o]u v ] v µ }v} ]u] v } µu]u } v ]U Z_ µ ]vÀ] ] (} u À µv } o } v o}]v ] µ U (} u o µ } ] v(} o o} v ] }V u v u}u](https://static.fdocuments.ec/doc/165x107/610fcb37fc9f945b027a60b5/comunicacin-2019-1-21-ou-v-v-v-u-v-uu-v-u-z-.jpg)


![microempresarial - COBACH SONORA · 2019-01-21 · > }o]u v ] v µ }v} ]u] v } µu]u } v ]U Z_ µ ]vÀ] ] (} u À µv } o } v o}]v ] µ U (} u o µ } ] v(} o o} v ] }V u v u}u v }U](https://static.fdocuments.ec/doc/165x107/5f01cf797e708231d401261f/microempresarial-cobach-2019-01-21-ou-v-v-v-u-v-uu-v.jpg)