Herramienta de Registro de Oportunidades - Velocity Tool- Sahula Hernández.
Upload
nguyenthuanCategory
view
219download
0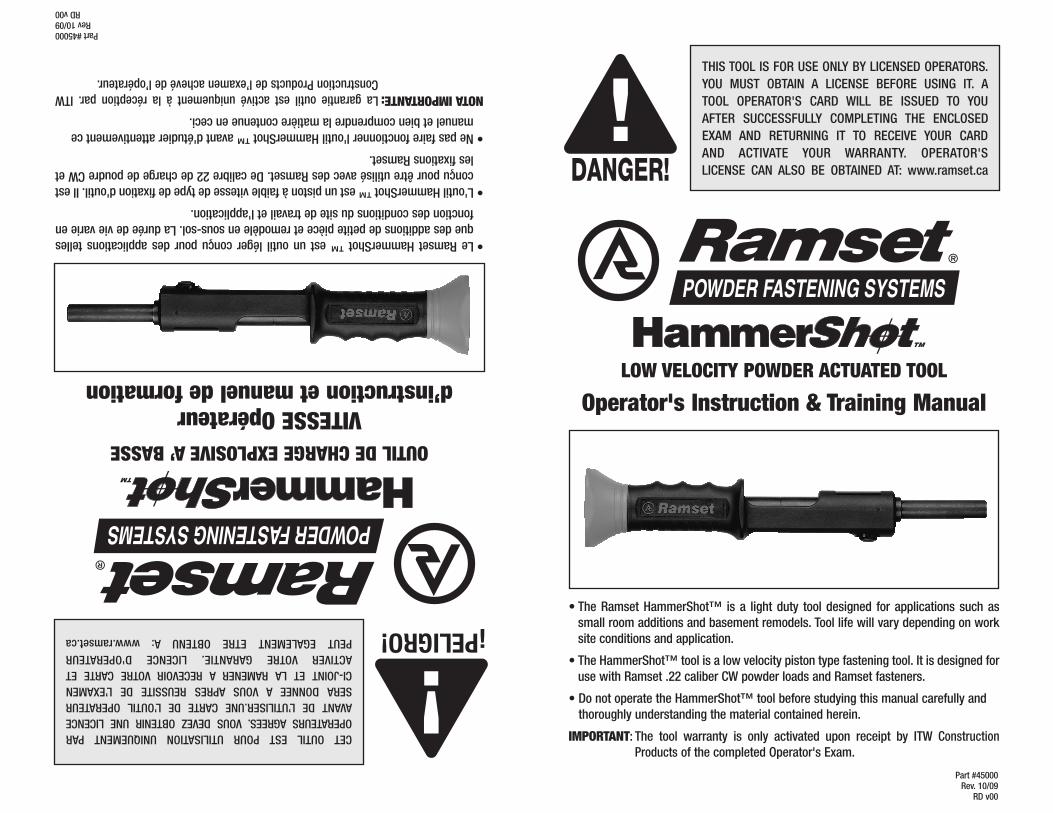
CET OUTIL EST POUR UTILISATION UNIQUEMENT PAR OPERATEURS AGREES. VOUS DEVEZ OBTENIR UNE LICENCE AVANT DE L’UTILISER.UNE CARTE DE L’OUTIL OPERATEUR SERA DONNEE A VOUS APRES REUSSITE DE L’EXAMEN CI-JOINT ET LA RAMENER A RECEVOIR VOTRE CARTE ET ACTIVER VOTRE GARANTIE. LICENCE D'OPERATEUR PEUT EGALEMENT ETRE OBTENU A: www.ramset.ca
OUTIL DE CHARGE EXPLOSIVE A’ BASSE
VITESSE Opérateur d’instruction et manuel de formation
• Le Ramset HammerShot ™ est un outil léger conçu pour des applications telles que des additions de petite pièce et remodèle en sous-sol. La durée de vie varie en fonction des conditions du site de travail et l'application.
• L'outil HammerShot ™ est un piston à faible vitesse de type de fixation d'outil. Il est conçu pour être utilisé avec des Ramset. De calibre 22 de charge de poudre CW et les fixations Ramset.
• Ne pas faire fonctionner l'outil HammerShot ™ avant d'étudier attentivement ce manuel et bien comprendre la matière contenue en ceci.
NOTA IMPORTANTE: La garantie outil est activé uniquement à la réception par. ITW Construction Products de l’examen achevé de l’opérateur.
THIS TOOL IS FOR USE ONLY BY LICENSED OPERATORS. YOU MUST OBTAIN A LICENSE BEFORE USING IT. A TOOL OPERATOR'S CARD WILL BE ISSUED TO YOU AFTER SUCCESSFULLY COMPLETING THE ENCLOSED EXAM AND RETURNING IT TO RECEIVE YOUR CARD AND ACTIVATE YOUR WARRANTY. OPERATOR'S LICENSE CAN ALSO BE OBTAINED AT: www.ramset.ca
LOW VELOCITY POWDER ACTUATED TOOL
Operator's Instruction & Training Manual
• The Ramset HammerShot™ is a light duty tool designed for applications such as small room additions and basement remodels. Tool life will vary depending on work site conditions and application.
• The HammerShot™ tool is a low velocity piston type fastening tool. It is designed for use with Ramset .22 caliber CW powder loads and Ramset fasteners.
• Do not operate the HammerShot™ tool before studying this manual carefully and thoroughly understanding the material contained herein.
IMPORTANT: The tool warranty is only activated upon receipt by ITW Construction Products of the completed Operator's Exam.
Part #45000 Rev. 10/09
RD v00
Part #45000 Rev 10/09
RD v00
ESTA HERRAMIENTA DEBE SER USADA SÓLO POR OPERADORES AUTORIZADOS. USTED DEBE OBTENER EL PERMISO CORRESPONDIENTE ANTES DE USARLA. SE LE EXPEDIRÁ SU TARJETA DE OPERADOR DE HERRAMIENTA DESPUÉS DE QUE CONTESTE CORRECTAMENTE EL EXAMEN ADJUNTO Y LO ENVÍE, PARA RECIBIR SU TARJETA Y ACTIVAR SU GARANTÍA. EL PERMISO DE OPERADOR TAMBIÉN PUEDE OBTENERSE EN: www.ramset.com
HERRAMIENTA DE PÓLVORA DE BAJA VELOCIDAD
Manual de Instrucciones y Entrenamiento del Operador
• La Ramset HammerShot™ es una herramienta de servicio ligero fabricada para usos tales como adición de habitaciones pequeñas y remodelación de sótanos. La vida de servicio de la herramienta varía según las condiciones en el sitio de trabajo y el uso a que se someta.
• El HammerShot™ es una herramienta de fijación tipo pistón de baja velocidad. Está fabricada para usarse con las cargas de pólvora Ramset CW calibre 0.22 y sujetadores Ramset.
• No utilice el HammerShot™ antes de estudiar cuidadosamente este manual y de comprender completamente el material contenido en el mismo.
NOTA IMPORTANTE: La garantía de esta herramienta se activa solamente al recibir ITW Brands el Examen del Operador contestado completamente. THIS TOOL IS FOR USE ONLY BY LICENSED OPERATORS.
YOU MUST OBTAIN A LICENSE BEFORE USING IT. A TOOL OPERATOR'S CARD WILL BE ISSUED TO YOU AFTER SUCCESSFULLY COMPLETING THE ENCLOSED EXAM AND RETURNING IT TO RECEIVE YOUR CARD AND ACTIVATE YOUR WARRANTY. OPERATOR'S LICENSE CAN ALSO BE OBTAINED AT: www.ramset.com
LOW VELOCITY POWDER ACTUATED TOOL
Operator's Instruction & Training Manual
• The Ramset HammerShot™ is a light duty tool designed for applications such as small room additions and basement remodels. Tool life will vary depending on work site conditions and application.
• The HammerShot™ tool is a low velocity piston type fastening tool. It is designed for use with Ramset .22 caliber CW powder loads and Ramset fasteners.
• Do not operate the HammerShot™ tool before studying this manual carefully and thoroughly understanding the material contained herein.
IMPORTANT: The tool warranty is only activated upon receipt by ITW Brands of the completed Operator's Exam.
Part #00022MANUAL PRINTED IN CHINA Rev. 10/09
RD v00 Part #00022MANUAL IMPRESO EN CHINA Rev. 10/09
RD v00
ESTA HERRAMIENTA DEBE SER USADA SÓLO POR OPERADORES AUTORIZADOS. USTED DEBE OBTENER EL PERMISO CORRESPONDIENTE ANTES DE USARLA. SE LE EXPEDIRÁ SU TARJETA DE OPERADOR DE HERRAMIENTA DESPUÉS DE QUE CONTESTE CORRECTAMENTE EL EXAMEN ADJUNTO Y LO ENVÍE, PARA RECIBIR SU TARJETA Y ACTIVAR SU GARANTÍA. EL PERMISO DE OPERADOR TAMBIÉN PUEDE OBTENERSE EN: www.ramset.com
HERRAMIENTA DE PÓLVORA DE BAJA VELOCIDAD
Manual de Instrucciones y Entrenamiento del Operador
• La Ramset HammerShot™ es una herramienta de servicio ligero fabricada para usos tales como adición de habitaciones pequeñas y remodelación de sótanos. La vida de servicio de la herramienta varía según las condiciones en el sitio de trabajo y el uso a que se someta.
• El HammerShot™ es una herramienta de fijación tipo pistón de baja velocidad. Está fabricada para usarse con las cargas de pólvora Ramset CW calibre 0.22 y sujetadores Ramset.
• No utilice el HammerShot™ antes de estudiar cuidadosamente este manual y de comprender completamente el material contenido en el mismo.
NOTA IMPORTANTE: La garantía de esta herramienta se activa solamente al recibir ITW Brands el Examen del Operador contestado completamente. THIS TOOL IS FOR USE ONLY BY LICENSED OPERATORS.
YOU MUST OBTAIN A LICENSE BEFORE USING IT. A TOOL OPERATOR'S CARD WILL BE ISSUED TO YOU AFTER SUCCESSFULLY COMPLETING THE ENCLOSED EXAM AND RETURNING IT TO RECEIVE YOUR CARD AND ACTIVATE YOUR WARRANTY. OPERATOR'S LICENSE CAN ALSO BE OBTAINED AT: www.ramset.com
LOW VELOCITY POWDER ACTUATED TOOL
Operator's Instruction & Training Manual
• The Ramset HammerShot™ is a light duty tool designed for applications such as small room additions and basement remodels. Tool life will vary depending on work site conditions and application.
• The HammerShot™ tool is a low velocity piston type fastening tool. It is designed for use with Ramset .22 caliber CW powder loads and Ramset fasteners.
• Do not operate the HammerShot™ tool before studying this manual carefully and thoroughly understanding the material contained herein.
IMPORTANT: The tool warranty is only activated upon receipt by ITW Brands of the completed Operator's Exam.
Part #00022MANUAL PRINTED IN CHINA Rev. 10/09
RD v00
Part #00022MANUAL IMPRESO EN CHINA Rev. 10/09
RD v00
GARANTÍATODAS LAS GARANTÍAS DE LOS PRODUCTOS DESCRITOS AQUÍ, EXPRESAS O IMPLÍCITAS, INCLUIDA LA GARANTÍA DE COMERCIABILIDAD E IDONEIDAD PARA CIERTOS PROPÓSITOS EN PARTICULAR, QUEDAN EXCLUIDAS DE MANERA ESPECÍFICA, EXCEPTO LO SIGUIENTE: ITW BRANDS REPARARÁ O REEMPLAZARÁ A SU SOLA DISCRECIÓN CUALQUIER PIEZA DE LA HERRAMIENTA O SUJETADOR QUE, DENTRO DE UN PLAZO DE 90 DÍAS DESPUÉS DE LA VENTA POR ITW BRANDS, ESTA COMPAÑÍA ENCUENTRE QUE ESTÁ DEFECTUOSO EN LOS MATERIALES O EN LA MANO DE OBRA; EL DESGASTE NORMAL QUEDA EXCLUIDO. ÉSTA ES LA ÚNICA GARANTÍA DE ITW BRANDS Y EL ÚNICO RECURSO A DISPOSICIÓN DEL COMPRADOR.Para devoluciones bajo garantía, comuníquese con: ITW Brands, Attn: QA Department, 1575 Hunter Road, Suite A, Hanover Park, IL 60133; Teléfono: (877) 489-2726.
NOTA: Es muy importante que el operador de esta herramienta lea y comprenda completamente el manual de la herramienta completo y conteste el Examen del Operador de la última página. La garantía no será válida hasta que no se reciba el examen, junto con una copia del recibo de venta, y hasta que ITW Brands no revise todo. El permiso de operador también puede obtenerse en: www.ramset.com
PARA EVITAR LESIONES SERIAS O LA MUERTE
GARANTÍA
WARRANTYALL WARRANTIES OF THE PRODUCTS DESCRIBED HEREIN, EXPRESSED OR IMPLIED, INCLUDING THE WARRANTY OF MERCHANTABILITY AND FITNESS FOR PARTICULAR PURPOSES ARE SPECIFICALLY EXCLUDED, EXCEPT FOR THE FOLLOWING: ITW BRANDS WILL REPAIR OR REPLACE AT ITS SOLE OPTION ANY TOOL PART OR FASTENER WHICH WITHIN 90 DAYS AFTER SALE BY ITW BRANDS IS FOUND BY ITW BRANDS TO BE DEFECTIVE IN MATERIAL OR WORKMANSHIP, NORMAL WEAR AND TEAR EXCLUDED. THIS IS THE SOLE WARRANTY OF ITW BRANDS AND THE SOLE REMEDY AVAILABLE TO THE BUYER.
For warranty returns contact: ITW Brands, Attn: QA Department, 1575 Hunter Road, Suite A, Hanover Park, IL 60133; Phone: (877) 489-2726.
NOTE: It is very important that the operator of this tool completely reads and understands the entire tool manual and completes the Operator's Exam on the last page. The warranty will not be valid until the test is received, along with a copy of your sales receipt, and reviewed by ITW Brands. Operator's license can also be obtained at: www.ramset.com
TO AVOID SERIOUS INJURY OR DEATH
WARRANTY
THIS TOOL IS FOR USE ONLY BY LICENSED OPERATORS.
YOU MUST OBTAIN A LICENSE BEFORE USING IT. A
TOOL OPERATOR'S CARD WILL BE ISSUED TO YOU
AFTER SUCCESSFULLY COMPLETING THE ENCLOSED
EXAM AND RETURNING IT TO RECEIVE YOUR CARD
AND ACTIVATE YOUR WARRANTY. OPERATOR'S
LICENSE CAN ALSO BE OBTAINED AT: www.ramset.com
LOW VELOCITY POWDER ACTUATED TOOL
Operator's Instruction & Training Manual
• The Ramset HammerShot™ is a light duty tool designed for applications such as
small room additions and basement remodels. Tool life will vary depending on work
site conditions and application.
• The HammerShot™ tool is a low velocity piston type fastening tool. It is designed for
use with Ramset .22 caliber CW powder loads and Ramset fasteners.
• Do not operate the HammerShot™ tool before studying this manual carefully and
thoroughly understanding the material contained herein.
IMPORTANT: The tool warranty is only activated upon receipt by ITW Brands of the
completed Operator's Exam.
Part #00022
MANUAL PRINTED IN CHINA
Rev. 09/09
RD v00
GARANTIEToutes garanties de produits décrits ici , explicite ou implicite, y compris la garanties marchande et d’adaptation à un usage particulier sont spécifiquement exclus sauf pour les suivants : ITW ça sera réparer ou remplacer à son seul choix une partie de l’outil ou de fixation qui dans les 90 jours après la vente par ITW est trouvé par ITW à défaut de matériaux ou de fabrication, USURE NORMALE et démarrage exclus ceci est la seule garantie de ITW et la seul recours est à disposition de l'acheteur.Pour retourner la garantie contacter : ITW attn : QA ministère, 120 Travail Road, Markham, ON. téléphone: 1-800-387-9692.
NOTA: Il est très important que l'opérateur de cet outil lit le manuel entier et complète l'examen de l'opérateur sur la dernière page. La garantie ne sera pas valable jusqu'à ce que le test est reçu, accompagné d'une copie de votre facture, et examinés par ITW. Licence de l'opérateur peut également être obtenue: www.ramset.ca
POUR ÉVITER LES BLESSURES GRAVES OU LA MORT
GARANTIE
WARRANTYALL WARRANTIES OF THE PRODUCTS DESCRIBED HEREIN, EXPRESSED OR IMPLIED, INCLUDING THE WARRANTY OF MERCHANTABILITY AND FITNESS FOR PARTICULAR PURPOSES ARE SPECIFICALLY EXCLUDED, EXCEPT FOR THE FOLLOWING: ITW CONSTRUCTION PRODUCTS WILL REPAIR OR REPLACE AT ITS SOLE OPTION ANY TOOL PART OR FASTENER WHICH WITHIN 90 DAYS AFTER SALE BY ITW CONSTRUCTION PRODUCTS IS FOUND BY ITW CONSTRUCTION PRODUCTS TO BEDEFECTIVE IN MATERIAL OR WORKMANSHIP, NORMAL WEAR AND TEAR EXCLUDED. THIS IS THE SOLE WARRANTY OF ITW CONSTRUCTION PRODUCTS AND THE SOLE REMEDY AVAILABLE TO THE BUYER.
For warranty returns contact: ITW Construction Products, Attn: QA Department, 120 Travail Road, Markham, ON, L3S3J1. Telephone: 1-800-387-9692.
NOTE: It is very important that the operator of this tool completely reads and under-stands the entire tool manual and completes the Operator's Exam on the last page. The warranty will not be valid until the test is received, along with a copy of your sales receipt, and reviewed by ITW Construction Products. Operator's license can also be obtained at: www.ramset.ca
TO AVOID SERIOUS INjURY OR DEATH
WARRANTY
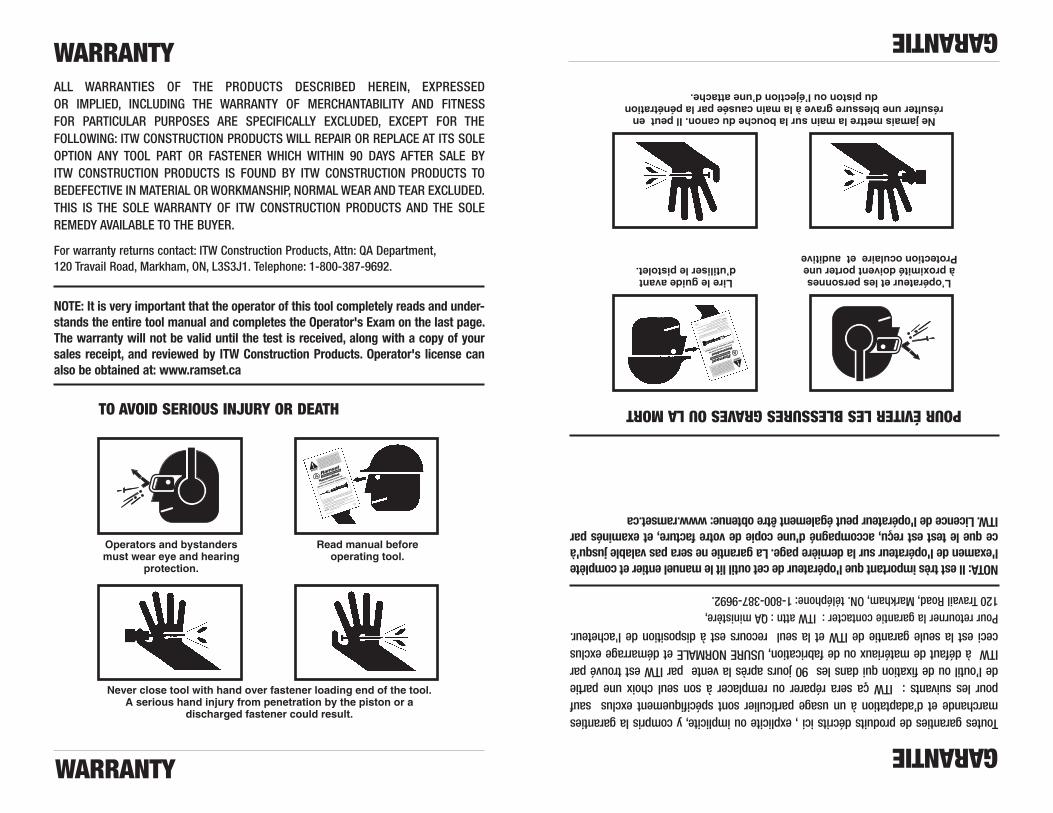
Operators and bystanders must wear eye and hearing
protection.
Never close tool with hand over fastener loading end of the tool. A serious hand injury from penetration by the piston or a
discharged fastener could result.
Read manual before operating tool.
GARANTÍATODAS LAS GARANTÍAS DE LOS PRODUCTOS DESCRITOS AQUÍ, EXPRESAS O IMPLÍCITAS, INCLUIDA LA GARANTÍA DE COMERCIABILIDAD E IDONEIDAD PARA CIERTOS PROPÓSITOS EN PARTICULAR, QUEDAN EXCLUIDAS DE MANERA ESPECÍFICA, EXCEPTO LO SIGUIENTE: ITW BRANDS REPARARÁ O REEMPLAZARÁ A SU SOLA DISCRECIÓN CUALQUIER PIEZA DE LA HERRAMIENTA O SUJETADOR QUE, DENTRO DE UN PLAZO DE 90 DÍAS DESPUÉS DE LA VENTA POR ITW BRANDS, ESTA COMPAÑÍA ENCUENTRE QUE ESTÁ DEFECTUOSO EN LOS MATERIALES O EN LA MANO DE OBRA; EL DESGASTE NORMAL QUEDA EXCLUIDO. ÉSTA ES LA ÚNICA GARANTÍA DE ITW BRANDS Y EL ÚNICO RECURSO A DISPOSICIÓN DEL COMPRADOR.Para devoluciones bajo garantía, comuníquese con: ITW Brands, Attn: QA Department, 1575 Hunter Road, Suite A, Hanover Park, IL 60133; Teléfono: (877) 489-2726.
NOTA: Es muy importante que el operador de esta herramienta lea y comprenda completamente el manual de la herramienta completo y conteste el Examen del Operador de la última página. La garantía no será válida hasta que no se reciba el examen, junto con una copia del recibo de venta, y hasta que ITW Brands no revise todo. El permiso de operador también puede obtenerse en: www.ramset.com
PARA EVITAR LESIONES SERIAS O LA MUERTE
GARANTÍA
WARRANTYALL WARRANTIES OF THE PRODUCTS DESCRIBED HEREIN, EXPRESSED OR IMPLIED, INCLUDING THE WARRANTY OF MERCHANTABILITY AND FITNESS FOR PARTICULAR PURPOSES ARE SPECIFICALLY EXCLUDED, EXCEPT FOR THE FOLLOWING: ITW BRANDS WILL REPAIR OR REPLACE AT ITS SOLE OPTION ANY TOOL PART OR FASTENER WHICH WITHIN 90 DAYS AFTER SALE BY ITW BRANDS IS FOUND BY ITW BRANDS TO BE DEFECTIVE IN MATERIAL OR WORKMANSHIP, NORMAL WEAR AND TEAR EXCLUDED. THIS IS THE SOLE WARRANTY OF ITW BRANDS AND THE SOLE REMEDY AVAILABLE TO THE BUYER.
For warranty returns contact: ITW Brands, Attn: QA Department, 1575 Hunter Road, Suite A, Hanover Park, IL 60133; Phone: (877) 489-2726.
NOTE: It is very important that the operator of this tool completely reads and understands the entire tool manual and completes the Operator's Exam on the last page. The warranty will not be valid until the test is received, along with a copy of your sales receipt, and reviewed by ITW Brands. Operator's license can also be obtained at: www.ramset.com
TO AVOID SERIOUS INJURY OR DEATH
WARRANTY
THIS TOOL IS FOR USE ONLY BY LICENSED OPERATORS.
YOU MUST OBTAIN A LICENSE BEFORE USING IT. A
TOOL OPERATOR'S CARD WILL BE ISSUED TO YOU
AFTER SUCCESSFULLY COMPLETING THE ENCLOSED
EXAM AND RETURNING IT TO RECEIVE YOUR CARD
AND ACTIVATE YOUR WARRANTY. OPERATOR'S
LICENSE CAN ALSO BE OBTAINED AT: www.ramset.com
LOW VELOCITY POWDER ACTUATED TOOL
Operator's Instruction & Training Manual
• The Ramset HammerShot™ is a light duty tool designed for applications such as
small room additions and basement remodels. Tool life will vary depending on work
site conditions and application.
• The HammerShot™ tool is a low velocity piston type fastening tool. It is designed for
use with Ramset .22 caliber CW powder loads and Ramset fasteners.
• Do not operate the HammerShot™ tool before studying this manual carefully and
thoroughly understanding the material contained herein.
IMPORTANT: The tool warranty is only activated upon receipt by ITW Brands of the
completed Operator's Exam.
Part #00022
MANUAL PRINTED IN CHINA
Rev. 09/09
RD v00
THIS TOOL IS FOR USE ONLY BY LICENSED OPERATORS.
YOU MUST OBTAIN A LICENSE BEFORE USING IT. A
TOOL OPERATOR'S CARD WILL BE ISSUED TO YOU
AFTER SUCCESSFULLY COMPLETING THE ENCLOSED
EXAM AND RETURNING IT TO RECEIVE YOUR CARD
AND ACTIVATE YOUR WARRANTY. OPERATOR'S
LICENSE CAN ALSO BE OBTAINED AT: www.ramset.com
LOW VELOCITY POWDER ACTUATED TOOL
Operator's Instruction & Training Manual
• The Ramset HammerShot™ is a light duty tool designed for applications such as
small room additions and basement remodels. Tool life will vary depending on work
site conditions and application.
• The HammerShot™ tool is a low velocity piston type fastening tool. It is designed for
use with Ramset .22 caliber CW powder loads and Ramset fasteners.
• Do not operate the HammerShot™ tool before studying this manual carefully and
thoroughly understanding the material contained herein.
IMPORTANT: The tool warranty is only activated upon receipt by ITW Brands of the
completed Operator's Exam.
Part #00022
MANUAL PRINTED IN CHINA
Rev. 09/09
RD v00
L’opérateur et les personnes à proximité doivent porter une Protection oculaire et auditive
Ne jamais mettre la main sur la bouche du canon. Il peut en résulter une blessure grave à la main causée par la pénétration
du piston ou l’éjection d’une attache.
Lire le guide avant d’utiliser le pistolet.
CONSIGNES DE SÉCURITÉ
1 CONSIGNES DE SÉCURITÉ
¡WARNING! Les pages suivantes contiennent des avertissements détaillés, des précautions. Et règles de fonctionnement
en toute sécurité avec laquelle l’opérateur doit être familier et de suivre pour et de éviter les blessures graves ou la mort. Après lecture approfondie de ce manuel, complète l'examen de l'opérateur et le retourner aux marques ITW Construction Products pour votre carte opérateur et pour activer la garantie.
AVANT LE CHARGEMENT ET LE TIR PROTEGEZ VOUS ET LES AUTRES
1. Ne placez jamais votre main ou les doigts sur la bouche de canon de l'outil - la fixation ou le piston peut sérieusement blesser la main dans le cas d'un accidentel de décharge.
2. Toujours utiliser seulement les fixations Ramset et les charges en tout temps pour un fonctionnement d’outil cohérent.
3. Les opérateurs et les personnes à proximité doivent porter une protection oculaire et auditive à tout moment. Des lésions oculai-res graves et une perte auditive peut provenir si l’équipement approprié n'est pas porté.
4. Garder l’espace de travail propre, et où cela est prescrit, toujours apposer une affiche dans la zone de travail identifiant : «Outil activé par charge explosive en usage». Ce type d’affiche peut être obtenu de notre Service technique, au : 1-800-387-9692.
NOTA IMPORTANTE: Afin d'activer votre garantie, vous devez lire atten-tivement ce manuel, terminer l'examen et le renvoyer à l'adresse sur la dernière page de ce manuel.
SAFETY PRECAUTIONS
1 SAFETY PRECAUTIONS
WARNING! The following pages contain detailed warnings, cautions, and rules of safe operation with which the opera-
tor must be familiar and follow to avoid serious injury or death. After thoroughly review-ing this manual, complete the Operator's Exam and return to ITW Construction Products for your Operator's Card and to activate your warranty.
BEFORE LOADING AND FIRING PROTECT YOURSELF AND OTHERS
1. Never place your hand or fingers over the front muzzle of the tool - the fastener or piston can seriously injure your hand in the event of an accidental discharge.
2. Always use only Ramset fasteners and loads at all times for consistent tool functioning.
3. Operators and bystanders must wear eye and hearing protection at all times. Serious eye injury and hearing loss can result if proper gear is not worn.
4. Keep work area clear and where required always post warning signs when using the tool. Sign should state, "Powder Actuated Tool in Use" and can be obtained by contacting Technical Services at 1-800-387-9692.
IMPORTANT: In order to activate your warranty, you must read this manual thoroughly, complete the exam and return to the address on the back page of this manual.
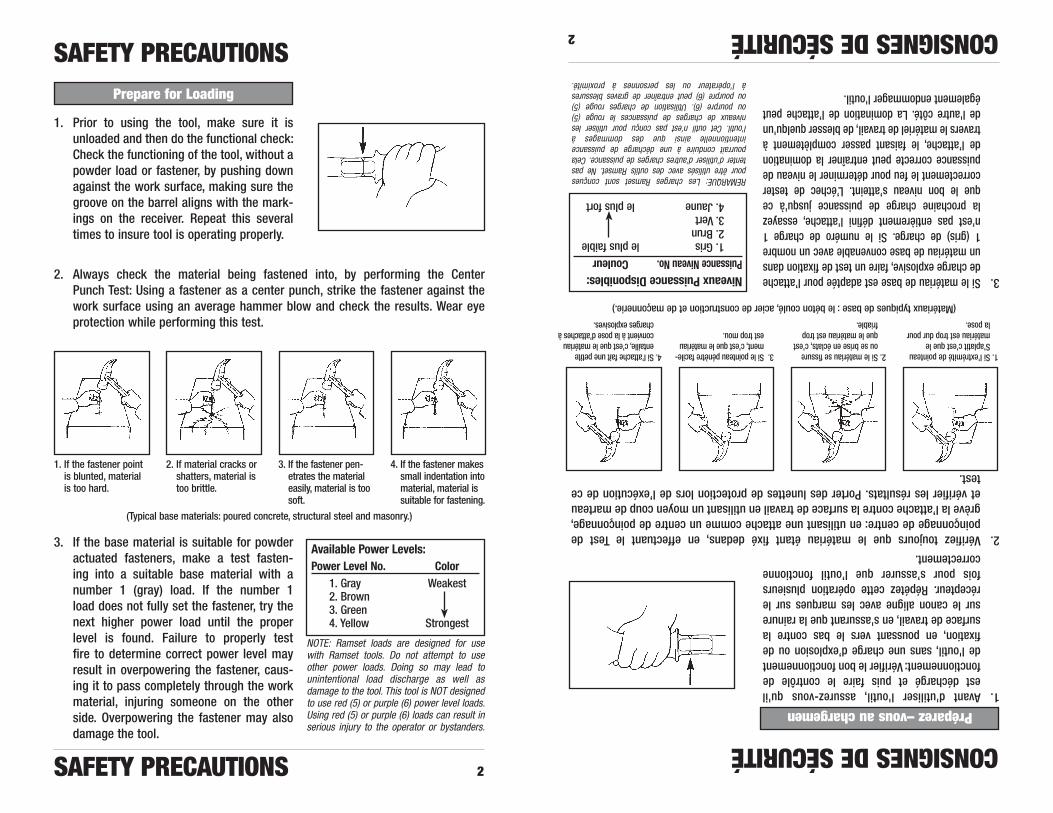
1. Avant d'utiliser l'outil, assurez-vous qu'il est déchargé et puis faire le contrôle de fonctionnement: Vérifier le bon fonctionnement de l'outil, sans une charge d’explosion ou de fixation, en poussant vers le bas contre la surface de travail, en s'assurant que la rainure sur le canon aligne avec les marques sur le récepteur. Répétez cette opération plusieurs fois pour s’assurer que l’outil fonctionne correctement.
2. Vérifiez toujours que le matériau étant fixé dedans, en effectuant le Test de poinçonnage de centre: en utilisant une attache comme un centre de poinçonnage, grève la l’attache contre la surface de travail en utilisant un moyen coup de marteau et vérifier les résultats. Porter des lunettes de protection lors de l’exécution de ce test.
3. Si le matériau de base est adaptée pour l’attache de charge explosive, faire un test de fixation dans un matériau de base convenable avec un nombre 1 (gris) de charge. Si le numéro de charge 1 n'est pas entièrement défini l'attache, essayez la prochaine charge de puissance jusqu'à ce que le bon niveau s’atteint. L’échec de tester correctement le feu pour déterminer le niveau de puissance correcte peut entraîner la domination de l’attache, le faisant passer complètement à travers le matériel de travail, de blesser quelqu'un de l'autre côté. La domination de l’attache peut également endommager l'outil.
CONSIGNES DE SÉCURITÉ
CONSIGNES DE SÉCURITÉ 2
Préparez –vous au chargemen
1. Si l’extrémité de pointeau S’aplatit c’est que le matériau est trop dur pour la pose.
2. Si le matériau se fissure ou se brise en éclats, c’est que le matériau est trop friable.
3. Si le pointeau pénètre facile-ment, c’est que le matériau est trop mou.
4. Si l’attache fait une petite entaille, c’est que le matériau convient à la pose d’attaches à charges explosives.
(Matériaux typiques de base : le béton coulé, acier de construction et de maçonnerie.)
REMARQUE: Les charges Ramset sont conçues pour être utilisés avec des outils Ramset. Ne pas tenter d’utiliser d'autres charges de puissance. Cela pourrait conduire à une décharge de puissance intentionnelle ainsi que des dommages à l'outil. Cet outil n'est pas conçu pour utiliser les niveaux de charges de puissances le rouge (5) ou pourpre (6). Utilisation de charges rouge (5) ou pourpre (6) peut entraîner de graves blessures à l'opérateur ou les personnes à proximité.
Niveaux Puissance Disponibles:Puissance Niveau No. Couleur 1. Gris le plus faible 2. Brun 3. Vert 4. Jaune le plus fort
1. Prior to using the tool, make sure it is unloaded and then do the functional check: Check the functioning of the tool, without a powder load or fastener, by pushing down against the work surface, making sure the groove on the barrel aligns with the mark-ings on the receiver. Repeat this several times to insure tool is operating properly.
2. Always check the material being fastened into, by performing the Center Punch Test: Using a fastener as a center punch, strike the fastener against the work surface using an average hammer blow and check the results. Wear eye protection while performing this test.
3. If the base material is suitable for powder actuated fasteners, make a test fasten-ing into a suitable base material with a number 1 (gray) load. If the number 1 load does not fully set the fastener, try the next higher power load until the proper level is found. Failure to properly test fire to determine correct power level may result in overpowering the fastener, caus-ing it to pass completely through the work material, injuring someone on the other side. Overpowering the fastener may also damage the tool.
SAFETY PRECAUTIONS
SAFETY PRECAUTIONS 2
Prepare for Loading
1. If the fastener point is blunted, material is too hard.
2. If material cracks or shatters, material is too brittle.
3. If the fastener pen-etrates the material easily, material is too soft.
4. If the fastener makes small indentation into material, material is suitable for fastening.
(Typical base materials: poured concrete, structural steel and masonry.)
NOTE: Ramset loads are designed for use with Ramset tools. Do not attempt to use other power loads. Doing so may lead to unintentional load discharge as well as damage to the tool. This tool is NOT designed to use red (5) or purple (6) power level loads. Using red (5) or purple (6) loads can result in serious injury to the operator or bystanders.
Available Power Levels:Power Level No. Color 1. Gray Weakest 2. Brown 3. Green 4. Yellow Strongest
1. Antes de usar la herramienta asegúrese de que esté descargada y entonces realice la revisión de funcionamiento siguiente: Revise el funcionamiento de la herramienta sin carga de pólvora ni sujetador; para ello, empújela contra la superficie de trabajo, asegurándose de que la ranura del barril se alinee con las marcas del receptor. Repita esto varias veces para asegurarse de que esté funcionando correctamente la herramienta.
2. Siempre revise el material en el que vaya a fijar; para ello efectúe la Prueba del Punzón de Marcar. Usando un sujetador como punzón de marcar, pique la superficie de trabajo con un golpe de martillo común y verifique los resultados. Tenga puesta protección para los ojos mientras efectúa esta prueba.
3. Si el material base es adecuado para sujetadores fijados con herramienta de pólvora, realice una prueba fijando un sujetador en un material base adecuado con una carga del número 1 (gris). Si la carga del número 1 no clava completamente el sujetador, pruebe con una carga del siguiente número más alto hasta que encuentre el nivel adecuado. Si no realiza disparos de prueba para determinar el nivel de potencia correcto, puede aplicar una fuerza excesiva al sujetador, causando que éste atraviese el material de trabajo y pueda lesionar a alguien situado al otro lado. Si aplica una fuerza excesiva al sujetador también puede dañar la herramienta.
MEDIDAS DE SEGURIDAD
MEDIDAS DE SEGURIDAD 2
Preparación para la carga
1. Si se embota la punta del sujetador, significa que el material es demasiado duro.
2. Si el material se agrieta o rompe, significa que es demasiado quebradizo.
3. Si el sujetador penetra con facilidad, significa que el material es demasiado blando.
4. Si el sujetador hace una pequeña muesca en el material, significa que éste es adecuado para fijación.
(Materiales base típicos: concreto vaciado, acero estructural y mampostería.)
NOTA: Las cargas Ramset están fabricadas para usarse con herramientas de dicha marca. No intente usar otras cargas. Si lo hace puede causar una descarga accidental con los consecuentes daños a la herramienta. Esta herramienta NO está fabricada para usar cargas rojas (5) ni moradas (6). Si se utilizan cargas rojas (5) o moradas (6), el operador o los circunstantes pueden sufrir lesiones.
Niveles de potencia disponibles:Nivel de potencia No. Color 1. Gris Menos potente 2. Café 3. Verde 4. Amarillo Más potente
1. Prior to using the tool, make sure it is unloaded and then do the functional check: Check the functioning of the tool, without a powder load or fastener, by pushing down against the work surface, making sure the groove on the barrel aligns with the markings on the receiver. Repeat this several times to insure tool is operating properly.
2. Always check the material being fastened into, by performing the Center Punch Test: Using a fastener as a center punch, strike the fastener against the work surface using an average hammer blow and check the results. Wear eye protection while performing this test.
3. If the base material is suitable for powder actuated fasteners, make a test fastening into a suitable base material with a num-ber 1 (gray) load. If the number 1 load does not fully set the fastener, try the next higher power load until the proper level is found. Failure to properly test fire to determine correct power level may result in overpowering the fastener, causing it to pass completely through the work material, injuring someone on the other side. Overpowering the fastener may also damage the tool.
SAFETY PRECAUTIONS
SAFETY PRECAUTIONS 2
Prepare for Loading
1. If the fastener point is blunted, material is too hard.
2. If material cracks or shatters, material is too brittle.
3. If the fastener pen-etrates the material easily, material is too soft.
4. If the fastener makes small indentation into material, material is suitable for fastening.
(Typical base materials: poured concrete, structural steel and masonry.)
NOTE: Ramset loads are designed for use with Ramset tools. Do not attempt to use other power loads. Doing so may lead to unintentional load discharge as well as damage to the tool. This tool is NOT designed to use red (5) or purple (6) power level loads. Using red (5) or purple (6) loads can result in serious injury to the operator or bystanders.
Available Power Levels:Power Level No. Color 1. Gray Weakest 2. Brown 3. Green 4. Yellow Strongest
CONSIGNES DE SÉCURITÉ
3 CONSIGNES DE SÉCURITÉ
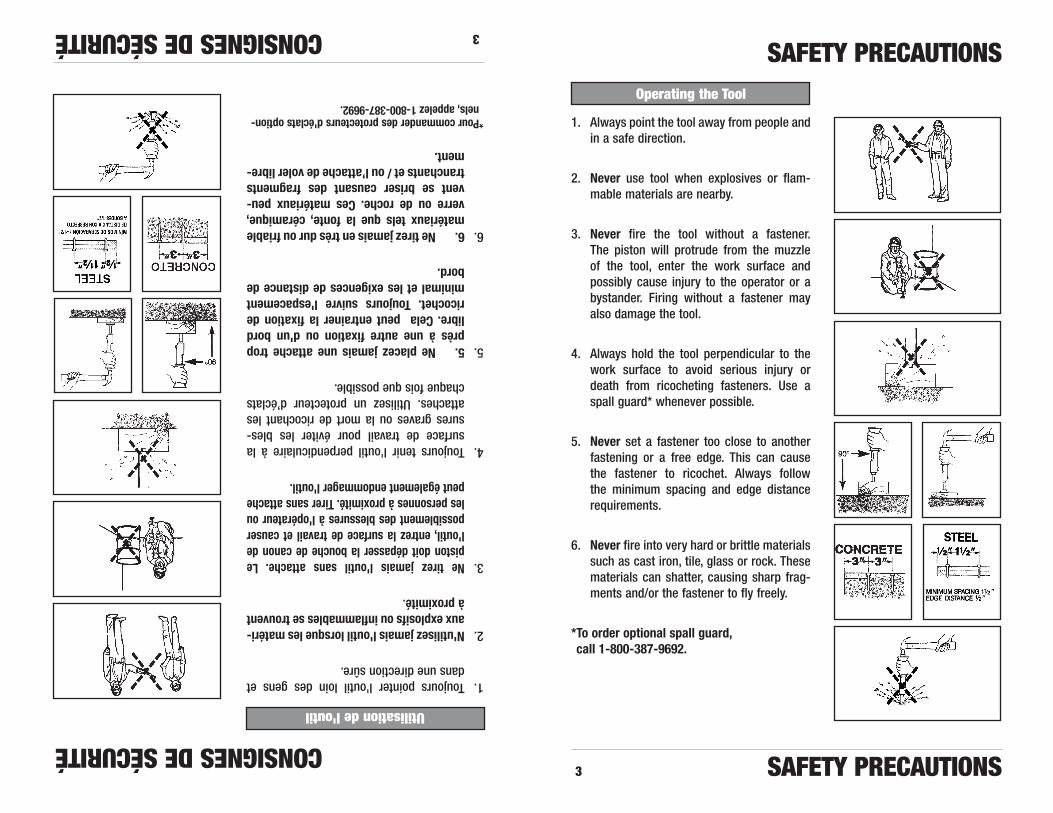
1. Toujours pointer l'outil loin des gens et dans une direction sûre.
2. N'utilisez jamais l'outil lorsque les matéri-aux explosifs ou inflammables se trouvent à proximité.
3. Ne tirez jamais l'outil sans attache. Le piston doit dépasser la bouche de canon de l'outil, entrez la surface de travail et causer possiblement des blessures à l'opérateur ou les personnes à proximité. Tirer sans attache peut également endommager l'outil.
4. Toujours tenir l'outil perpendiculaire à la surface de travail pour éviter les bles-sures graves ou la mort de ricochant les attaches. Utilisez un protecteur d’éclats chaque fois que possible.
5. 5. Ne placez jamais une attache trop près à une autre fixation ou d'un bord libre. Cela peut entrainer la fixation de ricochet. Toujours suivre l'espacement minimal et les exigences de distance de bord.
6. 6. Ne tirez jamais en très dur ou friable matériaux tels que la fonte, céramique, verre ou de roche. Ces matériaux peu-vent se briser causant des fragments tranchants et / ou l’attache de voler libre-ment.
* Pour commander des protecteurs d'éclats option-nels, appelez 1-800-387-9692.
Utilisation de l'outil
SAFETY PRECAUTIONS
3 SAFETY PRECAUTIONS
1. Always point the tool away from people and in a safe direction.
2. Never use tool when explosives or flam-mable materials are nearby.
3. Never fire the tool without a fastener. The piston will protrude from the muzzle of the tool, enter the work surface and possibly cause injury to the operator or a bystander. Firing without a fastener may also damage the tool.
4. Always hold the tool perpendicular to the work surface to avoid serious injury or death from ricocheting fasteners. Use a spall guard* whenever possible.
5. Never set a fastener too close to another fastening or a free edge. This can cause the fastener to ricochet. Always follow the minimum spacing and edge distance requirements.
6. Never fire into very hard or brittle materials such as cast iron, tile, glass or rock. These materials can shatter, causing sharp frag-ments and/or the fastener to fly freely.
* To order optional spall guard, call 1-800-387-9692.
Operating the Tool
MEDIDAS DE SEGURIDAD
3 MEDIDAS DE SEGURIDAD
1. Siempre apunte la herramienta lejos de las personas y en una dirección segura.
2. Nunca use la herramienta cuando haya cerca explosivos o materiales inflamables.
3. Nunca dispare la herramienta sin tener un sujetador puesto. El pistón saldrá por el extremo de la boca de la herramienta, penetrará la superficie de trabajo y posiblemente cause lesiones al operador o a un espectador. Si dispara sin tener un sujetador puesto, también puede dañar la herramienta.
4. Siempre mantenga la herramienta per-pendicular a la superficie de trabajo para evitar sufrir lesiones serias o la muerte a causa de sujetadores que reboten. Siempre que sea posible utilice un pro-tector contra descascaramiento*.
5. Nunca fije un sujetador demasiado cerca de otro sujetador o de un borde libre. Esto puede causar un rebote del sujetador. Siempre respete los requisitos mínimos de separación entre sujetadores y de distancia con respecto a bordes.
6. Nunca dispare en materiales muy duros o quebradizos como hierro fundido, azulejo, vidrio o piedra. Estos materiales pueden romperse y causar que salgan volando fragmentos afilados y/o el sujetador.
* Para pedir el protector contra descascaramiento optativo, llame al 1-877-ITW-BRANDS (1-877-489-2726)
Manejo de la herramienta
SAFETY PRECAUTIONS
3 SAFETY PRECAUTIONS
1. Always point the tool away from people and in a safe direction.
2. Never use tool when explosives or flam-mable materials are nearby.
3. Never fire the tool without a fastener. The piston will protrude from the muzzle of the tool, enter the work surface and possibly cause injury to the operator or a bystander. Firing without a fastener may also damage the tool.
4. Always hold the tool perpendicular to the work surface to avoid serious injury or death from ricocheting fasteners. Use a spall guard* whenever possible.
5. Never set a fastener too close to another fastening or a free edge. This can cause the fastener to ricochet. Always follow the minimum spacing and edge distance requirements.
6. Never fire into very hard or brittle mate-rials such as cast iron, tile, glass or rock. These materials can shatter, causing sharp fragments and/or the fastener to fly freely.
* To order optional spall guard, call 1-877-ITW-BRANDS (1-877-489-2726)
Operating the Tool
CONSIGNES DE SÉCURITÉ
CONSIGNES DE SÉCURITÉ 4
7. Ne fixez jamais dans le matériel de base d’acier de construction plus mince que 3 / 16 ". Ne fixezjamais dans le matériel de base en béton de moins de 3 fois la pénétration de tige. Toujours respecter les exigences de pénétration minimale.
8. La fixation dans le bloc et la maçonnerie n’est pas recommandée. Quand il est nécessaire de fixer dans les murs de maçonnerie, il est recommandé que les attaches soient enfon-cées dans les points horizontaux seulement. Les valeurs de publication de tenue pour ces matériaux ne sont pas disponibles en raison de l'incompatibilité des matériaux.
9. Ne jamais fixer à travers ou dans un trou. Toujours maintenir au moins 1 / 2 "distance de tout trou pré-percé ou pré-perforé.
10. Si vous décidez de ne pas faire une fixation après que l'outil a été chargé, retirez toujours la charge de poudre d'abord, puis l'attache. Ne jamais tenter de soulever une charge crue hors de l'outil. Appelez le service technique au 1-800-387-9692 pour assistance.
1. Ne jamais laisser un outil chargé sans sur-veillance. Quelqu'un peut le ramasser, sans le savoir qu’il est chargé et accidentelle-ment décharge l'outil causant des blessures graves ou la mort. Ne chargez jamais l'outil jusqu'à ce que vous soyez prêt à compléter la fixation. Toujours ranger les charges et l’outil, déchargé, sous verrouillage et clé.
Manipulation De L’outil Et Les Charges De Poudre
SAFETY PRECAUTIONS
SAFETY PRECAUTIONS 4
7. Never fasten into structural steel base material thinner than 3/16". Never fasten into concrete base material thinner than 3 times shank penetration. Always maintain minimum penetration requirements.
8. Fastening into block and masonry is not recommended. When it is necessary to fas-ten into masonry walls, it is recommended that fasteners be driven into the horizontal joints only. Published holding values for these materials is not available due to the inconsistency of the materials.
9. Never fasten through or into a hole. Always maintain at least 1/2" distance from any pre-drilled or pre-punched hole.
10. Should you decide not to make a fastening after the tool has been loaded, always remove the powder load first, then the fastener. Never attempt to pry an unfired load out of the tool. Call The Technical Department at 1-800-387-9692 for assistance.
1. Never leave a loaded tool unattended. Someone may pick it up, not know it is loaded and accidentally discharge the tool causing serious injury or death. Never load the tool until you are prepared to complete the fastening. Always store loads and tool, unloaded, under lock and key.
Handling Tool and Powder Loads
MEDIDAS DE SEGURIDAD
MEDIDAS DE SEGURIDAD 4
7. Nunca fije nada en material base de acero estructural de un espesor inferior a 3/16". Nunca fije nada en material base de concreto de un espesor inferior a 3 veces la longitud de penetración del sujetador. Siempre respete los requisitos mínimos de penetración.
8. No se recomienda fijar en bloc o en mam-postería. Cuando es necesario fijar en paredes de mampostería, se recomienda introducir los sujetadores sólo en las unio-nes horizontales. No hay valores de fuerza de sujeción publicados de estos materiales debido a la falta de uniformidad de éstos.
9. Nunca fije ningún sujetador en un agujero o a través de éste. Siempre mantenga una distancia mínima de 1/2" de cualquier aguero previamente taladrado o perforado.
10. Si decide no realizar la fijación después de haber cargado la herramienta, siempre retire primero la carga de pólvora, y luego el sujetador. Nunca intente extraer de la herramienta la carga a fuerza. Para recibir ayuda, llame al Depto. Técnico, al 1-877-ITW-BRANDS (1-877-489-2726).
1. Nunca deje desatendida una herramien-ta cargada. Alguien puede tomarla, sin saber que está cargada, dispararla acci-dentalmente, y causar lesiones serias o la muerte. Nunca cargue la herramienta sino hasta que esté preparado para fijar el sujetador. Siempre guarde la herramienta (descargada) y las cargas bajo llave.
Manejo de la herramienta y de las cargas de pólvora
ACEROCONCRETO
SAFETY PRECAUTIONS
SAFETY PRECAUTIONS 4
7. Never fasten into structural steel base material thinner than 3/16". Never fasten into concrete base material thinner than 3 times shank penetration. Always maintain minimum penetration requirements.
8. Fastening into block and masonry is not recommended. When it is necessary to fas-ten into masonry walls, it is recommended that fasteners be driven into the horizontal joints only. Published holding values for these materials is not available due to the inconsistency of the materials.
9. Never fasten through or into a hole. Always maintain at least 1/2" distance from any pre-drilled or pre-punched hole.
10. Should you decide not to make a fastening after the tool has been loaded, always remove the powder load first, then the fastener. Never attempt to pry an unfired load out of the tool. Call The Technical Department at 1-877-ITW-BRANDS (1-877-489-2726) for assistance.
1. Never leave a loaded tool unattended. Someone may pick it up, not know it is loaded and accidentally discharge the tool causing serious injury or death. Never load the tool until you are prepared to complete the fastening. Always store loads and tool, unloaded, under lock and key.
Handling Tool and Powder Loads
STEEL CONCRETE
SAFETY PRECAUTIONS
5 SAFETY PRECAUTIONS
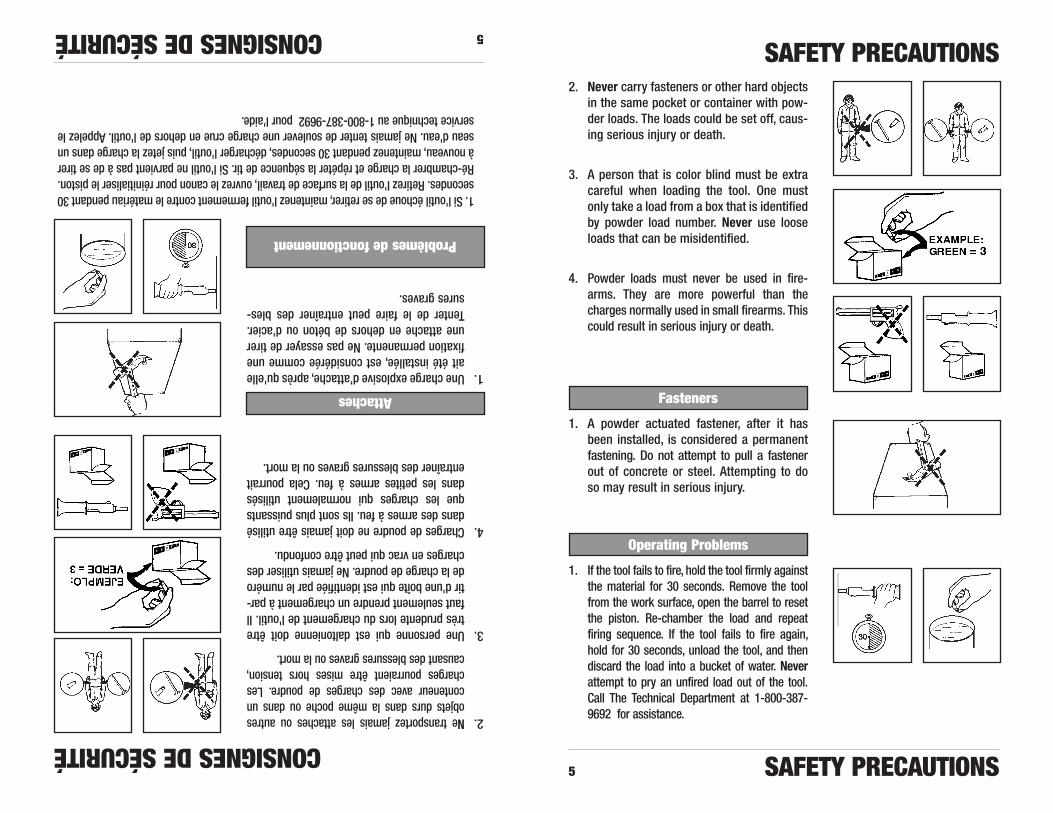
2. Never carry fasteners or other hard objects in the same pocket or container with pow-der loads. The loads could be set off, caus-ing serious injury or death.
3. A person that is color blind must be extra careful when loading the tool. One must only take a load from a box that is identified by powder load number. Never use loose loads that can be misidentified.
4. Powder loads must never be used in fire-arms. They are more powerful than the charges normally used in small firearms. This could result in serious injury or death.
1. A powder actuated fastener, after it has been installed, is considered a permanent fastening. Do not attempt to pull a fastener out of concrete or steel. Attempting to do so may result in serious injury.
1. If the tool fails to fire, hold the tool firmly against the material for 30 seconds. Remove the tool from the work surface, open the barrel to reset the piston. Re-chamber the load and repeat firing sequence. If the tool fails to fire again, hold for 30 seconds, unload the tool, and then discard the load into a bucket of water. Never attempt to pry an unfired load out of the tool. Call The Technical Department at 1-800-387-9692 for assistance.
Fasteners
Operating Problems
CONSIGNES DE SÉCURITÉ
5 CONSIGNES DE SÉCURITÉ
2. Ne transportez jamais les attaches ou autres objets durs dans la même poche ou dans un conteneur avec des charges de poudre. Les charges pourraient être mises hors tension, causant des blessures graves ou la mort.
3. Une personne qui est daltonienne doit être très prudente lors du chargement de l'outil. Il faut seulement prendre un chargement à par-tir d'une boîte qui est identifiée par le numéro de la charge de poudre. Ne jamais utiliser des charges en vrac qui peut être confondu.
4. Charges de poudre ne doit jamais être utilisé dans des armes à feu. Ils sont plus puissants que les charges qui normalement utilisés dans les petites armes à feu. Cela pourrait entraîner des blessures graves ou la mort.
1. Une charge explosive d’attache, après qu'elle ait été installée, est considérée comme une fixation permanente. Ne pas essayer de tirer une attache en dehors de béton ou d'acier. Tenter de le faire peut entraîner des bles-sures graves.
Attaches
Problèmes de fonctionnement
1. Si l'outil échoue de se retirer, maintenez l'outil fermement contre le matériau pendant 30 secondes. Retirez l'outil de la surface de travail, ouvrez le canon pour réinitialiser le piston. Ré-chambrer la charge et répéter la séquence de tir. Si l'outil ne parvient pas à de se tirer à nouveau, maintenez pendant 30 secondes, décharger l'outil, puis jetez la charge dans un seau d'eau. Ne jamais tenter de soulever une charge crue en dehors de l'outil. Appelez le service technique au 1-800-387-9692 pour l'aide.
MEDIDAS DE SEGURIDAD
5 MEDIDAS DE SEGURIDAD
2. Nunca lleve sujetadores ni otros objetos duros en el mismo bolsillo o recipiente donde tenga cargas de pólvora. Las cargas podrían dis-pararse y causar lesiones serias o la muerte.
3. Las personas que padecen daltonismo deben tener extremo cuidado al cargar la her-ramienta. Debe tomar la carga sólo de una caja identificada con el número de la carga de pólvora. Nunca use cargas sueltas que puedan identificarse de manera errónea.
4. Nunca deben usarse las cargas de pólvora con armas de fuego. Son más potentes que las cargas usadas normalmente con armas de fuego. Podrían producirse lesiones serias o la muerte.
1. Una vez instalado con herramienta de pól-vora un sujetador, se considera fijado de forma permanente. No intente extraer de concreto o acero un sujetador instalado. Si lo intenta puede causarse lesiones serias.
1. Si la herramienta no dispara, manténgala firmemente puesta contra el material por 30 segundos. Retire la herramienta de la superficie de trabajo y abra el barril para reajustar el pistón. Vuelva a colocar la carga en la camara y repita la secuencia de disparo. Si la herramienta no dispara de nuevo, manténgala en su lugar por 30 segundos, descárguela y luego deseche la carga en un balde de agua. Nunca intente extraer de la herramienta la carga a fuerza. Para recibir ayuda, llame al Depto. Técnico, al 1-877-ITW-BRANDS (1-877-489-2726).
Sujetadores
Problemas en el funcionamiento de la herramienta
SAFETY PRECAUTIONS
5 SAFETY PRECAUTIONS
2. Never carry fasteners or other hard objects in the same pocket or container with powder loads. The loads could be set off, causing serious injury or death.
3. A person that is color blind must be extra careful when loading the tool. One must only take a load from a box that is identi-fied by powder load number. Never use loose loads that can be misidentified.
4. Powder loads must never be used in fire-arms. They are more powerful than the charges normally used in small firearms. This could result in serious injury or death.
1. A powder actuated fastener, after it has been installed, is considered a permanent fastening. Do not attempt to pull a fastener out of concrete or steel. Attempting to do so may result in serious injury.
1. If the tool fails to fire, hold the tool firmly against the material for 30 seconds. Remove the tool from the work surface, open the barrel to reset the piston. Re-chamber the load and repeat firing sequence. If the tool fails to fire again, hold for 30 seconds, unload the tool, and then discard the load into a bucket of water. Never attempt to pry an unfired load out of the tool. Call The Technical Department at 1-877-ITW-BRANDS (1-877-489-2726) for assistance.
Fasteners
Operating Problems
CONSIGNES DE SÉCURITÉ
CONSIGNES DE SÉCURITÉ 6
Goupilles Rainurées à Ogive de Plastique.300
Longueur de Diamètre tige de tige
1/2" .145 5/8" .145 3/4" .145 1" .145 1-1/4" .145 1-1/2" .145 1-3/4" .145 2" .145 2-3/8" .145 2-1/2" .145
Goupilles Rainurées à Ogive de Plastique.300 avec rondelle 7/8
Longueur de Diamètre tige de tige
1" .145 1-1/4" .145 1-1/2" .145 2" .145 2-1/2" .145
2. Ne jamais décharger ou démonter un outil coincé, bloqué ou cassé qui contient une charge de poudre vive. Cela peut entraîner de tirer l'outil involontairement. Toujours pointer un outil coincé loin de vous-même et d'autres. Immédiatement stocker un outil coincé ou brisé dans un conteneur verrouillé après le marquage "Défective - Ne pas utiliser". Appelez 1-800-387-9692 pour l'assistance technique.
SAFETY PRECAUTIONS
SAFETY PRECAUTIONS 6
.300 Head Plastic Fluted Drive Pins
Shank Shank Length Diameter
1/2" .145 5/8" .145 3/4" .145 1" .145 1-1/4" .145 1-1/2" .145 1-3/4" .145 2" .145 2-3/8" .145 2-1/2" .145
.300 Head Plastic Fluted Drive Pin with 7/8" Washer
Shank Shank Length Diameter
1" .145 1-1/4" .145 1-1/2" .145 2" .145 2-1/2" .145
2. Never unload or disassemble a jammed, stuck or broken tool which contains a live powder load. This may cause the tool to fire unintentionally. Always point a jammed tool away from yourself and other people. Immediately store a jammed or broken tool in a locked container after tagging it "Defective - Do Not Use". Call 1-800-387-9692 for technical assistance.
MEDIDAS DE SEGURIDAD
MEDIDAS DE SEGURIDAD 6
Clavos con cabeza de 0.300” y estrías de plástico
Longitud Diámetro del tallo del tallo
1/2" .145 5/8" .145 3/4" .145 1" .145 1-1/4" .145 1-1/2" .145 1-3/4" .145 2" .145 2-3/8" .145 2-1/2" .145
Clavos con cabeza de 0.300”, estrías de plástico y arandela de 7/8"
Longitud Diámetro del tallo del tallo
1" .145 1-1/4" .145 1-1/2" .145 2" .145 2-1/2" .145
2. Nunca descargue ni desarme la herramienta si está trabada, pegada o descompuesta y contiene una carga de pólvora en buen estado. La herramienta podría dispararse accidentalmente. Siempre apunte toda herramienta trabada lejos de usted y de las demás personas. De inmediato guarde la herramienta trabada o descompuesta en un recipiente con cerradura de llave después de ponerle una etiqueta de "Defectuosa - No Usar" ("Defective - Do Not Use").
GUÍA PARA SELECCIONAR SUJETADORES RAMSET
SAFETY PRECAUTIONS
SAFETY PRECAUTIONS 6
.300 Head Plastic Fluted Drive Pins
Shank Shank Length Diameter
1/2" .145 5/8" .145 3/4" .145 1" .145 1-1/4" .145 1-1/2" .145 1-3/4" .145 2" .145 2-3/8" .145 2-1/2" .145
.300 Head Plastic Fluted Drive Pin with 7/8" Washer
Shank Shank Length Diameter
1" .145 1-1/4" .145 1-1/2" .145 2" .145 2-1/2" .145
2. Never unload or disassemble a jammed, stuck or broken tool which contains a live powder load. This may cause the tool to fire unintentionally. Always point a jammed tool away from yourself and other people. Immediately store a jammed or broken tool in a locked container after tagging it "Defective - Do Not Use". Call 1-877-ITW-BRANDS (1-877-489-2726) for technical assistance.
RAMSET FASTENER SELECTION GUIDERAMSET FASTENER SELECTION GUIDE
GUIDE DE SELECTION DES ATTACHES RAMSET
CAUTION! Assurez-vous de lire et de comprendre toutes les consignes de sécurité et de compléter l'examen
de l'opérateur avant de faire fonctionner l'outil. Vérifiez que l'outil est déchargé et qu’il n’ya pas de corps étrangers ou des attaches dans le canon. Effectuer un essai de fonc-tionnement journalier avant l’utilisation.
FONCTIONNEMENTVérifier le bon fonctionnement de l'outil, sans une charge de poudre ou attache dans l'outil, en poussant vers le bas contre la surface de travail, la vérification pour s'assurer que la partie de rainure du canon s’aligne avec les flèches sur le corps de l'outil. Fonctionnez l’outil déchargé plusieurs fois et s'assurer que les parties de culasse et le mécanisme de tir opère librement avant de fixer avec l'outil.
1. Pointez l'outil dans une direction sûre et faite glisser le canon de l’avant avec votre autre main. Cette action réinitialise le piston pour la fixation suivante. Perte de puissance peut être le résultat d'un piston mal réinitialisé.
2. Place une attache, pointez dehors, dans l'extrémité avant du canon jusqu'à la pointe en plastique cannelée s'adapte à l'intérieur. Toujours charger l’attache avant d'insérer la charge d'alimentation pour éviter une décharge accidentelle. Ne pas utiliser une force excessive lors de l'insertion de l’attache. Arrêtez-vous si une force excessive est nécessaire et appeler le 1-800 387-9692 pour l'assistance technique.
3. Insérez la charge de poudre après d'être assuré que la chambre est claire. La charge de poudre ne sera pas pleinement mise en, avant que l'outil est comprimé contre la surface de travail. Commencez toujours par le niveau le plus bas et augmenter jusqu'à ce que le niveau approprié est trouvé. Note: accabler une attache dans l’acier ou le béton est dan-gereux.
Note: Avant de faire la fixation, la base de matériau doit être testée en axe de poinçon pour l’aptitude des fixations de poudre explosive (voir page 2.).
FONCTIONNEMENT DE L’OUTIL
7 FONCTIONNEMENT DE L’OUTIL
CAUTION!Be sure to read and understand all safety precautions and complete the Operator's Exam before attempting to
operate the tool. Check to be sure the tool is unloaded and no foreign objects or fasteners are in the barrel. Perform daily function test before operating.
OPERATIONCheck the functioning of the tool, without a powder load or fastener in the tool, by pushing down against the work surface, checking to be sure the groove portion of the barrel aligns with the arrows on the tool body. Function unloaded tool several times and insure that the breech parts and firing mechanism operate freely before fastening with the tool.
1. Point the tool in a safe direction and slide the barrel forward with your other hand. This action resets the piston for the next fastening. Loss of power may be the result of an improperly reset piston.
2. Place a fastener, point out, into the front end of the barrel until the plastic fluted tip fits inside. Always load the fastener before inserting the power load to prevent accidental discharge. Do not use excessive force when inserting the fastener. Stop if excessive force is required and call 1-800 387-9692 for technical assistance.
3. Insert the powder load after making sure the chamber is clear. The powder load will not fully set until the tool is compressed against the work surface. Always start with the lowest level and increase until the proper level is found. Note: Overpowering a fastener into steel or concrete is dangerous.
Note: Before making the fastening, the base material should be center punch tested for suitability of powder actuated fastenings (see pg. 2).
TOOL OPERATION
7 TOOL OPERATION
TOOL OPERATION
TOOL OPERATION 8
4. Close tool by pulling the barrel back to the semi-closed position. Never attempt to close the tool by exerting force on the front of the barrel. Never place your fingers or hands over the muzzle end of the barrel. The proper position of the hands and fingers are shown in the illustration.
5. With the tool in the semi-closed position, place it against the material to be fastened. Hold the tool firmly at 90º with one hand and complete-ly depress, check to be sure the groove on the barrel aligns with the marking on the receiver.
6. Using a one pound hammer, strike the firing pin button with a sharp, firm blow. If the tool fails to fire, follow the misfire procedure on page 5.
Note: It is important to strike the firing pin button firmly and squarely. A light blow or one off-center may not activate the load, however it will jar the piston out of position which will cause a reduction in power. (See Troubleshooting, page 10.)
7. To prepare for the next fastening, point the tool in a safe direction, and slide the barrel firmly forward. This action ejects the fired load out of the tool and properly resets the piston. The tool is now ready for the next fastening.
Semi-close posi-tion
FONCTIONNEMENT DE L’OUTIL
FONCTIONNEMENT DE L’OUTIL 8
4. Fermer l'outil en tirant le canon à la position semi-fermée. Ne jamais essayer de fermer l'outil en exerçant une force sur le devant du canon. Ne placez jamais vos doigts ou les mains sur la bouche du canon. La bonne posi-tion des mains et des doigts sont présentés dans l'illustration.
5. Avec l'outil en position semi-fermée, le placer contre le matériau pour être fixer. Tenez l’outil fermement à 90 º avec une seule main et com-plètement déprimer, vérifiez que la rainure sur les alignes de canon avec le marquage sur le récepteur.
6. L'utilisation d’un marteau à un livre, frappez le bouton de tir à goupille avec un coup forte, ferme. Si l'outil ne parvient pas à de se tirer, suivez la procédure de tir ratée à la page 5.
Nota:Il est important de frapper le bouton de tir à goupille fermement et carrément. Un léger coup ou un hors-centre peut ne pas activer la charge, mais il peut trembler le piston hors de la position qui va provoquer une diminution de la puissance. (Voir Dépannage, page 10.)
7. Pour se préparer à la prochaine fixation, poin-tez l'outil dans une direction sûre, et glissez le canon fermement à l'avant. Cette action éjecte la charge tirée en dehors de l'outil et réinitialise correctement le piston. L'outil est maintenant prêt pour la fixation suivante
Posición semicerrada
NETTOYAGE APPROFONDIPour maintenir votre outil en bon état de fonctionnement, il est recommandé que l'outil soit nettoyé après usage intensif ou une exposition constante à la saleté et les débris. Appelez-le 1-800-387-9692 pour des informations sur le service.
THOROUGH CLEANINGTo maintain your tool in good working condition, it is recommended that the tool be cleaned after heavy use or constant exposure to dirt and debris. Call 1-800-387-9692 for service information.
DÉPANNAGE
9 DÉPANNAGE
L’Opérateur de l'outil doit suivre attentivement toutes les instructions de fonctionnement et les consignes pour fonctionner l’outil avec succès. Voici une liste de situations potentielles d'un opérateur qui peut les rencontrer et les causes probables:• Si un problème d’outil survient et l'assistance technique est nécessaire, s'il vous plaît appelez 1-800-387-9692.
ATTENTION: Ne pas faire fonctionner un outil qui ne fonctionne pas correctement.
OUTIL ECHOU DE SE TIRERIl ya trois causes pour la plupart de tous les tirs ratés.
RÉGLAGE D’ATTACHES INCOMPATIBLELa principale raison de la fixation incompatible est la mauvaise position de pis-ton. Il ya deux raisons pour un piston mal positionné:.
1. Défaut de réinitialiser complètement le piston.
2. Un frappe manqué de bouton arrière.
Dans les deux cas, le canon doit être totale-ment déployé pour réinitialiser le piston.
Note: Il est une bonne pratique pour étendre pleinement le canon et ré-chambre la charge après que l'outil est mal frappé causant un tir raté, et après que la procédure de tir raté a été suivie.
• Bouton de tir à goupille frappé trop à la légère.
• Bouton de tir à goupille frappé hors centre
• Outil pas complètement comprimé
TROUBLESHOOTING
9 TROUBLESHOOTING
Tool operator must carefully follow all operating instructions and precautions to successfully operate the tool. Following is a list of potential situations an operator may encounter and the probable causes:• If a tool problem occurs and technical assistance is required, please
call 1-800-387-9692.
WARNING: Do not operate a tool that is not functioning properly.
TOOL FAILS TO FIREThere are three causes for most all misfires.
INCONSISTENT FASTENER SETTINGThe major reason for inconsistent fastening is the improper position of the piston. There are two reasons for an improperly positioned piston:
1. Failure to completely reset the piston.
2. A missed hit of the rear button.
In both cases the barrel must be fully extended to reset the piston.
Note: It is a good practice to fully extend the barrel and re-chamber the load after the tool is improperly struck causing a misfire, and after the misfire procedure has been followed.
• Firing pin button struck too lightly
• Firing pin button struck off center
• Tool not completely compressed
CORRECCIÓN DE PROBLEMAS
9 CORRECCIÓN DE PROBLEMAS
El operador de la herramienta debe seguir cuidadosamente todas las instrucciones de funcionamiento y medidas de seguridad para utilizarla de forma correcta. A continuación aparece una lista de posibles situaciones que puede encontrar el operador y las causas probables:• Si ocurre un problema con una herramienta y se requiere asistencia técnica, llame por favor al 1-877-ITW-BRANDS (1-877-489-2726)ADVERTENCIA: No utilice la herramienta si no está funcionando correctamente.
LA HERRAMIENTA NO DISPARALa mayoría de los disparos fallidos se debe a tres causas.
FIJACIÓN NO UNIFORME DEL SUJETADORLa razón principal de la fijación no uniforme es la posición incorrecta del pistón. Hay dos razones por las cuales se coloca de manera incorrecta el pistón.
1. No reajustar completamente el pistón.2. No se golpeó el botón posterior.En ambos casos debe deslizarse el barril hacia adelante completamente para reajustar el pistón.
Nota: Es una buena práctica deslizar el barril hacia adelante completamente y volver a poner la carga en la recámara después de que se golpeó incorrectamente la herramienta y se causó un disparo fallido, y después de seguir el procedimiento indicado después de tal falla.
• Se golpeó el botón del per-cutor demasiado levemente
• Se golpeó el botón del percutor fuera de centro
• La herramienta no se presionó completamente
TROUBLESHOOTING
9 TROUBLESHOOTING
Tool operator must carefully follow all operating instructions and precautions to successfully operate the tool. Following is a list of potential situations an operator may encounter and the probable causes:• If a tool problem occurs and technical assistance is required, please
call 1-877-ITW-BRANDS (1-877-489-2726)WARNING: Do not operate a tool that is not functioning properly.
TOOL FAILS TO FIREThere are three causes for most all misfires.
INCONSISTENT FASTENER SETTINGThe major reason for inconsistent fastening is the improper position of the piston. There are two reasons for an improperly positioned piston:
1. Failure to completely reset the piston.
2. A missed hit of the rear button.
In both cases the barrel must be fully extended to reset the piston.
Note: It is a good practice to fully extend the barrel and re-chamber the load after the tool is improperly struck causing a misfire, and after the misfire procedure has been followed.
• Firing pin button struck too lightly
• Firing pin button struck off center
• Tool not completely compressed
DÉPANNAGE
DÉPANNAGE 10
PISTON SURMULTIPLIÉLe piston surmultiplié est un problème qui se produit après que l'outil est tiré. Le piston peut s'étendre à la surface de travail autant que 1/2 ".Le piston surmultiplié peut se produire pour plusieurs raisons :
• Charge de Poudre trop forte.
• Le matériel de base mou.
• Lacune aux matériaux de maçonnerie que vous en fixez.
• Mauvais choix d’attache.
POUR ÉVITER LE PISTON SURMULTIPLIÉ• Diminuer le niveau de puissance. Remarque: Toujours faire le test de fixations test avec la plus légère charge et l’augmenter jusqu'à le niveau approprié est trouvé.
• Assurez-vous que la base de matériau est vérifiée conformé-ment au test au pointeau.
• Lors de la fixation dans la maçon-nerie, toujours faire la fixation dans les joints horizontaux.
•Vérifiez la page 12, "Comment sélectionner une puissance explo-sive d’attache."
Attention: Surmultiplication Constante endommagera l'outil au-delà de la réparation. Pour obtenir une assistance technique ou de l’information sur le service appelez le 1-800-387-9692 .Note: Lorsque la surmultiplication se produit, le piston peut se coincer dans le canon avant. Dans ce cas s'assurer que l'outil est déchargé, tournez l’outil à l’envers et place sur la surface de travail. Frappe le piston exposé avec un marteau jusqu'à ce qu'il se déplace vers le bas dans le canon. Réinitialiser le piston. Porter des lunettes de sécurité lors de l'exécution de cette tâche.
Lors de la fixation dans le béton toujours maintenir un minimum de 3 "espacements entre les fixations et 3" de tout bord libre. La pénétration dans le béton doit toujours être au moins 1" (voir page 12, "Comment sélectionner une attache à charge explosive"). L'épaisseur de béton doit être au moins 3 fois la profondeur de pénétration.
Lors de la fixation en acier toujours de maintenir un minimum de 1-1/2 "espacement entre les fixations et 1 / 2" de tout bord libre. La longueur d’attache doit être suffisamment longue pour pénétrer l'acier complètement (voir page 12) L’épaisseur de l'acier est limitée à 3 / 16 "à 5 / 16".
Fixation Sur Béton
Fixation Sur Acier
TROUBLESHOOTING
TROUBLESHOOTING 10
PISTON OVERDRIVEPiston overdrive is a problem that occurs after the tool is fired. The piston may extend into the work surface as much as 1/2". Piston overdrive can occur because of several reasons:
• Powder load too strong
• Soft base material
• Void in the masonry material that you're fastening into.
• Incorrect fastener selection.
TO AVOID PISTON OVERDRIVE• Decrease power level. Note:
Always make test fastenings with lightest load and increase until proper level is found.
• Make sure base material is checked according to the Center Punch Test.
• When fastening into masonry, always make fastenings into horizontal joints.
• Check page 12, "How to Select a Power Actuated Fastener."
Caution: Constant overdrive will damage the tool beyond repair. For technical assistance or service information call 1-800-387-9692 .
Note: When overdrive occurs, the piston may jam into the front barrel. In this case be sure the tool is unload-ed, turn the tool upside down and place on the work surface. Strike the exposed piston with a hammer until it moves downward into the barrel. Reset the piston. Wear safety goggles when performing this task.
When fastening into concrete always maintain a minimum 3" spacing between fastenings and 3" from any free edge. Penetration into concrete should always be 1" minimum (see page 12, "How to Select a Powder Actuated Fastener"). The concrete thickness should be at least 3 times the penetration depth.
When fastening into steel always maintain a minimum 1-1/2" spacing between fasten-ings and 1/2" from any free edge. Fastener length should be long enough to penetrate the steel completely (see page 12) Steel thickness is limited to 3/16" to 5/16".
Fastening to Concrete
Fastening to Steel
APPLICATIONS
11 APPLICATIONS
7 / 8 "rondelle fournit une plus grande surface d'appui à la membrure de bois, ce qui réduit le soulèvement.
L’attache doit pénétrer complètement en acier pour une tenue de puissance maxi-male.
Lors de la fixation dans la maçonnerie, tirer dans les joints horizontaux seulement.
Bois sur béton
Bois sur Acier
Metal à épaisseur faible sur acier
Fourrure à Bande sur béton ou murs en maçonnerie
Metal à épaisseur faible sur béton
APPLICATIONS
11 APPLICATIONS
7/8" washer provides a greater bearing sur-face to the wood member, minimizing uplift.
Fastener should penetrate steel completely for maximum holding power.
When fastening into masonry, shoot into horizontal joints only.
Wood to Concrete
Wood to Steel
Thin Gauge Metal to Steel
Furring Strip to Concrete or Masonry Walls
Thin Gauge Metal to Concrete or Masonry
APLICACIÓNES
11 APLICACIÓNES
La arandela de 7/8" ofrece mayor superficie de soporte al miembro de madera, con lo cual reduce el levantamiento.
El sujetador debe penetrar completamente el acero para poder brindar la fuerza de sujeción máxima.
El sujetador debe penetrar completamente el acero para poder brindar la fuerza de sujeción máxima.
Madera a Concreto
Madera a Acero
Metal de Bajo Calibre sobre Acero
Franja de Enrasado sobre Concreto o Paredes de mampostería
Metal de Bajo Calibre sobreConcreto o Mampostería
APPLICATIONS
11 APPLICATIONS
7/8" washer provides a greater bearing sur-face to the wood member, minimizing uplift.
Fastener should penetrate steel completely for maximum holding power.
When fastening into masonry, shoot into horizontal joints only.
Wood to Concrete
Wood to Steel
Thin Gauge Metal to Steel
Furring Strip to Concrete or Masonry Walls
Thin Gauge Metal to Concrete or Masonry
COMMENT CHOISIR UNE ATTACHE A ‘ CHARGE EXPLOSIVE
MEDIDAS DE SEGURIDAD 12
DÉTERMINER LE TYPE D’ATTACHELes tiges de conduite sont utilisés pour fixer directement un objet (installation perma-nente). Les tiiges filetées sont utilisées lorsque l'objet fixé peut ensuite être supprimé ou si le calage est nécessaire. L'exemple suivant montre comment déterminer la tige et la longueur du fil:
IINSTALLATION PERMANENTE1A sur béton 1B sur Acier
of
Minimale épaisseur Requise Longueur de tige = du matériel + Pénétration (M) (P)
minimale épaisseur ou ¼ min.pta Longueur de tige = Acier(S) + Pénétration
File épaisseur Autorisation* Longueur = du Matériel + pour (A) (M) Ecrou et rondelle Longueur de tige = pénétration réquise
Filet épaisseur Autorisation* Longueur = du Matériel + pour (A) (M) Ecrou et rondelle
*Autorisation pour l'épaisseur de l'écrou et la rondelle= taille du filet (c'est à dire permettre à 1 / 4 "pour filet 1/4-20, etc.)
HOW TO SELECT A POWDER ACTUATED FASTENER
SAFETY PRECAUTIONS 12
DETERMINE FASTENER TYPEDrive pins are used to directly fasten an object (permanent installation). Threaded studs are used where the object fastened may later be removed or where shimming is required. The following shows how to determine shank and thread length:
PERMANENT INSTALLATION1A To Concrete 1B To Steel
of
Minimum Thickness Required Shank Length = of Material + Penetration (M) (P)
Minimum Thickness Thickness Shank Length = of Material + of Steel + 1/4" min. pt. (M) (S) allowance
Minimum Thickness of 1/4" min. pt. Shank Length = Steel (S) + allowance
Thread Thickness Allowance* Length = of Material + for (A) (M) Nut &Washer
Shank Length = Required Penetration (P)
Thread Thickness Allowance* Length = of Material + for (A) (M) Nut &Washer
REMOVABLE INSTALLATION2A To Concrete 2B To Steel
*Allowance for thickness of nut & washer = thread size (i.e. allow 1/4" for 1/4-20 thread, etc.)
CÓMO SELECCIONAR UN SUJETADOR PARA HERRAMIENTA DE PÓLVORA
MEDIDAS DE SEGURIDAD 12
DETERMINE EL TIPO DE SUJETADOR A USARLos clavos se usan para fijar directamente un objeto (instalación permanente). Los espárragos se utilizan donde el objeto fijado va a ser quitado posteriormente o donde se requiere acuñamiento. A continuación se muestra la forma de determinar la longitud del tallo y de la rosca.
INSTALACIÓN PERMANENTE1A En concreto 1B En acero
of
Longitud Espesor del Penetración mín. del tallo = Material + requerida (M) (P)
Longitud Espesor del 1/4" holgura mín. del tallo = Acero (S) + mín. punta
Longitud Espesor del Holgura* rosca = Material + para tuerca (A) (M) y arandela
Longitud tallo = Penetración requerida (P)
Longitud Espesor del Holgura* rosca = Material + para tuerca (A) (M) y arandela
INSTALACIÓN TEMPORAL2A En concreto
*Holgura para espesor de tuerca y arandela = tamaño rosca (o sea, deje 1/4" para rosca de 1/4-20, etc.)
HOW TO SELECT A POWDER ACTUATED FASTENER
SAFETY PRECAUTIONS 12
DETERMINE FASTENER TYPEDrive pins are used to directly fasten an object (permanent installation). Threaded studs are used where the object fastened may later be removed or where shimming is required. The following shows how to determine shank and thread length:
PERMANENT INSTALLATION1A To Concrete 1B To Steel
of
Minimum Thickness Required Shank Length = of Material + Penetration (M) (P)
Minimum Thickness Thickness Shank Length = of Material + of Steel + 1/4" min. pt. (M) (S) allowance
Minimum Thickness of 1/4" min. pt. Shank Length = Steel (S) + allowance
Thread Thickness Allowance* Length = of Material + for (A) (M) Nut &Washer
Shank Length = Required Penetration (P)
Thread Thickness Allowance* Length = of Material + for (A) (M) Nut &Washer
REMOVABLE INSTALLATION2A To Concrete 2B To Steel
*Allowance for thickness of nut & washer = thread size (i.e. allow 1/4" for 1/4-20 thread, etc.)
INSTALLATION MOBILE2A sur béton 2B sur acier
Minimale épaisseur Requise Longueur de tige = du matériel + de l’acier +1/4" min. pt. (M) (S) autorisa-tion
EXAMEN DE L'OPÉRATEUR
13 EXAMEN DE L'OPÉRATEUR
Après l’étude et la compréhension de l’outil dans ce manuel, répondre aux questions suivantes. Compléter les informations de l'autre côté de cette page. Joindre une copie de votre facture et l'envoyer à l'adresse indiquée sur le dos de ce manuel pour activer votre garantie d'outil et recevoir votre licence d’outil. La licence de l'opérateur peut également être obtenue à: www.ramset.ca1. les lunettes de sécurité et de protection auditive
doit être porté par l'operateur et toute personnes à proximité nécessaires pour l'utilisation de l'outil.
■ Vrai ■ Faux
2. Le niveau de puissance la plus forte devrait d'abord être au moment de la fixation.
■ Vrai ■ Faux
3. Ne jamais essayer de tirer l'outil jusqu'à la fin du museau lorsqu’il est comprimé contre la surface de travail et vous êtes prêt à faire une fixation.
■ Vrai ■ Faux
4. Plaque de roche, mur de gypse, bois, fibre de verre, carreaux de céramique, de brique et plaque de métal mince sont des exemples de matériaux qu’il ne faut pas les fixés dédans. ■ Vrai ■ Faux
5. Un outil à charge explosive peut être utilisé sans danger dans une atmosphère explosive ou inflam-mable.
■ Vrai ■ Faux
6. Les outils mal fonctionnés peuvent être utilisés et ne doivent pas être retirées du service immédiatement. ■ Vrai ■ Faux
7. Lorsque vous utilisez un outil à charge explosive, votre main ne doit jamais être placé devant la bouche de l’outil.
■ Vrai ■ Faux
8. Béton coulé et acier de construction sont des matériaux appropriés pour la fixation dédans.
■ Vrai ■ Faux
9. Pour déterminer l'aptitude de base d'un matériau, utiliser une attache comme un poinçon comme suit: A) Si la fixation est émoussée, ne
pas fixer, le matériau est trop dur. ■ Vrai ■ Faux
B) Si la fixation pénètre facilement, ne pas fixer;le matériel est trop mou. ■ Vrai ■ Faux
C) Si le matériel ou les fissures se brise, ne pas fixer;le matériel est trop fragile. ■ Vrai ■ Faux
10. Dans le béton, une attache doit être con-duite pas plus près d'un bord libre de 3 ". ■ Vrai ■ Faux
11. Lors de la fixation dans le béton, la base de matériau doit être supérieure à la pénétration de tige d'au moins 3 fois.
■ Vrai ■ Faux
12. Ne pas enfoncer les attaches dans l’acier qui est plus mince de 3 / 16 ". ■ Vrai ■ Faux
13. Les outils à charge explosive, les attaches et les charges, doivent toujours être conservés dans un endroit sûr et verrouillé lorsqu'ils ne sont pas utilisés pour éviter l'accè par des personnes non autorisées.
■ Vrai ■ Faux
14. Lorsque on considère la sécurité d'une applica-tion particulière, l'opérateur doit penser à toutes les caractéristiques suivantes: a) la charge de poudre, le niveau de puissance b) la sécurité de l'opérateur , c) la sécurité des personnes à proximitées et les collègues de travail, d) la base de matériau de réception.
■ Vrai ■ Faux
15. Ce n’est pas nécessaire de lire le manuel d'utilisation avant de faire fonctionner le modèle HammerShot ™ de l’outil à charge explosive en faible vitesse.
■ Vrai ■ Faux
16. La meilleure façon de vérifier le matériel de réception est de mettre plusieurs attches en utilisant la charge la plus puissante.
■ Vrai ■ Faux
17. le piston sirmultuplié est causé par accablage de l'outil ou par le déchargement de l'outil contre une surface molle.
■ Vrai ■ Faux
18. Il ne faut jamais tenter d'extraire une charge bloquée hors de l’outil.
■ Vrai ■ Faux
19. Placer une main sur l'extrémité de la fin de la bouche de l’outil chargé peut entraîner des bles-sures graves de la surmultiplication de piston ou de l’échapement de l’attache si l'outil est déchargé accidentellement.
■ Vrai ■ Faux
Signé _____________________________
Date ______________________________
OPERATOR'S EXAMINATION
13 OPERATOR'S EXAMINATION
After studying and understanding the material in this tool manual, answer the following questions. Complete the information on the other side of this page. Enclose a copy of your sales receipt and send to the address on the back of this manual to activate your tool warranty and receive your tool license. Operator's license can also be obtained at: www.ramset.ca1. Safety goggles and hearing protection must
always be worn by the operator and any neces-sary bystanders when using the tool.
■ True ■ False
2. The strongest power level should be tried first when making the first fastening.
■ True ■ False
3. Never attempt to fire the tool until the muzzle end is compressed against the work surface and you are ready to make a fastening.
■ True ■ False
4. Sheet rock, drywall board, wood, fiberglass, ceramic tile, brick and thin sheet metal are examples of materials not to be fastened into.
■ True ■ False
5. A powder actuated tool can be safely used in an explosive or flammable atmosphere.
■ True ■ False
6. Malfunctioning tools can be used and do not have to be removed from service immediately.
■ True ■ False
7. When operating a powder actuated tool, your hand should never be placed in front of the tool muzzle.
■ True ■ False
8. Poured concrete and structural steel are suitable materials for fastening into.
■ True ■ False
9. To determine the suitability of a base material, use a fastener as a center punch as follows:
A) If the fastener is blunted, do not fasten; the material is too hard. ■ True ■ False
B) If the fastener penetrates easily, do not fasten; the material is too soft. ■ True ■ False
C) If the material cracks or shatters, do not fasten; the material is too brittle. ■ True ■ False
10. In concrete, a fastener should be driven no closer to a free edge than 3".
■ True ■ False
11. When fastening into concrete, the base material should be greater than the shank penetration by at least 3 times.
■ True ■ False
12. Do not drive fasteners into steel that is thinner than 3/16".
■ True ■ False
13. Powder actuated tools, fasteners and loads, must always be kept in a secure, locked area when not in use to avoid access by unauthor-ized persons.
■ True ■ False
14. When considering the safety of a particular appli-cation, the operator must think about all of the following: a) the powder load power level, b) the operator's safety, c) the safety of bystanders and fellow workers, d) the base or receiving material.
■ True ■ False
15. It is not necessary to read the Operator's Manual prior to operating the Model HammerShot™ low velocity powder actuated tool.
■ True ■ False
16. The best way to check the receiving material is to set several fasteners using the most powerful load.
■ True ■ False
17. Piston overdrive is caused by overpowering of the tool or by discharging the tool against a soft surface.
■ True ■ False
18. One should never attempt to pry a stuck load out of a tool.
■ True ■ False
19. Placing a hand over the muzzle end of a loaded tool can result in serious injury from piston overdrive or an escaping fastener if the tool is discharged accidentally.
■ True ■ False
Signed ____________________________
Date ______________________________

LICENCE ET ACTIVATION DE GARANTIEL’outil HammerShot ™ est garanti pendant 90 jours après la vente des ITW.
Je certifie que j'ai lu et compris les instructions de l’outil d’opérateur HammerShot ™ , et le manuel de formation et j’ai pris l'examen de l'opérateur sur le verso.
(S'il vous plaît imprimé clairement)
Le numéro de série sur mon outil est: ___________________________________
S'il vous plaît envoyer mon licence d’outil à:
Nom ____________________________________________________________
Addresse ________________________________________________________
Ville ______________________État ________________Zip _______________
Téléphone _______________________________________________________
Email. ___________________________________________________________
Oui. Je souhaite recevoir des mises à jour de produit et informations de Ramset.
RETOUR AU:
Aux Etats-Unis.
Marques ITWATTN :le coordinateur de licence955 National Parkway, Suite 95500Schaumburg, IL 60173
En CANADÁ
Produits de Construction ITWATTENTION: le détaillant de commercialisation120, chemin de Travail, Markham Ontario, L3S 3J1
LICENSE AND WARRANTY ACTIVATIONThe HammerShot™ Tool is warranted for 90 days after sale by ITW Construction Products.
I certify that I have read and understand the HammerShot™ Tool Operator's Instruction and Training Manual and have taken the Operator's Exam on the reverse side.
(Please Print Clearly)
The serial number on my tool is: _______________________________________
Please send my tool license to:
Name ___________________________________________________________
Address _________________________________________________________
City _______________________ State ________________ Zip ______________
Phone ___________________________________________________________
Email ___________________________________________________________
o Yes. I would like to receive product updates and information from Ramset.
RETURN TO:
In USA
ITW BrandsATTN: License Coordinator955 National Parkway, Suite 95500 Schaumburg, IL 60173
In CANADA
ITW Construction ProductsATTN: Retail Marketing120 Travail Road, Markham Ontario, L3S 3J1
LICENCE ET ACTIVATION DE GARANTIE 14LICENSE AND WARRANTY ACTIVATION 14