X7033 BGB00 - service.mattel.com · Lavar la almohadilla por separado en agua fría y ciclo para...
16
X7033 BGB00 fisher-price.com IMPORTANT! Please keep these instructions for future reference. • Please read these instructions before assembly and use of this product. • Adult assembly is required. Tool needed for assembly: Phillips screwdriver (not included). • Requires one D (LR20) alkaline battery (not included) for soother operation. Requires three button cell (LR44) batteries (mercury-free batteries included) for toy operation. ¡IMPORTANTE! Guardar estas instrucciones para futura referencia. • Leer estas instrucciones antes de ensamblar y usar el producto. • Requiere ensamblaje por un adulto. Herramienta necesaria para el montaje: desatornillador de cruz (no incluido). • El mecanismo relajante funciona con 1 pila alcalina D (LR20) x 1,5V (no incluida). El juguete funciona con 3 pilas de botón (LR44) x 1,5V (pilas sin mercurio incluidas).
Transcript of X7033 BGB00 - service.mattel.com · Lavar la almohadilla por separado en agua fría y ciclo para...

1
X7033 BGB00
fisher-price.com
IMPORTANT! Please keep these instructions for future reference.• Pleasereadtheseinstructionsbeforeassemblyanduseofthisproduct.
• Adultassemblyisrequired.Toolneededforassembly:Phillipsscrewdriver(notincluded).
• RequiresoneD(LR20)alkalinebattery(notincluded)forsootheroperation.Requiresthreebuttoncell(LR44)batteries(mercury-freebatteriesincluded)fortoyoperation.
¡IMPORTANTE! Guardar estas instrucciones para futura referencia. • Leerestasinstruccionesantesdeensamblaryusarelproducto.
• Requiereensamblajeporunadulto.Herramientanecesariaparaelmontaje:desatornilladordecruz(noincluido).
• Elmecanismorelajantefuncionacon1pilaalcalinaD(LR20)x1,5V(noincluida).Eljuguetefuncionacon3pilasdebotón(LR44)x1,5V(pilassinmercurioincluidas).

2©2013Mattel.AllRightsReserved.
PRINTED IN CHINA X7033pr-0822
CONSUMER ASSISTANCEAYUDA AL CONSUMIDOR1-800-432-5437 (US)
Fisher-Price, Inc., 636 Girard Avenue, East Aurora, NY 14052.
Hearing-impaired consumers/Clientes con problemas auditivos/Pour les malentendants : 1-800-382-7470.
Centro de Servicio en México:59-05-51-00 Ext. 5206 ó 01-800-463-59-89
baby gear.2L
MÉXICO ImportadoydistribuidoporMatteldeMéxico,S.A.deC.V.,MigueldeCervantesSaavedraNo.193,Pisos10y11,Col.Granada,DelegaciónMiguelHidalgo,C.P.11520,México,D.F.R.F.C.MME-920701-NB3.
CHILE MattelChile,S.A.,AvenidaAméricoVespucio501-B,Quilicura,Santiago.Tel.:1230-020-6213.
VENEZUELA ServicioalconsumidorVenezuela:Tel.:0-800-100-9123.
ARGENTINA MattelArgentina,S.A.,Curupaytí1186,(1607)–VillaAdelina,BuenosAires.Tel.:0800-666-3373.
COLOMBIA MattelColombia,S.A.,Calle123#7-07P.5,Bogotá.Tel.:01800-710-2069.
PERÚ MattelPerú,S.A.,Av.JuandeArona#151,CentroEmpresarialJuandeArona,TorreC,Piso7,Oficina704,SanIsidro,Lima27,Perú.RUC:20425853865.Reg.Importador:02350-12-JUE-DIGESA.Tel.:0800-54744.RestodeLatinoamérica:[email protected].

3
To prevent serious injury or death:•Fall Hazard–Neveruseonanyelevatedsurface,sincechild’smovementmaycauseproducttoslideortipover.Useonlyonafloor.
•Suffocation Hazard–Neveruseonasoftsurface(bed,sofa,cushion)sinceproductcantipoverandcausesuffocationinsoftsurfaces.
• Alwaysuserestraintsystemuntilthechildisabletoclimbinandoutoftheproductunassisted.
• Thisproductisnotintendedtoreplaceacriborbassinetforprolongedperiodsofsleep.
• Neverleavechildunattended.• Usetheuprightposition(toddlermode)onlywhenchildhasdevelopedenoughupperbodycontroltositwithoutleaningforward.
• Neveruseasacarrierorliftwhilechildisseated.Neverusethetoybarasahandle.
ADVERTENCIA
Consumer InformationInformación al consumidor
Para evitar lesiones graves o la muerte:•Peligro de caídas–Nousarsobresuperficieselevadas,yaqueelmovimientodelniñopuedehacerqueelproductosecaiga.Usarúnicamentesobreelpiso.
•Peligro de asfixia –Nousarsobresuperficiessuaves(cama,sofá,cojín)yaqueelproductopodríavoltearseycausarasfixia.
• Siempreusarelsistemadesujeciónhastaqueelbebépuedasentarseysalirseporsísolo.
• Esteproductonoestádiseñadoparareemplazarunacunaomoisésporperiodosprolongadosdesueño.
• Nodejaralniñofueradesualcance.• Únicamenteusarlaposiciónvertical(modalidaddeniñopequeño)cuandoelniñohayadesarrolladoelsuficientecontroldelapartedearribadelcuerpoparasentarsesinhacersehaciaadelante.
• Nousarcomocargadornilevantarlamientraselbebéestésentado.Nousarlabarradejuguetescomoasa.
IMPORTANT!Beforeassemblyandeachuse,inspectthisproductfordamagedhardware,loosejoints,missingpartsorsharpedges.DONOTuseifanypartsaremissingorbroken.ContactFisher-Price®forreplacementpartsandinstructionsifneeded.Neversubstituteparts.
¡IMPORTANTE!Previoalmontajeydecadauso,revisarqueesteproductonotengapiezasdañadas,conexionessueltas,piezasfaltantesobordesfilosos.NOusarelproductosifaltaoestárotaalgunapieza.PóngaseencontactoconlaoficinaMattelmáspróximaasulocalidadparaobtenerpiezasderepuestoeinstrucciones,encasodesernecesarias.Nousarpiezasdeterceros.
WARNING

4
• Usethereclineposition(infantmode)untilchildisabletositupunassisted(approximately20lbs/9kg).
• Usetheuprightposition(toddlermode)onlywhenchildhasdevelopedenoughupperbodycontroltositwithoutleaningforward(maximum40lbs/18kg).
• Thepadismachinewashable.Washthepadseparatelyincoldwateronthegentlecycle.Donotusebleach.Tumbledryseparatelyonlowheatandremovepromptly.
• Theframe,toybarandtoysmaybewipedcleanusingamildcleaningsolutionandadampcloth.Donotusebleach.Donotuseharshorabrasivecleaners.Rinsecleanwithwatertoremoveresidue.Donotimmersetheframe,toybarandtoys.
To remove the pad:• Unfastenthebucklesaroundeachsiderail.Turntheseatfacedownonaflatsurface.Unfastentherearstrapbuckleonthepad.
• Turntheseatupright.Removethelowerpocketonthepadfromthevibrationsunit.
• Pullthefrontandbackoftheseatbackareaofthepadapart.Liftthepadofftheseat.
To replace the pad,refertoAssemblysteps9-12.• Productfeaturesanddecorationsmayvaryfromphotographs.
• Usarlaposiciónreclinada(modalidaddebebé)hastaqueelbebépuedaincorporarseporsísolo(pesoaproximado9kg).
• Únicamenteusarlaposiciónvertical(modalidaddeniñopequeño)cuandoelniñohayadesarrolladoelsuficientecontroldelapartedearribadelcuerpoparasentarsesinhacersehaciaadelante(pesomáximo18kg).
• Laalmohadillasepuedelavaramáquina.Lavarlaalmohadillaporseparadoenaguafríayciclopararopadelicada.Nousarblanqueador.Secarporseparadoatemperaturabajaysacarinmediatamentedespuésdeacabarelciclodesecado.
• Usarunpañohumedecidoenunasoluciónlimpiadoraneutraparalimpiarelarmazón,barradejuguetesyjuguetes.Nousarblanqueador.Nousarlimpiadoresfuertesoabrasivos.Enjuagarconaguaparaeliminarcualquierresiduo.Nosumergirelarmazón,barradejuguetesnilosjuguetes.
Para quitar la almohadilla:• Desajustarlashebillasalrededordecadariellateral.
• Colocarelasientocaraabajosobreunasuperficieplana.Desajustarlashebillasenlaalmohadilla.
• Colocarelasientoenposiciónvertical.Quitarlatabladelaranuraenelbordefrontaldelaalmohadilla.
• Separarlapartedelanteraytraseradeláreadelrespaldodelaalmohadilla.Levantarlaalmohadilladelasiento.
Para poner la almohadilla en su lugar, consultarlospasosdeensamblaje9-12.• Lascaracterísticasydecoracióndelproductopuedenvariardelasmostradas.
Consumer InformationInformación al consumidor
5
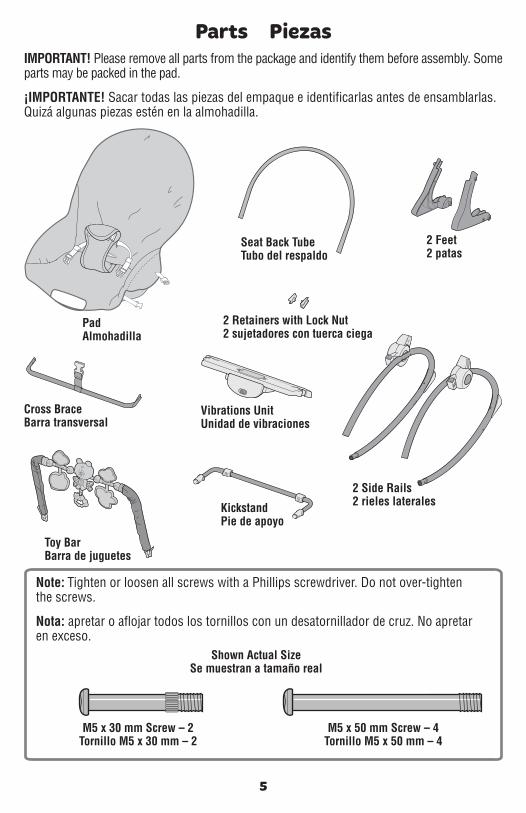
KickstandPie de apoyo
2 Side Rails2 rieles laterales
Toy BarBarra de juguetes
Vibrations UnitUnidad de vibraciones
IMPORTANT!Pleaseremoveallpartsfromthepackageandidentifythembeforeassembly.Somepartsmaybepackedinthepad.
¡IMPORTANTE!Sacartodaslaspiezasdelempaqueeidentificarlasantesdeensamblarlas.Quizáalgunaspiezasesténenlaalmohadilla.
Parts Piezas
2 Retainers with Lock Nut2 sujetadores con tuerca ciega
Seat Back TubeTubo del respaldo
PadAlmohadilla
Cross BraceBarra transversal
2 Feet2 patas
Note:TightenorloosenallscrewswithaPhillipsscrewdriver.Donotover-tightenthescrews.
Nota:apretaroaflojartodoslostornillosconundesatornilladordecruz.Noapretarenexceso.
Shown Actual SizeSe muestran a tamaño real
M5 x 30 mm Screw – 2Tornillo M5 x 30 mm – 2
M5 x 50 mm Screw – 4Tornillo M5 x 50 mm – 4
6
Assembly Montaje
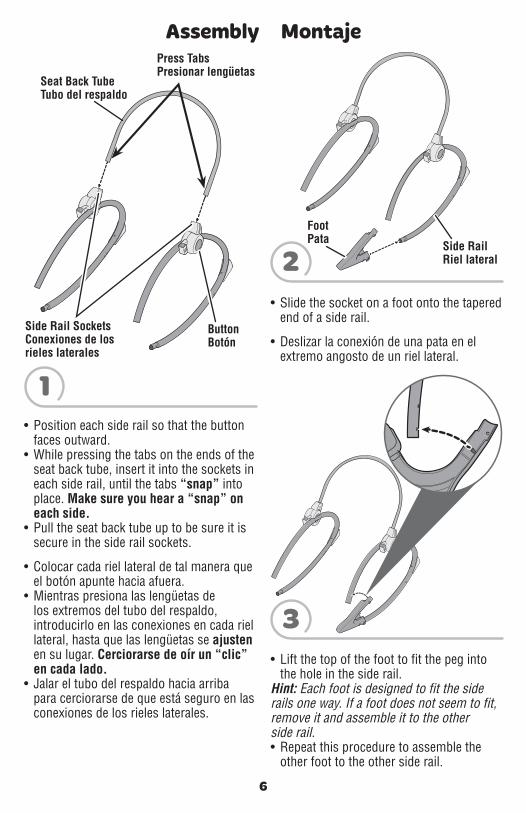
• Positioneachsiderailsothatthebuttonfacesoutward.
•Whilepressingthetabsontheendsoftheseatbacktube,insertitintothesocketsineachsiderail,untilthetabs“snap”intoplace.Make sure you hear a “snap” on each side.
• Pulltheseatbacktubeuptobesureitissecureinthesiderailsockets.
• Colocarcadariellateraldetalmaneraqueelbotónapuntehaciaafuera.
•Mientraspresionalaslengüetasdelosextremosdeltubodelrespaldo,introducirloenlasconexionesencadariellateral,hastaquelaslengüetasseajustenensulugar.Cerciorarse de oír un “clic” en cada lado.
• Jalareltubodelrespaldohaciaarribaparacerciorarsedequeestáseguroenlasconexionesdelosrieleslaterales.
Press TabsPresionar lengüetas
ButtonBotón
Seat Back TubeTubo del respaldo
Side Rail SocketsConexiones de los rieles laterales
1
2
3
• Slidethesocketonafootontothetaperedendofasiderail.
• Deslizarlaconexióndeunapataenelextremoangostodeunriellateral.
Side RailRiel lateral
FootPata
• Liftthetopofthefoottofitthepegintotheholeinthesiderail.
Hint: Eachfootisdesignedtofitthesiderailsoneway.Ifafootdoesnotseemtofit,removeitandassembleittotheothersiderail.• Repeatthisproceduretoassembletheotherfoottotheothersiderail.

7
• Levantarlapartedearribadelapataparaajustarlaclavijaenelorificiodelriellateral.
Atención: Cadapataestádiseñadaparaajustarseenlosrieleslateralesdeunamanera.Siunapatanoseajustacorrectamente,quitarlaymontarlaenelotroriellateral.• Repetiresteprocedimientoparaensamblarlaotrapataenelotroriellateral.
Assembly Montaje
45
•Withthevibrationsunitfacingforward,fitthenotchesontheunitontothesiderails,asshown.
• InsertaM5x50mmscrewthroughtheoutsideofeachsiderailandintotheendsofthevibrationsunit.
Vibrations UnitUnidad de vibraciones
M5 x 50 mm ScrewsTornillos M5 x 50 mm
• Conlaunidaddevibracionesapuntandohaciaadelante,ajustarlasmuescasdelaunidadenlosrieleslaterales,talcomosemuestra.
• IntroduciruntornilloM5x50mmenlaparteexteriordecadariellateralyenlosextremosdelaunidaddevibraciones.
• Inserttheendsofthekickstandintothesocketineachfoot.
• InsertaM5x50mmscrewintotheholeineachsiderailandtighten.
• Introducirlosextremosdelpiedeapoyoenlaconexióndecadapata.
• IntroduciruntornilloM5x50mmenelorificioencadariellateralyapretarlos.
M5 x 50 mm ScrewsTornillos M5 x 50 mm
KickstandPie de apoyo

8
8
7
6• Fitthecrossbracebetweenthesiderails,asshown.
Hint: Thecrossbraceisdesignedtofitoneway.Ifitdoesnotseemtofit,turnitaroundandtryagain.
• Ajustarlabarratransversalentrelosrieleslaterales,talcomosemuestra.
Atención: labarratransversalestádseñadaparaajustarsedeunamanera.Sinoseajusta,voltearlaeintentardenuevo.
Cross BraceBarra transversal
Assembly Montaje
• InsertanM5x30mmscrewthroughtheoutsideofeachsiderailandintotheendsofthecrossbrace.
IMPORTANT!Pleasefollowthenextassembly(step8)carefullytocompletelysecurethecrossbracetothesiderails.
M5 x 30 mm ScrewsTornillos M5 x 30 mm
• IntroduciruntornilloM5x30mmenlaparteexteriordecadariellateralyenlosextremosdelabarratransversal.
¡IMPORTANTE!Seguircuidadosamenteelsiguientepasodemontaje(paso8)paraasegurarporcompletolabarratransversalenlosrieleslaterales.
• Fitaretainerwithlocknutontotheendofthescrewandtotheinsideofasiderail.Tightenthescrew.
•Repeatthisproceduretofastenthescrewintheotherendofthecrossbraceandsiderail,usingtheremainingretainerwithlocknut.
• Ajustarunretenedorcontuercaciegaenelextremodeuntornilloyenelinteriordeunriellateral.Apretareltornillo.
• Repetiresteprocedimientoparaapretareltornilloenelotroextremodelabarratransversalyriellateral,usandoelretenedorrestantecontuercaciega.
Retainers with Lock NutSujetadores con tuerca ciega

9
11
10
9• Fittheupperpocketonthepadontotheseatbacktube.
• Ajustarlafundasuperiordelaalmohadillaeneltubodelrespaldo.
• Fastenthebuckleonthebackofthepadtothebuckleonthecrossbrace.Make sure you hear a "snap".
• Abrocharelcinturóndeldorsodelaalmohadillaalcinturóndelabarratransversal.Asegurarse de oír un clic.
Seat Back TubeTubo del respaldo
BucklesHebillas
Assembly Montaje
• Fitthelowerpocketonthepadontothevibrationsunit.
• Fitthefrontedgesofthevibrationsunitthroughthelargeopeninginthefrontofthepad.
• Ajustarlafundainferiordelaalmohadillaenlaunidaddevibraciones.
• Ajustarlosbordesdelanterosdelaunidaddevibracionesenelorificiograndedelfrentedelaalmohadilla.
Vibrations UnitUnidad de vibraciones
Pad Lower PocketFunda inferior de la almohadilla
OpeningOrificio
• Fastenthebucklesoneachsideofthepadaroundeachsiderail.Make sure you hear a "snap".
• Abrocharloscinturonesencadaladodelaalmohadillaalrededordecadariellateral.Asegurarse de oír un clic.
Pad BucklesHebillas de la almohadilla12
PadAlmohadilla
10
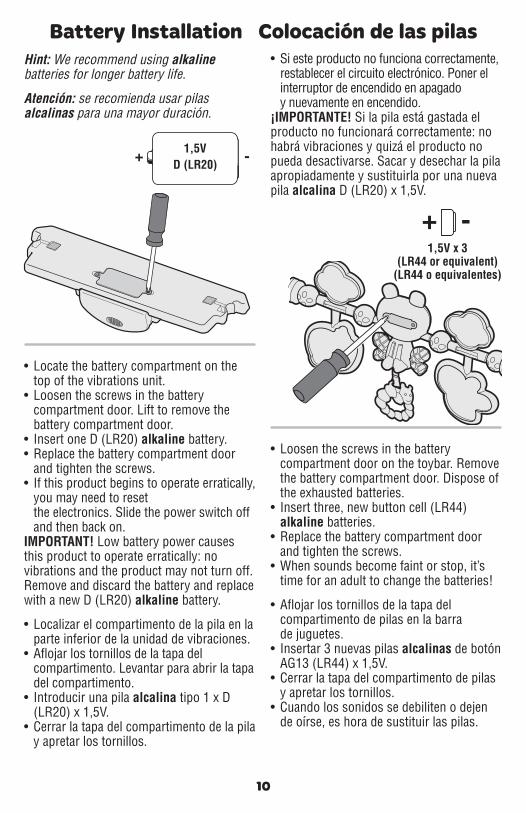
Battery Installation Colocación de las pilasHint:Werecommendusingalkalinebatteriesforlongerbatterylife.
Atención:serecomiendausarpilasalcalinasparaunamayorduración.
+ -1,5V D (LR20)
-+1,5V x 3
(LR44 or equivalent)(LR44 o equivalentes)
• Locatethebatterycompartmentonthetopofthevibrationsunit.
• Loosenthescrewsinthebatterycompartmentdoor.Lifttoremovethebatterycompartmentdoor.
• InsertoneD(LR20)alkalinebattery.• Replacethebatterycompartmentdoorandtightenthescrews.
• Ifthisproductbeginstooperateerratically,youmayneedtoresettheelectronics.Slidethepowerswitchoffandthenbackon.
IMPORTANT! Lowbatterypowercausesthisproducttooperateerratically:novibrationsandtheproductmaynotturnoff.RemoveanddiscardthebatteryandreplacewithanewD(LR20)alkalinebattery.
• Localizarelcompartimentodelapilaenlaparteinferiordelaunidaddevibraciones.
• Aflojarlostornillosdelatapadelcompartimento.Levantarparaabrirlatapadelcompartimento.
• Introducirunapilaalcalinatipo1xD(LR20)x1,5V.
• Cerrarlatapadelcompartimentodelapilayapretarlostornillos.
• Siesteproductonofuncionacorrectamente,restablecerelcircuitoelectrónico.Ponerelinterruptordeencendidoenapagadoynuevamenteenencendido.
¡IMPORTANTE!Silapilaestágastadaelproductonofuncionarácorrectamente:nohabrávibracionesyquizáelproductonopuedadesactivarse.SacarydesecharlapilaapropiadamenteysustituirlaporunanuevapilaalcalinaD(LR20)x1,5V.
• Loosenthescrewsinthebatterycompartmentdooronthetoybar.Removethebatterycompartmentdoor.Disposeoftheexhaustedbatteries.
• Insertthree,newbuttoncell(LR44)alkalinebatteries.
• Replacethebatterycompartmentdoorandtightenthescrews.
•Whensoundsbecomefaintorstop,it’stimeforanadulttochangethebatteries!
• Aflojarlostornillosdelatapadelcompartimentodepilasenlabarradejuguetes.
• Insertar3nuevaspilasalcalinasdebotónAG13(LR44)x1,5V.
• Cerrarlatapadelcompartimentodepilasyapretarlostornillos.
• Cuandolossonidossedebilitenodejendeoírse,eshoradesustituirlaspilas.

11
•Protecttheenvironmentbynotdisposingofthisproductwithhouseholdwaste(2002/96/EC).Checkyourlocalauthorityforrecyclingadviceandfacilities.
•Protegerelmedioambientenodesechandoesteproductoenlabasuradelhogar(2002/96/EC).Consultarconlaagencialocalpertinenteencuantoainformaciónycentrosdereciclaje.
Battery Installation Colocación de las pilasBattery Safety InformationInexceptionalcircumstances,batteriesmayleakfluidsthatcancauseachemicalburninjuryorruinyourproduct.Toavoidbatteryleakage:• Donotmixoldandnewbatteriesorbatteriesofdifferenttypes:alkaline,standard(carbon-zinc)orrechargeable(nickel-cadmium).
• Insertbatteriesasindicatedinsidethebatterycompartment.
• Removebatteriesduringlongperiodsofnon-use.Alwaysremoveexhaustedbatteriesfromtheproduct.Disposeofbatteriessafely.Donotdisposeofthisproductinafire.Thebatteriesinsidemayexplodeorleak.
• Nevershort-circuitthebatteryterminals.• Useonlybatteriesofthesameorequivalenttypeasrecommended.
• Donotchargenon-rechargeablebatteries.• Removerechargeablebatteriesfromtheproductbeforecharging.
• Ifremovable,rechargeablebatteriesareused,theyareonlytobechargedunderadultsupervision.
Información de seguridad acerca de las pilasEncircunstanciasexcepcionales,laspilaspuedenderramarlíquidoquepuedecausarquemadurasodañarelproducto.Paraevitarderrames:• Nomezclarpilasnuevascongastadasnimezclarpilasalcalinas,estándar(carbono-cinc)orecargables(níquel-cadmio).
• Cerciorarsedequelapolaridaddelaspilassealacorrecta.
• Sacarlaspilasgastadasdelproductoydesecharlasapropiadamente.Sacarlaspilassielproductonovaaserusadoduranteunperiodoprolongado.Noquemarlaspilasyaquepodríanexplotaroderramarellíquidoincorporadoenellas.
• Noprovocaruncortocircuitoconlasterminales.
• Usarsóloeltipodepilasrecomendadas(osuequivalente).
• Nocargarpilasnorecargables.• Sacarlaspilasrecargablesantesdecargarlas.
• Lacargadelaspilasrecargablessólodeberealizarseconlasupervisióndeunadulto.

12
ADVERTENCIA
WARNING
Setup and Use Preparación y uso
To prevent serious injury or death:•Fall Hazard–Neveruseonanyelevatedsurface,sincechild’smovementmaycauseproducttoslideortipover.Useonlyonafloor.
•Suffocation Hazard–Neveruseonasoftsurface(bed,sofa,cushion)sinceproductcantipoverandcausesuffocationinsoftsurfaces.
• Alwaysuserestraintsystemuntilthechildisabletoclimbinandoutoftheproductunassisted.
• Thisproductisnotintendedtoreplaceacriborbassinetforprolongedperiodsofsleep.
• Neverleavechildunattended.• Usetheuprightposition(toddlermode)onlywhenchildhasdevelopedenoughupperbodycontroltositwithoutleaningforward.
• Neveruseasacarrierorliftwhilechildisseated.Neverusethetoybarasahandle.
Para evitar lesiones graves o la muerte:•Peligro de caídas–Nousarsobresuperficieselevadas,yaqueelmovimientodelniñopuedehacerqueelproductosecaiga.Usarúnicamentesobreelpiso.
•Peligro de asfixia –Nousarsobresuperficiessuaves(cama,sofá,cojín)yaqueelproductopodríavoltearseycausarasfixia.
• Siempreusarelsistemadesujeciónhastaqueelbebépuedasentarseysalirseporsísolo.
• Esteproductonoestádiseñadoparareemplazarunacunaomoisésporperiodosprolongadosdesueño.
• Nodejaralniñofueradesualcance.• Únicamenteusarlaposiciónvertical(modalidaddeniñopequeño)cuandoelniñohayadesarrolladoelsuficientecontroldelapartedearribadelcuerpoparasentarsesinhacersehaciaadelante.
• Nousarcomocargadornilevantarlamientraselbebéestésentado.Nousarlabarradejuguetescomoasa.

13
Restraint PadAlmohadilla de sujeción
Restraint BeltCinturón de sujeción
Restraint BeltCinturón de sujeción
3
1
KickstandPie de apoyo
• Rotatethekickstandout.• Pushdownontheseatbottomtobesurethekickstandisinposition.
• Girarelpiedeapoyohaciaafuera.• Empujarelasientohaciaabajoparacerciorarsedequeelpiedeapoyoestáensulugar.
Seat PositionUpright:Whilepressingthebuttononeachsiderail,lifttheseatback.Recline:Whilepressingthebuttononeachsiderail,lowertheseatback.
Posición de asientoVertical:Mientraspresionaelbotónencadariellateral,levanteelrespaldo.Reclinada:Mientraspresionaelbotónencadariellateral,bajeelrespaldo.
PRESS ButtonPRESIONAR botón
PRESS ButtonPRESIONAR botón
LowerBajar
RECLINERECLINADA
UPRIGHTVERTICAL
LiftSubir
2
Securing Your Child• Placeyourchildintheseat.Positiontherestraintpadbetweenyourchild’slegs.
• Fastentherestraintbeltstoeachsideoftherestraintpad.Make sure you hear a “click” on both sides.
• Checktobesuretherestraintsystemissecurelyattachedbypullingitawayfromyourchild.Therestraintsystemshouldremainattached.
Sistema de sujeción• Sentaralniñoenelasiento.Colocarlaalmohadilladesujeciónentrelaspiernasdelniño.
• Ajustarloscinturonesdesujeciónencadaladodelaalmohadilladesujeción.Cerciórese de oír un “clic” en ambos lados.
• Verificarqueelsistemadesujeciónestábienajustado,tirandodelmismoendirecciónopuestaalniño.Elsistemadesujecióndebepermanecerajustado.
Setup and Use Preparación y uso

14
B
A
A
B
4
5Restraint SystemSistema de sujeción
• Tighteneachwaistbeltsothattherestraintsystemissnugagainstyourchild.Pleaserefertothenextsectionforinstructionstotightenthewaistbelts.
• Apretarcadacinturóndelacinturademodoqueelsistemadesujeciónquedebienajustadoalniño/a.Consultarlasiguientesecciónparamayoresdetallessobrecómoapretarelcinturón.
Setup and Use Preparación y uso
Free EndExtremo libre
Free EndExtremo libre
Anchored EndExtremo fijo
Anchored EndExtremo fijo
LOOSENAFLOJAR
TIGHTENAPRETAR
To tighten the belts:• FeedtheanchoredendoftherestraintbeltupthroughthebuckletoformaloopA .PullthefreeendoftherestraintbeltB .
To loosen the belts:• FeedthefreeendoftherestraintbeltupthroughthebuckletoformaloopA .Enlargetheloopbypullingontheendofthelooptowardthebuckle.PulltheanchoredendoftherestraintbelttoshortenthefreeendoftherestraintbeltB .
Para apretar los cinturones:• IntroducirelextremofijodelcinturóndesujeciónenlahebillaparaformarunespacioA .JalarelextremolibredelcinturóndesujeciónB .
Para aflojar los cinturones:• IntroducirelextremolibredelcinturóndesujeciónenlahebillaparaformarunespacioA .Agrandarelespaciojalandoelextremolibredelcinturónhacialahebilla.JalarelextremofijodelcinturóndesujeciónparaacortarelextremolibredelcinturónB .

15
• Fittheplugsoneachendofthetoybarintothesocketsineachsiderail.
Hint: Thetoybarisremovable.Presstheendsofthelatchesandliftthetoybar.•Makesureyourchildisproperlysecuredintheseat.
• Slidethepowerswitchtothe onpositionforcalmingvibrations.Slidethepowerswitchtothe offpositiontoturnvibrationsoff.
• Pulltheringforashorttune!
• Ajustarlosenchufesdecadaextremodelabarradejuguetesenlasconexionesencadariellateral.
Atención: Labarradejuguetessepuedequitar.Presionarlosextremosdelossegurosylevantarlabarradejuguetes.• Cerciorarsedequeelniñoestébienaseguradoenelasiento.Colocarelinterruptordeencendidoenlaposición paravibracionesrelajantes.
• Colocarelinterruptordeencendidoenlaposición paradesactivarlasvibraciones.
• ¡Jalaelaroparaunabrevemelodía!
PULLJALAR
6Power SwitchInterruptor de
encendido
Setup and UsePreparación y uso
Toddler modeModalidad de niño
pequeño
1• Inserttherestraintbeltsbackthroughthesmallslotsinthepad.
• Inserttherestraintpaddownthroughthelargeslotinthepad.
• Introducirloscinturonesdesujeciónderegresoporlaspequeñasranurasenlaalmohadilla.
• Introducirlaalmohadilladesujeciónporlaranuragrandeenlaalmohadilla.
Large SlotRanura grande
Small SlotRanura pequeña
Pad StrapCinturón de la almohadilla
2• Turntherockerfacedown.• Tucktheendsoftherestraintpadunderneaththepadstrap,asshown.
• Ponerlasillaalrevés.•Meterlosextremosdelaalmohadilladesujeciónabajodelcinturóndelaalmohadilla,talcomosemuestra.

16
Consumer InformationInformación al consumidor
FCC Statement (United States Only)ThisequipmenthasbeentestedandfoundtocomplywiththelimitsforaClassBdigitaldevice,pursuanttoPart15oftheFCCRules.Theselimitsaredesignedtoprovidereasonableprotectionagainstharmfulinterferenceinaresidentialinstallation.Thisequipmentgenerates,usesandcanradiateradiofrequencyenergyand,ifnotinstalledandusedinaccordancewiththeinstructions,maycauseharmfulinterferencetoradiocommunications.However,thereisnoguaranteethatinterferencewillnotoccurinaparticularinstallation.Ifthisequipmentdoescauseharmfulinterferencetoradioortelevisionreception,whichcanbedeterminedbyturningtheequipmentoffandon,theuserisencouragedtotrytocorrecttheinterferencebyoneormoreofthefollowingmeasures:• Reorientorrelocatethereceivingantenna.• Increasetheseparationbetweentheequipmentandreceiver.
• Consultthedealeroranexperiencedradio/TVtechnicianforhelp.
Note:Changesormodificationsnotexpresslyapprovedbythemanufacturerresponsibleforcompliancecouldvoidtheuser’sauthoritytooperatetheequipment.ThisdevicecomplieswithPart15oftheFCCRules.Operationissubjecttothefollowingtwoconditions:(1)thisdevicemaynotcauseharmfulinterferenceand(2)thisdevicemustacceptanyinterferencereceived,includinginterferencethatmaycauseundesiredoperation.
Nota FCC (Válido sólo en los Estados Unidos)EsteequipofueprobadoycumpleconloslímitesdeundispositivodigitaldeClaseB,segúnestáestablecidoenlaParte15delreglamentoFCC.Estoslímitesestándiseñadosparaproporcionarunaprotecciónrazonablecontrainterferenciadañinaenunainstalaciónresidencial.Esteequipogenera,utilizaypuederadiarenergíaderadiofrecuenciay,sinoseinstalayutilizasegúnloestipuladoenlasinstrucciones,puedecausarinterferenciadañinaaradiocomunicaciones.
Sinembargo,nohayningunagarantíadequenohayainterferenciaenunainstalaciónparticular.Siesteequipollegaacausarinterferenciadañinaalarecepciónderadiootelevisión,locualpuedeserverificadoencendiendoyapagandoelequipo,serecomiendatomarunadelassiguientesmedidasparacorregirelproblema:• Cambiarlaorientaciónolocalizacióndelaantenareceptora.
• Aumentarladistanciaentreelequipoyelreceptor.
• Ponerseencontactoconeldistribuidoroconuntécnicoderadio/TV.
Nota:loscambiosomodificacionesnoexpresamenteautorizadosporelfabricanteresponsabledelcumplimientodelasnormaspuedecancelarlaautoridaddelusuariodeusarelequipo.EstedispositivocumpleconlaParte15delreglamentoFCC.Elusoestásujetoalasdoscondicionessiguientes:(1)Estedispositivonodebecausarinterferenciadañinay(2)estedispositivodebeaceptarcualquierinterferenciarecibida,incluyendointerferenciaquepuedacausarqueeldispositivonofuncionecorrectamente.
ICES-003• ThisClassBdigitalapparatuscomplieswithCanadianICES-003.Operationissubjecttothefollowingtwoconditions:(1)thisdevicemaynotcauseharmfulinterferenceand(2)thisdevicemustacceptanyinterferencereceived,includinginterferencethatmaycauseundesiredoperation.
NMB-003• CetappareilnumériquedelaclasseBestconformeàlanormeNMB-003duCanada.L’utilisationdecedispositifestautoriséeseulementauxconditionssuivantes:(1)ilnedoitpasproduiredebrouillageet(2)l’utilisateurdudispositifdoitêtreprêtàacceptertoutbrouillageradioélectriquereçu,mêmesicebrouillageestsusceptibledecompromettrelefonctionnementdudispositif.