V0X814ST PIAGGIO X-8 movil ST - Shad · REF. 500479 Edición 5ª PIAGGIO X-8 125/200 ‘04 -...
2
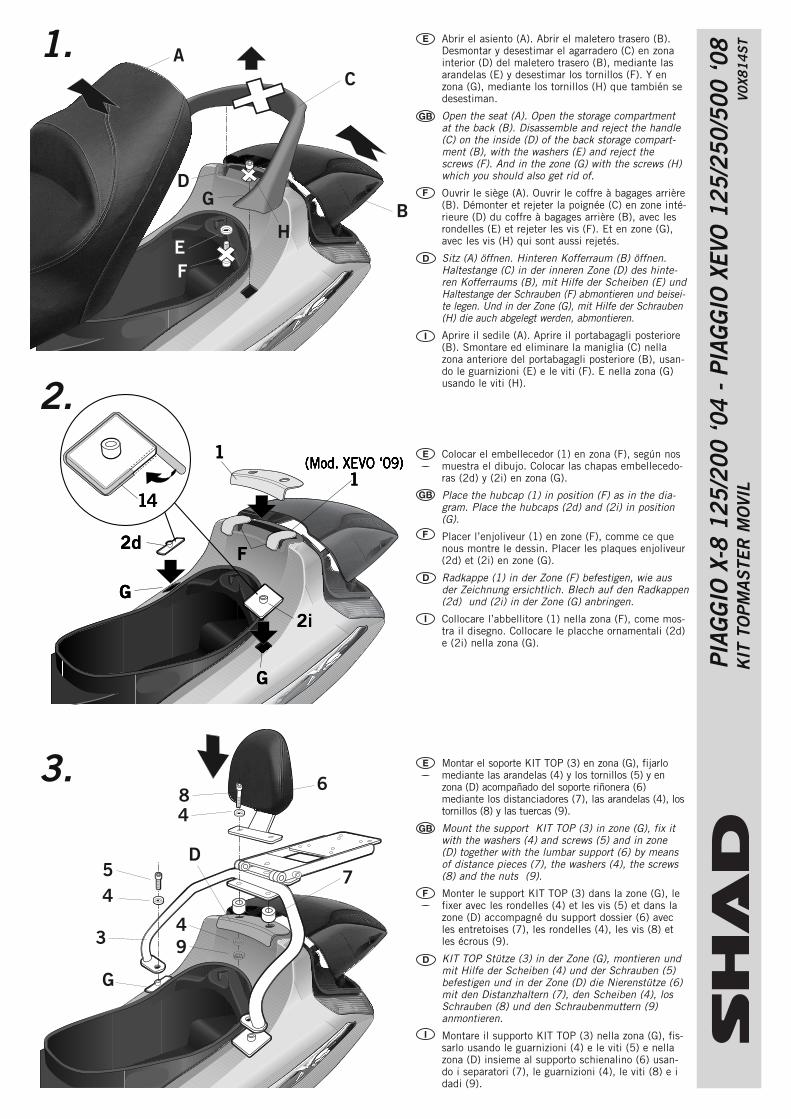
D 3 G 4 5 9 7 6 4 4 8 H A B C G E D F (Mod. XEVO ‘09) 1 F G G 2d 2i 1 14 1 (Mod. XEVO ‘09) (Mod. XEVO ‘09) (Mod. XEVO ‘09) 14 (Mod. XEVO ‘09) 1 (Mod. XEVO ‘09) (Mod. XEVO ‘09) G 2d 2d F F F F F F F F F F F F F F F F F F F F G 2 2 2 2i G G G G G G G G G G G G G G G G G G G G G G G G G G G G Abrir el asiento (A). Abrir el maletero trasero (B). Desmontar y desestimar el agarradero (C) en zona interior (D) del maletero trasero (B), mediante las arandelas (E) y desestimar los tornillos (F). Y en zona (G), mediante los tornillos (H) que también se desestiman. Open the seat (A). Open the storage compartment at the back (B). Disassemble and reject the handle (C) on the inside (D) of the back storage compart- ment (B), with the washers (E) and reject the screws (F). And in the zone (G) with the screws (H) which you should also get rid of. Ouvrir le siège (A). Ouvrir le coffre à bagages arrière (B). Démonter et rejeter la poignée (C) en zone inté- rieure (D) du coffre à bagages arrière (B), avec les rondelles (E) et rejeter les vis (F). Et en zone (G), avec les vis (H) qui sont aussi rejetés. Sitz (A) öffnen. Hinteren Kofferraum (B) öffnen. Haltestange (C) in der inneren Zone (D) des hinte- ren Kofferraums (B), mit Hilfe der Scheiben (E) und Haltestange der Schrauben (F) abmontieren und beisei- te legen. Und in der Zone (G), mit Hilfe der Schrauben (H) die auch abgelegt werden, abmontieren. Aprire il sedile (A). Aprire il portabagagli posteriore (B). Smontare ed eliminare la maniglia (C) nella zona anteriore del portabagagli posteriore (B), usan- do le guarnizioni (E) e le viti (F). E nella zona (G) usando le viti (H). PIAGGIO X-8 125/200 ‘04 - PIAGGIO XEVO 125/250/500 ‘08 KIT TOPMASTER MOVIL V0X814ST 1. 2. 3. Montar el soporte KIT TOP (3) en zona (G), fijarlo mediante las arandelas (4) y los tornillos (5) y en zona (D) acompañado del soporte riñonera (6) mediante los distanciadores (7), las arandelas (4), los tornillos (8) y las tuercas (9). Mount the support KIT TOP (3) in zone (G), fix it with the washers (4) and screws (5) and in zone (D) together with the lumbar support (6) by means of distance pieces (7), the washers (4), the screws (8) and the nuts (9). Monter le support KIT TOP (3) dans la zone (G), le fixer avec les rondelles (4) et les vis (5) et dans la zone (D) accompagné du support dossier (6) avec les entretoises (7), les rondelles (4), les vis (8) et les écrous (9). KIT TOP Stütze (3) in der Zone (G), montieren und mit Hilfe der Scheiben (4) und der Schrauben (5) befestigen und in der Zone (D) die Nierenstütze (6) mit den Distanzhaltern (7), den Scheiben (4), los Schrauben (8) und den Schraubenmuttern (9) anmontieren. Montare il supporto KIT TOP (3) nella zona (G), fis- sarlo usando le guarnizioni (4) e le viti (5) e nella zona (D) insieme al supporto schienalino (6) usan- do i separatori (7), le guarnizioni (4), le viti (8) e i dadi (9). Colocar el embellecedor (1) en zona (F), según nos muestra el dibujo. Colocar las chapas embellecedo- ras (2d) y (2i) en zona (G). Place the hubcap (1) in position (F) as in the dia- gram. Place the hubcaps (2d) and (2i) in position (G). Placer l’enjoliveur (1) en zone (F), comme ce que nous montre le dessin. Placer les plaques enjoliveur (2d) et (2i) en zone (G). Radkappe (1) in der Zone (F) befestigen, wie aus der Zeichnung ersichtlich. Blech auf den Radkappen (2d) und (2i) in der Zone (G) anbringen. Collocare l’abbellitore (1) nella zona (F), come mos- tra il disegno. Collocare le placche ornamentali (2d) e (2i) nella zona (G).
Transcript of V0X814ST PIAGGIO X-8 movil ST - Shad · REF. 500479 Edición 5ª PIAGGIO X-8 125/200 ‘04 -...
D
3
G
45
9
7
6
4
48
H
A
B
C
G
E
D
F
(Mod. XEVO ‘09)1
F
G
G
2d
2i
1
14
1(Mod. XEVO ‘09)(Mod. XEVO ‘09)(Mod. XEVO ‘09)
14
(Mod. XEVO ‘09)1
(Mod. XEVO ‘09)(Mod. XEVO ‘09)
G
2d2dFFFFFFFFFFFFFFFFFFFF
G
2222i
GGGGGGGGGGGGGGGGGGGGGGGGGGGG
Abrir el asiento (A). Abrir el maletero trasero (B).Desmontar y desestimar el agarradero (C) en zonainterior (D) del maletero trasero (B), mediante lasarandelas (E) y desestimar los tornillos (F). Y enzona (G), mediante los tornillos (H) que también sedesestiman.
Open the seat (A). Open the storage compartmentat the back (B). Disassemble and reject the handle(C) on the inside (D) of the back storage compart-ment (B), with the washers (E) and reject thescrews (F). And in the zone (G) with the screws (H)which you should also get rid of.
Ouvrir le siège (A). Ouvrir le coffre à bagages arrière(B). Démonter et rejeter la poignée (C) en zone inté-rieure (D) du coffre à bagages arrière (B), avec lesrondelles (E) et rejeter les vis (F). Et en zone (G),avec les vis (H) qui sont aussi rejetés.
Sitz (A) öffnen. Hinteren Kofferraum (B) öffnen.Haltestange (C) in der inneren Zone (D) des hinte-ren Kofferraums (B), mit Hilfe der Scheiben (E) undHaltestange der Schrauben (F) abmontieren und beisei-te legen. Und in der Zone (G), mit Hilfe der Schrauben(H) die auch abgelegt werden, abmontieren.
Aprire il sedile (A). Aprire il portabagagli posteriore(B). Smontare ed eliminare la maniglia (C) nellazona anteriore del portabagagli posteriore (B), usan-do le guarnizioni (E) e le viti (F). E nella zona (G)usando le viti (H).
PIAG
GIO
X-8
125
/200
‘04
- PI
AGG
IO X
EVO
125
/250
/500
‘08
KIT
TO
PMAS
TER
MO
VIL
V0X8
14ST1.
2.
3. Montar el soporte KIT TOP (3) en zona (G), fijarlomediante las arandelas (4) y los tornillos (5) y enzona (D) acompañado del soporte riñonera (6)mediante los distanciadores (7), las arandelas (4), lostornillos (8) y las tuercas (9).
Mount the support KIT TOP (3) in zone (G), fix itwith the washers (4) and screws (5) and in zone(D) together with the lumbar support (6) by meansof distance pieces (7), the washers (4), the screws(8) and the nuts (9).
Monter le support KIT TOP (3) dans la zone (G), lefixer avec les rondelles (4) et les vis (5) et dans lazone (D) accompagné du support dossier (6) avecles entretoises (7), les rondelles (4), les vis (8) etles écrous (9).
KIT TOP Stütze (3) in der Zone (G), montieren undmit Hilfe der Scheiben (4) und der Schrauben (5)befestigen und in der Zone (D) die Nierenstütze (6)mit den Distanzhaltern (7), den Scheiben (4), losSchrauben (8) und den Schraubenmuttern (9)anmontieren.
Montare il supporto KIT TOP (3) nella zona (G), fis-sarlo usando le guarnizioni (4) e le viti (5) e nellazona (D) insieme al supporto schienalino (6) usan-do i separatori (7), le guarnizioni (4), le viti (8) e idadi (9).
Colocar el embellecedor (1) en zona (F), según nosmuestra el dibujo. Colocar las chapas embellecedo-ras (2d) y (2i) en zona (G).
Place the hubcap (1) in position (F) as in the dia-gram. Place the hubcaps (2d) and (2i) in position(G).
Placer l’enjoliveur (1) en zone (F), comme ce quenous montre le dessin. Placer les plaques enjoliveur(2d) et (2i) en zone (G).
Radkappe (1) in der Zone (F) befestigen, wie ausder Zeichnung ersichtlich. Blech auf den Radkappen(2d) und (2i) in der Zone (G) anbringen.
Collocare l’abbellitore (1) nella zona (F), come mos-tra il disegno. Collocare le placche ornamentali (2d)e (2i) nella zona (G).
REF. 500479Edición 5ª
PIAG
GIO
X-8
125
/200
‘04
- PI
AGG
IO X
EVO
125
/250
/500
‘08
KIT
TO
PMAS
TER
MO
VIL
V0X8
14ST
B
11I
1213H
B
1112
10
3
13A
4.
5.
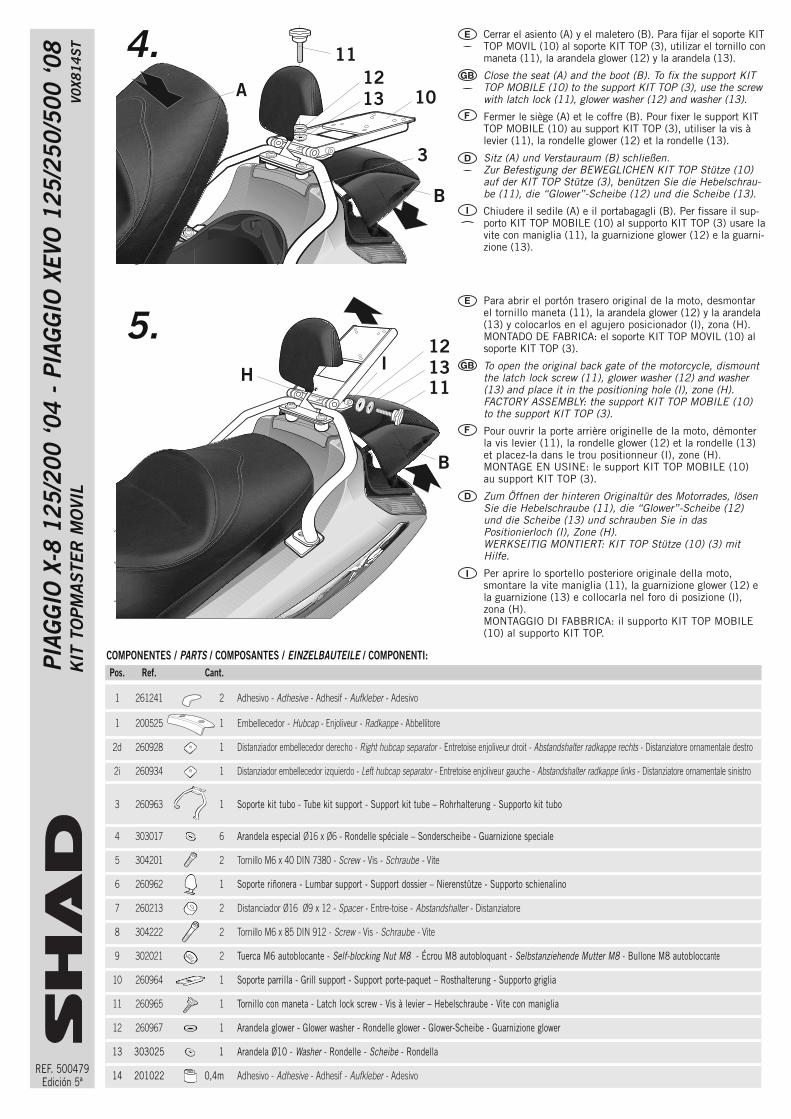
Cerrar el asiento (A) y el maletero (B). Para fijar el soporte KITTOP MOVIL (10) al soporte KIT TOP (3), utilizar el tornillo conmaneta (11), la arandela glower (12) y la arandela (13).
Close the seat (A) and the boot (B). To fix the support KITTOP MOBILE (10) to the support KIT TOP (3), use the screwwith latch lock (11), glower washer (12) and washer (13).
Fermer le siège (A) et le coffre (B). Pour fixer le support KITTOP MOBILE (10) au support KIT TOP (3), utiliser la vis àlevier (11), la rondelle glower (12) et la rondelle (13).
Sitz (A) und Verstauraum (B) schließen. Zur Befestigung der BEWEGLICHEN KIT TOP Stütze (10)auf der KIT TOP Stütze (3), benützen Sie die Hebelschrau-be (11), die “Glower”-Scheibe (12) und die Scheibe (13).
Chiudere il sedile (A) e il portabagagli (B). Per fissare il sup-porto KIT TOP MOBILE (10) al supporto KIT TOP (3) usare lavite con maniglia (11), la guarnizione glower (12) e la guarni-zione (13).
Para abrir el portón trasero original de la moto, desmontarel tornillo maneta (11), la arandela glower (12) y la arandela(13) y colocarlos en el agujero posicionador (I), zona (H). MONTADO DE FABRICA: el soporte KIT TOP MOVIL (10) alsoporte KIT TOP (3).
To open the original back gate of the motorcycle, dismountthe latch lock screw (11), glower washer (12) and washer(13) and place it in the positioning hole (I), zone (H). FACTORY ASSEMBLY: the support KIT TOP MOBILE (10)to the support KIT TOP (3).
Pour ouvrir la porte arrière originelle de la moto, démonterla vis levier (11), la rondelle glower (12) et la rondelle (13)et placez-la dans le trou positionneur (I), zone (H). MONTAGE EN USINE: le support KIT TOP MOBILE (10)au support KIT TOP (3).
Zum Öffnen der hinteren Originaltür des Motorrades, lösenSie die Hebelschraube (11), die “Glower”-Scheibe (12)und die Scheibe (13) und schrauben Sie in dasPositionierloch (I), Zone (H). WERKSEITIG MONTIERT: KIT TOP Stütze (10) (3) mitHilfe.
Per aprire lo sportello posteriore originale della moto,smontare la vite maniglia (11), la guarnizione glower (12) ela guarnizione (13) e collocarla nel foro di posizione (I),zona (H). MONTAGGIO DI FABBRICA: il supporto KIT TOP MOBILE(10) al supporto KIT TOP.
Pos. Ref. Cant.
1 261241 2 Adhesivo - Adhesive - Adhesif - Aufkleber - Adesivo
1 200525 1 Embellecedor - Hubcap - Enjoliveur - Radkappe - Abbellitore
2d 260928 1 Distanziador embellecedor derecho - Right hubcap separator - Entretoise enjoliveur droit - Abstandshalter radkappe rechts - Distanziatore ornamentale destro
2i 260934 1 Distanziador embellecedor izquierdo - Left hubcap separator - Entretoise enjoliveur gauche - Abstandshalter radkappe links - Distanziatore ornamentale sinistro
3 260963 1 Soporte kit tubo - Tube kit support - Support kit tube – Rohrhalterung - Supporto kit tubo
4 303017 6 Arandela especial Ø16 x Ø6 - Rondelle spéciale – Sonderscheibe - Guarnizione speciale
5 304201 2 Tornillo M6 x 40 DIN 7380 - Screw - Vis - Schraube - Vite
6 260962 1 Soporte riñonera - Lumbar support - Support dossier – Nierenstütze - Supporto schienalino
7 260213 2 Distanciador Ø16 Ø9 x 12 - Spacer - Entre-toise - Abstandshalter - Distanziatore
8 304222 2 Tornillo M6 x 85 DIN 912 - Screw - Vis - Schraube - Vite
9 302021 2 Tuerca M6 autoblocante - Self-blocking Nut M8 - Écrou M8 autobloquant - Selbstanziehende Mutter M8 - Bullone M8 autobloccante
10 260964 1 Soporte parrilla - Grill support - Support porte-paquet – Rosthalterung - Supporto griglia
11 260965 1 Tornillo con maneta - Latch lock screw - Vis à levier – Hebelschraube - Vite con maniglia
12 260967 1 Arandela glower - Glower washer - Rondelle glower - Glower-Scheibe - Guarnizione glower
13 303025 1 Arandela Ø10 - Washer - Rondelle - Scheibe - Rondella
14 201022 0,4m Adhesivo - Adhesive - Adhesif - Aufkleber - Adesivo
COMPONENTES / PARTS / COMPOSANTES / EINZELBAUTEILE / COMPONENTI: