Maestría en Redes de Computadoras - · PDF fileLa siguiente tabla muestra la ... Una...
20
Maestría en Redes de Computadoras Alumnos: Iván Moises Aranda Muñoz Emmanuel Castorena González Alejandra Montiel Fernández Materia: Redes LAN y WAN Maestra: M.C. Martha Delgado Pérez Reporte de Vlans con una interfaz Ethernet en servidor Pfsense Fecha de Entrega: 10 de Noviembre de 2012
Transcript of Maestría en Redes de Computadoras - · PDF fileLa siguiente tabla muestra la ... Una...
Maestría en Redes de Computadoras
Alumnos:
Iván Moises Aranda Muñoz
Emmanuel Castorena González
Alejandra Montiel Fernández
Materia: Redes LAN y WAN
Maestra: M.C. Martha Delgado Pérez
Reporte de Vlans con una interfaz
Ethernet en servidor Pfsense
Fecha de Entrega: 10 de Noviembre de 2012
2
Requerimientos de Hadware
SERVIDOR
Tarjeta Madre: WMT-LX Intel 850 ATX
Tarjeta de Red: 10/100 BaseT LAN adapter (Ethernet) integrated on motherboard.
Disco duro: 30 Gb
Memoria Ram: 256Mb.
Procesador: Intel Pentium (R) 4, 1.3 MHz Socket 4.23, 400MHz front Side bus
SWITCH
Cisco Catalyst 3560 serie PoE-24.
Requerimientos de Software
Servidor
Pfsense v2.0.1- REALSE (i386)
FreeBSD 8.1- REALSE-p6
Switch
HyperTerminal V 6.3
Cisco V12.2
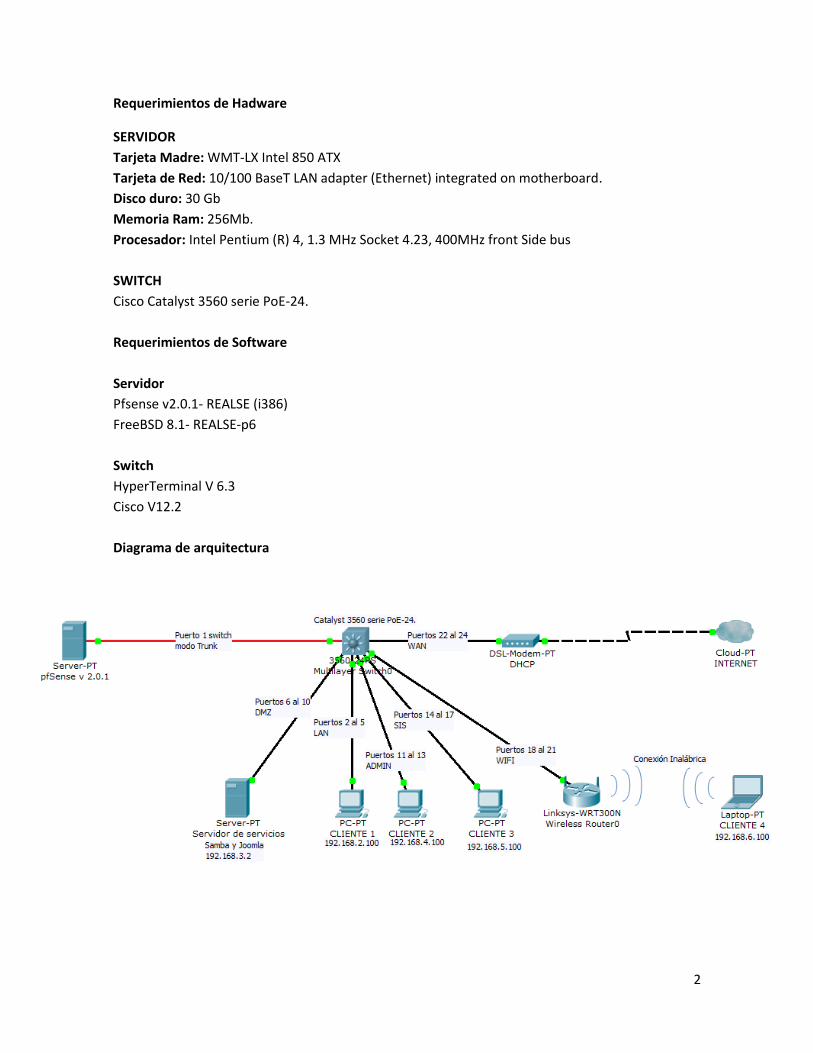
Diagrama de arquitectura
3
CONFIGURACIÓN DEL SWITCH
Se instala el pfsense en un servidor con una sola interfaz de red.
Interfaz Ethernet
Interfaz MAC Address
em0 08:00:27:13:66:b8
Tabla 1
La siguiente tabla muestra la relación de Vlans que se asignaran al switch.
VLAN Nombre Rango
em0_Vlan10 LAN 02 – 05
em0_Vlan20 DMZ 06 – 10
em0_Vlan30 ADMIN 11 – 13
em0_Vlan40 SIS 14 – 17
em0_Vlan50 WIFI 18 – 21
em0_Vlan60 WAN 22 – 24
Tabla 2
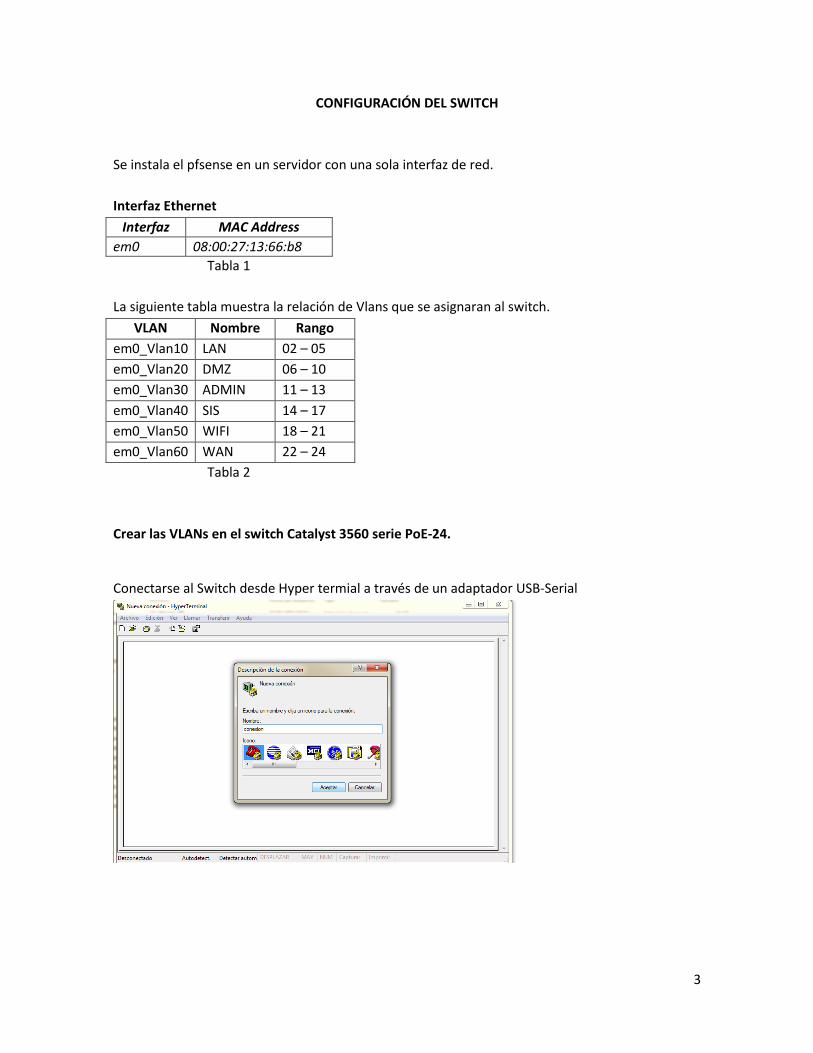
Crear las VLANs en el switch Catalyst 3560 serie PoE-24.
Conectarse al Switch desde Hyper termial a través de un adaptador USB-Serial

4
Utilizar el puerco COM con el que se tiene conexión al switch (para este caso es el COM3) y se le
da click en aceptar.
Se le da click en restaurar predeterminados y Aceptar
5
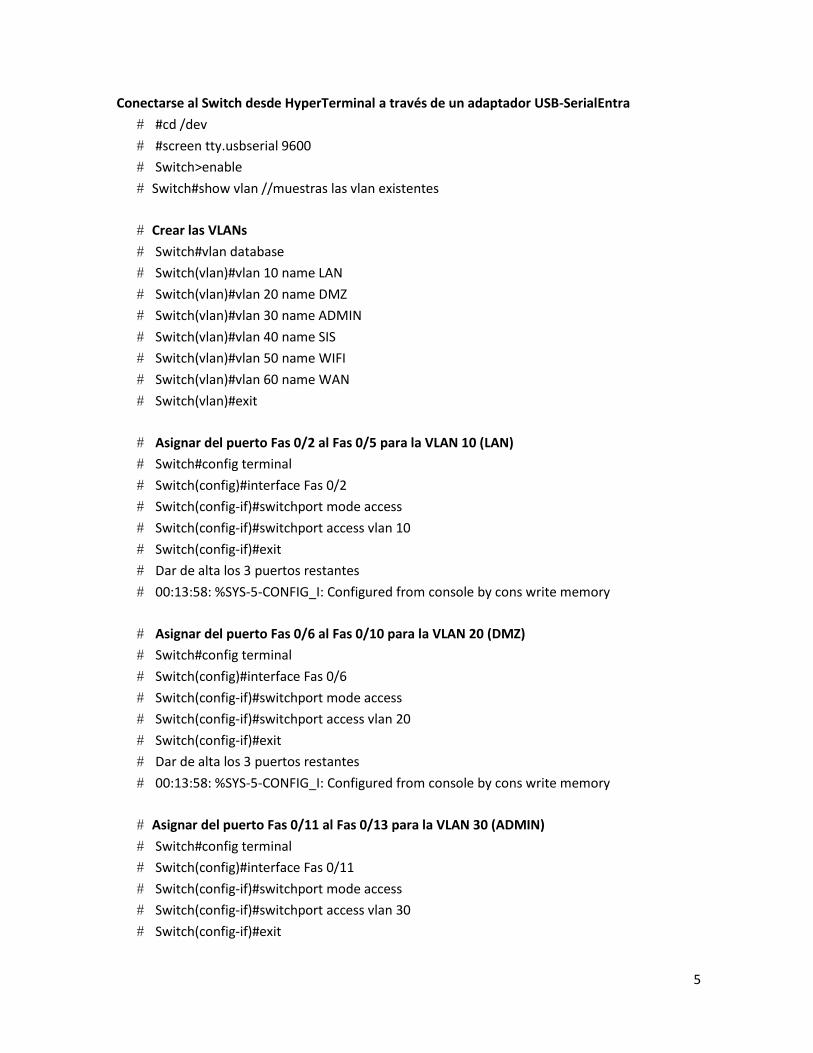
Conectarse al Switch desde HyperTerminal a través de un adaptador USB-SerialEntra
#cd /dev
#screen tty.usbserial 9600
Switch>enable
Switch#show vlan //muestras las vlan existentes
Crear las VLANs
Switch#vlan database
Switch(vlan)#vlan 10 name LAN
Switch(vlan)#vlan 20 name DMZ
Switch(vlan)#vlan 30 name ADMIN
Switch(vlan)#vlan 40 name SIS
Switch(vlan)#vlan 50 name WIFI
Switch(vlan)#vlan 60 name WAN
Switch(vlan)#exit
Asignar del puerto Fas 0/2 al Fas 0/5 para la VLAN 10 (LAN)
Switch#config terminal
Switch(config)#interface Fas 0/2
Switch(config-if)#switchport mode access
Switch(config-if)#switchport access vlan 10
Switch(config-if)#exit
Dar de alta los 3 puertos restantes
00:13:58: %SYS-5-CONFIG_I: Configured from console by cons write memory
Asignar del puerto Fas 0/6 al Fas 0/10 para la VLAN 20 (DMZ)
Switch#config terminal
Switch(config)#interface Fas 0/6
Switch(config-if)#switchport mode access
Switch(config-if)#switchport access vlan 20
Switch(config-if)#exit
Dar de alta los 3 puertos restantes
00:13:58: %SYS-5-CONFIG_I: Configured from console by cons write memory
Asignar del puerto Fas 0/11 al Fas 0/13 para la VLAN 30 (ADMIN)
Switch#config terminal
Switch(config)#interface Fas 0/11
Switch(config-if)#switchport mode access
Switch(config-if)#switchport access vlan 30
Switch(config-if)#exit

6
Dar de alta los 3 puertos restantes
00:13:58: %SYS-5-CONFIG_I: Configured from console by cons write memory
Asignar del puerto Fas 0/14 al Fas 0/17 para la VLAN 40 (SIS)
Switch#config terminal
Switch(config)#interface Fas 0/14
Switch(config-if)#switchport mode access
Switch(config-if)#switchport access vlan 40
Switch(config-if)#exit
Dar de alta los 3 puertos restantes
00:13:58: %SYS-5-CONFIG_I: Configured from console by cons write memory
Asignar del puerto Fas 0/18 al Fas 0/21 para la VLAN 50 (WIFI)
Switch#config terminal
Switch(config)#interface Fas 0/18
Switch(config-if)#switchport mode access
Switch(config-if)#switchport access vlan 50
Switch(config-if)#exit
Dar de alta los 3 puertos restantes
00:13:58: %SYS-5-CONFIG_I: Configured from console by cons write memory
Asignar del puerto Fas 0/22 al Fas 0/24 para la VLAN 60 (LAN)
Switch#config terminal
Switch(config)#interface Fas 0/22
Switch(config-if)#switchport mode access
Switch(config-if)#switchport access vlan 60
Switch(config-if)#exit
Dar de alta los 2 puertos restantes
00:13:58: %SYS-5-CONFIG_I: Configured from console by cons write memory
7
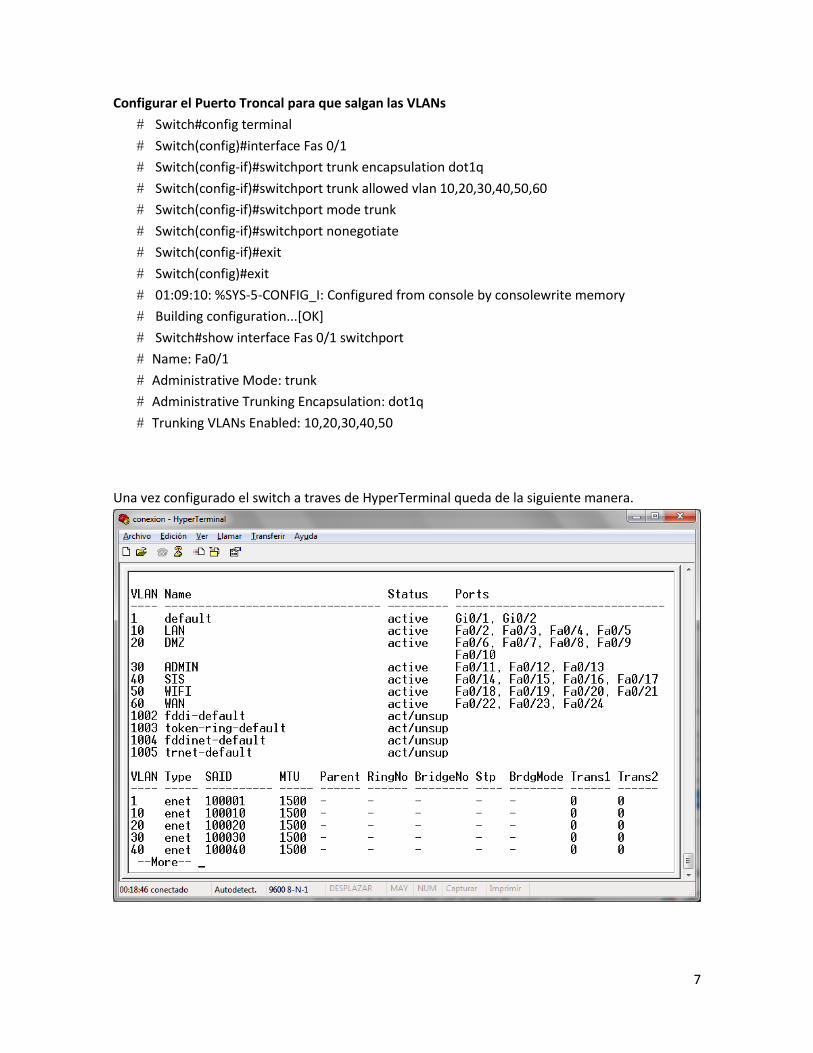
Configurar el Puerto Troncal para que salgan las VLANs
Switch#config terminal
Switch(config)#interface Fas 0/1
Switch(config-if)#switchport trunk encapsulation dot1q
Switch(config-if)#switchport trunk allowed vlan 10,20,30,40,50,60
Switch(config-if)#switchport mode trunk
Switch(config-if)#switchport nonegotiate
Switch(config-if)#exit
Switch(config)#exit
01:09:10: %SYS-5-CONFIG_I: Configured from console by consolewrite memory
Building configuration...[OK]
Switch#show interface Fas 0/1 switchport
Name: Fa0/1
Administrative Mode: trunk
Administrative Trunking Encapsulation: dot1q
Trunking VLANs Enabled: 10,20,30,40,50
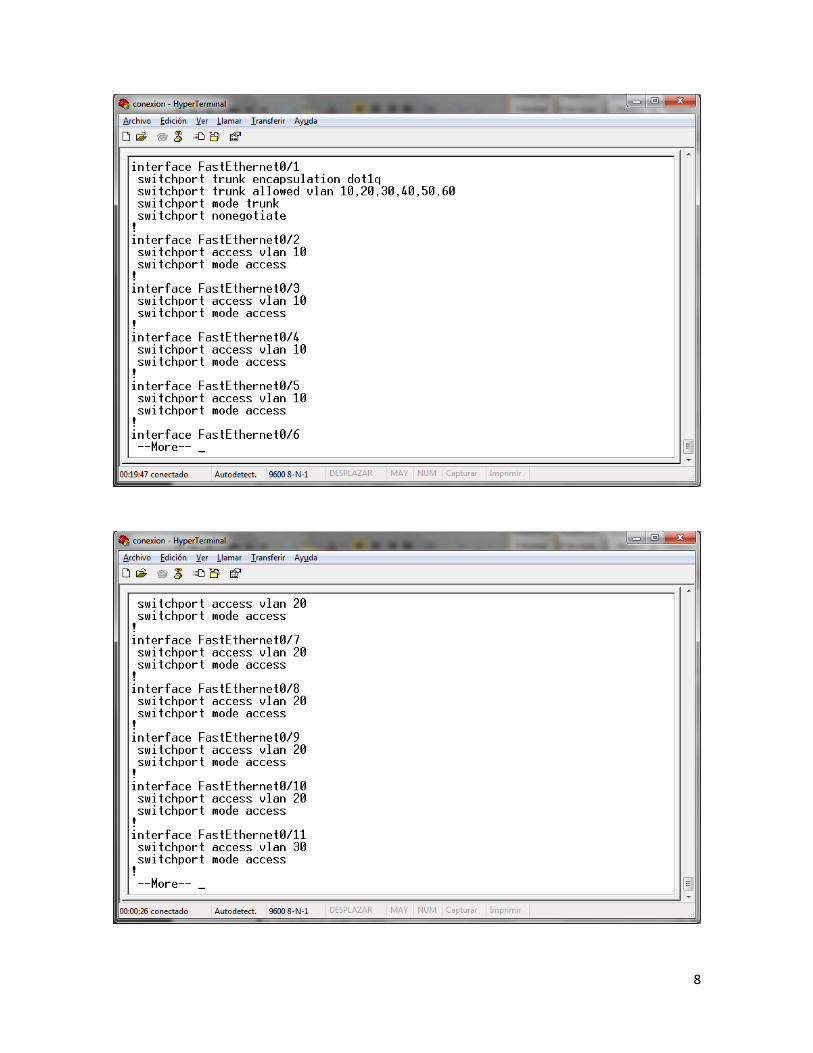
Una vez configurado el switch a traves de HyperTerminal queda de la siguiente manera.
8

9

10
Instalación de pfSense v.2.0.1
1.- Esperar a que el servidor termine de hacer checkup sobre dispositivos reconocidos por la
tarjeta madre.
2. - Do you want to set up VLANs first? -> y
3. - Do you want to set up VLANs now [y|n]? -> y
4. - VLAN Capable Interfaces: em0 00:e0:18:0c:82:fa (up). Enter the parent interface name for
the new VLAN (or nothing if finished): em0
5. - Enter the VLAN tag (1-4094): 10
6. - Enter the VLAN tag (1-4094): 20
11
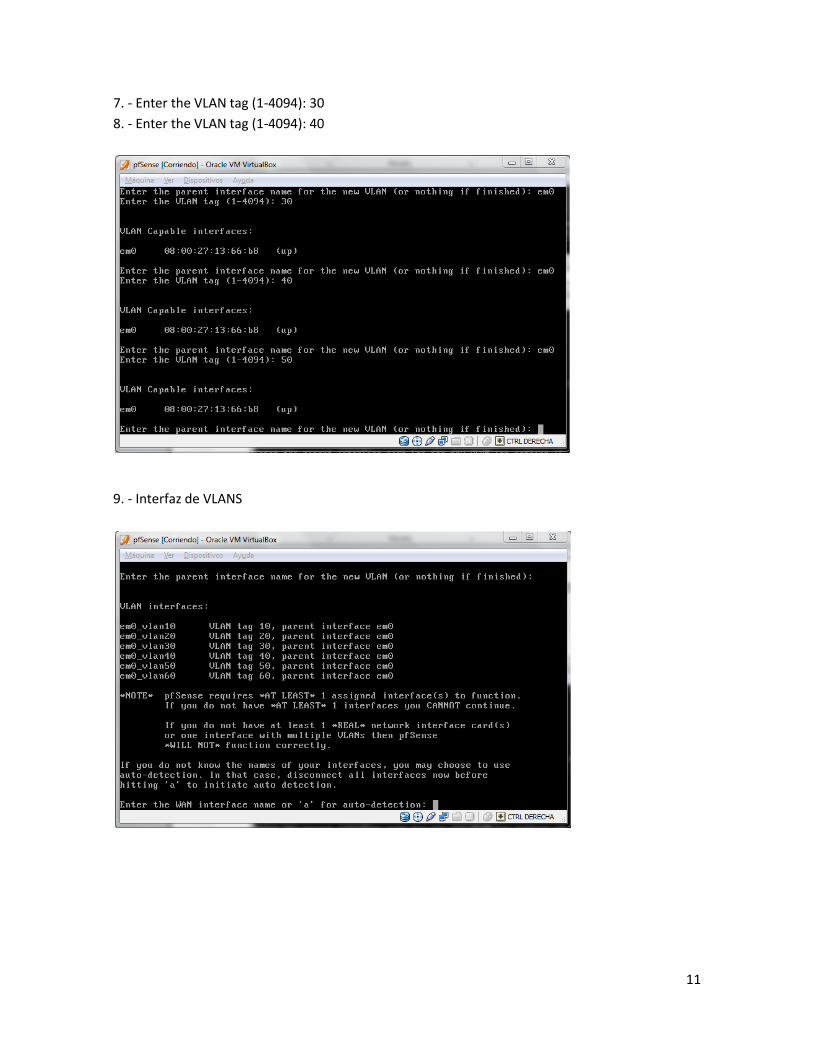
7. - Enter the VLAN tag (1-4094): 30
8. - Enter the VLAN tag (1-4094): 40
9. - Interfaz de VLANS
12
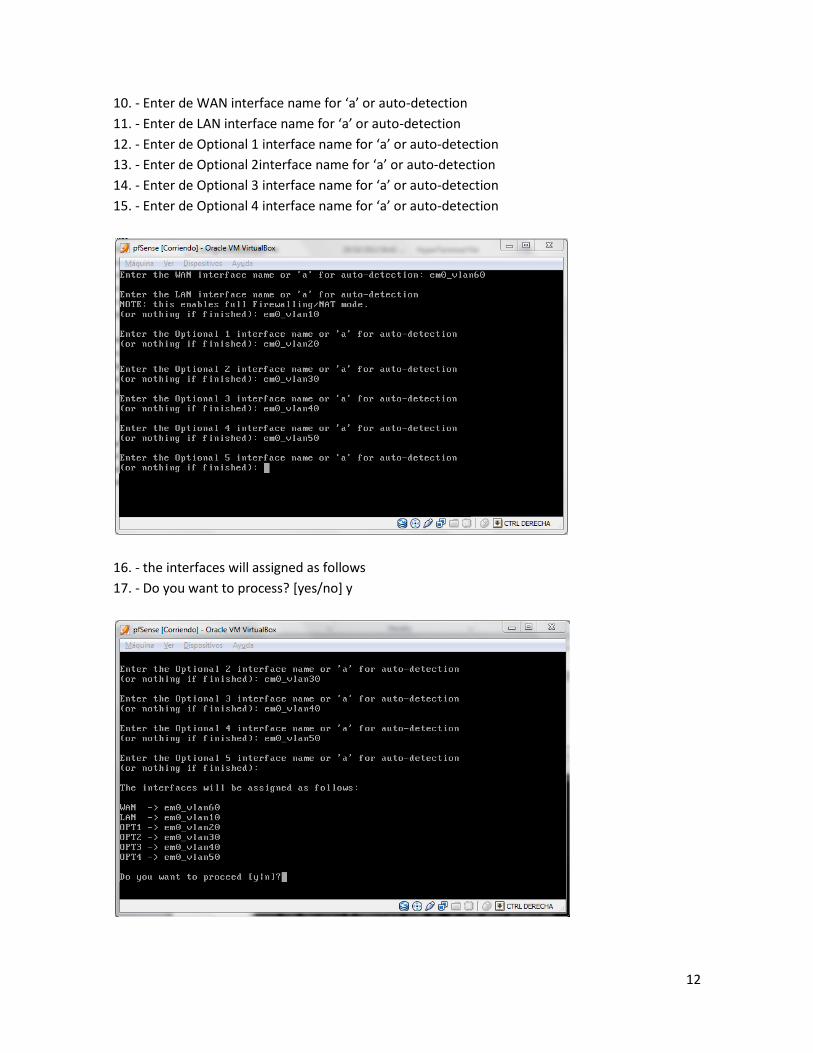
10. - Enter de WAN interface name for ‘a’ or auto-detection
11. - Enter de LAN interface name for ‘a’ or auto-detection
12. - Enter de Optional 1 interface name for ‘a’ or auto-detection
13. - Enter de Optional 2interface name for ‘a’ or auto-detection
14. - Enter de Optional 3 interface name for ‘a’ or auto-detection
15. - Enter de Optional 4 interface name for ‘a’ or auto-detection
16. - the interfaces will assigned as follows
17. - Do you want to process? [yes/no] y
13
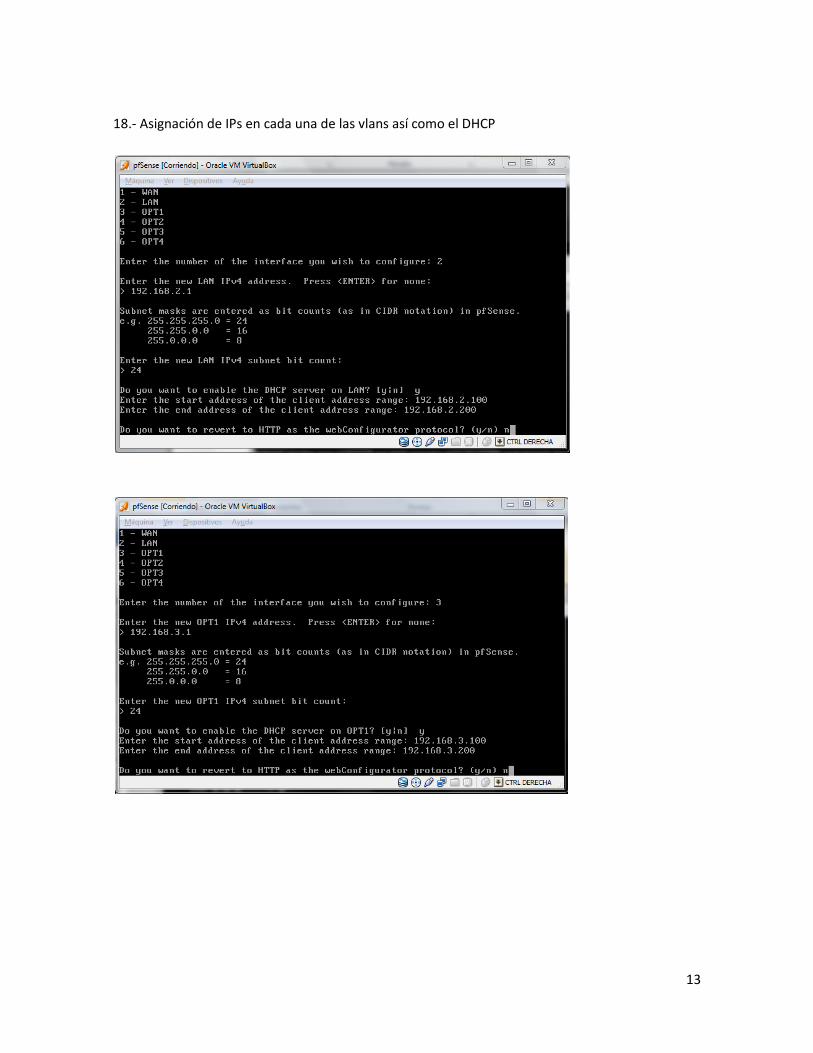
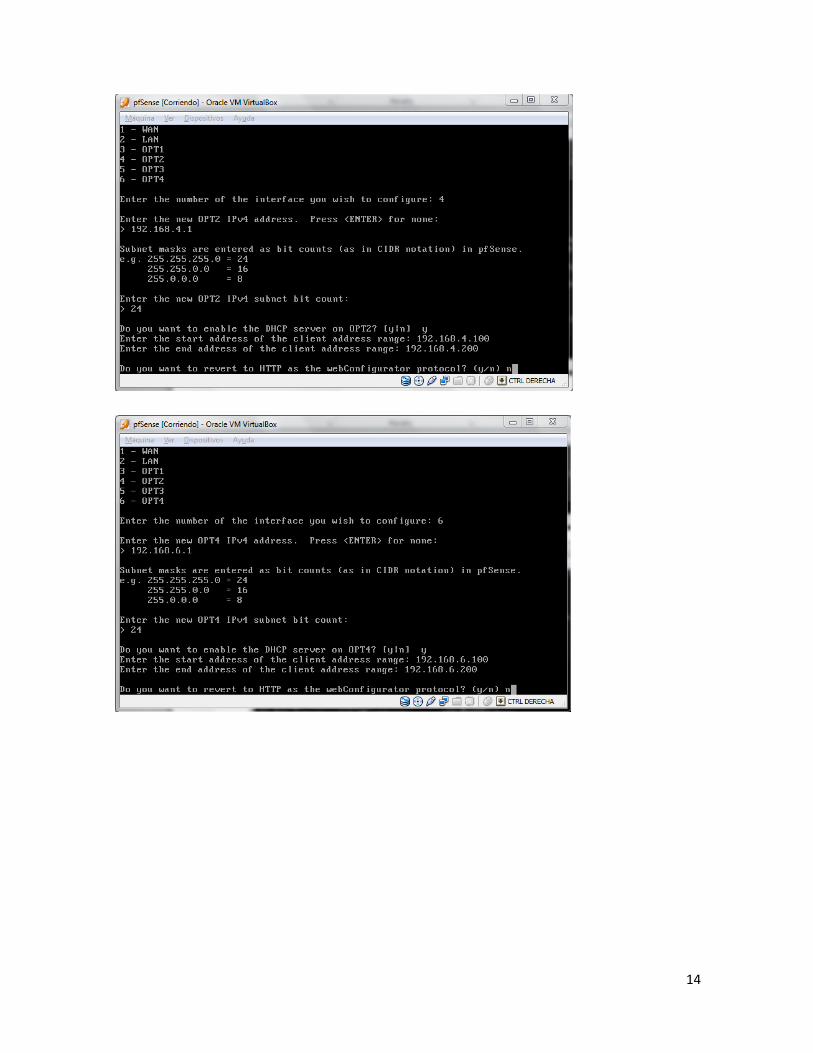
18.- Asignación de IPs en cada una de las vlans así como el DHCP
14
15
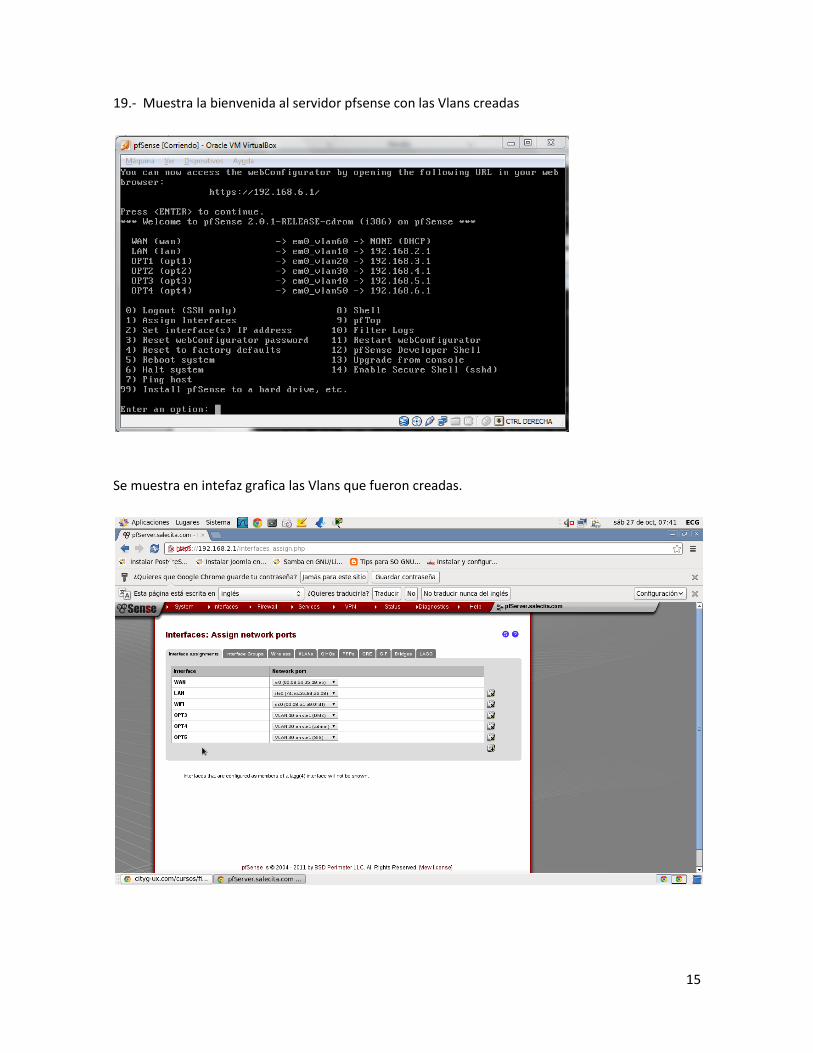
19.- Muestra la bienvenida al servidor pfsense con las Vlans creadas
Se muestra en intefaz grafica las Vlans que fueron creadas.
16
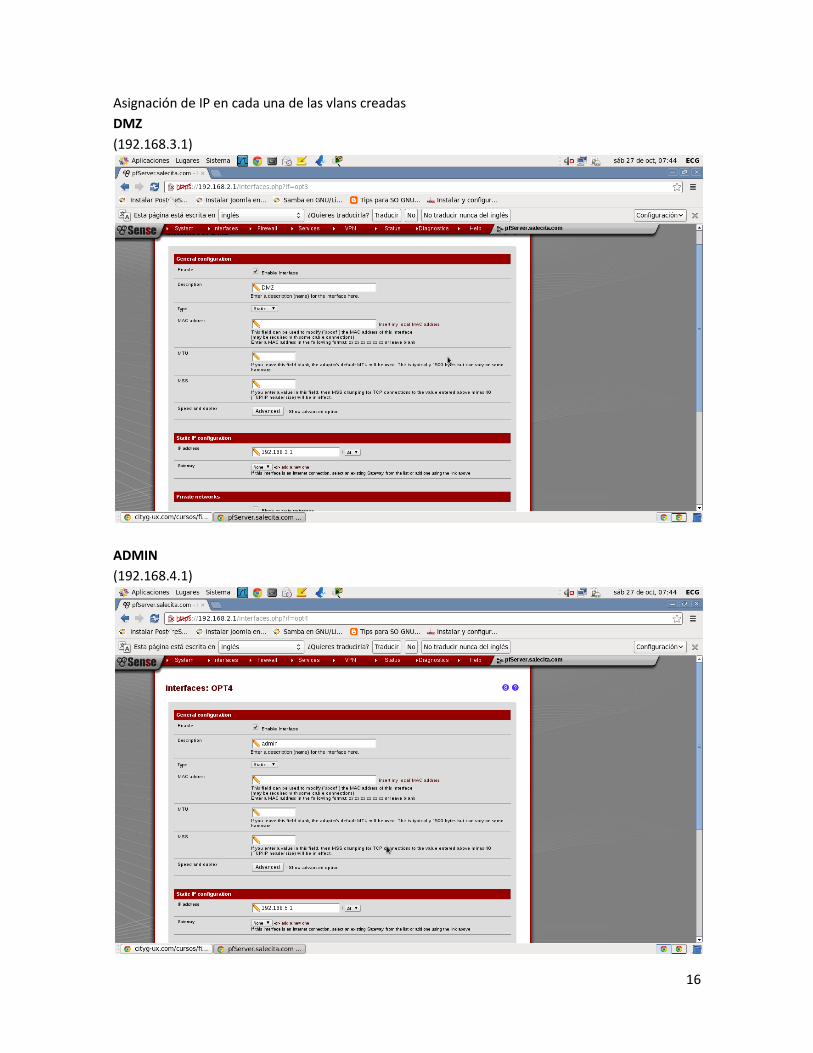
Asignación de IP en cada una de las vlans creadas
DMZ
(192.168.3.1)
ADMIN
(192.168.4.1)
17
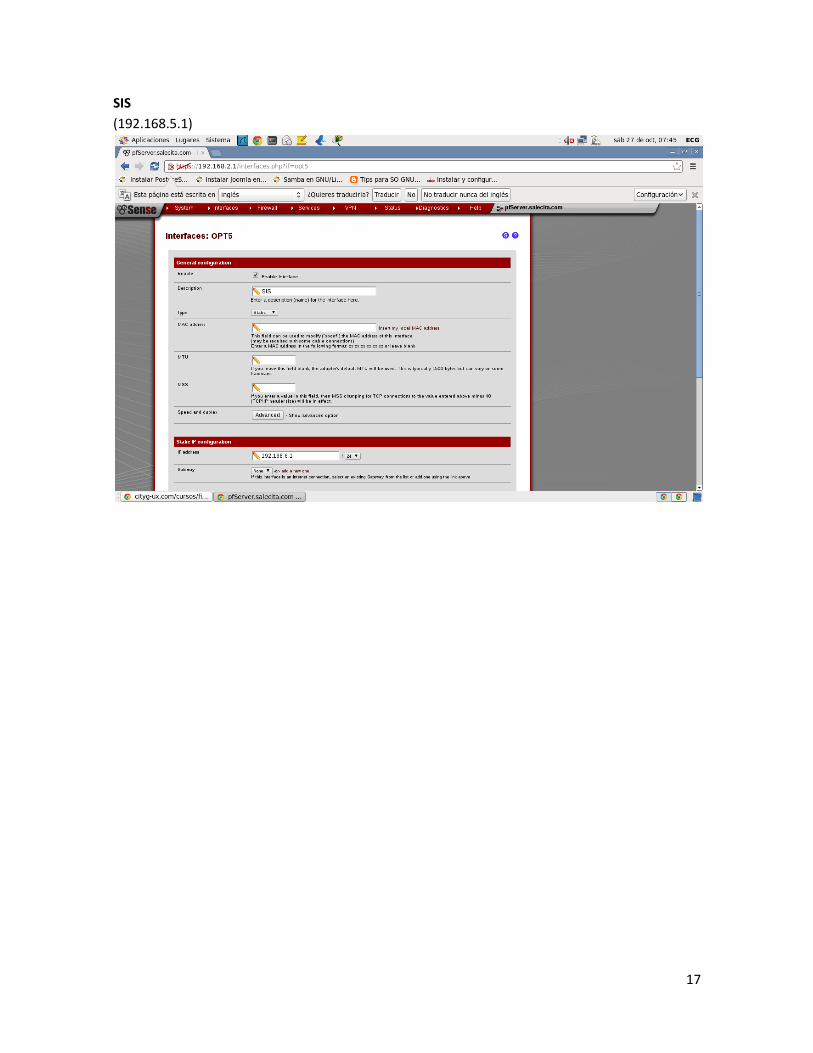
SIS
(192.168.5.1)
18
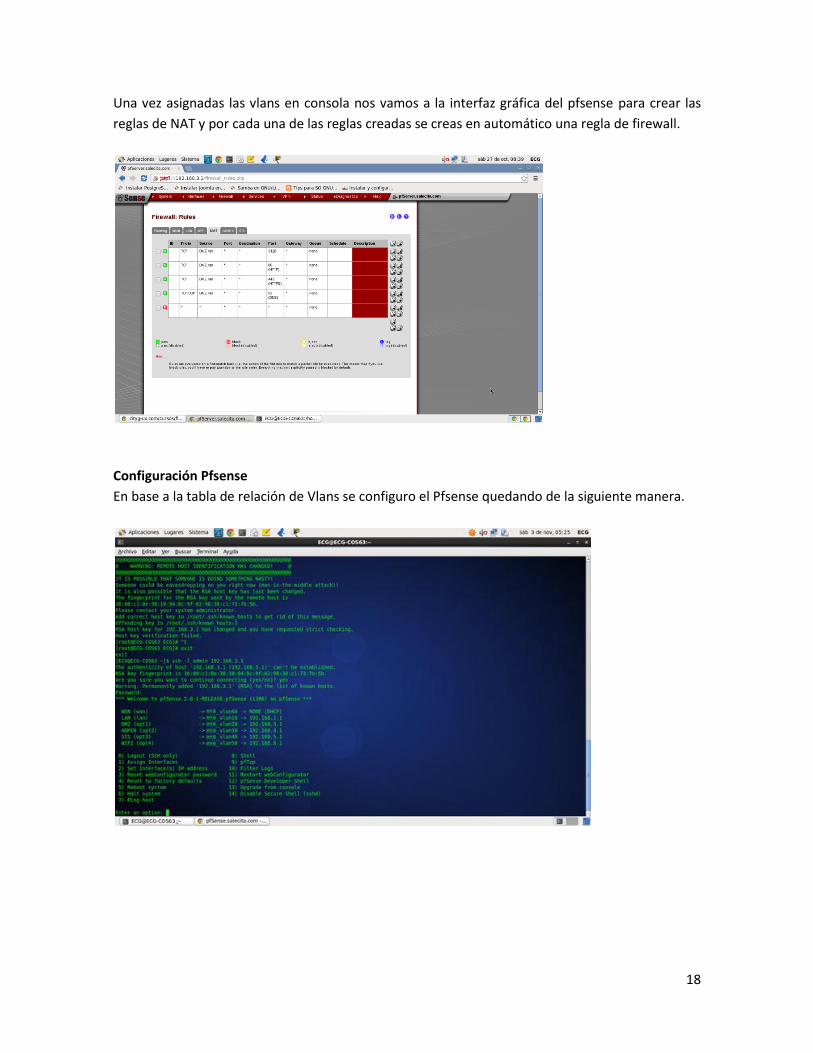
Una vez asignadas las vlans en consola nos vamos a la interfaz gráfica del pfsense para crear las
reglas de NAT y por cada una de las reglas creadas se creas en automático una regla de firewall.
Configuración Pfsense
En base a la tabla de relación de Vlans se configuro el Pfsense quedando de la siguiente manera.
19
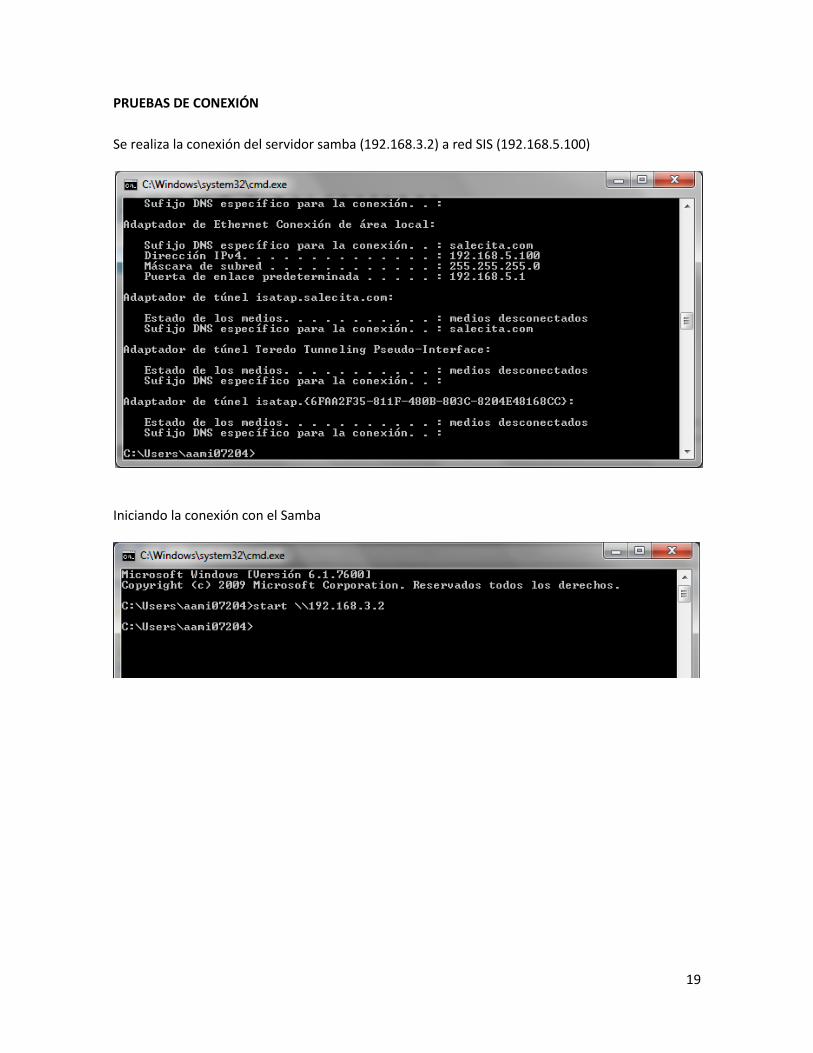
PRUEBAS DE CONEXIÓN
Se realiza la conexión del servidor samba (192.168.3.2) a red SIS (192.168.5.100)
Iniciando la conexión con el Samba
20
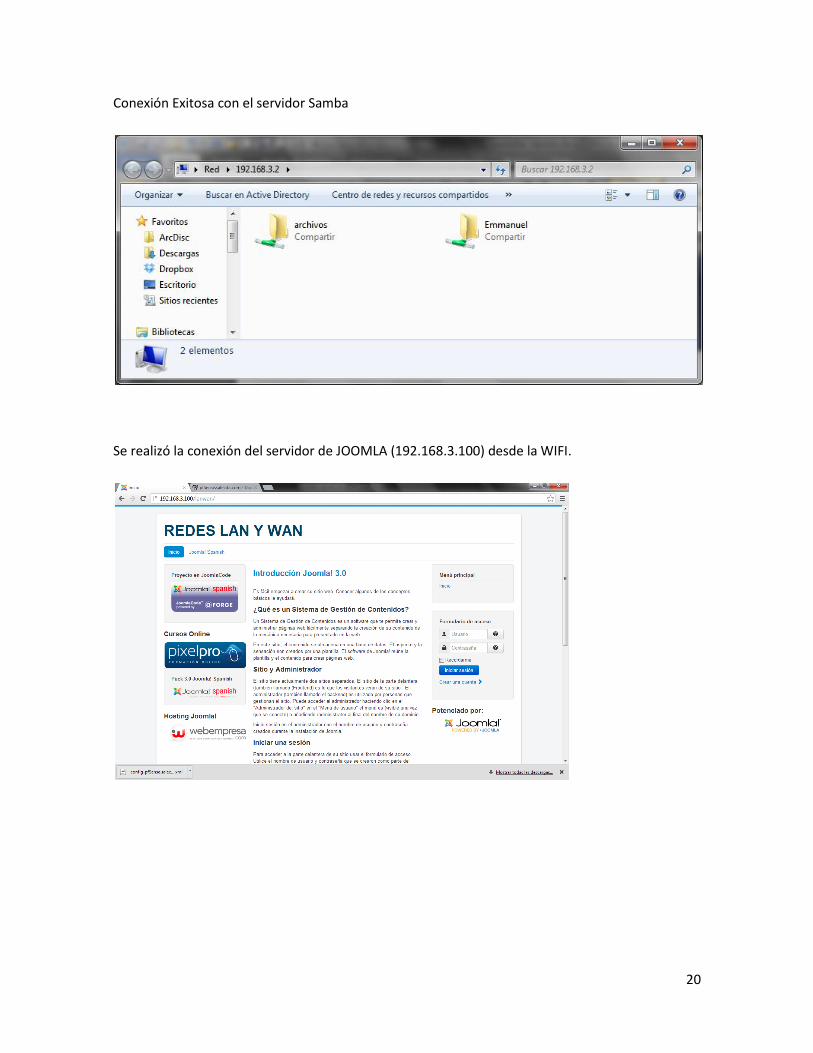
Conexión Exitosa con el servidor Samba
Se realizó la conexión del servidor de JOOMLA (192.168.3.100) desde la WIFI.