Guía básica Basics Guide - hp.com · el cristal desde su equipo o desde HP All-in-O ne. Para...
32
Guía básica Basics Guide HP Deskjet F2200 All-in-One series
Transcript of Guía básica Basics Guide - hp.com · el cristal desde su equipo o desde HP All-in-O ne. Para...

Guía básicaBasics Guide
HP Deskjet F2200 All-in-One series
Avisos de Hewlett-Packard CompanyLa información contenida en el presente documento está sujeta a cambios sin previo aviso.Reservados todos los derechos. Quedan prohibidas la reproducción, adaptación o traducción del presente material sin previa autorización por escrito de Hewlett-Packard, excepto en los casos permitidos por las leyes de propiedad intelectual. Las únicas garantías para los productos y servicios HP son las descritas en las declaraciones expresas de garantía que acompañan a dichos productos y servicios. Nada de lo aquí indicado deberá interpretarse como una garantía adicional. HP no se responsabiliza de los posibles errores técnicos o editoriales ni de las omisiones que puedan existir en el presente documento.© 2007 Hewlett-Packard Development Company, L.P.Windows, Windows 2000 y Windows XP son marcas comerciales registradas en EE.UU. de Microsoft Corporation.Windows Vista es una marca comercial o marca comercial registrada de Microsoft Corporation en los EE.UU. o en otros países.Intel y Pentium son marcas comerciales o marcas comerciales registradas de Intel Corporation o de sus filiales en EE.UU. y en otros países.
Hewlett-Packard Company noticesThe information contained in this document is subject to change without notice.All rights reserved. Reproduction, adaptation, or translation of this material is prohibited without prior written permission of Hewlett-Packard, except as allowed under copyright laws. The only warranties for HP products and services are set forth in the express warranty statements accompanying such products and services. Nothing herein should be construed as constituting an additional warranty. HP shall not be liable for technical or editorial errors or omissions contained herein.© 2007 Hewlett-Packard Development Company, L.P.
Windows, Windows 2000, and Windows XP are U.S. registered trademarks of Microsoft Corporation. Windows Vista is either a registered trademark or trademark of Microsoft Corporation in the United States and/or other countries. Intel and Pentium are trademarks or registered trademarks of Intel Corporation or its subsidiaries in the United States and other countries.

HP Deskjet F2200 All-in-One seriesGuía
Español
áb sica

Contenido
1 Descripción general de HP All-in-OneEl dispositivo HP All-in-One de un vistazo.................................................................................2Botones del panel de control......................................................................................................3Descripción general de las luces de estado...............................................................................4Carga de originales para escanear y copiar...............................................................................5Realización de una copia...........................................................................................................6Escaneado de un original...........................................................................................................6
2 Solución de problemas y asistencia técnicaDesinstalación y reinstalación del software................................................................................7Solución de problemas de instalación de hardware...................................................................8Cómo eliminar atascos de papel..............................................................................................11Solución de problemas relacionados con los cartuchos de impresión.....................................11Cómo buscar más información.................................................................................................11
Guía de instalación.............................................................................................................11Ayuda en pantalla...............................................................................................................11Sitio web de HP..................................................................................................................11
Servicio de asistencia técnica de HP.......................................................................................11Asistencia telefónica de HP................................................................................................11
Período de cobertura de la asistencia telefónica..........................................................11Después del período de asistencia telefónica..............................................................12
Antes de llamar al servicio de asistencia técnica de HP....................................................12Información técnica..................................................................................................................12
Requisitos del sistema........................................................................................................12Especificaciones del papel.................................................................................................12Especificaciones físicas......................................................................................................12Especificaciones de alimentación.......................................................................................12Especificaciones medioambientales...................................................................................13Avisos sobre normativas.....................................................................................................13
Número de identificación de modelo normativo...........................................................13Garantía..............................................................................................................................14
1
Espa
ñol
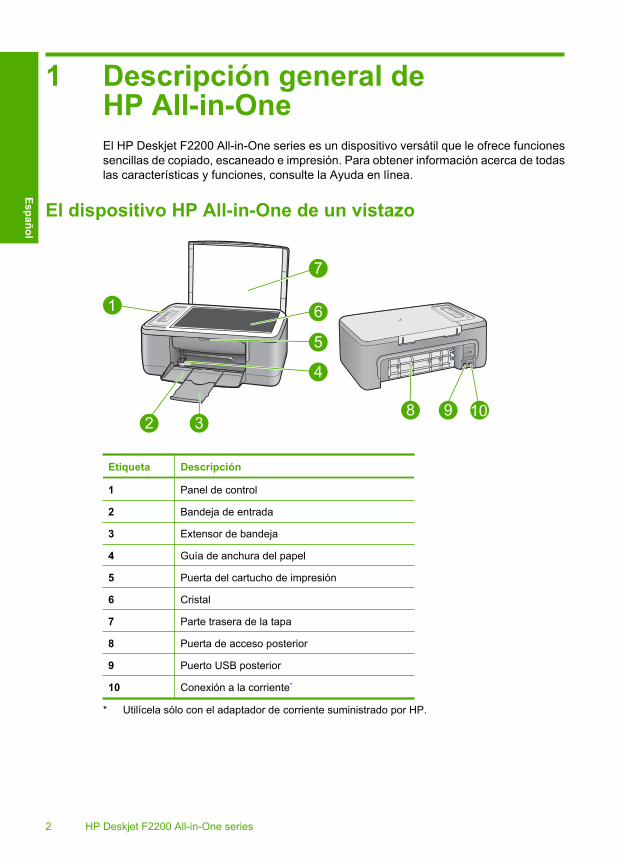
1 Descripción general deHP All-in-OneEl HP Deskjet F2200 All-in-One series es un dispositivo versátil que le ofrece funcionessencillas de copiado, escaneado e impresión. Para obtener información acerca de todaslas características y funciones, consulte la Ayuda en línea.
El dispositivo HP All-in-One de un vistazo
Etiqueta Descripción
1 Panel de control
2 Bandeja de entrada
3 Extensor de bandeja
4 Guía de anchura del papel
5 Puerta del cartucho de impresión
6 Cristal
7 Parte trasera de la tapa
8 Puerta de acceso posterior
9 Puerto USB posterior
10 Conexión a la corriente*
* Utilícela sólo con el adaptador de corriente suministrado por HP.
2 HP Deskjet F2200 All-in-One series
Español
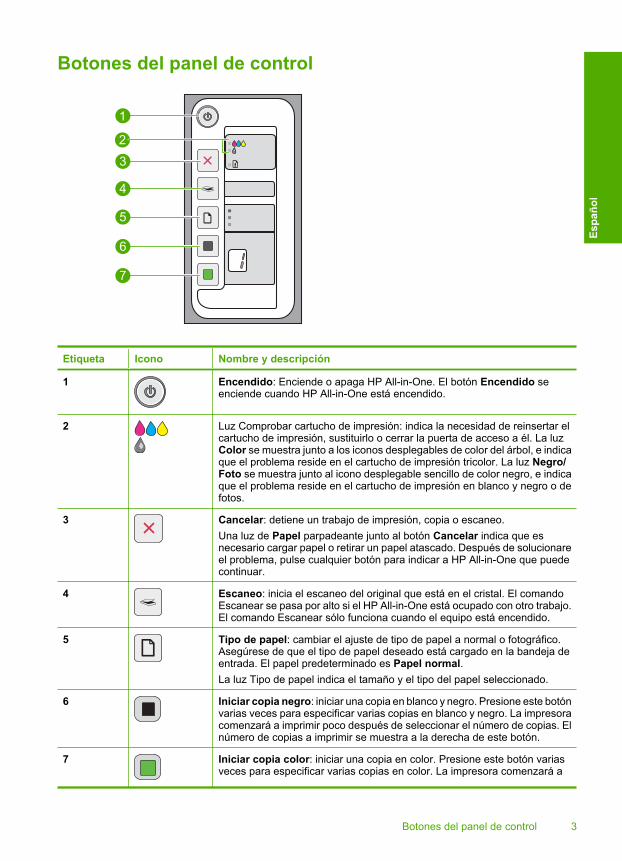
Botones del panel de control
Etiqueta Icono Nombre y descripción
1 Encendido: Enciende o apaga HP All-in-One. El botón Encendido seenciende cuando HP All-in-One está encendido.
2 Luz Comprobar cartucho de impresión: indica la necesidad de reinsertar elcartucho de impresión, sustituirlo o cerrar la puerta de acceso a él. La luzColor se muestra junto a los iconos desplegables de color del árbol, e indicaque el problema reside en el cartucho de impresión tricolor. La luz Negro/Foto se muestra junto al icono desplegable sencillo de color negro, e indicaque el problema reside en el cartucho de impresión en blanco y negro o defotos.
3 Cancelar: detiene un trabajo de impresión, copia o escaneo. Una luz de Papel parpadeante junto al botón Cancelar indica que esnecesario cargar papel o retirar un papel atascado. Después de solucionareel problema, pulse cualquier botón para indicar a HP All-in-One que puedecontinuar.
4 Escaneo: inicia el escaneo del original que está en el cristal. El comandoEscanear se pasa por alto si el HP All-in-One está ocupado con otro trabajo.El comando Escanear sólo funciona cuando el equipo está encendido.
5 Tipo de papel: cambiar el ajuste de tipo de papel a normal o fotográfico.Asegúrese de que el tipo de papel deseado está cargado en la bandeja deentrada. El papel predeterminado es Papel normal.La luz Tipo de papel indica el tamaño y el tipo del papel seleccionado.
6 Iniciar copia negro: iniciar una copia en blanco y negro. Presione este botónvarias veces para especificar varias copias en blanco y negro. La impresoracomenzará a imprimir poco después de seleccionar el número de copias. Elnúmero de copias a imprimir se muestra a la derecha de este botón.
7 Iniciar copia color: iniciar una copia en color. Presione este botón variasveces para especificar varias copias en color. La impresora comenzará a
Botones del panel de control 3
Espa
ñol
Etiqueta Icono Nombre y descripción
imprimir poco después de seleccionar el número de copias. El número decopias a imprimir se muestra a la derecha de este botón.
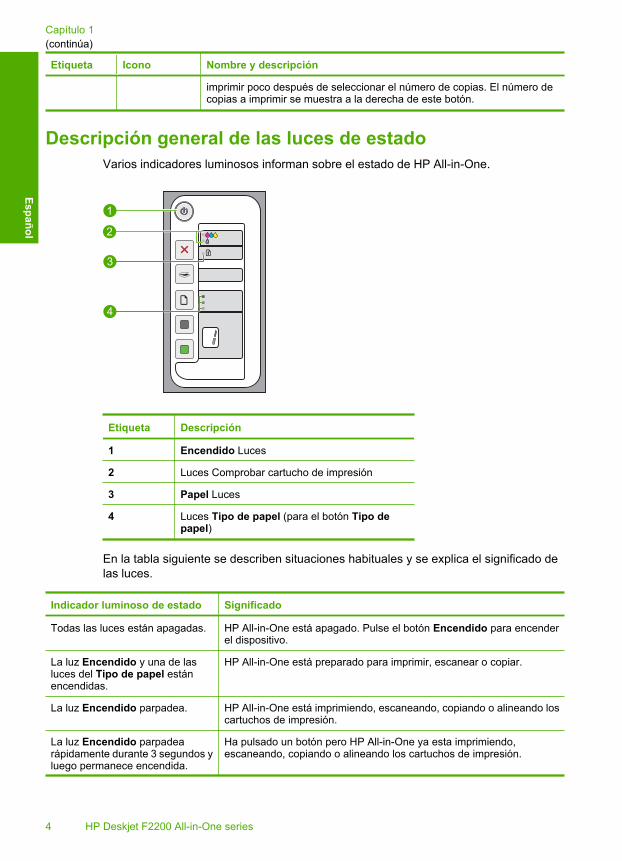
Descripción general de las luces de estadoVarios indicadores luminosos informan sobre el estado de HP All-in-One.
Etiqueta Descripción
1 Encendido Luces
2 Luces Comprobar cartucho de impresión
3 Papel Luces
4 Luces Tipo de papel (para el botón Tipo depapel)
En la tabla siguiente se describen situaciones habituales y se explica el significado delas luces.
Indicador luminoso de estado Significado
Todas las luces están apagadas. HP All-in-One está apagado. Pulse el botón Encendido para encenderel dispositivo.
La luz Encendido y una de lasluces del Tipo de papel estánencendidas.
HP All-in-One está preparado para imprimir, escanear o copiar.
La luz Encendido parpadea. HP All-in-One está imprimiendo, escaneando, copiando o alineando loscartuchos de impresión.
La luz Encendido parpadearápidamente durante 3 segundos yluego permanece encendida.
Ha pulsado un botón pero HP All-in-One ya esta imprimiendo,escaneando, copiando o alineando los cartuchos de impresión.
Capítulo 1(continúa)
4 HP Deskjet F2200 All-in-One series
Español

Indicador luminoso de estado Significado
La luz Encendido parpadeadurante 20 segundos y luegopermanece encendida.
Se ha pulsado el botón Escaneo y no se ha obtenido respuesta delequipo.
La luz Papel parpadea. • El HP All-in-One se ha quedado sin papel.• Hay un atasco de papel en HP All-in-One.
La luz Comprobar cartucho deimpresión parpadea.
• La puerta de acceso al cartucho de impresión está abierta.• Faltan cartuchos de impresión o éstos no están colocados
correctamente.• No se ha quitado la cinta del cartucho de impresión.• El cartucho de impresión no está diseñado para su uso en este
HP All-in-One.• Es posible que el cartucho de impresión tenga algún defecto.• El cartucho de impresión especificado tiene poca tinta.
Parpadean las luces Encendido,Papel y Comprobar cartucho deimpresión.
Fallo en el escáner.Apague el HP All-in-One y vuelva a encenderlo. Si el problema continúa,póngase en contacto con la asistencia técnica de HP.
Todas las luces parpadean. Se ha producido un error grave en HP All-in-One.1. Apague HP All-in-One.2. Desenchufe el cable de alimentación.3. Espere un minuto y vuelva a enchufar el cable de alimentación.4. Vuelva a encender HP All-in-One.Si el problema continúa, póngase en contacto con la asistencia técnicade HP.
Carga de originales para escanear y copiarPuede cargar papeles de distintos tipos y tamaños en HP All-in-One, incluido el papelde tamaño carta o A4, papel fotográfico, transparencias y sobres. Para obtener másinformación, consulte la ayuda en pantalla.
Para cargar un original en el cristal1. Levante la tapa de HP All-in-One.2. Coloque el original con la cara que desea copiar o escanear hacia abajo en la esquina
frontal izquierda del cristal.
Sugerencia Para obtener el tamaño de copia correcto, asegúrese de que nohay cinta adhesiva ni ningún otro objeto extraño en el cristal.
(continúa)
Carga de originales para escanear y copiar 5
Espa
ñol

3. Cierre la tapa.
Realización de una copiaPuede realizar copias de calidad desde el panel de control.
Para realizar una copia desde el panel de control1. Asegúrese de que hay papel cargado en la bandeja de entrada.2. Coloque el original con la cara que desea copiar o escanear hacia abajo en la esquina
frontal izquierda del cristal.3. Pulse el botón Tipo de papel para establecer el tipo de papel.4. Pulse Iniciar copia negro o Iniciar copia color.
Escaneado de un originalPuede iniciar el escaneo de los documentos originales o imágenes que coloque sobreel cristal desde su equipo o desde HP All-in-One. Para utilizar las funciones de escaneo,HP All-in-One y el equipo deben estar conectados y encendidos. El softwareHP Photosmart debe estar instalado y en ejecución antes de comenzar el escaneo.
Nota Si utiliza Windows 2000, utilice el asistente para escáner de Windows en lugarde pulsar el botón Escaneo.
Para escanear a un equipo1. Coloque el original con la cara que desea copiar o escanear hacia abajo en la esquina
frontal izquierda del cristal.
Sugerencia Para lograr copias de buena calidad, asegúrese de que el cristaldel escáner esté limpio y no haya ningún material extraño.
2. Pulse Escaneo.3. Haga cualquier trabajo de edición en la imagen preliminar y cuando termine haga clic
en Aceptar.
Capítulo 1
6 HP Deskjet F2200 All-in-One series
Español

2 Solución de problemas yasistencia técnicaEste capítulo contiene información específica sobre problemas de instalación y configuración, asícomo algunos temas sobre funcionamiento. Para obtener más información, consulte la ayuda enpantalla.Muchos problemas se producen cuando el producto se conecta al equipo mediante un cable USBantes de que el software del HP Photosmart esté instalado. Si ha conectado el producto al equipoantes de que en la pantalla de instalación del software se le indique que lo haga, debe seguir estospasos:
Para solucionar los problemas de la instalación del software1. Desconecte el cable USB del equipo.2. Desinstale el software (si ya lo ha instalado). Para obtener más información, consulte
“Desinstalación y reinstalación del software” en la página 7.3. Reinicie el equipo.4. Apague el producto, espere un minuto y vuelva a encenderlo.5. Vuelva a instalar el software del HP Photosmart.
Precaución No conecte el cable USB al equipo hasta que se le indique en la pantalla deinstalación del software.
Para obtener información sobre el servicio de asistencia, consulte la cubierta posterior de esta guía.
Desinstalación y reinstalación del softwareSi la instalación no está completa o si ha conectado el cable USB al equipo antes de que se lesolicitara en la pantalla de instalación del software, es posible que tenga que desinstalar y volver ainstalar el software. No se limite a eliminar del equipo los archivos de la aplicación HP All-in-One.Asegúrese de eliminarlos correctamente mediante la utilidad de desinstalación que se incluye alinstalar el software suministrado con HP All-in-One.
Para desinstalarlo de un equipo Windows e instalarlo de nuevo:1. Abra el panel de control de Windows y haga doble clic en Agregar o quitar programas.2. Seleccione el software del controlador HP Deskjet All-in-One y haga clic en Cambiar o
quitar.Siga las instrucciones en pantalla.
3. Desconecte el producto del equipo.4. Reinicie el equipo.
Nota Debe desconectar el producto antes de reiniciar el equipo. No conecte el productoal equipo hasta después de haber vuelto a instalar el software.
5. Para volver a instalar el software, inserte el CD-ROM del producto en la unidad de CD-ROMdel equipo y siga las instrucciones que se indican en la pantalla de inicio.Si no aparece la pantalla de inicio, haga doble clic en Mi PC, haga doble clic en el icono de launidad de CD-ROM que tiene el logotipo de HP y, a continuación, haga doble clic ensetup.exe.
6. Siga las instrucciones de la pantalla y las que se proporcionan en la Guía de instalación queacompaña al producto.
Cuando la instalación de software concluye, el icono del HP Digital Imaging Monitor aparece enla bandeja del sistema de Windows.
Desinstalación y reinstalación del software 7
Espa
ñol

Para comprobar que el software se ha instalado correctamente, haga doble clic en el icono de Centrode soluciones de HP del escritorio. Si Centro de soluciones de HP muestra los iconos principales(Escanear imagen y Escanear documento), el software se habrá instalado correctamente.Para usuarios de Macintosh: Las instrucciones de desinstalación y reinstalación se encuentran enel archivo Léame y en los archivos de Ayuda del software.
Solución de problemas de instalación de hardwareEsta sección contiene información sobre la solución de los problemas de hardware que puedeexperimentar el HP All-in-One.
El producto no se enciende
Solución• Asegúrese de que el cable de alimentación está firmemente conectado al producto y al
adaptador de alimentación. Enchufe el cable de alimentación a una toma de tierra, a unprotector contra sobretensiones o a una regleta.
1 Conexión de alimentación
2 Cable de alimentación y adaptador
3 Toma de corriente
• Si está utilizando una regleta, asegúrese de que esté encendida. O bien intente enchufarel producto directamente en la toma de corriente.
• Compruebe el interruptor para asegurarse de que funciona. Enchufe un electrodomésticoque funcione y compruebe si se enciende. Si no es así, puede que el problema esté en latoma de corriente.
• Si ha enchufado el producto a una toma de corriente con interruptor, asegúrese de que latoma está encendida. Si el interruptor está encendido pero sigue sin funcionar, es posibleque haya algún problema con la toma de corriente.
Causa: El producto no está correctamente conectado a una toma eléctrica o ésta tiene algúnfallo.
Solución: Es posible que el producto no responda si pulsa el botón Encendido demasiadorápido. Pulse el botón Encendido una vez. La activación del producto puede tardar unosminutos. Si pulsa el botón Encendido otra vez durante el proceso, es posible que apague elproducto.
Capítulo 2
8 HP Deskjet F2200 All-in-One series
Español
Precaución Si el producto sigue sin encenderse, puede que tenga algún fallo mecánico.Desenchufe el producto de la toma de corriente.Póngase en contacto con el servicio de asistencia técnica de HP para obtener asistencia.Visite: www.hp.com/support. Si se le solicita, seleccione el país o la región y, luego, hagaclic en Contactar HP para obtener información sobre cómo ponerse en contacto con elservicio de asistencia técnica.
Causa: pulsó el botón Encendido demasiado rápido.
He conectado el cable USB, pero tengo problemas al utilizar HP All-in-One con elequipo
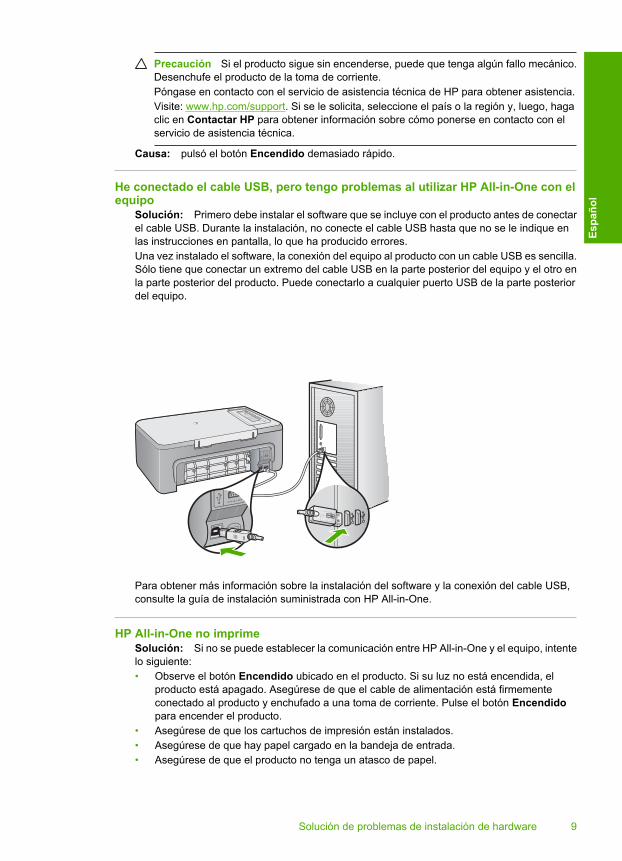
Solución: Primero debe instalar el software que se incluye con el producto antes de conectarel cable USB. Durante la instalación, no conecte el cable USB hasta que no se le indique enlas instrucciones en pantalla, lo que ha producido errores.Una vez instalado el software, la conexión del equipo al producto con un cable USB es sencilla.Sólo tiene que conectar un extremo del cable USB en la parte posterior del equipo y el otro enla parte posterior del producto. Puede conectarlo a cualquier puerto USB de la parte posteriordel equipo.
Para obtener más información sobre la instalación del software y la conexión del cable USB,consulte la guía de instalación suministrada con HP All-in-One.
HP All-in-One no imprimeSolución: Si no se puede establecer la comunicación entre HP All-in-One y el equipo, intentelo siguiente:• Observe el botón Encendido ubicado en el producto. Si su luz no está encendida, el
producto está apagado. Asegúrese de que el cable de alimentación está firmementeconectado al producto y enchufado a una toma de corriente. Pulse el botón Encendidopara encender el producto.
• Asegúrese de que los cartuchos de impresión están instalados.• Asegúrese de que hay papel cargado en la bandeja de entrada.• Asegúrese de que el producto no tenga un atasco de papel.
Solución de problemas de instalación de hardware 9
Espa
ñol
• Compruebe que el carro de impresión no esté atascado.Levante la puerta frontal para acceder a la zona del carro de impresión. Retire cualquierobjeto que bloquee el carro de impresión, incluidos los materiales de embalaje. Apague elproducto y vuelva a encenderlo.
• Imprima una hoja de prueba para ver si el producto puede imprimir y que se estácomunicando con el ordenador.
• Compruebe que la cola de impresión no está en pausa. Si lo está, seleccione el ajusteadecuado para reanudar la impresión. Para obtener más información sobre el acceso a lacola de impresión, consulte la documentación que se incluye con el sistema operativoinstalado en el equipo.
• Compruebe el cable USB. Si está utilizando un cable antiguo, es posible que éste nofuncione correctamente. Pruebe a conectarlo a otro equipo para comprobar que el cableUSB funciona. Si experimenta problemas, lo más probable es que tenga que sustituir elcable USB. Asimismo, compruebe que el cable no tiene una longitud superior a 3 metros.
• Asegúrese de que su ordenador es compatible con USB y que utiliza un sistema operativotambién compatible. Para obtener más información, consulte el archivo Léame.
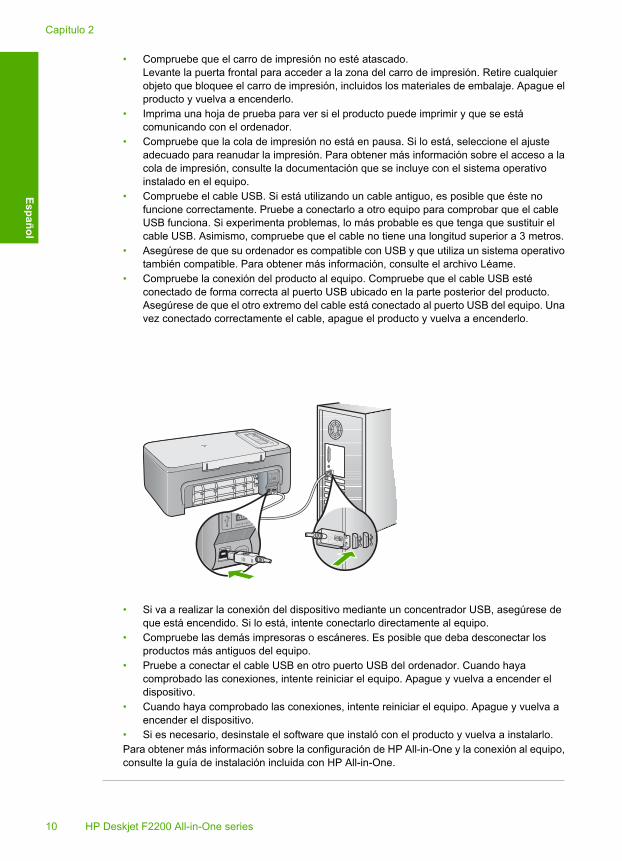
• Compruebe la conexión del producto al equipo. Compruebe que el cable USB estéconectado de forma correcta al puerto USB ubicado en la parte posterior del producto.Asegúrese de que el otro extremo del cable está conectado al puerto USB del equipo. Unavez conectado correctamente el cable, apague el producto y vuelva a encenderlo.
• Si va a realizar la conexión del dispositivo mediante un concentrador USB, asegúrese deque está encendido. Si lo está, intente conectarlo directamente al equipo.
• Compruebe las demás impresoras o escáneres. Es posible que deba desconectar losproductos más antiguos del equipo.
• Pruebe a conectar el cable USB en otro puerto USB del ordenador. Cuando hayacomprobado las conexiones, intente reiniciar el equipo. Apague y vuelva a encender eldispositivo.
• Cuando haya comprobado las conexiones, intente reiniciar el equipo. Apague y vuelva aencender el dispositivo.
• Si es necesario, desinstale el software que instaló con el producto y vuelva a instalarlo.Para obtener más información sobre la configuración de HP All-in-One y la conexión al equipo,consulte la guía de instalación incluida con HP All-in-One.
Capítulo 2
10 HP Deskjet F2200 All-in-One series
Español

Cómo eliminar atascos de papelPara más información sobre retirar papel atascado, consulte la Ayuda en pantalla. Para obtenerinformación sobre cómo acceder a la Ayuda en pantalla en un equipo Windows, consulte “Ayudaen pantalla” en la página 11.
Solución de problemas relacionados con los cartuchos de impresiónPara obtener información sobre cómo detectar problemas en los cartuchos de impresión, consultela Ayuda en pantalla. Para consultar las instrucciones de acceso a la Ayuda en pantalla, consulte“Ayuda en pantalla” en la página 11.
Cómo buscar más informaciónHay una serie de recursos, tanto impresos como en pantalla, que proporcionan información sobrela configuración y el uso de HP All-in-One.
Guía de instalaciónLa guía de instalación proporciona instrucciones para configurar e instalar el software deHP All-in-One. Asegúrese de seguir los pasos de la guía de instalación en el orden establecido.Si le surgen problemas durante la instalación, consulte el apartado Resolución de problemas en laúltima sección de la Guía de instalación, o consulte “Solución de problemas y asistencia técnica”en la página 7 en esta guía.
Ayuda en pantallaLa Ayuda en pantalla proporciona instrucciones detalladas sobre funciones de HP All-in-One queno se describen en esta Guía del usuario, incluidas las funciones disponibles únicamente al utilizarel software que instaló con HP All-in-One. La Ayuda en pantalla proporciona también informaciónsobre las normativas y regulaciones medioambientales.
Para acceder a la Ayuda en pantalla• Windows: Haga clic en Inicio > Todos los programas > HP > Deskjet F2200
All-in-One series > Ayuda.Para instalar la Ayuda en pantalla, coloque el CD del software en la unidad y siga lasinstrucciones que aparecen en pantalla.
• Macintosh: Haga clic en Ayuda > Ayuda de Mac > Biblioteca > Ayuda del producto HP.
Sitio web de HPSi dispone de acceso a internet, podrá obtener ayuda y asistencia técnica en el sitio web de HPen www.hp.com/support. Este sitio web ofrece asistencia técnica, controladores, suministros einformación sobre pedidos.
Servicio de asistencia técnica de HPPuede ponerse en contacto con el servicio de asistencia técnica de HP por teléfono o a través deinternet. Las opciones de asistencia técnica y la disponibilidad varían según el producto, el país oregión y el idioma.
Asistencia telefónica de HPPara ver una lista de los números de teléfono del servicio de asistencia, consulte el anverso de lacubierta posterior de esta guía.Las opciones de asistencia técnica y la disponibilidad varían según el producto, el país o región yel idioma.
Período de cobertura de la asistencia telefónicaHay disponible un año de asistencia telefónica para Latinoamérica (México incluido). Paradeterminar la duración de la asistencia telefónica gratuita en Norteamérica, Europa Oriental, OrienteMedio, Asia y Pacífico y África, vaya a www.hp.com/support.
Servicio de asistencia técnica de HP 11
Espa
ñol

Se aplicará la tarificación telefónica estándar.
Después del período de asistencia telefónicaUna vez que el período de asistencia telefónica haya finalizado, HP proporciona asistencia con uncoste adicional.Póngase en contacto con un distribuidor local de HP o llame al número de asistencia de su país oregión para obtener más información sobre las opciones disponibles.
Antes de llamar al servicio de asistencia técnica de HP1. Realice las comprobaciones siguientes:
a. El HP All-in-One está conectado y encendido.b. Los cartuchos de impresión especificados están instalados correctamente.c. El papel recomendado está cargado correctamente en la bandeja de entrada.
2. Reinicie el HP All-in-One:a. Apague el HP All-in-One pulsando el botón Encendido.b. Desenchufe el cable de alimentación de la parte posterior del HP All-in-One.c. Vuelva a enchufar el cable de alimentación al HP All-in-One.d. Encienda el HP All-in-One pulsando el botón Encendido.
3. Localice la información siguiente:a. El nombre exacto del HP All-in-One, tal como figura en el panel de control.b. Imprima un informe de autocomprobación. Para obtener más informaciones, consulte la
guía del usuario.c. Esté preparado para describir el problema de forma detallada.d. Tenga preparados el número de serie y el identificador del servicio, que se encuentran en
el informe de autocomprobación.e. Esté junto a la impresora HP All-in-One cuando llame al servicio de asistencia de HP.
Información técnicaEn esta sección se indican las especificaciones técnicas y la información sobre normativasinternacionales del HP All-in-One. Para más información sobre las normativas y regulacionesmedioambientales, consulte la Ayuda en pantalla.Para obtener información sobre regulaciones y sobre el medio ambiente, incluida la declaración deconformidad, consulte la ayuda de la pantalla.
Requisitos del sistemaLos requisitos del sistema de software se encuentran en el archivo Léame.
Especificaciones del papel• Capacidad de la bandeja de entrada: Hojas de papel normal: Hasta 80 hojas de papel (75 gsm)• Capacidad de la bandeja de salida: Hojas de papel normal: Hasta 50 hojas de papel (75 gsm)
Nota Para ver una lista completa de los tamaños de los soportes de impresión, consulte elsoftware de la impresora.
Especificaciones físicas• Altura: 18,05 cm• Anchura: 42,57 cm• Profundidad: 26,74 cm• Peso: 5,27 kg
Especificaciones de alimentación• Consumo: 20 W (impresión media)• Tensión de entrada: 100 a 240 VCA ~ 1 A 50-60 Hz
Capítulo 2
12 HP Deskjet F2200 All-in-One series
Español
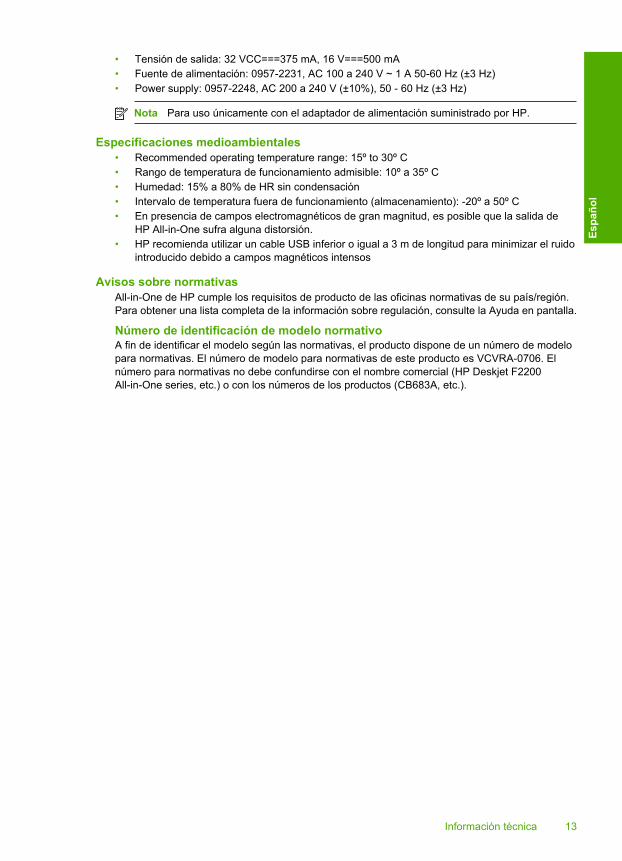
• Tensión de salida: 32 VCC===375 mA, 16 V===500 mA• Fuente de alimentación: 0957-2231, AC 100 a 240 V ~ 1 A 50-60 Hz (±3 Hz)• Power supply: 0957-2248, AC 200 a 240 V (±10%), 50 - 60 Hz (±3 Hz)
Nota Para uso únicamente con el adaptador de alimentación suministrado por HP.
Especificaciones medioambientales• Recommended operating temperature range: 15º to 30º C• Rango de temperatura de funcionamiento admisible: 10º a 35º C• Humedad: 15% a 80% de HR sin condensación• Intervalo de temperatura fuera de funcionamiento (almacenamiento): -20º a 50º C• En presencia de campos electromagnéticos de gran magnitud, es posible que la salida de
HP All-in-One sufra alguna distorsión.• HP recomienda utilizar un cable USB inferior o igual a 3 m de longitud para minimizar el ruido
introducido debido a campos magnéticos intensos
Avisos sobre normativasAll-in-One de HP cumple los requisitos de producto de las oficinas normativas de su país/región.Para obtener una lista completa de la información sobre regulación, consulte la Ayuda en pantalla.
Número de identificación de modelo normativoA fin de identificar el modelo según las normativas, el producto dispone de un número de modelopara normativas. El número de modelo para normativas de este producto es VCVRA-0706. Elnúmero para normativas no debe confundirse con el nombre comercial (HP Deskjet F2200All-in-One series, etc.) o con los números de los productos (CB683A, etc.).
Información técnica 13
Espa
ñol

Garantía
A. Alcance de la garantía limitada 1. Hewlett-Packard (HP) garantiza al usuario final que el producto de HP especificado no tendrá defectos de materiales ni
mano de obra por el periodo anteriormente indicado, cuya duración empieza el día de la compra por parte del cliente. 2. Para los productos de software, la garantía limitada de HP se aplica únicamente a la incapacidad del programa para
ejecutar las instrucciones. HP no garantiza que el funcionamiento de los productos se interrumpa o no contenga errores.
3. La garantía limitada de HP abarca sólo los defectos que se originen como consecuencia del uso normal del producto, y no cubre otros problemas, incluyendo los originados como consecuencia de: a. Mantenimiento o modificación indebidos; b. Software, soportes de impresión, piezas o consumibles que HP no proporcione o no admita; c. Uso que no se ajuste a las especificaciones del producto; d. Modificación o uso incorrecto no autorizados. 4. Para los productos de impresoras de HP, el uso de un cartucho que no sea de HP o de un cartucho recargado no
afecta ni a la garantía del cliente ni a cualquier otro contrato de asistencia de HP con el cliente. No obstante, si el error o el desperfecto en la impresora se atribuye al uso de un cartucho que no sea de HP, un cartucho recargado o un cartucho de tinta caducado, HP cobrará aparte el tiempo y los materiales de servicio para dicho error o desperfecto.
5. Si durante la vigencia de la garantía aplicable, HP recibe un aviso de que cualquier producto presenta un defecto cubierto por la garantía, HP reparará o sustituirá el producto defectuoso como considere conveniente.
6. Si HP no logra reparar o sustituir, según corresponda, un producto defectuoso que esté cubierto por la garantía, HP reembolsará al cliente el precio de compra del producto, dentro de un plazo razonable tras recibir la notificación del defecto.
7. HP no tendrá obligación alguna de reparar, sustituir o reembolsar el precio del producto defectuoso hasta que el cliente lo haya devuelto a HP.
8. Los productos de sustitución pueden ser nuevos o seminuevos, siempre que sus prestaciones sean iguales o mayores que las del producto sustituido.
9. Los productos HP podrían incluir piezas, componentes o materiales refabricados equivalentes a los nuevos en cuanto al rendimiento.
10. La Declaración de garantía limitada de HP es válida en cualquier país en que los productos HP cubiertos sean distribuidos por HP. Es posible que existan contratos disponibles para servicios de garantía adicionales, como el servicio in situ, en cualquier suministrador de servicios autorizado por HP, en aquellos países donde HP o un importador autorizado distribuyan el producto.
B. Limitaciones de la garantíaHASTA DONDE LO PERMITAN LAS LEYES LOCALES, NI HP NI SUS TERCEROS PROVEEDORES OTORGAN NINGUNA OTRA GARANTÍA O CONDICIÓN DE NINGÚN TIPO, YA SEAN GARANTÍAS O CONDICIONES DE COMERCIABILIDAD EXPRESAS O IMPLÍCITAS, CALIDAD SATISFACTORIA E IDONEIDAD PARA UN FIN DETERMINADO.
C. Limitaciones de responsabilidad 1. Hasta donde lo permitan las leyes locales, los recursos indicados en esta Declaración de garantía son los únicos y
exclusivos recursos de los que dispone el cliente. 2. HASTA EL PUNTO PERMITIDO POR LA LEY LOCAL, EXCEPTO PARA LAS OBLIGACIONES EXPUESTAS
ESPECÍFICAMENTE EN ESTA DECLARACIÓN DE GARANTÍA, EN NINGÚN CASO HP O SUS PROVEEDORES SERÁN RESPONSABLES DE LOS DAÑOS DIRECTOS, INDIRECTOS, ESPECIALES, INCIDENTALES O CONSECUENCIALES, YA ESTÉ BASADO EN CONTRATO, RESPONSABILIDAD EXTRACONTRACTUAL O CUALQUIER OTRA TEORÍA LEGAL, Y AUNQUE SE HAYA AVISADO DE LA POSIBILIDAD DE TALES DAÑOS.
D. Legislación local 1. Esta Declaración de garantía confiere derechos legales específicos al cliente. El cliente podría también gozar de otros
derechos que varían según el estado (en Estados Unidos), la provincia (en Canadá), o la entidad gubernamental en cualquier otro país del mundo.
2. Hasta donde se establezca que esta Declaración de garantía contraviene las leyes locales, dicha Declaración de garantía se considerará modificada para acatar tales leyes locales. Bajo dichas leyes locales, puede que algunas de las declinaciones de responsabilidad y limitaciones estipuladas en esta Declaración de garantía no se apliquen al cliente. Por ejemplo, algunos estados en Estados Unidos, así como ciertas entidades gubernamentales en el exterior de Estados Unidos (incluidas las provincias de Canadá) pueden:
a. Evitar que las renuncias y limitaciones de esta Declaración de garantía limiten los derechos estatutarios del cliente (por ejemplo, en el Reino Unido);
b. Restringir de otro modo la capacidad de un fabricante de aumentar dichas renuncias o limitaciones; u c. Ofrecer al usuario derechos adicionales de garantía, especificar la duración de las garantías implícitas a las que no
puede renunciar el fabricante o permitir limitaciones en la duración de las garantías implícitas. 3. LOS TÉRMINOS ENUNCIADOS EN ESTA DECLARACIÓN DE GARANTÍA, SALVO HASTA DONDE LO PERMITA LA LEY, NO EXCLUYEN, RESTRINGEN NI MODIFICAN LOS DERECHOS ESTATUTARIOS OBLIGATORIOS
PERTINENTES A LA VENTA DE PRODUCTOS HP A DICHOS CLIENTES, SINO QUE SON ADICIONALES A LOS MISMOS.
Información sobre la Garantía Limitada del Fabricante HPEstimado Cliente:Adjunto puede encontrar el nombre y dirección de las entidades HP que proporcionan la Garantía Limitada de HP (garantía del fabricante) en su país. Usted puede tener también frente al vendedor los derechos que la ley le conceda, conforme a lo estipulado en el contrato de compra, que son adicionales a la garantía del fabricante y no quedan limitados por ésta.España: Hewlett-Packard Española S.L., C/ Vicente Aleixandre 1, Parque Empresarial Madrid - Las Rozas, 28230 Las Rozas,
Madrid
Producto HP Duración de la garantía limitadaMedio de almacenamiento del software 90 díasImpresora 1 añoCartuchos de tinta o impresión La garantía es válida hasta que se agote la tinta HP o hasta que
se alcance la fecha de “fin de garantía” indicada en el cartucho, cualquiera de los hechos que se produzca en primer lugar. Esta garantía no cubrirá los productos de tinta HP que se hayan rellenado o manipulado, se hayan vuelto a limpiar, se hayan utilizado incorrectamente o se haya alterado su composición.
Accesorios 1 año, a no ser que se especifique otro dato
Capítulo 2
14 HP Deskjet F2200 All-in-One series
Español

HP Deskjet F2200 All-in-One seriesBasics Guide
Engl
ish

Contents
1 HP All-in-One overviewThe HP All-in-One at a glance..................................................................................................17Control panel buttons...............................................................................................................18Status light overview.................................................................................................................19Load originals for scanning and copying..................................................................................20Make a copy.............................................................................................................................20Scan an original........................................................................................................................21
2 Troubleshooting and supportUninstall and reinstall the software...........................................................................................22Hardware setup troubleshooting...............................................................................................22Clear paper jams......................................................................................................................25Print cartridge troubleshooting..................................................................................................25Find more information...............................................................................................................25
Setup Guide........................................................................................................................25Onscreen Help....................................................................................................................25HP Web site........................................................................................................................26
HP support................................................................................................................................26HP support by phone..........................................................................................................26
Phone support period...................................................................................................26After the phone support period.....................................................................................26
Before calling HP Support..................................................................................................26Technical information...............................................................................................................26
System requirements..........................................................................................................27Paper specifications...........................................................................................................27Physical specifications........................................................................................................27Power specifications...........................................................................................................27Environmental specifications..............................................................................................27Regulatory notices..............................................................................................................27
Regulatory model identification number.......................................................................27Warranty.............................................................................................................................28
16 HP Deskjet F2200 All-in-One series
English
1 HP All-in-One overviewThe HP Deskjet F2200 All-in-One series is a versatile device that gives you easy-to-usecopying, scanning, and printing. For information about the full range of features andfunctions, see the onscreen Help.
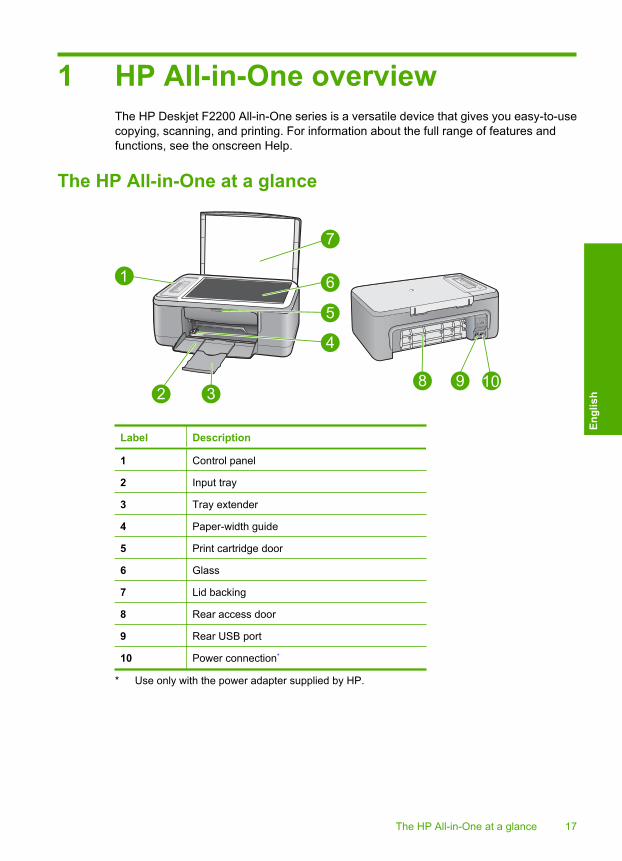
The HP All-in-One at a glance
Label Description
1 Control panel
2 Input tray
3 Tray extender
4 Paper-width guide
5 Print cartridge door
6 Glass
7 Lid backing
8 Rear access door
9 Rear USB port
10 Power connection*
* Use only with the power adapter supplied by HP.
The HP All-in-One at a glance 17
Engl
ish

Control panel buttons
Label Icon Name and Description
1 On: Turns the HP All-in-One on or off. The On button is lit when theHP All-in-One is powered on.
2 Check Print Cartridge lights: Indicates the need to reinsert the specified printcartridge, replace the print cartridge, or close the print cartridge door. TheColor light appears next to the three color drop icons and indicates that theproblem is with the tri-color print cartridge. The Black/Photo light appearsnext to the single black drop icon and indicates that the problem is with theblack or photo print cartridge.
3 Cancel: Stops a print, copy, or scan job. A blinking Paper light next to the Cancel button indicates the need to loadpaper or clear a paper jam. Press any button after a problem is solved toinstruct the HP All-in-One to continue.
4 Scan: Starts scanning the original currently on the glass. The Scan commandis ignored if the HP All-in-One is busy with any other job. The Scan commandfunctions only when the computer is on.
5 Paper Type: Changes the paper type setting to either plain or photo paper.Make sure the appropriate paper type is loaded in the input tray. The defaultpaper type setting is Plain Paper.The Paper Type lights indicate the currently selected paper size and type.
6 Start Copy Black: Starts a black-and-white copy job. Press this buttonmultiple times to specify multiple black copies. The printer will start printingshortly after the number of copies have been selected. The number of copiesto be printed is shown to the right of this button.
7 Start Copy Color: Starts a color copy job. Press this button multiple timesto specify multiple color copies. The printer will start printing shortly after thenumber of copies have been selected. The number of copies to be printed isshown to the right of this button.
Chapter 1
18 HP Deskjet F2200 All-in-One series
English

Status light overviewSeveral indicator lights inform you of the status of the HP All-in-One.
Label Description
1 On light
2 Check Print Cartridge lights
3 Paper light
4 Paper Type lights (for the Paper Type button)
The following table describes common situations and explains what the lights mean.
Light status What it means
All lights are off. The HP All-in-One is turned off. Press the On button to turn on the device.
The On light and one of the PaperType lights are on.
The HP All-in-One is ready for printing, scanning, or copying.
The On light is blinking. The HP All-in-One is busy printing, scanning, copying, or aligning theprint cartridges.
The On light blinks quickly for 3seconds and then is on steady.
You pressed a button while the HP All-in-One is already busy printing,scanning, copying, or aligning the print cartridges.
The On light blinks for 20 secondsand then is steady.
You pressed the Scan button and there was no response from thecomputer.
The Paper light is blinking. • The HP All-in-One is out of paper.• The HP All-in-One has a paper jam.
The Check Print Cartridge light isblinking.
• The print cartridge door is open.• The print cartridges are missing or not seated correctly.• The tape was not removed from the print cartridge.• The print cartridge is not intended for use in this HP All-in-One.
Status light overview 19
Engl
ish

Light status What it means
• The print cartridge might be defective.• The print cartridge is low on ink.
The On, Paper, and Check PrintCartridge lights are blinking.
Scanner failure.Turn off the HP All-in-One, then turn it on again. If the problem persists,contact HP Support.
All lights are blinking. The HP All-in-One has a fatal error.1. Turn the HP All-in-One off.2. Unplug the power cord.3. Wait a minute, then plug the power cord back in.4. Turn the HP All-in-One back on.If the problem persists, contact HP Support.
Load originals for scanning and copyingYou can load many different types and sizes of paper in the HP All-in-One, including letteror A4 paper, photo paper, transparencies, and envelopes. For more information, see theonscreen Help.
To load an original on the glass1. Lift the lid on the HP All-in-One.2. Place your original with the side you want to copy or scan face down on the left front
corner of the glass.
TIP: To get the correct copy size, make sure that there is no tape or other foreignobject on the glass.
3. Close the lid.
Make a copyYou can make quality copies from the control panel.
Chapter 1(continued)
20 HP Deskjet F2200 All-in-One series
English

To make a copy from the control panel1. Make sure you have paper loaded in the input tray.2. Place your original with the side you want to copy or scan face down on the left front
corner of the glass.3. Press the Paper Type button to set the paper type.4. Press Start Copy Black or Start Copy Color.
Scan an originalFor original documents or images placed on the glass, you can start a scan from yourcomputer or from the HP All-in-One. To use the scan features, the HP All-in-One andcomputer must be connected and turned on. The HP Photosmart Software must also beinstalled and running on your computer prior to scanning.
NOTE: If you are using Windows 2000, use the Windows Scanner wizard instead ofpressing the Scan button.
To scan to a computer1. Place your original with the side you want to copy or scan face down on the left front
corner of the glass.
TIP: For quality copies, ensure that the scanner glass is clean and that there areno foreign materials adhering to it.
2. Press Scan.3. Make any edits to the preview image, and then click Accept when you are finished.
Scan an original 21
Engl
ish

2 Troubleshooting and supportThis chapter contains troubleshooting information for installation and configuration issues and someoperational topics. For more troubleshooting information, see the onscreen Help.Many issues are caused when the product is connected to the computer using a USB cable beforethe HP Photosmart software is installed on the computer. If you connected the product to yourcomputer before the software installation screen prompts you to do so, you must follow these steps:
To troubleshoot software installation1. Disconnect the USB cable from the computer.2. Uninstall the software (if you have already installed it). For more information, see “Uninstall and
reinstall the software” on page 22.3. Restart your computer.4. Turn off the product, wait one minute, then restart it.5. Reinstall the HP Photosmart software.
CAUTION: Do not connect the USB cable to the computer until prompted by the softwareinstallation screen.
For support contact information, see the inside back cover of this guide.
Uninstall and reinstall the softwareIf your installation is incomplete, or if you connected the USB cable to the computer before promptedby the software installation screen, you might need to uninstall and then reinstall the software. Donot simply delete the HP All-in-One application files from your computer. Make sure to remove themproperly using the uninstall utility provided when you installed the software that came with theHP All-in-One.
To uninstall from a Windows computer and then reinstall1. Open the Windows control panel and double-click Add or Remove Programs.2. Select HP Deskjet All-in-One Driver Software, and then click Change/Remove.
Follow the onscreen instructions.3. Disconnect the product from your computer.4. Restart your computer.
NOTE: It is important that you disconnect the product before restarting your computer. Donot connect the product to your computer until after you have reinstalled the software.
5. To reinstall the software, insert the product CD-ROM into your computer’s CD-ROM drive andfollow the instructions on the startup screen to install the software.If the startup screen does not appear, double-click My Computer, double-click the CD-ROMicon with the HP logo, and then double-click setup.exe
6. Follow the onscreen instructions and the instructions provided in the Setup Guide that camewith the product.
When the software installation is complete, the HP Digital Imaging Monitor icon appears in theWindows system tray.To verify that the software is properly installed, double-click the HP Solution Center icon on thedesktop. If the HP Solution Center shows the essential icons (Scan Picture and ScanDocument), the software has been properly installed.For Macintosh users: Uninstall and reinstall directions are in the Readme file and in the Help filesfor the software.
Hardware setup troubleshootingThis section contains hardware troubleshooting information for the HP All-in-One.
22 HP Deskjet F2200 All-in-One series
English

The product will not turn on
Solution• Make sure the power cord is firmly connected to both the product and the power adapter.
Plug the power cord into a power outlet, surge protector, or power strip.
1 Power connection
2 Power cord and adapter
3 Power outlet
• If you are using a power strip, make sure the power strip is on. Or, try plugging the productdirectly into a power outlet.
• Test the power outlet to make sure it is working. Plug in an appliance that you know works,and see if the appliance has power. If not, then there might be a problem with the poweroutlet.
• If you plugged the product into a switched outlet, make sure the outlet is switched on. If itis switched to on but still does not work, then there might be a problem with the power outlet.
Cause: The product was not plugged into a power outlet properly or there was a problem withthe power outlet.
Solution: The product might not respond if you press the On button too quickly. Press theOn button once. It might take a few minutes for the product to turn on. If you press the On buttonagain during this time, you might turn the product off.
CAUTION: If the product still does not turn on, it might have a mechanical failure. Unplugthe product from the power outlet.Contact HP support for service.Go to: www.hp.com/support. If prompted, choose your country/region, and then clickContact HP for information on calling for technical support.
Cause: You pressed the On button too quickly.
I connected the USB cable, but I am having problems using the HP All-in-One withmy computer
Solution: You must first install the software that came with the product before connecting theUSB cable. During installation, do not plug in the USB cable until prompted by the onscreeninstructions. Connecting the USB cable before prompted can cause errors.Once you have installed the software, connecting your computer to the product with a USB cableis straightforward. Simply plug one end of the USB cable into the back of your computer and the
Hardware setup troubleshooting 23
Engl
ish

other into the back of the product. You can connect to any USB port on the back of yourcomputer.
For more information on installing the software and connecting the USB cable, see the SetupGuide that came with the HP All-in-One.
The HP All-in-One does not printSolution: If the HP All-in-One and computer are not communicating with each other, try thefollowing:• Look at the On button located on the product. If it is not lit, the product is turned off. Make
sure the power cord is firmly connected to the product and plugged into a power outlet.Press the On button to turn on the product.
• Make sure the print cartridges are installed.• Make sure you have paper loaded in the input tray.• Make sure that the product does not have a paper jam.• Check that the print carriage is not jammed.
Open the front access door to access the print carriage area. Remove any objects that areblocking the print carriage, including any packing materials. Turn the product off and thenturn it on again.
• Print a test page to see if the product can print and is communicating with the computer.• Make sure that the print queue is not paused. If it is, choose the appropriate setting to
resume printing. For more information about accessing the print queue, see thedocumentation that came with the operating system installed on your computer.
• Check the USB cable. If you are using an older cable, it might not be working properly. Tryconnecting it to another product to see if the USB cable works. If you experience problems,the USB cable might need to be replaced. Also verify that the cable does not exceed 3meters (9.8 feet) in length.
• Make sure your computer is USB ready and that you are using a supported operatingsystem. For more information, see the Readme file.
• Check the connection from the product to your computer. Verify that the USB cable issecurely plugged into the USB port on the back of the product. Make sure the other end ofthe USB cable is plugged into a USB port on your computer. After the cable is connectedproperly, turn the product off and then on again.
Chapter 2
24 HP Deskjet F2200 All-in-One series
English

• If you are connecting the product through a USB hub, make sure the hub is turned on. If thehub is on, try connecting directly to your computer.
• Check other printers or scanners. You might need to disconnect older products from yourcomputer.
• Try connecting the USB cable to another USB port on your computer. After you check theconnections, try restarting your computer. Turn the product off and then on again.
• After you check the connections, try restarting your computer. Turn the product off and thenon again.
• If necessary, remove and then install the software you installed with the product again.For more information on setting up the HP All-in-One and connecting it to your computer, seethe Setup Guide that came with the HP All-in-One.
Clear paper jamsFor information about clearing a paper jam, see the onscreen Help. For instructions on accessingthe onscreen Help on a Windows computer, see “Onscreen Help” on page 25.
Print cartridge troubleshootingFor information about troubleshooting print cartridges, see the onscreen Help. For instructions onaccessing the onscreen Help, see “Onscreen Help” on page 25.
Find more informationA variety of resources, both printed and onscreen, provide information about setting up and usingthe HP All-in-One.
Setup GuideThe Setup Guide provides instructions for setting up your HP All-in-One and installing software.Make sure you follow the steps in the Setup Guide in order.If you have problems during setup, see Troubleshooting in the last section of the Setup Guide, orsee “Troubleshooting and support” on page 22 in this guide.
Onscreen HelpThe onscreen Help provides detailed instructions on features of your HP All-in-One that are notdescribed in this guide, including features that are only available using the software you installedwith your HP All-in-One. The onscreen Help also provides regulatory and environmental information.
Find more information 25
Engl
ish

To access the onscreen Help• Windows: Click Start > All Programs > HP > Deskjet F2200 All-in-One series > Help.
To install the onscreen Help, insert the software CD in your computer and follow the onscreeninstructions.
• Macintosh: Click Help > Mac Help > Library > HP Product Help.
HP Web siteIf you have Internet access, you can get help and support from the HP Web site at www.hp.com/support. This Web site offers technical support, drivers, supplies, and ordering information.
HP supportYou can contact HP Support by phone and online. Support options and availability vary by product,country/region, and language.
HP support by phoneFor a list of support phone numbers, see the inside back cover of this guide.Support options and availability vary by product, country/region, and language.
Phone support periodOne year of phone support is available in Latin America (including Mexico). To determine the durationof phone support in North America, Eastern Europe, the Middle East, Asia Pacific, and Africa, goto www.hp.com/support.Standard phone company charges apply.
After the phone support periodAfter the phone support period, help is available from HP at an additional cost.Contact your HP dealer or call the support phone number for your country/region to learn more aboutsupport options.
Before calling HP Support1. Make sure that:
a. The HP All-in-One is plugged in and turned on.b. The specified print cartridges are installed correctly.c. The recommended paper is properly loaded in the input tray.
2. Reset the HP All-in-One:a. Turn off the HP All-in-One by pressing the On button.b. Unplug the power cord from the back of the HP All-in-One.c. Plug the power cord back into the HP All-in-One.d. Turn on the HP All-in-One by pressing the On button.
3. Have the following information available:a. Specific name of the HP All-in-One, as it appears on the control panel.b. Print a self-test report. (For more information, see the User Guide.)c. Be prepared to describe your problem in detail.d. Have your serial number and service ID ready, found on the self-test report.e. Be near the HP All-in-One printer when you call HP Support.
Technical informationThe technical specifications and international regulatory information for the HP All-in-One areprovided in this section. For additonal regulatory and environmental specifications, see the onscreenHelp.For additional regulatory and environmental information, including the Declaration of Conformitystatement, see the onscreen Help.
Chapter 2
26 HP Deskjet F2200 All-in-One series
English

System requirementsSoftware system requirements are located in the Readme file.
Paper specifications• Input tray capacity: Plain paper sheets: Up to 80 (75 gsm (20 lb.) paper)• Output tray capacity: Plain paper sheets: Up to 50 (75 gsm (20 lb.) paper)
NOTE: For a complete list of supported media sizes, see the printer software.
Physical specifications• Height: 18.05 cm (7.11 inches)• Width: 42.57 cm (16.76 inches)• Depth: 26.74 cm (10.53 inches)• Weight: 5.27 kg (11 lbs)
Power specifications• Power consumption: 20 watts (average printing)• Input voltage: AC 100 to 240 V ~ 1 A 50–60 Hz• Output voltage: DC 32 V===375 mA, 16 V===500mA• Power supply: 0957-2231, AC 100 to 240 V ~ 1 A 50–60 Hz (±3 Hz)• Power supply: 0957-2248, AC 200 to 240 V (±10%), 50 - 60 Hz (±3 Hz)
NOTE: Use only with the power adapter supplied by HP.
Environmental specifications• Recommended operating temperature range: 15º to 30º C (59º to 86º F)• Allowable operating temperature range: 10º to 35º C (50º to 95º F)• Humidity: 15% to 80% RH non-condensing• Non-operating (Storage) temperature range: –20º to 50º C (–4º to 122º F)• In the presence of high electromagnetic fields, it is possible the output from the HP All-in-One
may be slightly distorted• HP recommends using a USB cable less than or equal to 3 m (10 feet) in length to minimize
injected noise due to potential high electromagnetic fields
Regulatory noticesThe HP All-in-One meets product requirements from regulatory agencies in your country/region. Fora complete listing of regulatory notices, see the onscreen Help.
Regulatory model identification numberFor regulatory identification purposes, your product is assigned a Regulatory Model Number. TheRegulatory Model Number for your product is VCVRA-0706. This regulatory number should not beconfused with the marketing name (HP Deskjet F2200 All-in-One series, etc.) or product numbers(CB683A, etc.).
Technical information 27
Engl
ish

Warranty
A. Extent of limited warranty 1. Hewlett-Packard (HP) warrants to the end-user customer that the HP products specified above will be free from defects
in materials and workmanship for the duration specified above, which duration begins on the date of purchase by the customer.
2. For software products, HP’s limited warranty applies only to a failure to execute programming instructions. HP does not warrant that the operation of any product will be interrupted or error free.
3. HP's limited warranty covers only those defects that arise as a result of normal use of the product, and does not cover any other problems, including those that arise as a result of:
a. Improper maintenance or modification; b. Software, media, parts, or supplies not provided or supported by HP; c. Operation outside the product's specifications; d. Unauthorized modification or misuse. 4. For HP printer products, the use of a non-HP cartridge or a refilled cartridge does not affect either the warranty to the
customer or any HP support contract with the customer. However, if printer failure or damage is attributable to the use of a non-HP or refilled cartridge or an expired ink cartridge, HP will charge its standard time and materials charges to service the printer for the particular failure or damage.
5. If HP receives, during the applicable warranty period, notice of a defect in any product which is covered by HP's warranty, HP shall either repair or replace the product, at HP's option.
6. If HP is unable to repair or replace, as applicable, a defective product which is covered by HP's warranty, HP shall, within a reasonable time after being notified of the defect, refund the purchase price for the product.
7. HP shall have no obligation to repair, replace, or refund until the customer returns the defective product to HP. 8. Any replacement product may be either new or like-new, provided that it has functionality at least equal to that of the
product being replaced. 9. HP products may contain remanufactured parts, components, or materials equivalent to new in performance. 10. HP's Limited Warranty Statement is valid in any country where the covered HP product is distributed by HP. Contracts
for additional warranty services, such as on-site service, may be available from any authorized HP service facility in countries where the product is distributed by HP or by an authorized importer.
B. Limitations of warrantyTO THE EXTENT ALLOWED BY LOCAL LAW, NEITHER HP NOR ITS THIRD PARTY SUPPLIERS MAKES ANY OTHER WARRANTY OR CONDITION OF ANY KIND, WHETHER EXPRESS OR IMPLIED WARRANTIES OR CONDITIONS OF MERCHANTABILITY, SATISFACTORY QUALITY, AND FITNESS FOR A PARTICULAR PURPOSE.
C. Limitations of liability 1. To the extent allowed by local law, the remedies provided in this Warranty Statement are the customer's sole and
exclusive remedies. 2. TO THE EXTENT ALLOWED BY LOCAL LAW, EXCEPT FOR THE OBLIGATIONS SPECIFICALLY SET FORTH IN
THIS WARRANTY STATEMENT, IN NO EVENT SHALL HP OR ITS THIRD PARTY SUPPLIERS BE LIABLE FOR DIRECT, INDIRECT, SPECIAL, INCIDENTAL, OR CONSEQUENTIAL DAMAGES, WHETHER BASED ON CONTRACT, TORT, OR ANY OTHER LEGAL THEORY AND WHETHER ADVISED OF THE POSSIBILITY OF
SUCH DAMAGES.D. Local law 1. This Warranty Statement gives the customer specific legal rights. The customer may also have other rights which vary
from state to state in the United States, from province to province in Canada, and from country to country elsewhere in the world.
2. To the extent that this Warranty Statement is inconsistent with local law, this Warranty Statement shall be deemed modified to be consistent with such local law. Under such local law, certain disclaimers and limitations of this Warranty Statement may not apply to the customer. For example, some states in the United States, as well as some governments outside the United States (including provinces in Canada), may:
a. Preclude the disclaimers and limitations in this Warranty Statement from limiting the statutory rights of a consumer (e.g., the United Kingdom); b. Otherwise restrict the ability of a manufacturer to enforce such disclaimers or limitations; or c. Grant the customer additional warranty rights, specify the duration of implied warranties which the manufacturer
cannot disclaim, or allow limitations on the duration of implied warranties. 3. THE TERMS IN THIS WARRANTY STATEMENT, EXCEPT TO THE EXTENT LAWFULLY PERMITTED, DO NOT
EXCLUDE, RESTRICT, OR MODIFY, AND ARE IN ADDITION TO, THE MANDATORY STATUTORY RIGHTS APPLICABLE TO THE SALE OF THE HP PRODUCTS TO SUCH CUSTOMERS.
HP Limited WarrantyDear Customer,You will find below the name and address of the HP entity responsible for the performance of the HP Limited Warranty in your country. You may have additional statutory rights against the seller based on your purchase agreement. Those rights are not in any way affected by this HP Limited Warranty.Ireland: Hewlett-Packard Ireland Ltd. 30 Herbert Street IRL-Dublin 2United Kingdom: Hewlett-Packard Ltd, Cain Road, Bracknell, GB-Berks RG12 1HN
HP product Duration of limited warrantySoftware Media 90 daysPrinter 1 yearPrint or Ink cartridges Until the HP ink is depleted or the “end of warranty” date printed on the cartridge has been reached, whichever occurs first. This
warranty does not cover HP ink products that have been refilled, remanufactured, refurbished, misused, or tampered with.
Accessories 1 year unless otherwise stated
Chapter 2
28 HP Deskjet F2200 All-in-One series
English
الجزائر
البحرين
℡
℡
مصر
العراق
الكويت
لبنان
قطر
اليمن
ישראל
األردن
عمان
السعوبية
تونس
اإلمارات العربية المتحدة
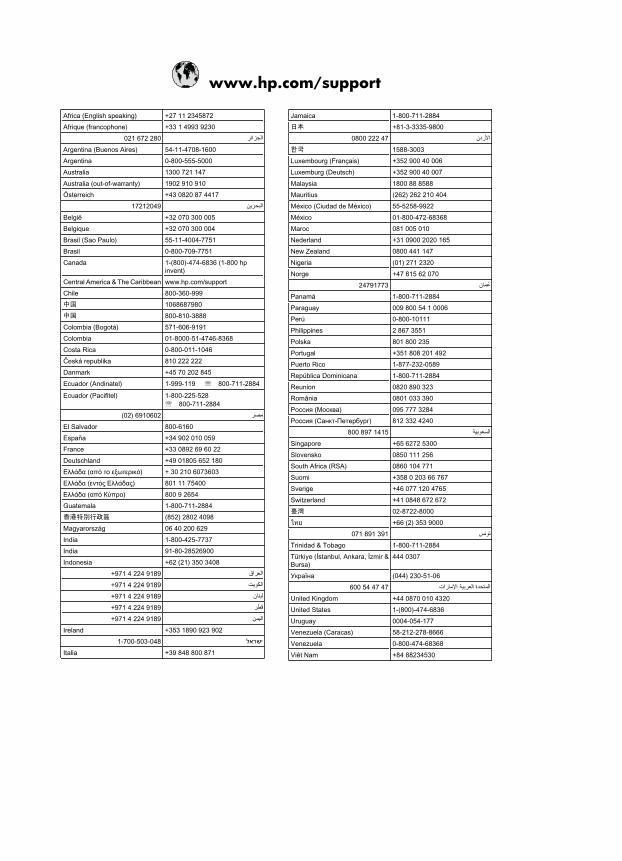
www.hp.com/support