EN FR Instructions de montage / Mode d'emploi / Garantie...
36
Montreux 16570xx1 Carlton 17670xx1 Phoenix 17620xx1 Terrano 37670xx1 EN Installation / User Instructions / Warranty FR Instructions de montage / Mode d'emploi / Garantie ES Instrucciones de montaje / Manejo / Garantía
Transcript of EN FR Instructions de montage / Mode d'emploi / Garantie...
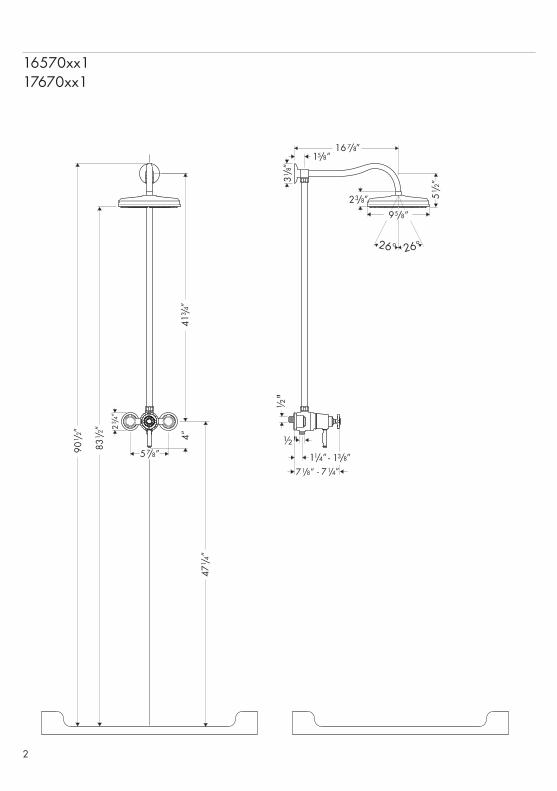
Montreux16570xx1
Carlton17670xx1
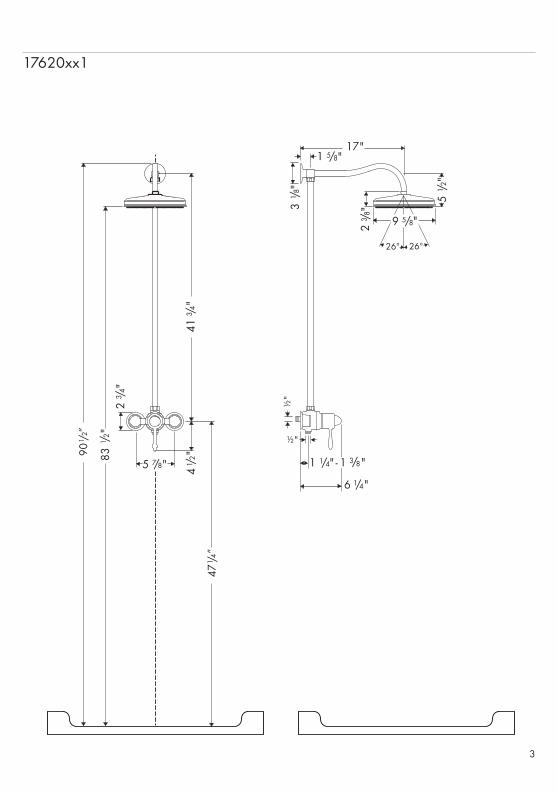
Phoenix17620xx1
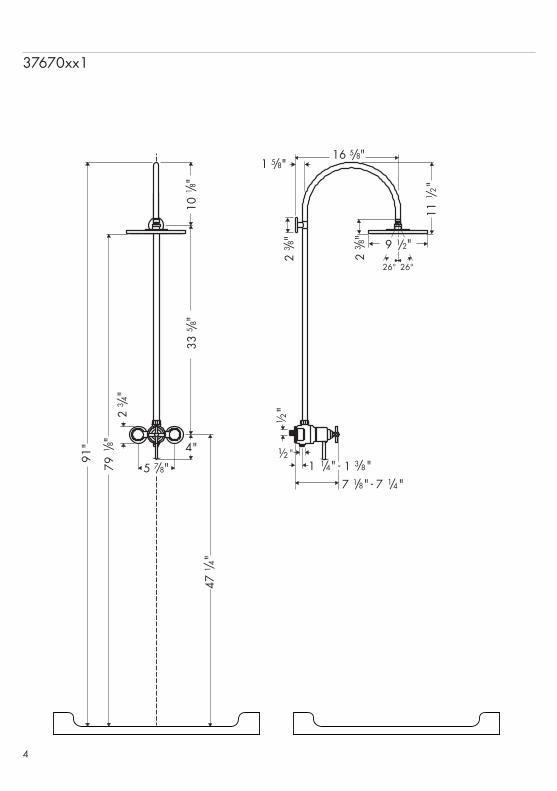
Terrano37670xx1
EN Installation/UserInstructions/WarrantyFR Instructionsdemontage/Moded'emploi/GarantieES Instruccionesdemontaje/Manejo/Garantía
�
16570xx117670xx1
�
176�0xx1
�
�7670xx1
5
Technical Information
Recommendedwaterpressure 15-75PSIMax.waterpressure 1�5PSIRecommendedhotwatertemp. 1�0°-1�0°F*Max.hotwatertemp 176°F*Flowrate-showerhead �.5GPMFlowrate-handshower �.5GPM
*Pleaseknowandfollowallapplicablelocalplumbingcodeswhensettingthetemperatureonthewaterheater.
Données techniques
Pressiond’eaurecommandée 15-75PSIPressiond’eaumaximum 1�5PSITempératurerecommandée 1�0°-1�0°F* d'eauchaude Températuremaximumd'eauchaude 176°F*Capaciténominale-pommededouche �.5GPMCapaciténominale-douchette �.5GPM
*Vousdevezconnaîtreetrespectertouslescodesdeplom-berielocauxapplicablespourleréglagedelatempératureduchauffe-eau.
English Français
Installation ConsiderationsForbestresults,Hansgroherecommendsthatthisunitbeinstalledbyalicensed,professionalplumber.
Pleasereadovertheseinstructionsthoroughlybe-forebeginninginstallation.Makesurethatyouhavealltoolsandsuppliesneededtocompletetheinstallation.
Thefinishedwallsurfacemustbecompleteandsealedbeforeinstallationoftheshowerpipe.
Thescrewsandanchorsincludedaresuitableforinstallationonsolidsurfacessuchastile,densenaturalstone,etc.Thewallshouldbeflat,with-outprotrudingtiles,joints,etc.
Iftheshowerpipeistobeinstalledinafiberglassoracrylicshowerenclosure,thewallmustbereinforced.
Protectionagainstbackflowisprovidedbycheckvalves.
Topreventscaldinjury,themaximumoutputtem-peratureoftheshowervalvemustbenohigherthan1�0°F.InMassachusetts,themaximumoutputtemperaturecanbenohigherthan11�°F.
Keepthisbookletandthereceipt(orotherproofofdateandplaceofpurchase)forthisproductinasafeplace.Thereceiptisrequiredshoulditbenecessarytorequestwarrantyparts.
•
•
•
•
•
•
•
•
À prendre en considération pour l’installation
Pourdemeilleursrésultats,Hansgroherecom-mandequeceproduitsoitinstalléparunplom-bierprofessionnellicencié.
Veuillezlireattentivementcesinstructionsavantdeprocéderàl’installation.Assurez-vousdedis-poserdetouslesoutilsetdumatérielnécessairespourl’installation.
Lasurfacedumurfinidoitêtrecomplétéeetscel-léeavantl’installationdecetuyaudedouche.
Lesvisetchevillesfourniespermettentl’installationsurdessurfacessolidestellesquelescarreaux,lespierresnaturellesdenses,etc.Lemurdoitêtreplat,sansaucuncarreau,joint,etc.,saillant.
Sivousprévoyezinstallercetuyaudedouchedansunecabinededoucheenfibredeverreouenacrylique,vousdevrezrenforcerlemur.
Laprotectioncontreleretourd’eauestassuréepardesclapetsanti-retour.
Pourempêcherdesblessuresparébouillante-ment,latempératuredesortiemaximaledurobinetdedouchenedoitpasexcéder1�0°F.AuMassachusetts,latempératuredesortiemaxi-maledurobinetdedouchenedoitpasexcéder11�°F.
Conservezcelivretetlereçu(ouuneautrepreuvesurlaquellefigurentladateetl’endroitdel’achat)pourceproduitdansunendroitsûr.Lereçuestrequissivouscommandezdespiècessousgarantie.
•
•
•
•
•
•
•
•
6
Datos tecnicos
Presiónrecomendadaenservicio 15-75PSIPresiónenserviciomax. 1�5PSITemperaturarecomendadadel 1�0�-1�0�F* aguacalienteTemperaturadelaguacalientemax. 176�F*Caudalmáximo-ducha �.5GPMCaudalmáximo-teleducha �.5GPM
*Debeconocerycumplirtodosloscódigoslocalesapli-cablesparaajustarlatemperaturadelcalentadordeagua.
Consideraciones para la instalación
Paraobtenermejoresresultados,lainstalacióndebeestaracargodeunplomeroprofesionalmatriculado.
Antesdecomenzarlainstalación,leaestasinstruccionesdetenidamente.Asegúresedetenerlasherramientasylosinsumosnecesariosparacompletarlainstalación.
Lasuperficiedelaparedterminadadebeestarcompletayselladaantesdelainstalacióndeltubodeladucha.
Lostornillosypernosdeanclajeincluidossonaptosparainstalaciónensuperficiessólidas,comoazulejo,piedranaturalcompacta,etc.Lapareddebeserplana,sinazulejosquesobresal-gan,uniones,etc.
Encasodeinstalareltubodeduchaenuncer-ramientodeduchadefibradevidriooacrílico,debereforzarlapared.
Laproteccióncontraflujoinversoseproporcionamedianteválvulasderetención.
Paraevitarescaldaduras,lamáximatem-peraturadesalidadelaválvuladeladuchanodebeexcederlos1�0°F.EnMassachusetts,lamáximatemperaturadesalidadelaválvuladeladuchanodebeexcederlos11�°F.
Mantengaestefolletoyelrecibo(uotrocom-probantedellugaryfechadecompra)deesteproductoenlugarseguro.Elreciboserequiereencasodesernecesariosolicitarpiezasbajogarantía.
•
•
•
•
•
•
•
•
Español
Thisunitmeetsorexceedsthefollowing:
ASMEA11�.18.1
CSAB1�5.1
ListedbyIAPMO
ApprovedforuseinMassachusetts
•
•
•
•
7
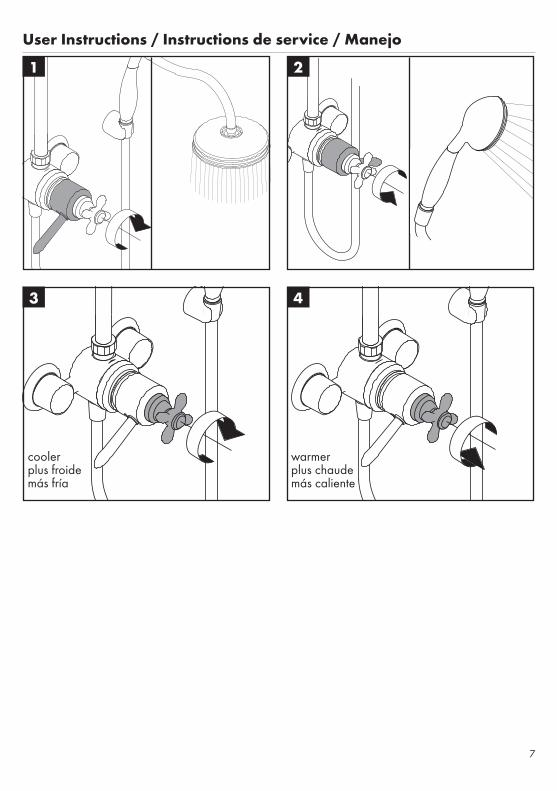
User Instructions / Instructions de service / Manejo
1 2
3 4
coolerplusfroidemásfría
warmerpluschaudemáscaliente
8
English
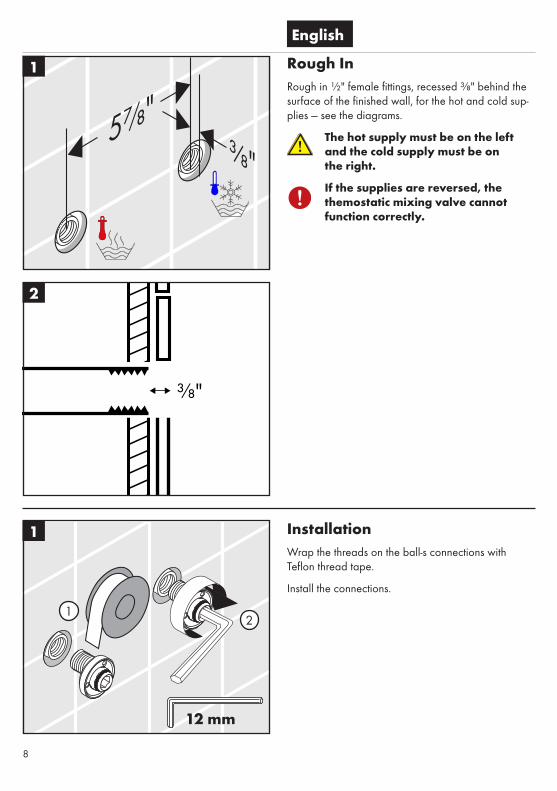
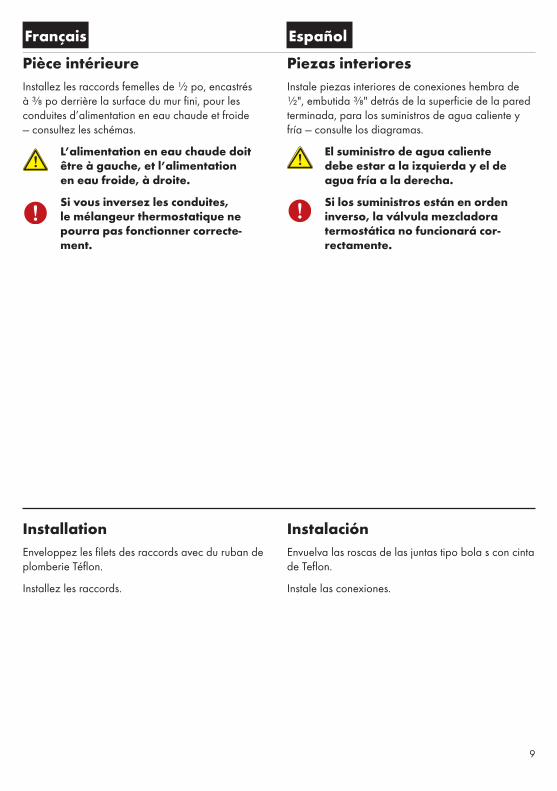
Rough InRoughin½"femalefittings,recessed⅜"behindthesurfaceofthefinishedwall,forthehotandcoldsup-plies—seethediagrams.
The hot supply must be on the left and the cold supply must be on the right.
If the supplies are reversed, the themostatic mixing valve cannot function correctly.
InstallationWrapthethreadsontheball-sconnectionswithTeflonthreadtape.
Installtheconnections.
1
2
1
12 mm
1�
�
Français Español
Pièce intérieureInstallezlesraccordsfemellesde½po,encastrésà⅜poderrièrelasurfacedumurfini,pourlesconduitesd’alimentationeneauchaudeetfroide—consultezlesschémas.
L’alimentation en eau chaude doit être à gauche, et l’alimentation en eau froide, à droite.
Si vous inversez les conduites, le mélangeur thermostatique ne pourra pas fonctionner correcte-ment.
InstallationEnveloppezlesfiletsdesraccordsavecdurubandeplomberieTéflon.
Installezlesraccords.
Piezas interioresInstalepiezasinterioresdeconexioneshembrade½",embutida⅜"detrásdelasuperficiedelaparedterminada,paralossuministrosdeaguacalienteyfría—consultelosdiagramas.
El suministro de agua caliente debe estar a la izquierda y el de agua fría a la derecha.
Si los suministros están en orden inverso, la válvula mezcladora termostática no funcionará cor-rectamente.
InstalaciónEnvuelvalasroscasdelasjuntastipobolasconcintadeTeflon.
Instalelasconexiones.
10
English
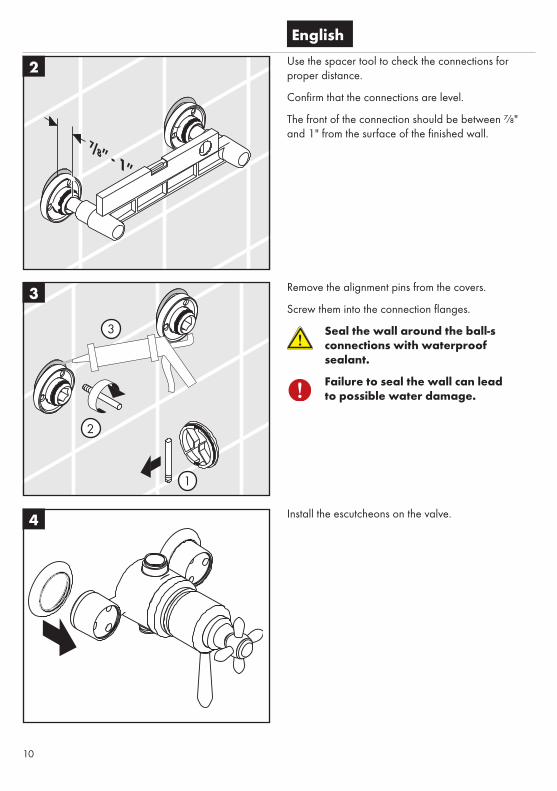
Usethespacertooltochecktheconnectionsforproperdistance.
Confirmthattheconnectionsarelevel.
Thefrontoftheconnectionshouldbebetween⅞"and1"fromthesurfaceofthefinishedwall.
Removethealignmentpinsfromthecovers.
Screwthemintotheconnectionflanges.
Seal the wall around the ball-s connections with waterproof sealant.
Failure to seal the wall can lead to possible water damage.
Installtheescutcheonsonthevalve.
2
3
4
1
�
�
11
Français EspañolUtilisezl’outild’espacementpourinstallerlesrac-cordsàladistanceappropriée.
Veillezàcequelesraccordssoientauniveau.
Ledevantdesraccordsdoitsetrouveràunedistancede⅞poà1podelasurfacedumurfini.
Retirezlestigesd’alignementdescouvercles.
Vissez-lesdanslescollerettesderaccordement.
Scellez le mur autour des raccords à l’aide d’un agent d’étanchéité.
Si le mur n’est pas scellé, l’eau pourrait éventuellement causer des dommages.
Installezlesécussonssurlerobinet.
Useelseparadorparaverificarladistanciaadec-uadadelasconexiones.
Confirmequelasconexionesestánniveladas.
Elfrentedelaconexióndebeserdeentre⅞"y1"desdelasuperficiedelaparedterminada.
Retirelospasadoresdealineacióndelastapas.
Atorníllelosenlasbridasdeconexión.
Selle la pared alrededor de las juntas tipo bola s con un sellador impermeable.
Si no se sella la pared, pueden producirse daños por acción del agua.
Instalelosescudosenlaválvula.
1�
English
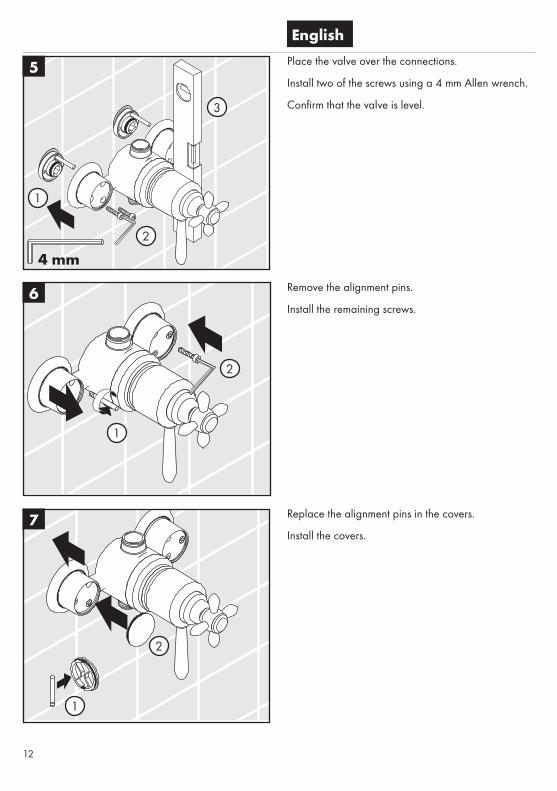
Placethevalveovertheconnections.
Installtwoofthescrewsusinga�mmAllenwrench.
Confirmthatthevalveislevel.
Removethealignmentpins.
Installtheremainingscrews.
Replacethealignmentpinsinthecovers.
Installthecovers.
5
6
7
4 mm
1
�
�
1
�
1
�
1�
Français EspañolPlacezlerobinetsurlesraccords.
Installezdeuxdesvisàl’aided’unecléhexagonalede�mm.
Assurez-vousquelerobinetestauniveau.
Retirezlestigesd’alignement.
Installezlesvisrestantes.
Replacezlestigesd’alignementdanslescouvercles.
Installezlescouvercles.
Coloquelaválvulasobrelasconexiones.
InstaledosdelostornillosconunallaveAllende�mm.
Confirmequelaválvulaquedenivelada.
Retirelospasadoresdealineación.
Instalelostornillosrestantes.
Reemplacelospasadoresdealineacióndelastapas.
Instalelastapas.
1�
English
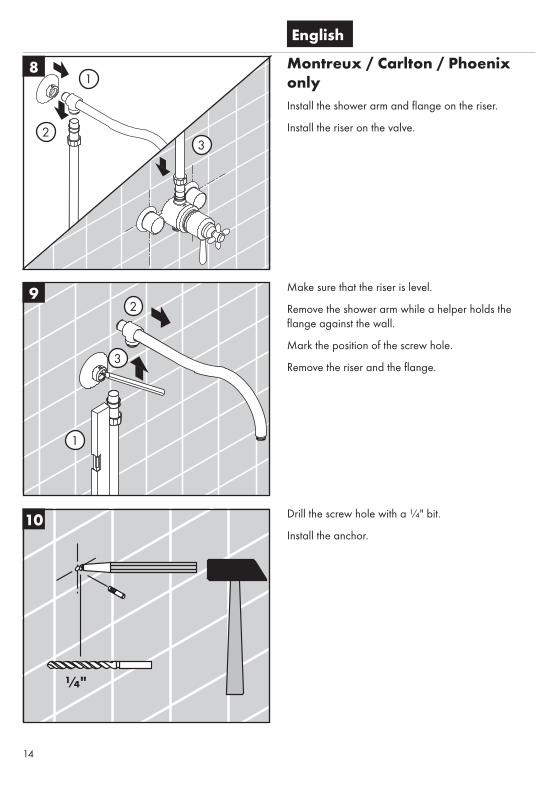
Montreux / Carlton / Phoenix onlyInstalltheshowerarmandflangeontheriser.
Installtheriseronthevalve.
Makesurethattheriserislevel.
Removetheshowerarmwhileahelperholdstheflangeagainstthewall.
Markthepositionofthescrewhole.
Removetheriserandtheflange.
Drillthescrewholewitha¼"bit.
Installtheanchor.
8
9
10
1
��
1
�
�
¼"
15
Français Español
Montreux / Carlton / Phoenix uniquementInstallezlebrasdedoucheetlabridesurlacolonnemontante.
Installezlacolonnemontantesurlerobinet.
Assurez-vousquelacolonnemontanteestauniveau.
Retirezlebrasdedouchependantqu’uneautrepersonnemaintientlabridecontrelemur.
Marquezlapositiondutroudevissage.
Retirezlacolonnemontanteetlabride.
Percezletroudevissageàl’aided’unemèchede¼po.
Installezlacheville.
Sólo para Montreux/Carlton/PhoenixInstaleelbrazodeduchaylabridaenlatuberíadesubida.
Instalelatuberíadesubidaenlaválvula.
Asegúresedequelatuberíadesubidaquedenivelada.
Retireelbrazodeduchamientrasqueunayudantesostienelabridacontralapared.
Marquelaposicióndelorificioparaeltornillo.
Retirelatuberíadesubidaylabrida.
Perforeelorificioparaeltornilloconunabrocade¼".
Instaleelpernodeanclaje.
16
English
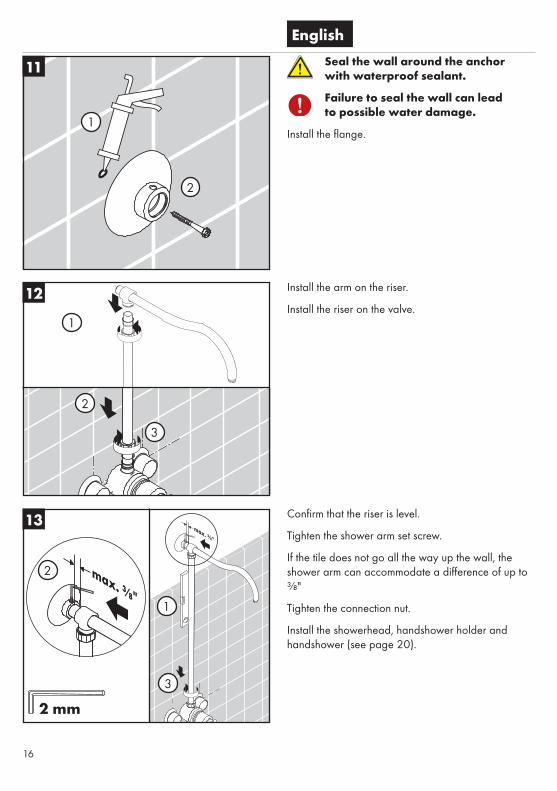
Seal the wall around the anchor with waterproof sealant.
Failure to seal the wall can lead to possible water damage.
Installtheflange.
Installthearmontheriser.
Installtheriseronthevalve.
Confirmthattheriserislevel.
Tightentheshowerarmsetscrew.
Ifthetiledoesnotgoallthewayupthewall,theshowerarmcanaccommodateadifferenceofupto⅜"
Tightentheconnectionnut.
Installtheshowerhead,handshowerholderandhandshower(seepage�0).
11
12
13
2 mm
1
�
1
�
�
1
�
�
17
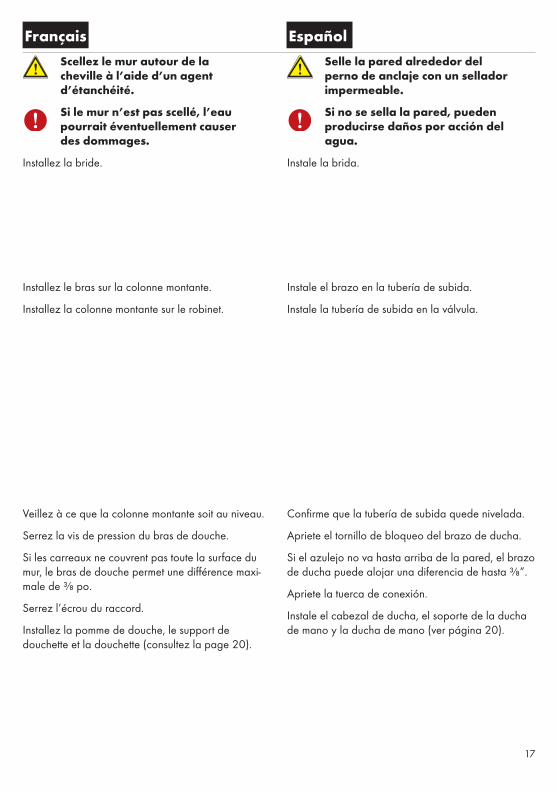
Français EspañolScellez le mur autour de la cheville à l’aide d’un agent d’étanchéité.
Si le mur n’est pas scellé, l’eau pourrait éventuellement causer des dommages.
Installezlabride.
Installezlebrassurlacolonnemontante.
Installezlacolonnemontantesurlerobinet.
Veillezàcequelacolonnemontantesoitauniveau.
Serrezlavisdepressiondubrasdedouche.
Silescarreauxnecouvrentpastoutelasurfacedumur,lebrasdedouchepermetunedifférencemaxi-malede⅜po.
Serrezl’écrouduraccord.
Installezlapommededouche,lesupportdedouchetteetladouchette(consultezlapage�0).
Selle la pared alrededor del perno de anclaje con un sellador impermeable.
Si no se sella la pared, pueden producirse daños por acción del agua.
Instalelabrida.
Instaleelbrazoenlatuberíadesubida.
Instalelatuberíadesubidaenlaválvula.
Confirmequelatuberíadesubidaquedenivelada.
Aprieteeltornillodebloqueodelbrazodeducha.
Sielazulejonovahastaarribadelapared,elbrazodeduchapuedealojarunadiferenciadehasta⅜”.
Aprietelatuercadeconexión.
Instaleelcabezaldeducha,elsoportedeladuchademanoyladuchademano(verpágina�0).
18
English
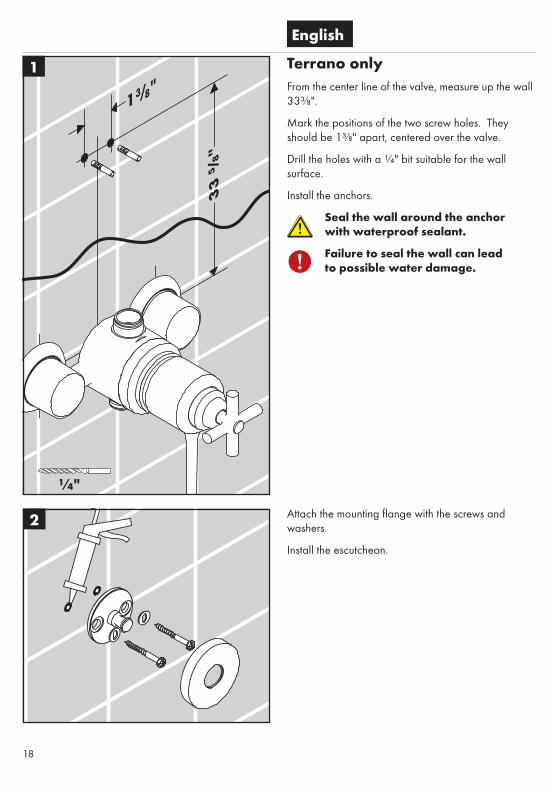
Terrano onlyFromthecenterlineofthevalve,measureupthewall��⅜".
Markthepositionsofthetwoscrewholes.Theyshouldbe1⅜"apart,centeredoverthevalve.
Drilltheholeswitha¼"bitsuitableforthewallsurface.
Installtheanchors.
Seal the wall around the anchor with waterproof sealant.
Failure to seal the wall can lead to possible water damage.
Attachthemountingflangewiththescrewsandwashers.
Installtheescutcheon.
1
2
¼"
1�
Français Español
Terrano uniquementÀpartirdelalignecentraledurobinet,tracezunelignesurlemurà��⅜po.
Marquezlespositionsdesdeuxtrousdevissage.Ilsdoiventêtreséparésde1⅜poetcentrésau-dessusdurobinet.
Percezlestrousàl’aided’unemèchede¼poconvenantàlasurfacedumur.
Installezleschevilles.
Scellez le mur autour de la cheville à l’aide d’un agent d’étanchéité.
Si le mur n’est pas scellé, l’eau pourrait éventuellement causer des dommages.
Fixezlabridedemontageàl’aidedesvisetdesrondelles.
Installezl’écusson.
Sólo para TerranoDesdelalíneacentraldelaválvula,mida��⅜”haciaarribadelapared.
Marquelasposicionesdelosdosorificiosparatornil-los.Debentenerunaseparaciónde1⅜”,centradossobrelaválvula.
Perforelosorificiosconunabrocade¼"apropiadaparalasuperficiedelapared.
Instalelospernosdeanclaje.
Selle la pared alrededor del perno de anclaje con un sellador impermeable.
Si no se sella la pared, pueden producirse daños por acción del agua.
Acoplelabridademontajeconlostornillosylasarandelas.
Instaleelescudo.
�0
English
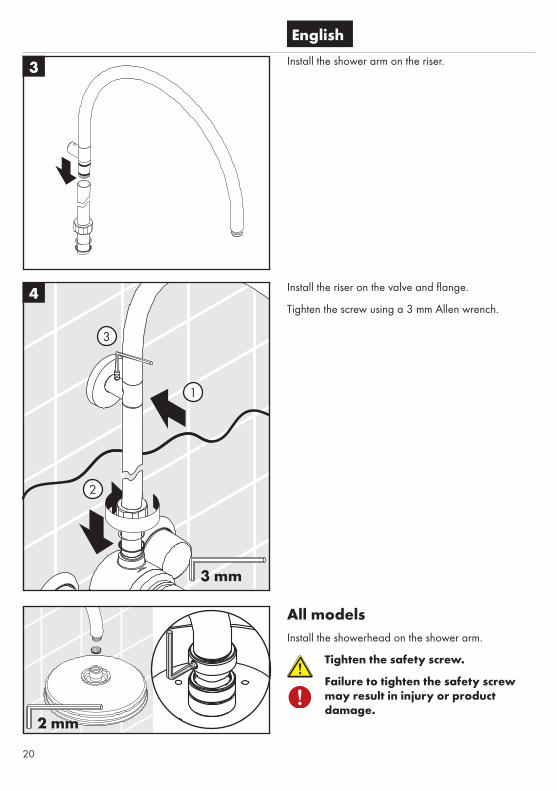
Installtheshowerarmontheriser.
Installtheriseronthevalveandflange.
Tightenthescrewusinga�mmAllenwrench.
All modelsInstalltheshowerheadontheshowerarm.
Tighten the safety screw.
Failure to tighten the safety screw may result in injury or product damage.
3
4
2 mm
3 mm
1
�
�
�1
Français EspañolInstallezlebrasdedouchesurlacolonnemontante.
Installezlacolonnemontantesurlerobinetetlabride.
Serrezlavisàl’aided’unecléhexagonalede�mm.
Tous les modèlesInstallezlapommededouchesurlebrasdedouche.
Serrez la vis de sûreté.
Le fait de ne pas serrer la vis de sûreté peut entraîner des bles-sures ou endommager le produit.
Instaleelbrazodeduchaenlatuberíadesubida.
Instalelatuberíadesubidaenlaválvulaylabrida.
AprieteeltornilloconunallaveAllende�mm.
Todos los modelosInstaleladuchademanoenelbrazodeducha.
Apriete el tornillo de seguridad.
No ajustar el tornillo de seguri-dad puede causar una lesión o daño del producto.
��
English
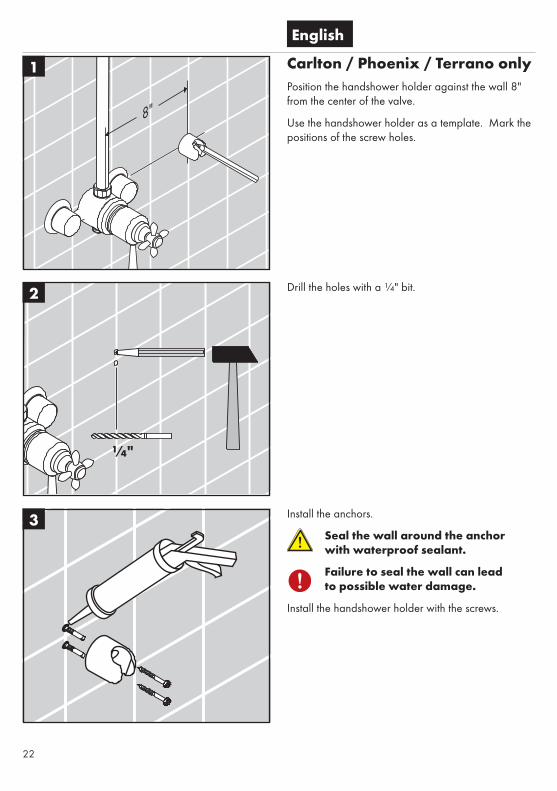
Carlton / Phoenix / Terrano onlyPositionthehandshowerholderagainstthewall8"fromthecenterofthevalve.
Usethehandshowerholderasatemplate.Markthepositionsofthescrewholes.
Drilltheholeswitha¼"bit.
Installtheanchors.
Seal the wall around the anchor with waterproof sealant.
Failure to seal the wall can lead to possible water damage.
Installthehandshowerholderwiththescrews.
1
2
3
¼"
��
Français Español
Carlton / Phoenix / Terrano uniquementPlacezlesupportdouchettesurl’emplacementsouhaité.
Marquezlespositionsdestrousdevissage.
Percezlestrousàl’aided’unemèchede¼po.
Installezleschevilles.
Scellez le mur autour des chevilles à l’aide d’un agent d’étanchéité.
Si le mur n’est pas scellé, l’eau pourrait éventuellement causer des dommages.
Installezlesupportdouchetteàl’aidedesvis.
Sólo para Carlton / Phoenix / Terrano Coloqueelsoportededuchaenellugardeseado.
Marquelasposicionesdelosorificiosparatornillos.
Perforelosorificiosconunabrocade¼".
Instalelospernosdeanclaje.
Selle la pared alrededor de los pernos de anclaje con un sellador impermeable.
Si no se sella la pared, pueden producirse daños por acción del agua.
Instaleelsoportededuchaconlostornillos.
��
English
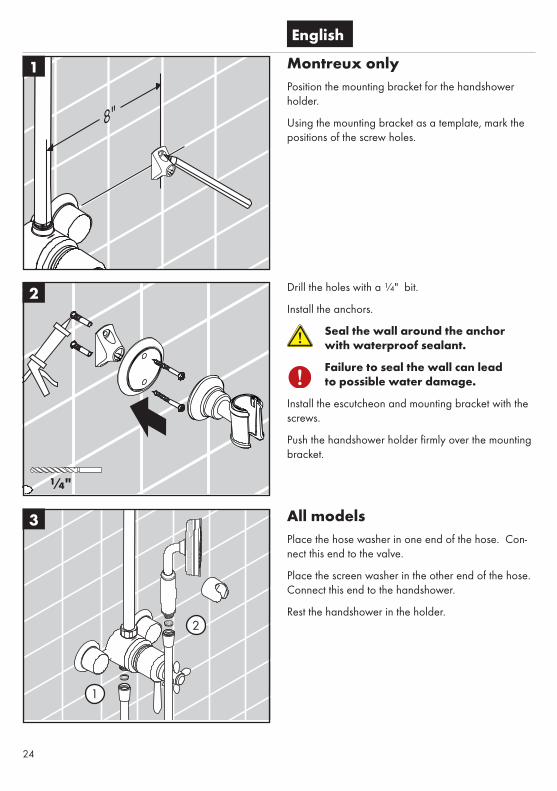
Montreux onlyPositionthemountingbracketforthehandshowerholder.
Usingthemountingbracketasatemplate,markthepositionsofthescrewholes.
Drilltheholeswitha¼"bit.
Installtheanchors.
Seal the wall around the anchor with waterproof sealant.
Failure to seal the wall can lead to possible water damage.
Installtheescutcheonandmountingbracketwiththescrews.
Pushthehandshowerholderfirmlyoverthemountingbracket.
All modelsPlacethehosewasherinoneendofthehose.Con-nectthisendtothevalve.
Placethescreenwasherintheotherendofthehose.Connectthisendtothehandshower.
Restthehandshowerintheholder.
¼"
1
2
3
1
�

�5
Français Español
Montreux seulementPlacezlesupportsurl’emplacementsouhaité.
Marquezlespositionsdestrousdevissage.
Percezlestrousàl’aided’unemèchede¼po.
Installezleschevilles.
Scellez le mur autour des chevilles à l’aide d’un agent d’étanchéité.
Si le mur n’est pas scellé, l’eau pourrait éventuellement causer des dommages.
Installezl'écussonetlesupportàl’aidedesvis.
Installezlesupportdouchette.
Sólo para Montreux Coloqueelsoporteenellugardeseado.
Marquelasposicionesdelosorificiosparatornillos.
Perforelosorificiosconunabrocade¼".
Instalelospernosdeanclaje.
Selle la pared alrededor de los pernos de anclaje con un sellador impermeable.
Si no se sella la pared, pueden producirse daños por acción del agua.
Instaleelflorónyelsoporteconlostornillos.
Instaleelsoportededucha.
Tous les modèlesPlacezlarondelleencaoutchoucnoirdansl’unedesextrémitésdutuyau.Fixezcetteextrémitéaurobinetdebaignoire.
Placezletamisdansl’autreextrémitédutuyau.Fixezcetteextrémitéàladouchette.
Déposezladouchettedanssonsupport.
Todos los modelosColoquelaarandeladegomanegraenunextremodelamanguera.Acopleesteextremoalgrifodelabañera.
Coloquelaarandeladefiltroenelotroextremodelamanguera.Acopleesteextremoaladuchademano.
Apoyeladuchademanoenelsoporte.
�6
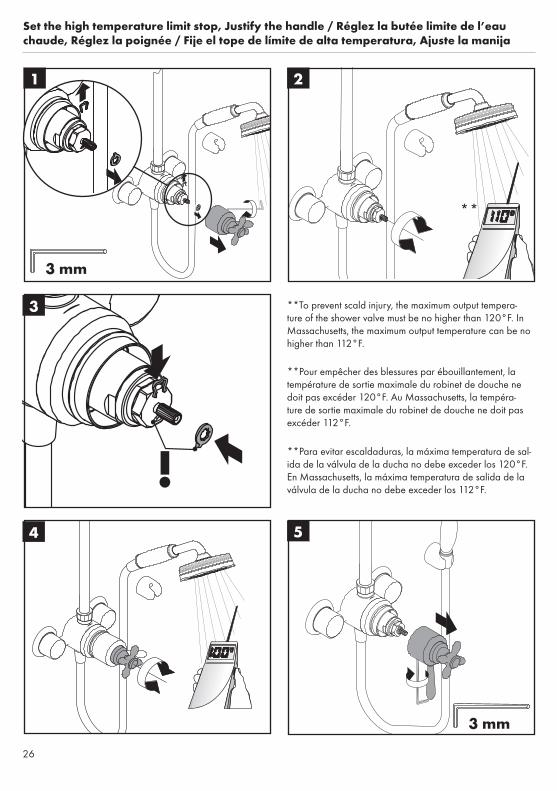
**Topreventscaldinjury,themaximumoutputtempera-tureoftheshowervalvemustbenohigherthan1�0°F.InMassachusetts,themaximumoutputtemperaturecanbenohigherthan11�°F.
**Pourempêcherdesblessuresparébouillantement,latempératuredesortiemaximaledurobinetdedouchenedoitpasexcéder1�0°F.AuMassachusetts,latempéra-turedesortiemaximaledurobinetdedouchenedoitpasexcéder11�°F.
**Paraevitarescaldaduras,lamáximatemperaturadesal-idadelaválvuladeladuchanodebeexcederlos1�0°F.EnMassachusetts,lamáximatemperaturadesalidadelaválvuladeladuchanodebeexcederlos11�°F.
Set the high temperature limit stop, Justify the handle / Réglez la butée limite de l’eau chaude, Réglez la poignée / Fije el tope de límite de alta temperatura, Ajuste la manija
1 2
3
4 5
**
3 mm
3 mm
�7
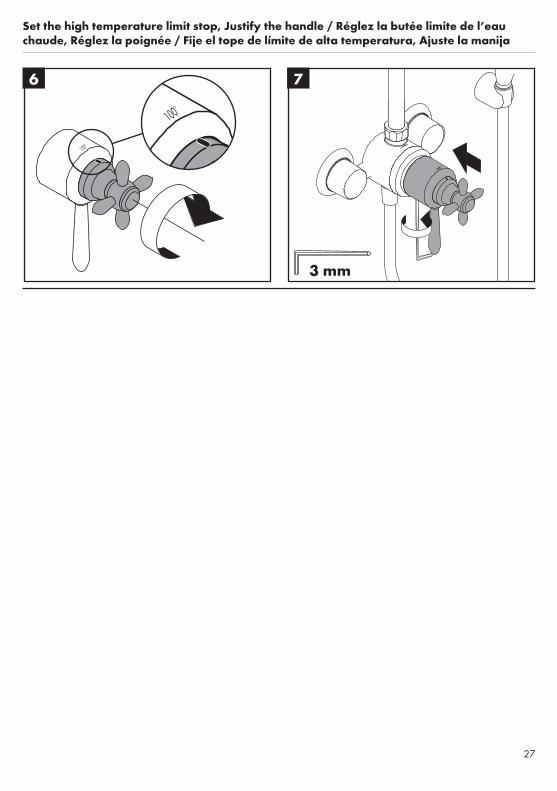
Set the high temperature limit stop, Justify the handle / Réglez la butée limite de l’eau chaude, Réglez la poignée / Fije el tope de límite de alta temperatura, Ajuste la manija
6 7
3 mm
�8
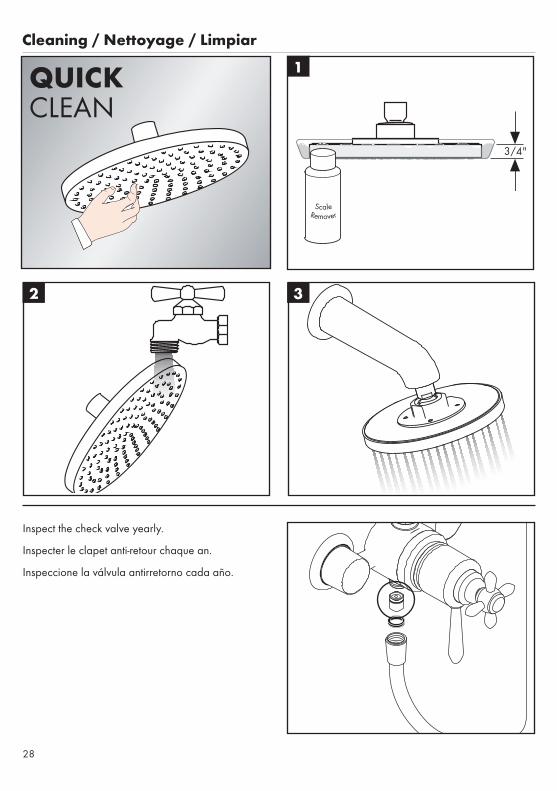
Cleaning / Nettoyage / Limpiar
Inspectthecheckvalveyearly.
Inspecterleclapetanti-retourchaquean.
Inspeccionelaválvulaantirretornocadaaño.
1
2 3

��
Replacement Parts / Pièces détachées / Repuestos
xx = Colors / Couleurs / Acabados00=Chrome6�=OilRubBronze8�=BrushedNickel8�=PolishedNickel
17���xx0
165�5xx0
�67�8xx0�67��xx0
���8�000
�8�76xx�
��07�000
�67�1xx0
�67��001
�65��xx0
16��5xx0
�67��xx0
�67�5xx0
�67�6xx0
�67�7xx0
����6000
�8�7�xx1
17850xx1
16��0xx1
�67�8xx0
�7�6�xx0
�67�0000�766�000
�55�8xx0�6��1000
����6000
�0
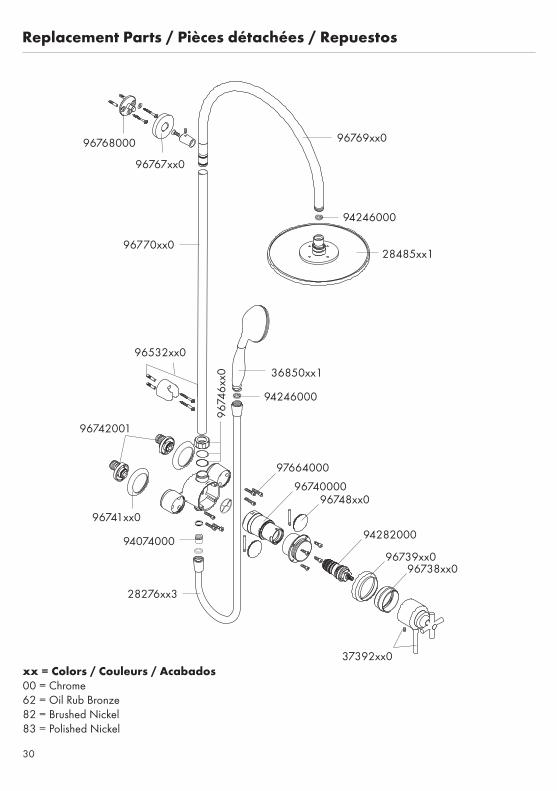
Replacement Parts / Pièces détachées / Repuestos
xx = Colors / Couleurs / Acabados00=Chrome6�=OilRubBronze8�=BrushedNickel8�=PolishedNickel
�7���xx0
�67�8xx0�67��xx0
���8�000
�8�76xx�
��07�000
�67�1xx0
�67��001
�65��xx0
�6770xx0
�6767xx0
�6768000
�67�
6xx0
�676�xx0
����6000
�8�85xx1
�6850xx1
�67�8xx0�67�0000
�766�000
����6000
�1
Cleaning Recommendation for Hansgrohe ProductsModernbathroomfaucets,kitchenmixersandshowersconsistofverydifferentmaterialstocomplywiththeneedsofthemarketwithregardtodesignandfunctionality.Toavoiddamage,itisnecessarytoconsidercertaincriteriawhencleaning.
At the cleaning of the fittings and showers, in principle, it must be pointed out:
• Onlyusecleaningmaterialwhichisexplicitlyintendedforthistypeofapplication.
• Neverusecleaningmaterials,whichcontainhydrochloricacid,formicacid,chlorinepalelyeoraceticacid,astheycauseconsiderabledamage.
• Phosphorusacidiccleanersareonlyconditionallyapplicable.
• Donotmixcleaningagents,unlessdirectedbythemanufacturer.
• Neverusecleaningmaterialsorapplianceswithanabrasiveeffect,suchasunsuitablecleaningpowders,spongepadsormicrofibercloths.
• Alwaysfollowtheinstructionsonthecleaningagentpackagewithrespecttospecifiedcleanerdosageandcontacttime.
• Thebuildingupofcalcificationshastoberemovedbycleaningregularly.
• Whenusingspraycleaners,sprayfirstontoasoftclothorspongeneverdirectlyontotheproduct,asdropscouldenteropeningsandgapsandcausedamage.
• Aftercleaning,rinsethoroughlywithcleanwatertoremoveanycleanerresidue.
• Theuseofsteamcleanersisnotpermitted.Thehightemperaturescandamagetheproducts.
Important
• Residuesofliquidsoaps,shampoosandshowerfoamscanalsocausedamage,sorinsewithcleanwaterafteruse.
• Thedamageofalreadydamagedsurfaceswilldeteriorateundertheeffectofthecleansers.
• Components with damaged surfaces must be replaced, otherwise there is a risk of injury.
• Damage caused by improper treatment is not covered by our warranty.
Conseil de nettoyage pour les produits HansgroheDenosjourslesanitairemoderne,larobinetterieetlesdouchettessecomposentdematériauxtrèsdifférentspoursatisfaireàlademandeconcernantledesignetlafonctionnalité.Pouréviterlesdétériorationsetlesréclamations,aussibienpourl’utilisationquepourlenettoyageprochain,certainscritèresserontàprendreenconsidération.
A prendre en considération lors de l’entretien de la robinetterie et de douchettes:
• Ondoitseulementutiliserlesproduitsdenettoyagequisontformellementprévuspourcedomaine.
• Aucuncontactavecl’applicationdenettoyantscontenantdel’acidechlorhydrique,del’acideformiqueoudel’acideacétiquequipeuventcauserdeconsidérablesdétériorations.
• Lesnettoyantsàbased’acidephosphorique,aussi,nesontpasàutilisersansréserves.
• Lemélangedenettoyantsengénéraln’estpasautorisé.
• L’utilisationdeproduitsdenettoyagerécurantsetdesustensilescommedesfrottoirs,desépongesàrécureretdestorchonsmicrofibresestexclue.
• Lesconseilsd’entretiendesproducteursdenettoyantssontàsuivreobligatoirement.
• Lenettoyageestàfairecorrespondreavecledosage,letempsd’action,spécifiqueàl’objetetàlanécessité.
• Ledépôtdecalcaireestévitéparunnettoyagerégulier.
��
• Pourlenettoyageavecproduitvaporiséliquide,enaucuncassurlarobinetterie,maisaucontraireaspergésurlechiffon(torchon,éponge)eteffectuercommecelalenettoyage,carlesaérosolspeuventpénétrerdanslesouverturesetfentesdelarobinetterieetpeuventprovoquerdesdétériorations.
• Aprèslenettoyagerincezavecsuffisammentd’eauclairepouréliminerlesrestesdeproduitsattachés.
• L’utilisationd’appareildenettoyageàvapeurn’estpasautorisée,carlestempératuresimportantespeuventdétériorerlesproduits.
Indications importantes
• Lesproduitspourlecorpscommelessavonsliquides,lesshampooingsoulesgelsdedouchepeuventcauserdesdétériorations.
• Iciaussiondoit:Aprèsl’utilisationrincersoigneusementlesrestesavecdel’eau.
Conseil de nettoyage
• Les deteriorations imputables à un mauvais entretien ne peuvent être pris en considération par notre garantie.
• Parl’actiond’unnettoyantsurlesrevêtementsdéjàendommagéilseproduituneaggravationdes dég�ts.desdég�ts.
Recomendación de limpieza para los productos de HansgroheHoyendía,lasgriferíasdebañoydecocinaasícomoduchasmodernassecomponendematerialesmuydistintosparasatisfacerlasexigenciasdelmercadorespectoaldiseñoylafuncionalidad.Paraevitardañosyreclamacioneshayquetenerencuentaciertosaspectostantoenelusocomoensulimpieza.
Para el cuidado de las griferías y las duchas en principio hay que seguir lo siguiente:
• Usarsólodetergentesprevistosespecíficamenteparaestecampodeaplicación.
• Noaplicardetergentesquecontenganácidoclorhídrico,fórmicooacéticoporquepuedencausardañosimportantes.
• Detergentesquecontienenácidofosfóricotampocopuedenseraplicadosilimitadamente.Porreglageneralnosedebenmezclardetergentes.
• Tampocosedebenutilizarutensiliosabrasivos,comosonpolvosabrasivos,esponjasopañosdemicrofibra.
• Setienenqueseguirsiemprelassugerenciasdeempleodelosfabricantesdelosdetergentes.
• Lalimpiezatienequeserrealizadasegúnladosificaciónyeltiempodeactuación,enfuncióndelobjetoyajustadaalasnecesidadesespecíficasdelmismo.
• Graciasaunalimpiezaperiódicasepuedenevitarlosdepósitosdecal.
• Noconvienerociareldetergenteenningúncasosobrelagriferíasinosobrelostextilesyejecutarlalimpiezaasí,porqueellíquidopuedeentrarenaperturasohendidurasdelagriferíaycausardaños.
• Despuésdelalimpiezahayqueaclararconsuficienteaguaparaeliminarcompletamenteelrestodedetergente.
• Lautilizacióndelimpiadoresavapornoestápermitida,lasaltastemperaturaspuedendañarlosproductos.
Indicaciones importantes
• Losresiduosdeproductosdeaseocomojabónlíquido,champúsygeldeduchapuedendañartambiénlosmateriales.
• Porloquetambiénsedeberáprestaratenciónalosiguiente:aclararconabundanteaguadespuésdeluso.
• Conmaterialesyadañadoslaaccióndedetergentsincrementaráeldesgastedeestos.
• Los componentes con superficies dañadas deberán cambiarse, en otro caso se corre el peligro de lesionarse.
• Losdañosqueresultendeunusoinadecuadonoestánincluidosennuestragarantía.
��
Limited Consumer WarrantyThisproducthasbeenmanufacturedandtestedtothehighestqualitystandardsbyHansgrohe,Inc.(“Hansgrohe”).ThiswarrantyislimitedtoHansgroheproductsthatarepurchasedbyaconsumerintheUnitedStatesorCanadaafterMarch1,1��6,andinstalledineitherintheUnitedStatesorinCanada.
WHO IS COVERED BY THE WARRANTYThiswarrantyextendstotheoriginalpurchaseronly.Thiswarrantyisnon-transferable.
WHAT IS COVERED BY THE WARRANTYThewarrantycoversonlyyourHansgrohemanufacturedproduct.Hansgrohewarrantsthisproductagainstdefectsinmaterialorworkmanshipasfollows:
Hansgrohewillreplaceatnochargeforpartsonlyor,atitsoption,replaceanyproductorpartoftheproductthatprovesdefectivebecauseofimproperworkmanshipand/ormaterial,undernormalinstallation,use,serviceandmaintenance.IfHansgroheisunabletoprovideareplacementandrepairisnotpracticalorcannotbemadeintimelyfashion,Hansgrohemayelecttorefundthepurchasepriceinexchangeforthereturnoftheproduct.
LENGTH OF WARRANTYReplacementorrepairedpartsofproductswillbecoveredforthetermofthiswarranty,asstatedinthefollowingtwosentences.Ifyouareaconsumerwhopurchasedtheproductforuseprimarilyforpersonal,familyorhouseholdpurposes,thiswarrantyextendsforaslongasyouowntheproductandthehomeinwhichtheproductisoriginallyinstalled.Ifyoupurchasedtheproductforuseprimarilyforanyotherpurpose,including,withoutlimitation,acommercialpurpose,thiswarrantyextendsonly(i)for1year,withrespecttoHansgrohe&Commercialproducts,and(ii)for5years,withrespecttoAxorproducts.
THIS WARRANTY DOES NOT COVER, AND HANSGROHE WILL NOT PAY FOR:A.Conditions,malfunctionsordamagenotresultingfromdefectsinmaterialorworkmanship.B.Conditions,malfunctionsordamageresultingfrom(1)normalwearandtear,improperinstallation,impropermaintenance,misuse,abuse,negligence,accidentoralteration;(�)theuseofabrasiveorcausticcleaningagentsor“no-rinse”cleaningproducts,ortheuseoftheproductinanymannercontrarytotheproductinstructions;or(�)conditionsinthehomesuchasexcessivewaterpressureorcorrosion.C.Laborandotherexpensesfordisconnection,deinstallation,orreturnoftheproductforwarrantyservice(includingbutnotlimitedtoproperpackagingandshippingcosts),orforinstallationorreinstallationoftheproduct.D.Accessories,connectedmaterialsandproducts,orrelatedproductsnotmanufacturedbyHansgrohe.E.AnyHansgroheorAxorproductsoldfordisplaypurposes.F.RubbedBronzefinishissubjecttoa�-yearlimitedwarranty.ChromeandallPVDfinishesarecoveredbythelimitedlifetimewarranty.
G.HansgroheWaterFiltrationSystemissubjecttoa1-yearlimitedwarranty.Warrantydoesnotincludereplacementfilters.
TO OBTAIN WARRANTY PARTS OR INFORMATIONContactyourHansgroheretailer,orcontactTechnicalServiceat:
Hansgrohe,Inc.1���BluegrassLakesParkway
Alpharetta,GA�000�Toll-free800-���-0�55
Inrequestingwarrantyservice,youwillneedtoprovide:1.Thesalesreceiptorotherevidenceofthedateandplaceofpurchase.�.Adescriptionoftheproblem.�.Deliveryoftheproductorthedefectivepart,postageprepaidandcarefullypackedandinsured,to:
Hansgrohe,Inc.1���BluegrassLakesParkway
Alpharetta,GA�000�Toll-free800-���-0�55
��
Whenwarrantyserviceiscompleted,anyrepairedorreplacementproductorpartwillbereturnedtoyoupostageprepaid.
EXCLUSIONS AND LIMITATIONS
REPAIR OR REPLACEMENT (OR, IN LIMITED CIRCUMSTANCES, REFUND OF THE PURCHASE PRICE) AS PROVIDED UNDER THIS WARRANTY IS THE EXCLUSIVE REMEDY OF THE PURCHASER. HANSGROHE NEITHER ASSUMES NOR AUTHORIZES ANY PERSON TO CREATE FOR IT ANY OTHER OBLIGATION OR LIABILITY IN CONNECTION WITH THIS PRODUCT. HANSGROHE SHALL NOT BE LIABLE TO PURCHASER OR ANY OTHER PERSON FOR ANY INCIDENTAL, SPECIAL OR CONSEQUENTIAL DAMAGES, ARISING OUT OF BREACH OF THIS WARRANTY OR ANY IMPLIED WARRANTY (INCLUDING BUT NOT LIMITED TO ANY IMPLIED WARRANTY OF MERCHANTABILITY).
SomeStatesdonotallowtheexclusionorlimitationofincidentalorconsequentialdamages,sotheabovelimitationorexclusionmaynotapplytoyou.Thiswarrantygivesyouspecificlegalrights,andyoumayalsohaveotherrightsthatvaryfromstatetostate.
TO THE EXTENT PERMITTED BY LAW, ANY IMPLIED WARRANTIES OF MERCHANTABILITY AND FITNESS FOR A PARTICULAR PURPOSE, ARE LIMITED TO THE DURATION OF THE EXPRESS WARRANTY.
Somestatesdonotallowlimitationsonhowlonganimpliedwarrantymaylast,sotheabovelimitationsmaynotapplytoyou.YoumayberequiredbylawtogiveusareasonableopportunitytocorrectorcureanyfailuretocomplybeforeyoucanbringanyactionincourtagainstusundertheMagnuson-MossWarrantyAct.
PRODUCT INSTRUCTIONS AND QUESTIONSUponpurchaseorpriortoinstallation,pleasecarefullyinspectyourHansgroheproductforanydamageorvisibledefect.Priortoinstalling,alwayscarefullystudytheenclosedinstructionsontheproperinstallationandthecareandmaintenanceofthisproduct.Ifyouhavequestionsatanytimeabouttheuse,installationorperformanceofyourHansgroheproduct,orthiswarranty,pleasewriteusorcallustoll-freeat800-���-0�55.

�5

Hansgrohe,Inc.•1��0BluegrassLakesParkway•Alpharetta,GA�000�Tel.800-���-0�55•Fax770-�60-�887
www.hansgrohe-usa.com US
-Ins
talla
tion
Instr
uctio
ns•
Par
tNo.
�0�
6000
8•
Rev
ised
10/�
010


![Notice d'emploi et de Gebruiks- en montage- Instrucciones ...€¦ · de conexión para contacto final de ... gen/Medidas de montaje/Dimensões de montagem [mm] ... en cuenta la tabla](https://static.fdocuments.ec/doc/165x107/5adab6587f8b9aee348d233f/notice-demploi-et-de-gebruiks-en-montage-instrucciones-de-conexin-para.jpg)