43-010 43-011 43-018 43-019...43-010 43-011 43-018 43-019 Abastecimiento de agua cerrado. Couper...
8
43-010 43-011 43-018 43-019 Abastecimiento de agua cerrado. Couper l’alimentation en eau. fitting. Sustituyendo una instalación existente, quite el montaje viejo. Si remplaçant une installation existante, enlevez le vieux raccord. Fregadero limpio en toda superficie para su nueva instalación. Nettoyer les surfaces de montage de lavabo pour votre nouvelle installation. • Shut off the water supply. remove the old Clean the sink mounting surfaces for your new fitting •
Transcript of 43-010 43-011 43-018 43-019...43-010 43-011 43-018 43-019 Abastecimiento de agua cerrado. Couper...
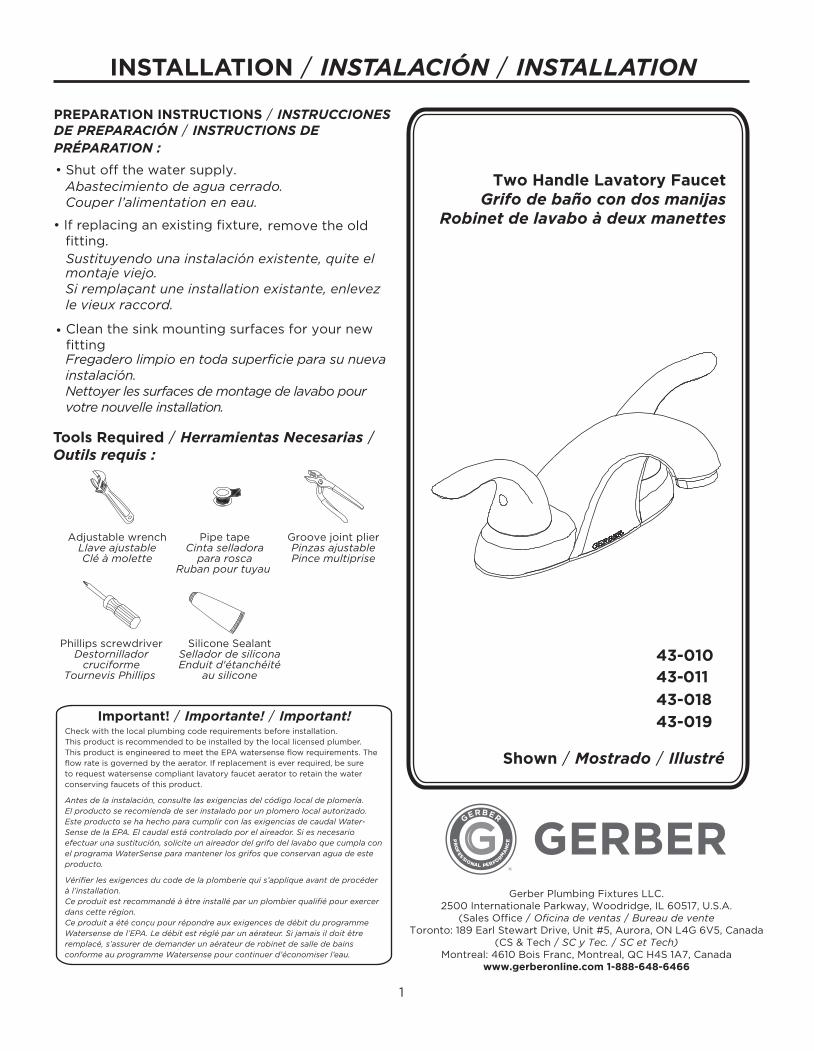
43-010 43-011
43-018
43-019
Abastecimiento de agua cerrado. Couper l’alimentation en eau.
fitting. Sustituyendo una instalación existente, quite el
montaje viejo. Si remplaçant une installation existante, enlevez le vieux raccord.
Fregadero limpio en toda superficie para su nueva instalación.
Nettoyer les surfaces de montage de lavabo pour votre nouvelle installation.
• Shut off the water supply.
remove the old
Clean the sink mounting surfaces for your new fitting
•
INSTALLATION STEPS / PASOS PARA LA INSTALACIÓN / ÉTAPES D’INSTALLATION :
Figure 1
Figure 2
2
PR
OF
ESSIONAL PERFORM
AN
CE
®
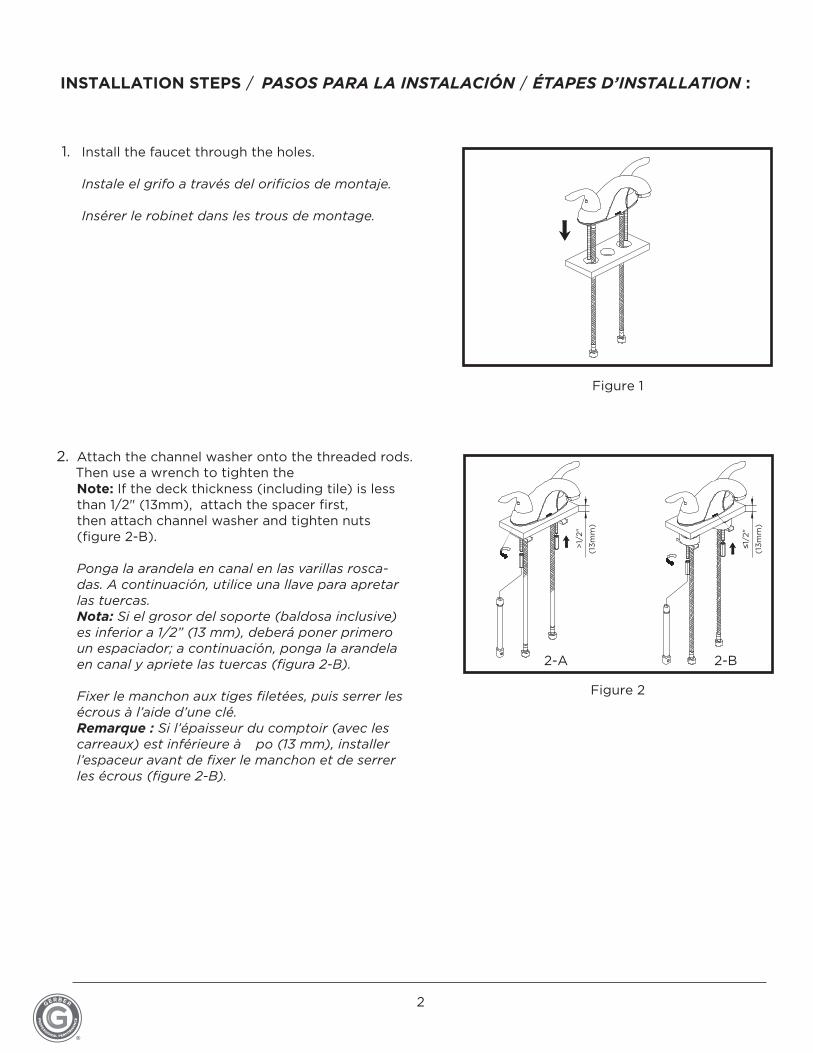
1. Install the faucet through the holes.
Instale el grifo a través del orificios de montaje.
Insérer le robinet dans les trous de montage.
2. Attach the channel washer onto the threaded rods.
Note: If the deck thickness (including tile) is less than 1/2" (13mm), attach the spacer first, then attach channel washer and tighten nuts (figure 2-B).
Ponga la arandela en canal en las varillas rosca-das. A continuación, utilice una llave para apretar las tuercas.Nota: Si el grosor del soporte (baldosa inclusive) es inferior a 1/2” (13 mm), deberá poner primero un espaciador; a continuación, ponga la arandela en canal y apriete las tuercas (figura 2-B).
Fixer le manchon aux tiges filetées, puis serrer les écrous à l’aide d’une clé.
Si l’épaisseur du comptoir (avec les
l’espaceur avant de fixer le manchon et de serrer les écrous (figure 2-B).
≤1/2
"
(13
mm
)
>1/
2"
(13
mm
)
2-B2-A
Then use a wrench to tighten the
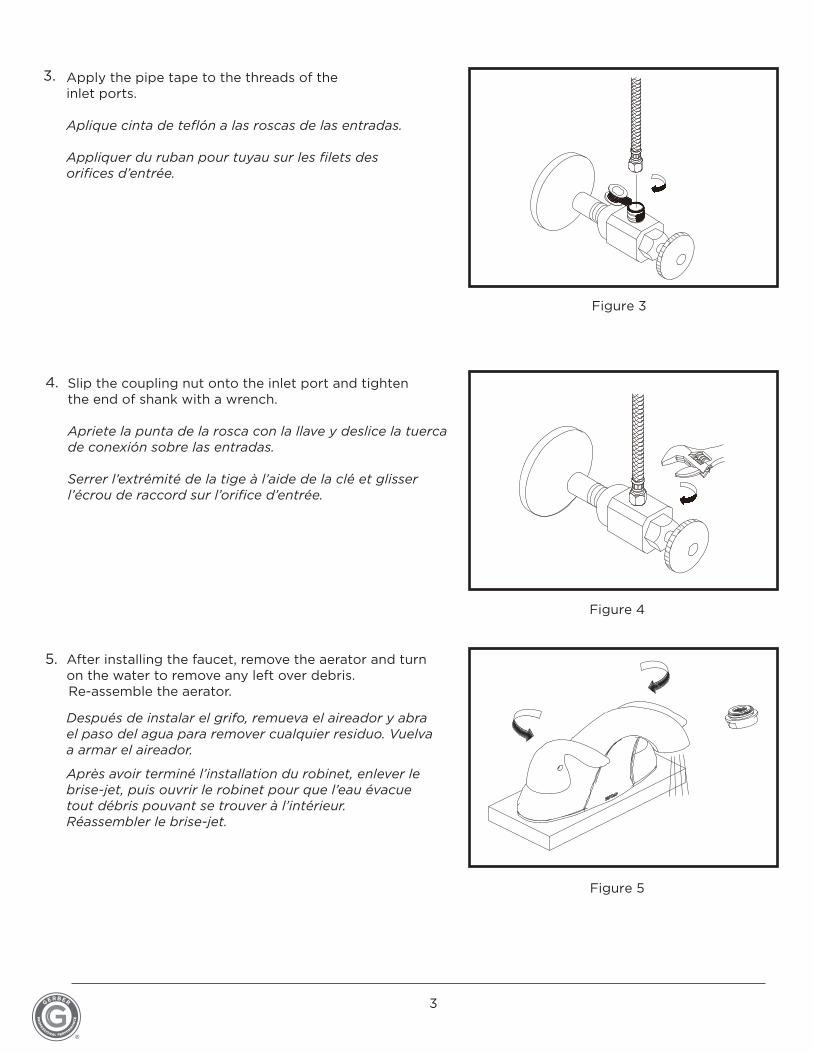
5. After installing the faucet, remove the aerator and turn on the water to remove any left over debris. Re-assemble the aerator.
Después de instalar el grifo, remueva el aireador y abra el paso del agua para remover cualquier residuo. Vuelva a armar el aireador.
Après avoir terminé l’installation du robinet, enlever le brise-jet, puis ouvrir le robinet pour que l’eau évacue tout débris pouvant se trouver à l’intérieur. Réassembler le brise-jet.
Figure 5
Figure 3
3.
Figure 4
4.
3
PR
OF
ESSIONAL PERFORM
AN
CE
®
Slip the coupling nut onto the inlet port and tighten the end of shank with a wrench.
Apriete la punta de la rosca con la llave y deslice la tuerca de conexión sobre las entradas.
Serrer l’extrémité de la tige à l’aide de la clé et glisser l’écrou de raccord sur l’orifice d’entrée.
Apply the pipe tape to the threads of theinlet ports.
Aplique cinta de teflón a las roscas de las entradas.
Appliquer du ruban pour tuyau sur les filets des orifices d’entrée.
4
PR
OF
ESSIONAL PERFORM
AN
CE
®
Touch Down Drain Installation Instructions / Instrucciones para la instalación del desagüe touch down / Instructions d’installation de la bonde de vidange manuelle
1.
Figure (1)
1.
6.
5.
7.
4.
2.
3.
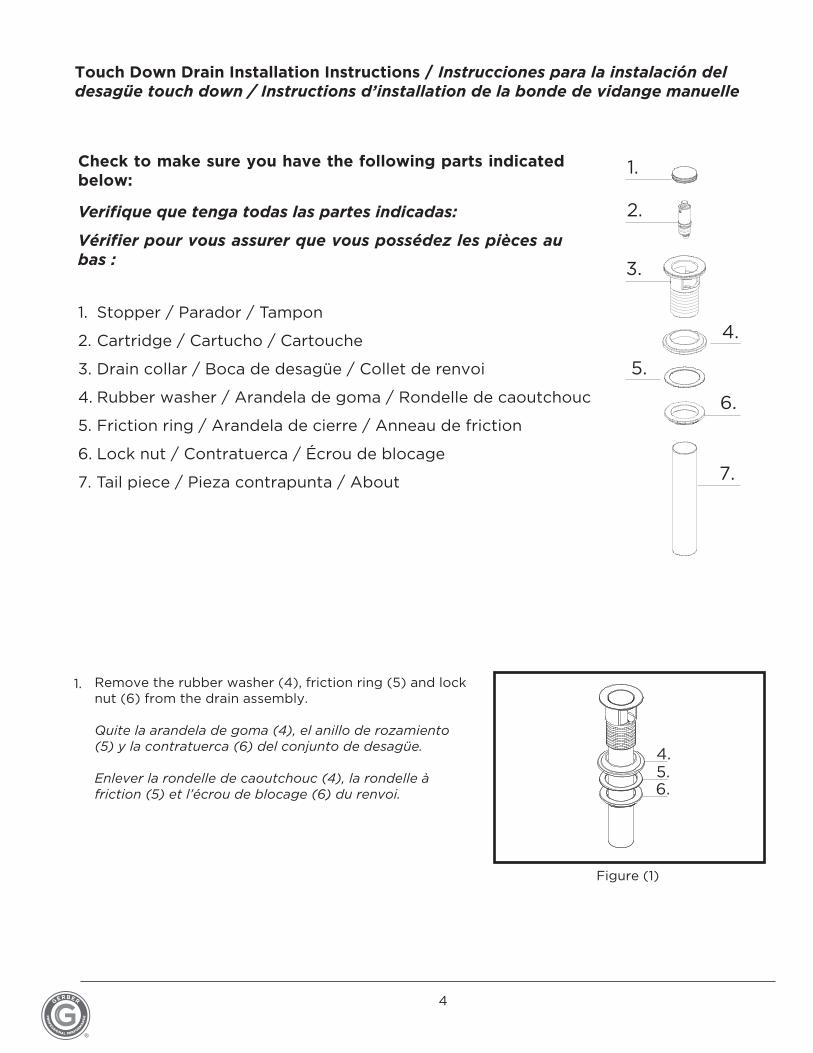
Check to make sure you have the following parts indicated below:
Verifique que tenga todas las partes indicadas:
Vérifier pour vous assurer que vous possédez les pièces aubas :
1. Stopper / Parador / Tampon
2. Cartridge / Cartucho / Cartouche
3. Drain collar / Boca de desagüe / Collet de renvoi
4. Rubber washer / Arandela de goma / Rondelle de caoutchouc
5. Friction ring / Arandela de cierre / Anneau de friction
6. Lock nut / Contratuerca / Écrou de blocage
7. Tail piece / Pieza contrapunta / About
4.5.6.
Remove the rubber washer (4), friction ring (5) and lock nut (6) from the drain assembly.
Quite la arandela de goma (4), el anillo de rozamiento (5) y la contratuerca (6) del conjunto de desagüe.
Enlever la rondelle de caoutchouc (4), la rondelle à friction (5) et l’écrou de blocage (6) du renvoi.

For drain cartridge replacement or cleaning Para sustituir o limpiar el cartucho de desagüe Pour remplacer ou nettoyer la cartouche de renvoi
4.
3.
2.
Remove the cartridge (2) from the drain:
Reinstall the cartridge (2) into the drain collar, thread on the stopper cap.
6
PR
OF
ESSIONAL PERFORM
AN
CE
®
Figure 1
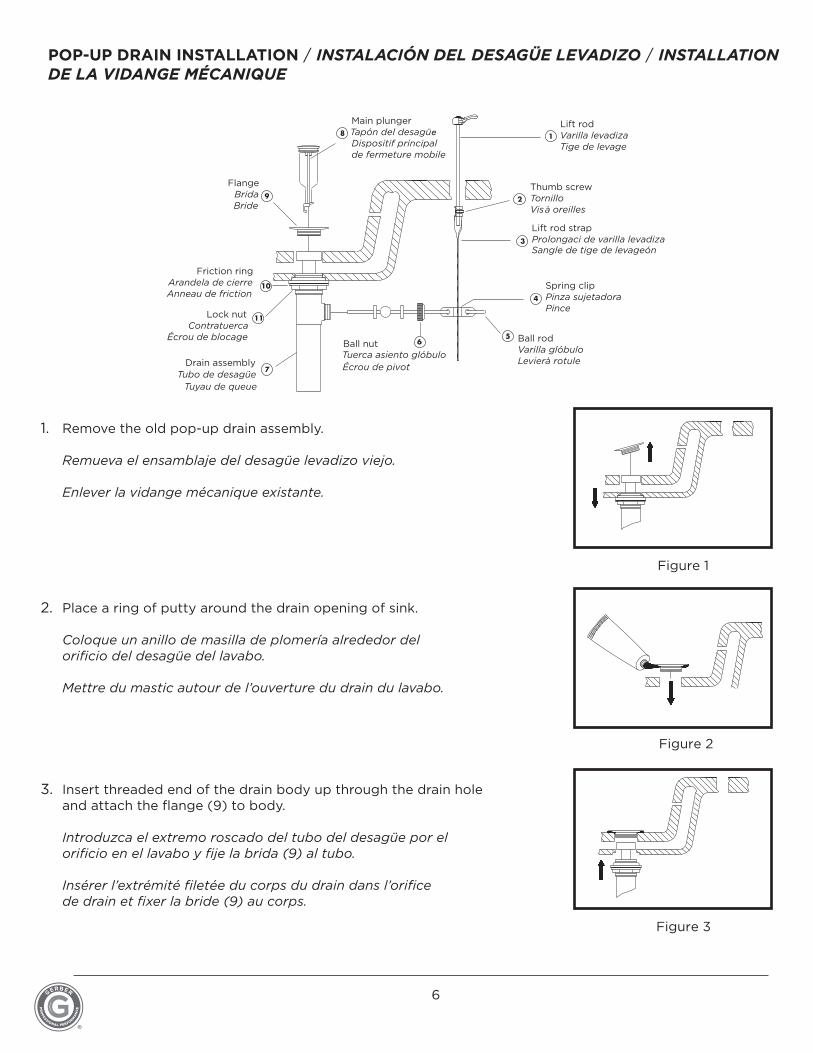
POP-UP DRAIN INSTALLATION / INSTALACIÓN DEL DESAGÜE LEVADIZO / INSTALLATIONDE LA VIDANGE MÉCANIQUE
Lift rodVarilla levadizaTige de levage
Thumb screwTornilloVis à oreilles
Lift rod strapProlongaci de varilla levadizaSangle de tige de levageón
Ball rodVarilla glóbuloLevierà rotule
Main plungerTapón del desagüeDispositif principal de fermeture mobile
Spring clipPinza sujetadoraPince
FlangeBridaBride
Lock nutContratuerca
Écrou de blocage
Friction ringArandela de cierreAnneau de friction
18
9
6
10
11
7
2
3
4
5
Drain assemblyTubo de desagüe
Tuyau de queue
Ball nutTuerca asiento glóbuloÉcrou de pivot
Remove the old pop-up drain assembly.
Remueva el ensamblaje del desagüe levadizo viejo.
Enlever la vidange mécanique existante.
1.
Figure 2
Place a ring of putty around the drain opening of sink.
Coloque un anillo de masilla de plomería alrededor del orificio del desagüe del lavabo.
Mettre du mastic autour de l’ouverture du drain du lavabo.
2.
Figure 3
Insert threaded end of the drain body up through the drain hole and attach the flange (9) to body.
Introduzca el extremo roscado del tubo del desagüe por el orificio en el lavabo y fije la brida (9) al tubo.
Insérer l’extrémité filetée du corps du drain dans l’orifice de drain et fixer la bride (9) au corps.
3.
7
PR
OF
ESSIONAL PERFORM
AN
CE
®
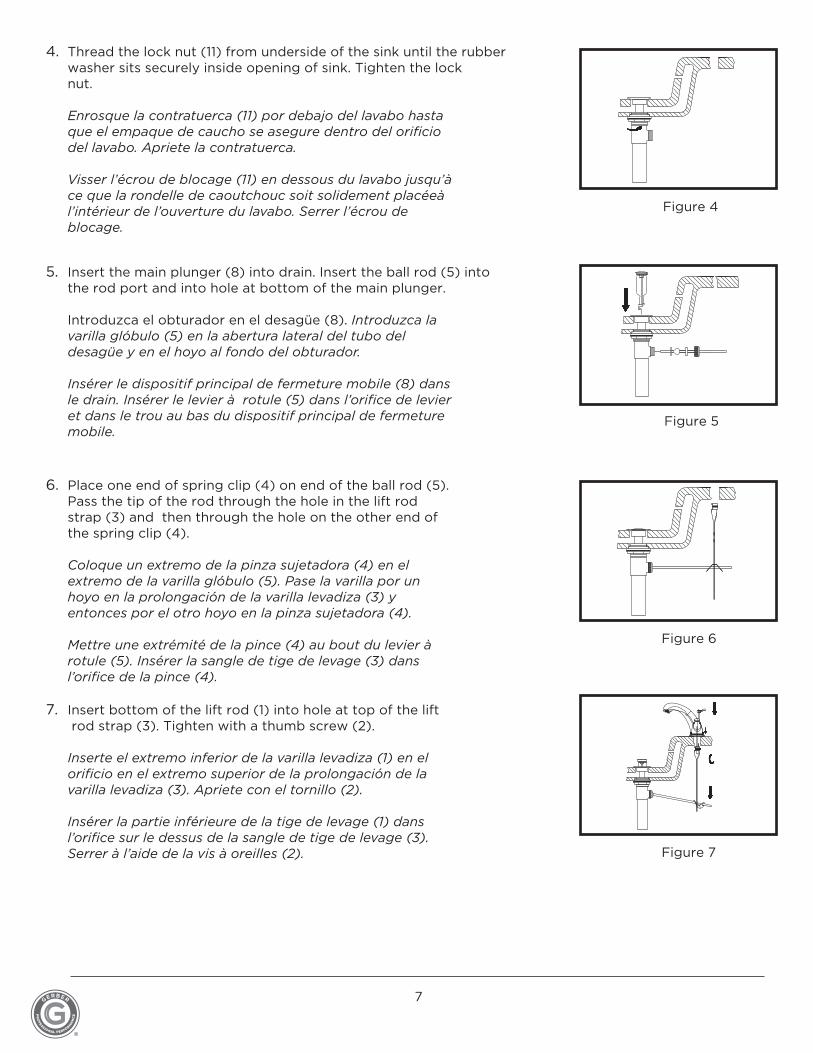
Figure 4
Thread the lock nut (11) from underside of the sink until the rubber washer sits securely inside opening of sink. Tighten the lock nut. Enrosque la contratuerca (11) por debajo del lavabo hasta que el empaque de caucho se asegure dentro del orificiodel lavabo. Apriete la contratuerca.
Visser l’écrou de blocage (11) en dessous du lavabo jusqu’à ce que la rondelle de caoutchouc soit solidement placéeàl’intérieur de l’ouverture du lavabo. Serrer l’écrou de blocage.
4.
Figure 5
Insert the main plunger (8) into drain. Insert the ball rod (5) into the rod port and into hole at bottom of the main plunger. Introduzca el obturador en el desagüe (8). Introduzca la varilla glóbulo (5) en la abertura lateral del tubo del desagüe y en el hoyo al fondo del obturador.
Insérer le dispositif principal de fermeture mobile (8) dans le drain. Insérer le levier à rotule (5) dans l’orifice de levier et dans le trou au bas du dispositif principal de fermeture mobile.
5.
Figure 6
Place one end of spring clip (4) on end of the ball rod (5). Pass the tip of the rod through the hole in the lift rod strap (3) and then through the hole on the other end of the spring clip (4).
Coloque un extremo de la pinza sujetadora (4) en el extremo de la varilla glóbulo (5). Pase la varilla por un hoyo en la prolongación de la varilla levadiza (3) y entonces por el otro hoyo en la pinza sujetadora (4).
Mettre une extrémité de la pince (4) au bout du levier à rotule (5). Insérer la sangle de tige de levage (3) dans l’orifice de la pince (4).
6.
Figure 7
Insert bottom of the lift rod (1) into hole at top of the lift rod strap (3). Tighten with a thumb screw (2).
Inserte el extremo inferior de la varilla levadiza (1) en el orificio en el extremo superior de la prolongación de la varilla levadiza (3). Apriete con el tornillo (2).
Insérer la partie inférieure de la tige de levage (1) dans l’orifice sur le dessus de la sangle de tige de levage (3). Serrer à l’aide de la vis à oreilles (2).
7.
8
PR
OF
ESSIONAL PERFORM
AN
CE
®
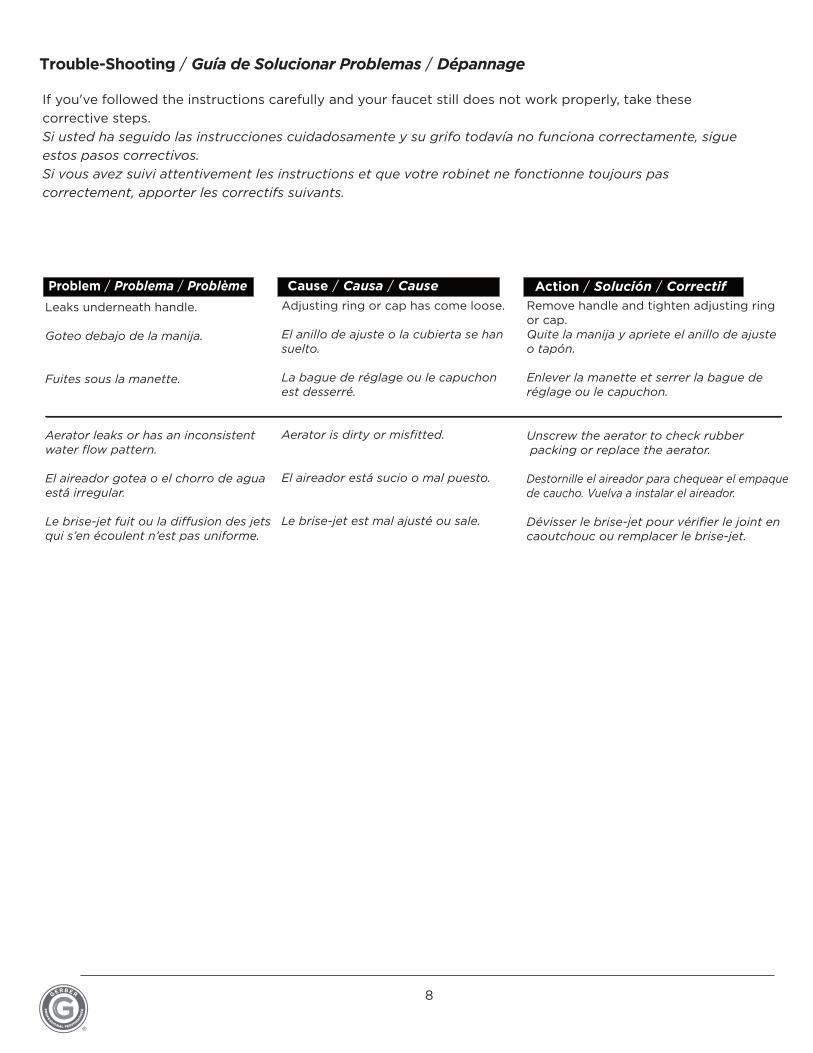
Trouble-Shooting / Guía de Solucionar Problemas / Dépannage
If you've followed the instructions carefully and your faucet still does not work properly, take these
corrective steps.
Si usted ha seguido las instrucciones cuidadosamente y su grifo todavía no funciona correctamente, sigue
estos pasos correctivos.
Si vous avez suivi attentivement les instructions et que votre robinet ne fonctionne toujours pas
correctement, apporter les correctifs suivants.
Problem / Problema / Problème Cause / Causa / Cause Action / Solución / Correctif
Leaks underneath handle.
Goteo debajo de la manija.
Fuites sous la manette.
Adjusting ring or cap has come loose.
El anillo de ajuste o la cubierta se han suelto.
La bague de réglage ou le capuchon est desserré.
Remove handle and tighten adjusting ring or cap.Quite la manija y apriete el anillo de ajuste o tapón.
Enlever la manette et serrer la bague de réglage ou le capuchon.
Aerator leaks or has an inconsistent water flow pattern.
El aireador gotea o el chorro de agua está irregular.
Le brise-jet fuit ou la diffusion des jets qui s’en écoulent n’est pas uniforme.
Aerator is dirty or misfitted.
El aireador está sucio o mal puesto.
Le brise-jet est mal ajusté ou sale.
Unscrew the aerator to check rubber packing or replace the aerator.
Destornille el aireador para chequear el empaque de caucho. Vuelva a instalar el aireador.
Dévisser le brise-jet pour vérifier le joint en caoutchouc ou remplacer le brise-jet.